建立 SharePoint 裝載的 Project Server 載入宏
在您可以為 Project Online (自動裝載、提供者裝載和 SharePoint 託管) 建立的三種應用程式類型中,SharePoint 裝載的應用程式是最簡單的建立和部署。 SharePoint 裝載的應用程式不需要 OAuth 驗證,也不會使用 Azure 或需要維護提供者裝載資源的本機網站。 Visual Studio 中的 SharePoint 2013 應用程式範本是一個便利的架構,可開發可在 Office 市集中發佈和銷售,或部署至 SharePoint 上私人應用程式目錄的應用程式。
在 Project 中,狀態設定是小組成員可以使用 Project Web App 中的 [工作] 頁面來提交已指派任務的狀態,例如一周中花費在工作上的每一天工作時數。 指派擁有者通常 (項目經理) 可以核准或拒絕狀態。 當狀態核准時,Project 會重新計算排程。 QuickStatus 應用程式會顯示指派的工作,讓使用者可以快速更新完成百分比,並提交所選工作分派的狀態以供核准。 雖然 Project Web App 中的 [工作] 頁面具有更多功能,但 QuickStatus 應用程式是提供簡化介面的範例。
QuickStatus 應用程式是開發人員的範例;它不適合用於生產環境。 主要目的是要顯示適用於 Project Online 的應用程式開發範例,而不是建立功能完整的狀態應用程式。 如需更好的狀態方法,請參閱 後續步驟中的建議。
如需狀態的一般資訊,請參閱 工作進度。 如需開發 SharePoint 和 Project Server 載入宏的詳細資訊,請參閱 SharePoint 載入宏。
建立 Project Server 2013 應用程式的必要條件
若要開發可部署到 Project Online 或 Project Server 2013 內部部署安裝的相對簡單應用程式,您可以使用 Napa 來提供在線開發環境。 對於更複雜的應用程式、修改 Project Web App 功能區,以及在開發期間更輕鬆地偵錯,您可以使用Visual Studio 2012或 Visual Studio 2013。 例如,透過內部部署安裝,您可以手動檢查草稿數據表,以取得 Project Server 資料庫中的變更。 本文說明如何使用Visual Studio進行應用程式開發。
使用 Visual Studio 開發 Project Server 應用程式需要下列專案:
請確定已在本機開發電腦上安裝最新的 Service Pack 和 Windows 更新。 作業系統可為 Windows 7、Windows 8、Windows Server 2008 或 Windows Server 2012。
您必須擁有已安裝 SharePoint Server 2013 和 Project Server 2013 的電腦,其中電腦已設定為應用程式隔離和側載應用程式。 側載可讓Visual Studio暫時安裝應用程式以進行偵錯。 您可以使用 SharePoint 和 Project Server 的內部部署安裝。 如需詳細資訊, 請參閱為 SharePoint 應用程式設定內部部署開發環境。
注意事項
針對內部部署安裝,請先設定隔離的應用程式網域, 再 建立公司應用程式目錄。
開發計算機可以是已安裝 Office Developer Tools for Visual Studio 2012 的遠端電腦。 請確定您已安裝最新的版本;請參閱 Office 和 SharePoint 應用程式下載的工具一節。
確認您將用於開發和測試的 Project Web App 實例可在瀏覽器中存取。
如需使用在線工具的相關信息,請參閱在 Microsoft 365 上設定 SharePoint 載入宏的開發環境。 如需建置使用在線工具之 Project Server 簡單應用程式的逐步解說,請參閱 EPMSource 部落格系列: 建置您的第一個 Project Server 應用程式。
使用 Visual Studio 建立 Project Server 應用程式
適用於 Visual Studio 2012 的 Office 開發人員工具包含可與 Project Server 2013 搭配使用的 SharePoint 應用程式範本。 當您建立應用程式解決方案時,解決方案會包含自訂程式碼的下列檔案:
AppManifest.xml 包含應用程式標題、許可權要求範圍和其他屬性的設定。 程式 1 包含使用指令清單 Designer 設定屬性的步驟。
[頁面] 檔案 夾中的Default.aspx是應用程式的主要頁面。 程式 2 示範如何新增 QuickStatus 應用程式的 HTML5 內容。
[ 腳本] 資料夾中的App.js是自訂 JavaScript 程式代碼的主要檔案。 程式 3 說明 QuickStatus 應用程式的 JavaScript 程式代碼。
如果您新增以 jQuery 為基礎的方格或日期選擇器等商業控件,您可以在Default.aspx檔案中新增其他 JavaScript 檔案的參考。
[內容] 檔案 夾中的App.css是自定義 CSS3 樣式的主要檔案。 程式 2 和程式 3 包含 CSS) QuickStatus 應用程式的級聯樣式表單 (相關信息。 您可以在 Default.aspx 檔案中新增其他 CSS 檔案的參考。
[影像] 檔案 夾中的AppIcon.png是應用程式在 Office 市集或應用程式目錄中顯示的 96 x 96 圖示。
若要修改 Project Web App 功能區,您可以新增功能區自定義動作。 QuickStatus 應用程式的範例程式代碼區段包含已修改Default.aspx、App.js、App.css、Elements.xml 和 AppManifest.xml 檔案的完整程序代碼。
程式1。 在 Visual Studio 中建立應用程式專案
以系統管理員身分執行 Visual Studio 2012,然後在 [開始] 頁面上選取 [ 新增專案 ]。
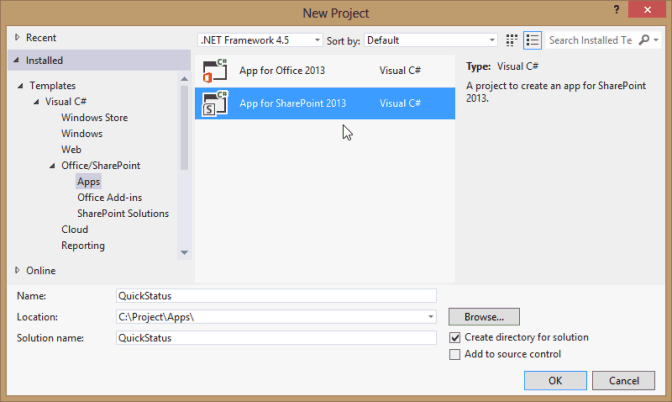
在 [ 新增專案] 對話框中,展開 [範本]、[ Visual C#] 和 [ Office/SharePoint ] 節點,然後選取 [ 應用程式]。 在中央窗格頂端的目標 Framework 下拉式清單中使用預設 .NET Framework 4.5,然後選取 [適用於 SharePoint 2013 的應用程式], (參閱圖 1) 。
在 [ 名稱] 欄位 中,輸入 QuickStatus,流覽至您要儲存應用程式的位置,然後選擇 [ 確定]。
圖 1: Creating a Project Server app in Visual Studio
在 [ 新增 SharePoint 應用程式 ] 對話框中,填寫下列三個字段:
在頂端文字框中,輸入您希望應用程式在 Project Web App 中顯示的名稱。 例如,輸入 [快速狀態更新]。
針對要用於偵錯的網站,輸入 Project Web App 實例的URL。 例如,輸入
https://ServerName/ProjectServerName(將 ServerName 和 ProjectServerName 取代為您自己的值) ,然後選擇 [ 驗證]。 如果一切順利,Visual Studio 會顯示 連線成功。 如果您收到錯誤訊息,請確定 Project Web App URL 正確,且 Project Server 計算機已設定為應用程式隔離和側載應用程式。 如需詳細資訊,請參閱 建立 Project Server 2013 應用程式的 必要條件一節。在 [ 如何裝載 SharePoint 應用程式 ] 下拉式清單中,選擇 [SharePoint 裝載]。
注意
如果您不小心選擇預設 的提供者裝載 專案類型,Visual Studio 會在方案中建立兩個專案: QuickStatus 專案和 QuickStatusWeb 專案。 如果您看到兩個專案,請刪除該方案並重新啟動。
選擇 [確定 ] 以建立 QuickStatus 方案、 QuickStatus 專案和預設檔案。
例如,開啟指令清單 Designer 檢視 (,按兩下 AppManifest.xml 檔案) 。 在 [ 一般] 索引標籤上, [標題] 文字框應該會顯示您在步驟 4 中輸入的應用程式名稱。 選擇 [ 許可權] 索 引標籤,為應用程式新增下列許可權要求 (請參閱圖 2) :
在 [ 許可權要求 ] 清單的第一列的 [ 範圍 ] 資料行中,選擇下拉式清單中的 [ 狀態 ]。 在 [ 許可權] 數據行中,選擇 [SubmitStatus]。
新增 範圍 為 多個專案 且權 限 為 [讀取] 的數據列。
圖 2: Setting the permission scope for a statusing app
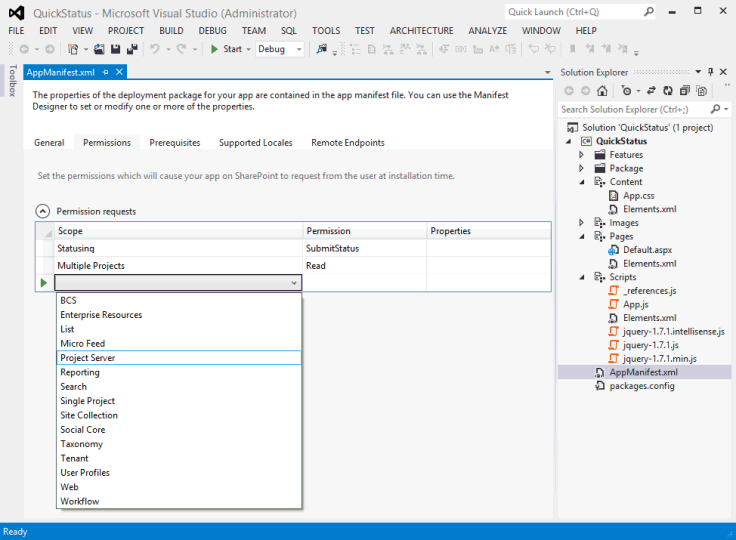
QuickStatus 應用程式可讓 Project Web App 使用者從多個專案讀取該使用者的指派、變更完成的指派百分比,以及提交更新。 此應用程式不需要圖 2 下拉式清單中顯示的其他許可權要求範圍。 許可權要求範圍是應用程式代表使用者要求的許可權。 如果使用者在 Project Web App 中沒有這些許可權,應用程式就不會執行。 應用程式可以有多個許可權要求範圍,包括其他 SharePoint 許可權的範圍,但應該只有應用程式功能所需的最小許可權。 以下是與 Project Server 相關的許可權要求範圍:
企業資源:資源管理員許可權,可讀取或寫入其他 Project Web App 用戶的相關信息。
多個專案:讀取或寫入多個專案,其中使用者具有要求的許可權。
Project Server:要求應用程式用戶必須具有 Project Web App 的系統管理員許可權。
報告:讀取 ProjectData OData 服務 Project Web App (只需要 Project Web App) 的登入許可權。
單一專案:讀取或寫入使用者具有要求許可權的專案。
狀態:提交工作分派狀態的更新,例如工作時間、完成百分比和新的指派。
工作流程:如果使用者具有執行 Project Server 工作流程的許可權,則應用程式會以提升的工作流程許可權來執行。
如需 Project Server 2013 許可權要求範圍的詳細資訊,請參閱 Project 2013 開發人員 匯報 中的 Project 應用程式一節和 SharePoint 2013 中的應用程式許可權。
建立 QuickStatus 應用程式的 HTML 內容
開始撰寫 HTML 內容的程式代碼之前,請先設計 QuickStatus 應用程式的使用者介面和用戶體驗 (圖 3 顯示已完成頁面) 的範例。 設計也可以包含與 HTML 程式代碼互動的 JavaScript 函式大綱。 如需一般資訊,請參閱 SharePoint 2013 中應用程式的 UX 設計。
圖 3: Design of the QuickStatus app page
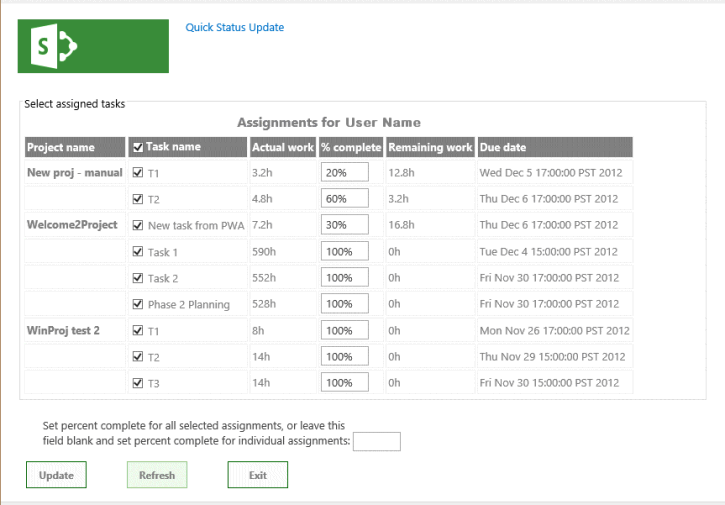
應用程式會在頂端顯示顯示名稱,也就是 AppManifest.xml 中 Title 元素的值。
根據預設,頁面會使用 HTML5。 以下是 QuickStatus 應用程式在頁面本文中包含之主要 UI 對象的標準 HTML 元素:
表 單 專案包含所有其他UI元素。
fieldset 元素會建立指派數據表的容器和框線;子圖例專案會提供容器的標籤。
table 元素包含 標題,且只包含數據表標頭。 JavaScript 函式會變更數據表 標題 並新增指派的數據列。
注意事項
為了輕鬆地新增分頁和排序,生產應用程式可能會使用商業 jQuery 型網格線控件,而不是數據表。
數據表包含專案名稱的數據行、具有複選框的任務名稱、實際工時、完成百分比、剩餘工時,以及工作分派完成日期。 JavaScript 函式會針對每個工作的完成百分比建立複選框和文字輸入字段。
文字框的 輸入 元素會設定所有選定指派的完成百分比。
按鈕元素會提交狀態變更。
按鈕元素會重新整理頁面。
按鈕元素會結束應用程式,並返回 Project Web App 中的 [工作] 頁面。
底端文字框和按鈕元素位於 div 元素內,因此 CSS 可以輕鬆地管理 UI 物件的位置和外觀。 JavaScript 函式會在頁面底部新增段落,其中包含狀態更新成功或失敗的結果。
程式 2. 建立 HTML 內容
在 Visual Studio 中,開啟Default.aspx檔案。
檔案包含兩個 asp:Content 元素:
ContentPlaceHolderID="PlaceHolderAdditionalPageHead"具有 屬性的專案會新增到頁首內,而具有ContentPlaceHolderID="PlaceHolderMain"屬性的專案會放在頁面 主體 元素內。在
<asp:Content ContentPlaceHolderID="PlaceHolderAdditionalPageHead" runat="server">頁面標題的控件中,新增 Project Server 計算機上 PS.js 檔案的參考。 針對測試和偵錯,您可以使用 PS.debug.js。<script type="text/javascript" src="/_layouts/15/ps.debug.js"></script>應用程式基礎結構會使用
/_layouts/15/IIS 中 SharePoint 網站的虛擬目錄。 實體檔案為%ProgramFiles%\Common Files\Microsoft Shared\Web Server Extensions\15\TEMPLATE\LAYOUTS\PS.debug.js。注意事項
在您部署應用程式以供生產環境使用之前,請先從腳本參考中移除
.debug以改善效能。在
<asp:Content ContentPlaceHolderID="PlaceHolderMain" runat="server">頁面主體的控件中,刪除產生的 div 元素,然後新增 UI 物件的 HTML 程式代碼。 table 元素只包含標頭數據列。 [ 工作名稱] 資料行包含複選框輸入控制項。 標題 項目的文字會由 App.js 檔案中 getUserInfo 函式的 onGetUserNameSuccess 回呼取代。<form> <fieldset> <legend>Select assigned tasks</legend> <table id="assignmentsTable"> <caption id="tableCaption">Replace caption</caption> <thead> <tr id="headerRow"> <th>Project name</th> <th><input type="checkbox" id="headercheckbox" checked="checked" />Task name</th> <th>Actual work</th> <th>% complete</th> <th>Remaining work</th> <th>Due date</th> </tr> </thead> </table> </fieldset> <div id="inputPercentComplete" > Set percent complete for all selected assignments, or leave this <br /> field blank and set percent complete for individual assignments: <input type="text" name="percentComplete" id="pctComplete" size="4" maxlength="4" /> </div> <div id="submitResult"> <p><button id="btnSubmitUpdate" type="button" class="bottomButtons" ></button></p> <p id="message"></p> </div> <div id="refreshPage"> <p><button id="btnRefresh" type="button" class="bottomButtons" >Refresh</button></p> </div> <div id="exitPage"> <p><button id="btnExit" type="button" class="bottomButtons" >Exit</button></p> </div> </form>在 App.css 檔案中,針對UI元素的位置和外觀新增CSS程式代碼。 如需 QuickStatus 應用程式的完整 CSS 程式代碼,請參閱 QuickStatus 應用程式的範例程式代碼 一節。
程式 3 會新增 JavaScript 函式來讀取指派並建立數據表數據列,以及變更和更新完成的指派百分比。 實際步驟在開發應用程式時會更加反覆,您也可以在其中建立一些 HTML 程式代碼、新增和測試相關的樣式和 JavaScript 函式、修改或新增更多 HTML 程式代碼,然後重複此程式。
建立 QuickStatus 應用程式的 JavaScript 函式
SharePoint 應用程式的 Visual Studio 範本包含 App.js 檔案,其中包含預設的初始化程式代碼,可取得 SharePoint 用戶端內容,並示範應用程式頁面的基本取得和設定動作。 SharePoint 用戶端 SP.js 連結庫的 JavaScript 命名空間是 SP。 因為 Project Server 應用程式使用 PS.js 連結庫,所以應用程式會使用 PS 命名空間來取得客戶端內容,並存取 Project Server 的 JSOM。
QuickStatus 應用程式中的 JavaScript 函式包含下列專案:
具現化文件物件模型 (DOM) 時,就會執行檔 就緒 事件處理程式。 就緒事件處理程式會執行下列四個步驟:
使用 Project Server JSOM 和 pwaWeb 全域變數的用戶端內容,初始化 projContext 全域變數。
呼叫 getUserInfo 函 式來初始化 projUser 全域變數。
呼叫 getAssignments 函式,以取得使用者的指定指派數據。
將 click 事件處理程式系結至數據表標頭複選框,以及數據表每個數據列中的複選框。 Click 事件處理程式會在用戶選取或清除資料表中的任何複選框時,管理複選框的 checked 屬性。
如果 getAssignments 函式成功,它會呼叫 onGetAssignmentsSuccess 函式。 該函式會針對每個指派在數據表中插入一個數據列、初始化每個數據列中的 HTML 控件,然後初始化底部按鈕屬性。
[更新] 按鈕的 onClick 事件處理程式會呼叫 updateAssignments 函式。 該函式會取得套用至每個選定指派的完成百分比值;或者,如果完成百分比文本框是空的,則函式會取得數據表中每個選定指派的完成百分比。 updateAssignments 函式接著會儲存並提交狀態更新,並將有關結果的訊息寫入頁面底部。
程式 3. 建立 JavaScript 函式
在 Visual Studio 中,開啟 App.js 檔案,然後刪除檔案中的所有內容。
新增全域變數和檔 就緒 事件處理程式。 檔物件是使用 jQuery 函式來存取。
數據表標頭複選框的 Click 事件處理程式會設定數據列複選框的核取狀態。 如果已選取所有數據列複選框或全部都清除,則數據列複選框的 click 事件處理程式會設定標頭複選框的核取狀態。 Click 事件處理程式也會將頁面底部的結果訊息設定為空字串。
var projContext; var pwaWeb; var projUser; // This code runs when the DOM is ready and creates a ProjectContext object. // The ProjectContext object is required to use the JSOM for Project Server. $(document).ready(function () { projContext = PS.ProjectContext.get_current(); pwaWeb = projContext.get_web(); getUserInfo(); getAssignments(); // Bind a click event handler to the table header check box, which sets the row check boxes // to the checked state of the header check box, and sets the results message to an empty string. $('#headercheckbox').live('click', function (event) { $('input:checkbox:not(#headercheckbox)').attr('checked', this.checked); $get("message").innerText = ""; }); // Bind a click event handler to the row check boxes. If any row check box is cleared, clear // the header check box. If all of the row check boxes are selected, select the header check box. $('input:checkbox:not(#headercheckbox)').live('click', function (event) { var isChecked = true; $('input:checkbox:not(#headercheckbox)').each(function () { if (this.checked == false) isChecked = false; $get("message").innerText = ""; }); $("#headercheckbox").attr('checked', isChecked); }); });新增 getUserInfo 函式,此函式會在查詢成功時呼叫 onGetUserNameSuccess 。 onGetUserNameSuccess 函式會將 標題 段落的內容取代為包含使用者名稱的數據表 標題。
// Get information about the current user. function getUserInfo() { projUser = pwaWeb.get_currentUser(); projContext.load(projUser); projContext.executeQueryAsync(onGetUserNameSuccess, // Anonymous function to execute if getUserInfo fails. function (sender, args) { alert('Failed to get user name. Error: ' + args.get_message()); }); } // This function is executed if the getUserInfo call is successful. function onGetUserNameSuccess() { var prefaceInfo = 'Assignments for ' + projUser.get_title(); $('#tableCaption').text(prefaceInfo); }新增 getAssignments 函式,它會呼叫 onGetAssignmentsSuccess (請參閱步驟 5) 指派查詢是否成功。 [ 包含] 選項會限制查詢只傳回指定的欄位。
// Get the collection of assignments for the current user. function getAssignments() { assignments = PS.EnterpriseResource.getSelf(projContext).get_assignments(); // Register the request that you want to run on the server. The optional "Include" parameter // requests only the specified properties for each assignment in the collection. projContext.load(assignments, 'Include(Project, Name, ActualWork, ActualWorkMilliseconds, PercentComplete, RemainingWork, Finish, Task)'); // Run the request on the server. projContext.executeQueryAsync(onGetAssignmentsSuccess, // Anonymous function to execute if getAssignments fails. function (sender, args) { alert('Failed to get assignments. Error: ' + args.get_message()); }); }新增 onGetAssignmentsSuccess 函式,這會將每個指派的數據列新增至數據表。 prevProjName 變數可用來判斷數據列是否適用於不同的專案。 如果是,項目名稱會以粗體字型顯示;如果不是,則專案名稱會設定為空字串。
注意事項
JSOM 不包含 CSOM 包含的 TimeSpan 屬性,例如 ActualWorkTimeSpan。 相反地,JSOM 會使用屬性的毫秒數,例如 PS。StatusAssignment.actualWorkMilliseconds 屬性。 取得該屬性的方法 是get_actualWorkMilliseconds,這會傳回整數值。 > get_actualWork方法會傳回字串,例如 「3h」。。 您可以在 QuickStatus 應用程式中使用任一值,但顯示方式不同。 指派查詢包含這兩個屬性,因此您可以在偵錯期間測試值。 如果您移除 actualWork 變數,您也可以移除指派查詢中的 ActualWork 屬性。
最後, onGetAssignmentsSuccess 函式會使用 click 事件處理程式,初始化 [更新 ] 按鈕和 [ 重新 整理] 按鈕。 您也可以在 HTML 程式代碼中設定 [更新 ] 按鈕的文字值。
// Get the enumerator, iterate through the assignment collection, // and add each assignment to the table. function onGetAssignmentsSuccess(sender, args) { if (assignments.get_count() > 0) { var assignmentsEnumerator = assignments.getEnumerator(); var projName = ""; var prevProjName = "3D2A8045-4920-4B31-B3E7-9D0C5195FC70"; // Any unique name. var taskNum = 0; var chkTask = ""; var txtPctComplete = ""; // Constants for creating input controls in the table. var INPUTCHK = '<input type="checkbox" class="chkTask" checked="checked" id="chk'; var LBLCHK = '<label for="chk'; var INPUTTXT = '<input type="text" size="4" maxlength="4" class="txtPctComplete" id="txt'; while (assignmentsEnumerator.moveNext()) { var statusAssignment = assignmentsEnumerator.get_current(); projName = statusAssignment.get_project().get_name(); // Get an integer, such as 3600000. var actualWorkMilliseconds = statusAssignment.get_actualWorkMilliseconds(); // Get a string, such as "1h". Not used here. var actualWork = statusAssignment.get_actualWork(); if (projName === prevProjName) { projName = ""; } prevProjName = statusAssignment.get_project().get_name(); // Create a row for the assignment information. var row = assignmentsTable.insertRow(); taskNum++; // Create an HTML string with a check box and task name label, for example: // <input type="checkbox" class="chkTask" checked="checked" id="chk1" /> <label for="chk1">Task 1</label> chkTask = INPUTCHK + taskNum + '" /> ' + LBLCHK + taskNum + '">' + statusAssignment.get_name() + '</label>'; txtPctComplete = INPUTTXT + taskNum + '" />'; // Insert cells for the assignment properties. row.insertCell().innerHTML = '<strong>' + projName + '</strong>'; row.insertCell().innerHTML = chkTask; row.insertCell().innerText = actualWorkMilliseconds / 3600000 + 'h'; row.insertCell().innerHTML = txtPctComplete; row.insertCell().innerText = statusAssignment.get_remainingWork(); row.insertCell().innerText = statusAssignment.get_finish(); // Initialize the percent complete cell. $get("txt" + taskNum).innerText = statusAssignment.get_percentComplete() + '%' } } else { $('p#message').attr('style', 'color: #0f3fdb'); // Blue text. $get("message").innerText = projUser.get_title() + ' has no assignments' } // Initialize the button properties. $get("btnSubmitUpdate").onclick = function() { updateAssignments(); }; $get("btnSubmitUpdate").innerText = 'Update'; $get('btnRefresh').onclick = function () { window.location.reload(true); }; $get('btnExit').onclick = function () { exitToPwa(); }; }為 [更新] 按鈕新增 updateAssignments click 事件處理程式。 當用戶變更工作完成百分比的值,或在 [percentComplete ] 文字框中加入值時,可以輸入數種格式的值,例如 “60”、“60%” 或 “60 %”。 getNumericValue 方法會傳回輸入文字的數值。
注意事項
在設計用於生產環境的應用程式中,數值資訊的輸入值應該包含字段驗證和其他錯誤檢查。
updateAssignments 範例包含一些基本錯誤檢查,並在頁面底部的訊息段落中顯示資訊;如果更新查詢成功,則為綠色;如果發生輸入錯誤或更新查詢不成功,則為紅色。
在使用 submitAllStatusUpdates 方法之前,應用程式必須使用 PS 將更新儲存至伺服器 。StatusAssignmentCollection.update 方法。
// Update all checked assignments. If the bottom percent complete field is blank, // use the value in the % complete field of each selected row in the table. function updateAssignments() { // Get percent complete from the bottom text box. var pctCompleteMain = getNumericValue($('#pctComplete').val()).trim(); var pctComplete = pctCompleteMain; var assignmentsEnumerator = assignments.getEnumerator(); var taskNum = 0; var taskRow = ""; var indexPercent = ""; var doSubmit = true; while (assignmentsEnumerator.moveNext()) { var pctCompleteRow = ""; taskRow = "chk" + ++taskNum; if ($get(taskRow).checked) { var statusAssignment = assignmentsEnumerator.get_current(); if (pctCompleteMain === "") { // Get percent complete from the text box field in the table row. pctCompleteRow = getNumericValue($('#txt' + taskNum).val()); pctComplete = pctCompleteRow; } // If both percent complete fields are empty, show an error. if (pctCompleteMain === "" && pctCompleteRow === "") { $('p#message').attr('style', 'color: #e11500'); // Red text. $get("message").innerHTML = '<b>Error:</b> Both <i>Percent complete</i> fields are empty, in row ' + taskNum + ' and in the bottom textbox.<br/>One of those fields must have a valid percent.' + '<p>Please refresh the page and try again.</p>'; doSubmit = false; taskNum = 0; break; } if (doSubmit) statusAssignment.set_percentComplete(pctComplete); } } // Save and submit the assignment updates. if (doSubmit) { assignments.update(); assignments.submitAllStatusUpdates(); projContext.executeQueryAsync(function (source, args) { $('p#message').attr('style', 'color: #0faa0d'); // Green text. $get("message").innerText = 'Assignments have been updated.'; }, function (source, args) { $('p#message').attr('style', 'color: #e11500'); // Red text. $get("message").innerText = 'Error updating assignments: ' + args.get_message(); }); } } // Get the numeric part for percent complete, from a string. For example, with "20 %", return "20". function getNumericValue(pctComplete) { pctComplete = pctComplete.trim(); pctComplete = pctComplete.replace(/ /g, ""); // Remove interior spaces. indexPercent = pctComplete.indexOf('%', 0); if (indexPercent > -1) pctComplete = pctComplete.substring(0, indexPercent); return pctComplete; }新增 exitToPwa 函式,此函式會使用 SPHostUrl 查詢字串參數作為主機 Project Web App 網站的 URL。 若要流覽回 [工作] 頁面,請附加
"/Tasks.aspx"至 URL。 例如, spHostUrl 變數會設定為https://ServerName/ProjectServerName/Tasks.aspx。getQueryStringParameter 函式會分割 QuickStatus 頁面的 URL,以擷取並傳回 URL 選項中的指定參數。 以下是檔的範 例。QuickStatus 檔的 URL 值 (一行) :
https://app-ef98082fa37e3c.servername.officeapps.selfhost.corp.microsoft.com/pwa/ QuickStatus/Pages/Default.aspx ?SPHostUrl=https%3A%2F%2Fsphvm%2D85178%2Fpwa &SPLanguage=en%2DUS &SPClientTag=1 &SPProductNumber=15%2E0%2E4420%2E1022 &SPAppWebUrl=https%3A%2F%2Fapp%2Def98082fa37e3c%2Eservername %2Eofficeapps%2Eselfhost%2Ecorp%2Emicrosoft%2Ecom%2Fpwa%2FQuickStatus針對先前的 URL,getQueryStringParameter 函式會傳回 SPHostUrl 查詢字串值 。
https://ServerName/pwa// Exit the QuickStatus page and go back to the Tasks page in Project Web App. function exitToPwa() { // Get the SharePoint host URL, which is the top page of PWA, and add the Tasks page. var spHostUrl = decodeURIComponent(getQueryStringParameter('SPHostUrl')) + "/Tasks.aspx"; // Set the top window for the QuickStatus IFrame to the Tasks page. window.top.location.href = spHostUrl; } // Get a specified query string parameter from the {StandardTokens} URL option string. function getQueryStringParameter(urlParameterKey) { var docUrl = document.URL; var params = docUrl.split('?')[1].split('&'); for (var i = 0; i < params.length; i++) { var theParam = params[i].split('='); if (theParam[0] == urlParameterKey) return decodeURIComponent(theParam[1]); } }
如果您此時發佈 QuickStatus 應用程式並將其新增至 Project Web App,則可從 [網站內容] 頁面執行應用程式,但使用者無法輕鬆使用。 若要協助使用者尋找並執行應用程式,您可以將應用程式的按鈕新增至 [工作] 頁面上的功能區。 程式 4 示範如何新增功能區自定義動作。
Adding a ribbon custom action
Project Web App 的功能區索引標籤、群組和控件是在 pwaribbon.xml 檔案中指定,該檔案會安裝在執行 Project Server 之計算機的 目錄中[Program Files]\Common Files\Microsoft Shared\Web Server Extensions\15\TEMPLATE\FEATURES\PWARibbon\listtemplates。 為了協助設計 Project Web App 功能區的自定義動作,Project 2013 SDK 下載包含一份 pwaribbon.xml。
Project Web App 會針對 [工作] 頁面使用不同的功能區定義,視 Project Web App 實例是否使用單一輸入模式,讓使用者輸入時程表和工作狀態的值。 如果您有 Project Web App 的系統管理許可權,若要判斷進入模式,請在頁面右上角的下拉式設定功能表中選擇 [PWA 設定]。 在 [PWA 設定] 頁面上,選擇 [ 時程表設定和預設值],然後查看頁面底部的 [ 單一輸入模式 ] 複選框。
當單一輸入模式關閉時,[工作] 頁面上的功能區會由 pwaribbon.xml 中的 [我的工作] 區域定義:
<!-- REGION My Work Ribbon-->
<CustomAction
Id="Ribbon.ContextualTabs.MyWork"
. . .
當單一輸入模式開啟時,[工作] 頁面功能區是由 pwaribbon.xml 中的 [系結模式] 區域所定義:
<!-- REGION Tied Mode Ribbon-->
<CustomAction
Id="Ribbon.ContextualTabs.TiedMode"
. . .
雖然每個區域中的群組和控件看起來都很類似,但系結模式的控件可以呼叫不同於非系結模式之相同控件的函式。 程式 4 示範如何在單一輸入模式關閉時新增 QuickStatus 應用程式的按鈕控制件 (單一輸入模式 複選框) 。
注意事項
如需將自定義動作新增至功能區或 SharePoint 應用程式中功能表的一般資訊,請參閱 建立自定義動作以搭配 SharePoint 應用程式部署。
程式 4. 將功能區自定義動作新增至 [工作] 頁面
在 Project Web App 中檢查 [工作] 頁面上的功能區。 選 取功能 區上的 [工作] 索引標籤,並規劃修改方式。 有七個群組,例如提交、工作和期間。 [提交] 群組有兩個控件:[儲存] 按鈕和 [傳送狀態] 下拉功能表。 您可以在群組中的任何位置新增控件、在 [工作] 索引 卷標的任何 位置新增具有新控件的群組,或新增另一個具有自定義群組和控件的功能區索引卷標。 在此範例中,我們會將第三個按鈕新增至 Submit 群組,其中按鈕會叫用 QuickStatus 應用程式的 URL。
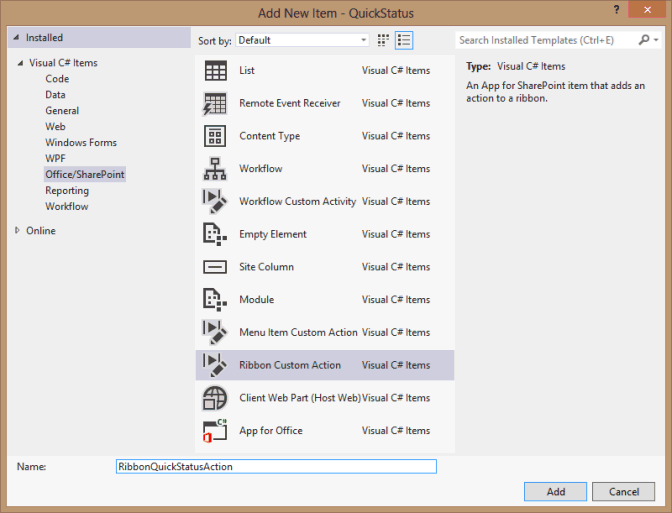
在 Visual Studio 的 [方案總管] 窗格中,以滑鼠右鍵按兩下 QuickStatus 專案,然後新增專案。 在 [ 新增專案 ] 對話框中,選擇 [功能 區自定義動作 (請參閱圖 4) 。 例如,將自定義動作命名為 RibbonQuickStatusAction,然後選擇 [ 新增]。
圖 4: Adding a ribbon custom action
在 [為功能區 建立自定義動作 ] 精靈的第一頁上,保留選取 [ 主機 Web ] 選項,在自定義動作範圍的下拉式清單中選擇 [ 無 ],然後選擇 [ 下一步 (參閱圖 5) 。 下拉式清單中的專案與 SharePoint 相關,而不是與 Project Server 相關。 我們會針對自定義動作取代大部分產生的 XML,使其套用至 Project Server。
圖 5: Specifying properties for the ribbon custom action
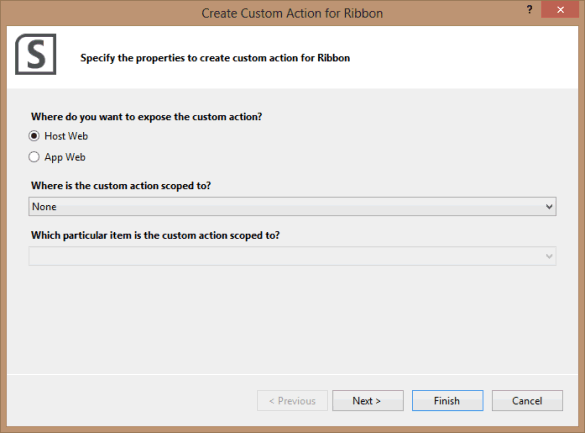
在 [建立功能區 自定義動作 精靈] 的下一個頁面上,保留設定的所有預設值,然後選擇 [ 完成 (請參閱圖 6) 。 Visual Studio 會建立 RibbonQuickStatusAction 資料夾,其中包含 Elements.xml 檔案。
圖 6: Specifying the settings for a button control
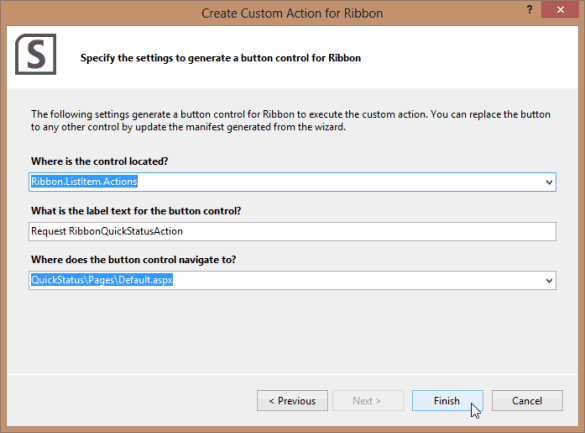
修改功能區自定義動作之 Elements.xml 檔中產生的預設程序代碼。 以下是預設 XML 程式代碼:
<?xml version="1.0" encoding="utf-8"?> <Elements xmlns="http://schemas.microsoft.com/sharepoint/"> <CustomAction Id="21ea3aaf-79e5-4aac-9479-8eef14b4d9df.RibbonQuickStatusAction" Location="CommandUI.Ribbon" Sequence="10001" Title="Invoke 'RibbonQuickStatusAction' action"> <CommandUIExtension> <!-- Update the UI definitions below with the controls and the command actions that you want to enable for the custom action. --> <CommandUIDefinitions> <CommandUIDefinition Location="Ribbon.ListItem.Actions.Controls._children"> <Button Id="Ribbon.ListItem.Actions.RibbonQuickStatusActionButton" Alt="Request RibbonQuickStatusAction" Sequence="100" Command="Invoke_RibbonQuickStatusActionButtonRequest" LabelText="Request RibbonQuickStatusAction" TemplateAlias="o1" Image32by32="_layouts/15/images/placeholder32x32.png" Image16by16="_layouts/15/images/placeholder16x16.png" /> </CommandUIDefinition> </CommandUIDefinitions> <CommandUIHandlers> <CommandUIHandler Command="Invoke_RibbonQuickStatusActionButtonRequest" CommandAction="~appWebUrl/Pages/Default.aspx"/> </CommandUIHandlers> </CommandUIExtension > </CustomAction> </Elements>在 CustomAction 元素中,刪除 Sequence 屬性和 Title 屬性。
若要將控件新增至 Submit 群組,請在集合中尋找集合中
Ribbon.ContextualTabs.MyWork.Home.Groups的第一個群組 pwaribbon.xml 檔案,也就是開頭<Group Id="Ribbon.ContextualTabs.MyWork.Home.Page" Command="PageGroup" Sequence="10" Title="$Resources:pwafeatures,PAGE_PDP_CM_SUBMIT"為 的專案。 若要將子控件新增至 Submit 群組,下列程式代碼會顯示 Elements.xml 檔案中 CommandUIDefinition 元素的正確 Location 屬性:<CommandUIDefinitions> <CommandUIDefinition Location="Ribbon.ContextualTabs.MyWork.Home.Page.Controls._children"> . . . </CommandUIDefinition> </CommandUIDefinitions>變更子 Button 元素的屬性值,如下所示:
<Button Id="Ribbon.ContextualTabs.MyWork.Home.Page.QuickStatus" Alt="Quick Status app" Sequence="30" Command="Invoke_QuickStatus" LabelText="Quick Status" TemplateAlias="o1" Image16by16="_layouts/15/1033/images/ps16x16.png" Image16by16Left="-80" Image16by16Top="-144" Image32by32="_layouts/15/1033/images/ps32x32.png" Image32by32Left="-32" Image32by32Top="-288" ToolTipTitle="QuickStatus" ToolTipDescription="Run the QuickStatus app" />若要讓按鈕成為群組中的第三個控件, Sequence 屬性可以是任何高於
Sequence="20"現有 [ 傳送狀態 ] 控件值的數位 (這是 pwaribbon.xml) 中的 FlyoutAnchor 元素。 依照慣例,群組和控件的序號為10, 20, 30, …,可讓專案插入中繼位置。Command 屬性會指定要在 CommandUIHandler 元素中執行的命令, (查看下列步驟 5.d) 。 您可以簡化命令名稱,讓下一位開發人員更容易使用。 例如
Command="Invoke_QuickStatus",讀取比Command="Invoke_RibbonQuickStatusActionButtonRequest"容易。影像屬性會指定按鈕控件的 16 x 16 像素圖示和 32 x 32 像素圖示。 在預設 Elements.xml 檔案中,
Image32by32="_layouts/15/images/placeholder32x32.png"指定橘色點。 您可以從映像對應檔案中擷取圖示, (ps16x16.png 和 ps32x32.png) 安裝在執行 Project Server 之電腦的目錄中[Program Files]\Common Files\Microsoft Shared\Web Server Extensions\15\TEMPLATE\LAYOUTS\1033\IMAGES。 例如,32 x 32 像素圖示位於左側圖示的第二欄,而第 10 個數據列位於 ps32x32.png 影像對應的頂端, (圖示頂端位於第九列的結尾之後;9 列 x 32 像素/列 = 288 像素) 。若要顯示按鈕控件的工具提示,請新增 ToolTipTitle 屬性和 ToolTipDescription 屬性。
變更 CommandUIHandler 元素的屬性。 例如,確定 Command 屬性符合 Button 元素的 Command 屬性值。 針對 CommandAction 屬性,
~appWebUrl是 QuickStatus 網頁 URL 的佔位符。 當功能區按鈕叫用 QuickStatus 應用程式時, {StandardTokens} 令牌會由包含 SPHostUrl、 SPLanguage、 SPClientTag、 SPProductNumber 和 SPAppWebUrl 的 URL 選項取代。<CommandUIHandlers> <CommandUIHandler Command="Invoke_QuickStatus" CommandAction="~appWebUrl/Pages/Default.aspx?{StandardTokens}"/> </CommandUIHandlers>
在 方案總管 中,開啟 Feature1.feature 設計工具,然後將 RibbonQuickStatusAction 專案從 [方案] 窗格中的 [專案] 移至 [功能] 窗格中的 [專案]。 如果您接著開啟 Package.package 設計工具, RibbonQuickStatusAction 專案將會位於 [ 封裝 ] 窗格的 [專案] 中。
當您開發應用程式並新增功能區按鈕時,通常會測試應用程式,並在 JavaScript 程式代碼中設定斷點以進行偵錯。 當您按 F5 開始偵錯時,Visual Studio 會編譯應用程式、將其部署至 QuickStatus 專案之 [網站 URL] 屬性中指定的網站,並顯示詢問您是否信任應用程式的頁面。 當您繼續並結束 QuickStatus 應用程式時,它會返回 Project Web App 中的 [工作] 頁面。
注意事項
圖 7 顯示功能區 [工作] 索引標籤上的 [快速狀態] 按鈕已停用。 使用 Visual Studio 進行許多偵錯部署之後,當您繼續在相同的測試伺服器上偵錯或部署已發佈的應用程式時,可能會封鎖自定義功能區控件。 若要啟用按鈕,請刪除 Visual Studio 中的 RibbonQuickStatusAction 專案,然後建立具有不同名稱和標識元的新功能區動作。 如果無法解決問題,請嘗試從 Project Web App 測試實例中移除應用程式,然後使用不同的應用程式識別碼重新建立應用程式。
圖 7: 檢視已停用 [快速狀態] 按鈕的工具提示
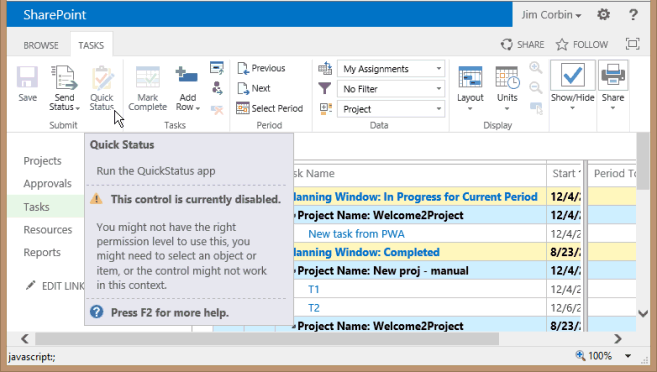
程式 5 示範如何部署和安裝 QuickStatus 應用程式。 程式 6 顯示在安裝應用程式之後測試應用程式的一些額外步驟。
部署 QuickStatus 應用程式
有數種方式可將應用程式部署至 SharePoint Web 應用程式,例如 Project Web App。 您使用的部署將取決於您要將應用程式發佈至私人 SharePoint 目錄或公用 Office 市集,以及 SharePoint 是安裝在內部部署還是在線租用。 程式 5 示範如何將 QuickStatus 應用程式部署至私人應用程式目錄中的內部部署安裝。 如需詳細資訊,請 參閱安裝和管理 SharePoint 2013 的應用程式 和 發佈 SharePoint 應用程式
注意事項
將應用程式新增至 SharePoint 目錄需要 SharePoint 系統管理員許可權。
程式 5. 部署 QuickStatus 應用程式
在 Visual Studio 中,儲存所有檔案,然後以滑鼠右鍵按兩下 方案總管 中的 QuickStatus 專案,然後選擇 [發佈]。
由於 QuickStatus 應用程式是 SharePoint 裝載的,因此發佈 (請參閱圖 8) 。 在 [ 發佈 Office 和 SharePoint 應用程式 ] 對話框中,選擇 [ 完成]。
圖 8. 發佈 QuickStatus 應用程式
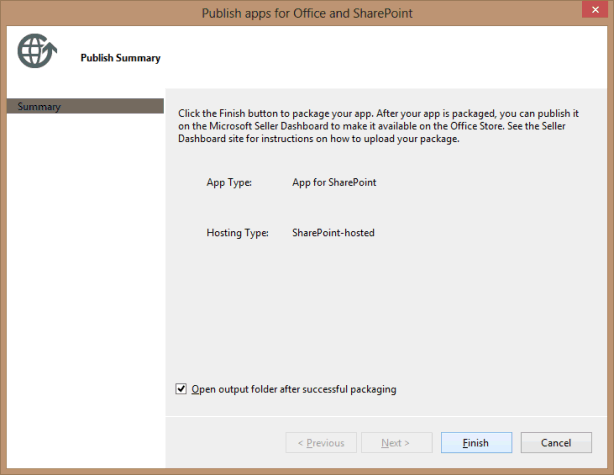
將 QuickStatus.app 檔案從
~\QuickStatus\bin\Debug\app.publish\1.0.0.0目錄複製到本機電腦 (上的便利目錄,或複製到 SharePoint 計算機,以進行內部部署安裝) 。在 SharePoint 管理中心中,選擇 [快速啟動] 中的 [應用程式 ],然後選擇 [ 管理應用程式類別目錄]。
如果應用程式目錄不存在,請遵循在 SharePoint 2013 中管理應用程式類別目錄中的設定 Web 應用程式的應用程式類別目錄網站一節,建立應用程式類別目錄的網站集合。
如果應用程式目錄存在,請流覽至 [管理應用程式類別目錄] 頁面上的網站URL。 例如,在下列步驟中,應用程式類別目錄網站是
https://ServerName/sites/TestApps。在應用程式目錄頁面上,選擇 [快速啟動] 中的 [ 適用於 SharePoint 的應用程式 ]。 在 [SharePoint 應用程式] 頁面的功能區 [ 檔案 ] 索引標籤上,選擇 [ 上傳檔]。
在 [ 新增檔] 對話框中,流覽 QuickStatus.app 檔案,新增版本的批注,然後選擇 [ 確定]。
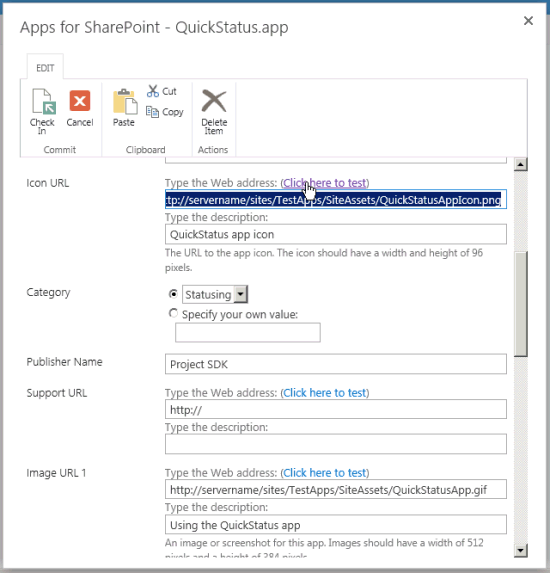
當您新增應用程式時,您也可以新增應用程式描述、圖示和其他資訊的本機資訊。 在 [ 適用於 SharePoint 的應用程式 - QuickStatus.app ] 對話框中,新增您要在 SharePoint 網站集合中顯示的應用程式資訊。 例如,新增下列資訊:
簡短描述 欄位:輸入快速狀態測試應用程式。
描述 欄位:輸入測試應用程式,以更新多個專案中工作的完成百分比。
圖示 URL 欄 位:將應用程式圖示的 96 x 96 像素影像新增至應用程式目錄的網站資產。 例如,流覽至
https://ServerName/sites/TestApps,在 [設定] 下拉功能表中選擇 [網站內容],選擇 [網站資產],然後新增 quickStatusApp.png 影像。 以滑鼠右鍵按兩下 quickStatusApp 專案,選擇 [屬性],然後在 [屬性] 對話框中複製 [位址 (URL) 值。 例如,複製https://ServerName/sites/TestApps/SiteAssets/QuickStatusApp.png,然後將值貼到 [圖示 URL 網址] 字段中。 輸入圖示的描述,例如 (如圖 9) 中,輸入 QuickStatus 應用程式圖示。 測試 URL 是否有效。Figure 9. 新增 QuickStatus 應用程式的圖示 URL
 應用程式
應用程式類別 欄位:選擇現有的類別,或指定您自己的值。 例如,輸入 Statusing。
注意事項
名為 Statusing 的 類別僅供測試之用。 Project Server 應用程式的一般類別是 Project Management。
發行者名稱 欄位:輸入發行者的名稱。 在此範例中,輸入 Project SDK。
[已啟用] 欄位:若要讓 Project Web App 月臺管理員可以看見應用程式以進行安裝,請選取 [已啟用] 複選框。
其他欄位是選擇性的。 例如,您可以為應用程式詳細數據頁面新增支援URL和多個說明影像。 在圖 9 中, [影像 URL 1] 欄 位包含應用程式螢幕快照的 URL 和螢幕快照的描述。
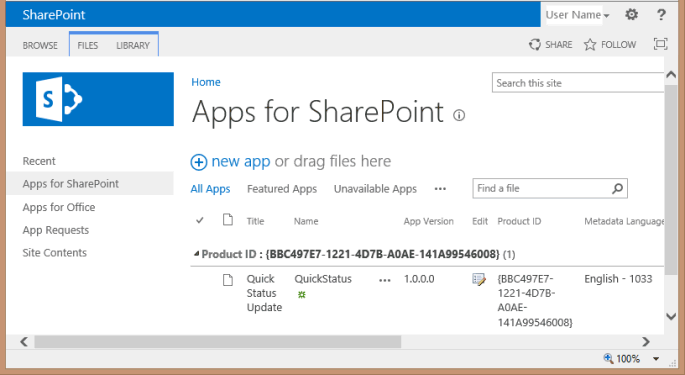
在 [ SharePoint 應用程式 - QuickStatus.app ] 對話框中,選擇 [ 儲存]。 在圖 9 中,[適用於 SharePoint 的應用程式] 文檔庫中的 [快速狀態更新] 專案已取出以供編輯,因此在對話框功能區的 [編輯] 索引卷標上,您可以選擇 簽到 完成程式 (請參閱圖 10) 。
Figure 10. QuickStatus 應用程式會新增至 Apps for SharePoint 文檔庫。
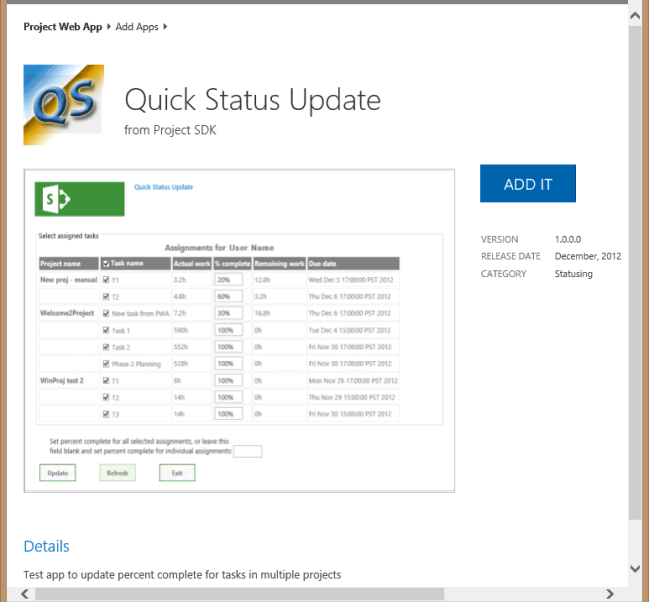
在 [Project Web App] 的 [設定] 下拉功能表中,選擇 [新增應用程式]。 在 [您的應用程式] 頁面的 [快速啟動] 中,選擇 [從您的組織],然後選擇 [快速狀態更新] 應用程式的 [應用程式詳細數據]。 圖 11 顯示詳細數據頁面,其中包含您在上一個步驟中新增的應用程式圖示、螢幕快照和其他資訊。
Figure 11. 在 Project Web App 中使用 [快速狀態更新詳細數據] 頁面
在 [快速狀態更新詳細數據] 頁面上,選擇 [ 新增 IT]。 Project Web App 會顯示一個對話方塊,其中列出QuickStatus應用程式可執行的作業 (請參閱圖12) 。 作業清單衍生自 AppManifest.xml 檔案中的 AppPermissionRequest 元素。
圖 12. 確認您信任快速狀態應用程式
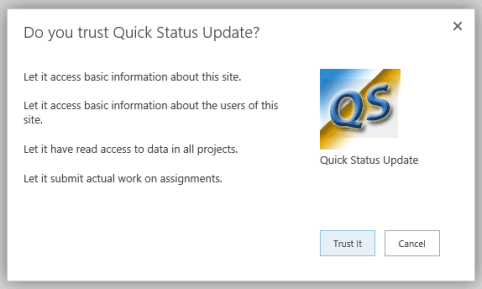
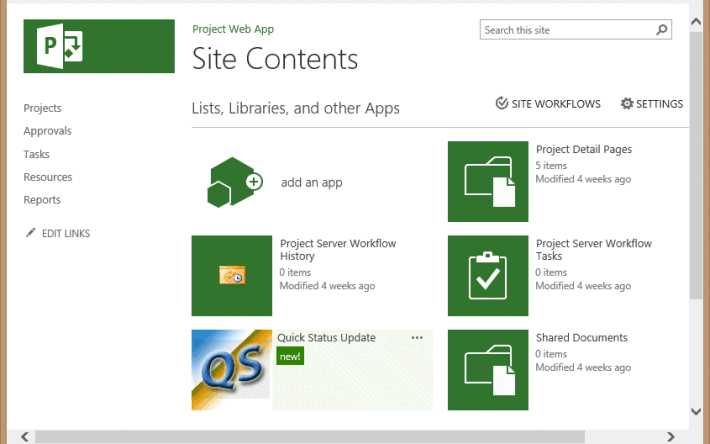
在 [ 您信任快速狀態更新 ] 對話框中,選擇 [ 信任]。 應用程式會新增至 [Project Web App 網站內容] 頁面, (參閱圖 13) 。
圖 13. 在 [網站內容] 頁面上檢視 [快速狀態] 應用程式
 在
在
在 [網站內容] 頁面上,您可以選取 [快速狀態更新 ] 圖示來執行應用程式。
注意事項
如需提供應用程式相關信息的其他命令,請在 [網站內容] 頁面上,選擇包含 [快速狀態更新] 名稱和省略號 (...) 的區域。您可以檢視應用程式的 [關於] 頁面、檢視包含應用程式錯誤相關信息的 [應用程式詳細數據] 頁面、檢視應用程式許可權頁面,或從 Project Web App 中移除應用程式。
在 Project Web App (的 [工作] 頁面上,請參閱圖 14) ,功能區上應該會啟用 [QuickStatus] 按鈕。 如果 [ 快速狀態] 按鈕已停用,請嘗試圖 7 附注中所述的動作。
Figure 14. Starting the QuickStatus app from the TASKS tab
![標啟動 QuickStatus 應用程式 從 [工作] 索引標籤啟動 QuickStatus 應用程式 從](media/pj15_createstatusingapp_tasksribbon.gif) [工作] 索引卷
[工作] 索引卷
程式 6 顯示一些要使用 QuickStatus 應用程式進行測試。
測試 QuickStatus 應用程式
使用者可能會在 QuickStatus 應用程式中嘗試的每個作業,都應該先在 Project Server 的測試安裝上進行測試,然後再將應用程式部署至實際執行伺服器或 Project Online 的生產租使用者。 測試安裝可讓您變更和刪除使用者的指派,而不會影響實際專案。 測試也應該牽涉到具有不同許可權集合的數個使用者,例如系統管理員、專案經理和小組成員。 徹底測試可以發現應該在應用程式中進行的變更,這在開發期間的測試中並不明顯。 程式 6 列出 QuickStatus 應用程式的數個測試,但不包含一系列詳盡的測試。
程式 6. 測試 QuickStatus 應用程式
執行用戶沒有指派的 QuickStatus 應用程式。 應用程式應該會在頁面底部顯示藍色訊息,例如, 用戶名稱沒有指派。
選擇 [更新],並更新綠色 [ 指派] 的訊息變更。
注意事項
應該變更應用程式行為,以便在沒有指派時停用 [ 更新 ] 按鈕。
執行應用程式,其中使用者在數個不同的專案中有多個指派,而某些指派尚未完成。 請注意應用程式的外觀,並依照下列方式執行動作 (請參閱圖 15) :
onGetAssignmentsSuccess 函式會針對目前使用者的每個指派,在數據表中建立一個數據列。 專案名稱只會以粗體字型顯示每個專案中第一個指派的一次。
清除 [ 任務名稱 ] 資料列標頭中的複選框。 數據表標頭 click 事件處理程式會清除工作數據列中的所有其他複選框。
選取所有工作。 每個數據列的 Click 事件處理程式會判斷是否已選取所有數據列,如果是,則選取 [ 工作名稱 ] 資料行標頭。
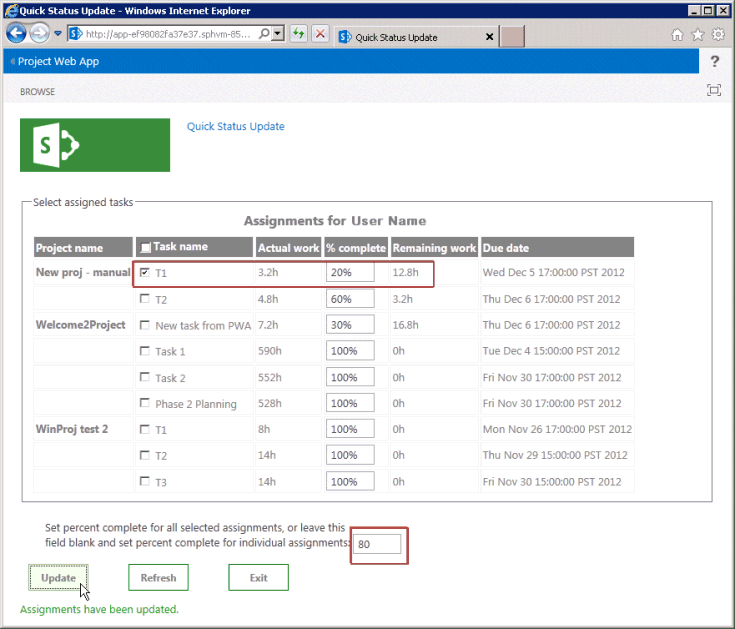
再次清除所有複選框,然後選取一個具有一些剩餘工作的指派。 例如,圖 15 顯示最上層工作 T1 有 20% 的剩餘工時要完成。
在 [ 設定完成百分比] 文本框中,輸入 80,然後選擇 [ 更新]。 頁面底部應該會顯示綠色訊息:指 派已更新。
圖 15. Updating an assignment in the QuickStatus app
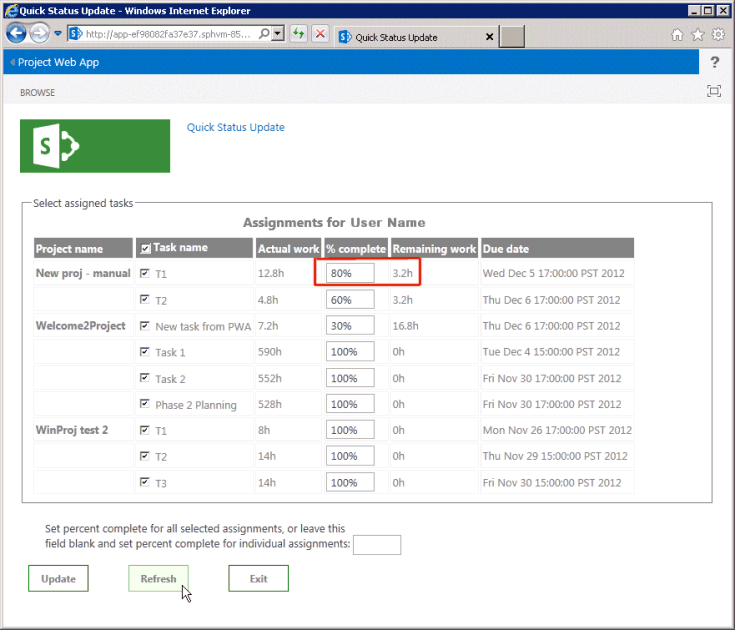
選擇 [重新整理 (請參閱圖 16) 。 系統會再次選取所有工作,而最上層工作會顯示 80% 完成。
圖 16. 重新整理 [快速狀態更新] 頁面
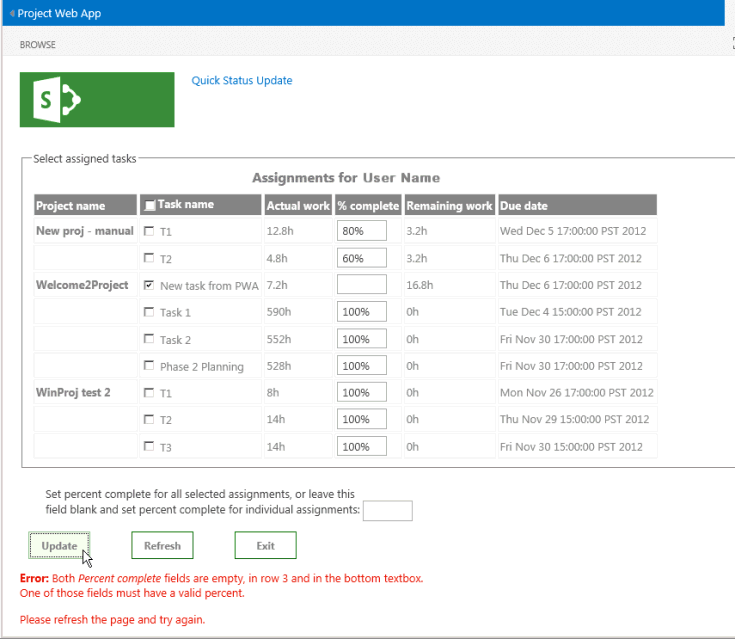
清除所有複選框,然後選取另一個工作。 例如, 從 PWA 選取 [新增工作]。 將 [ 設定完成百分比] 文本框保留空白,刪除所選工作之 [完成百分比 ] 數據行中的所有文字,然後選擇 [ 更新]。 因為這兩個文本框都是空的,所以應用程式會顯示紅色錯誤訊息 (請參閱圖 17) 。
Figure 17. Testing the error message
將上一個工作更新為80%完成,然後選擇 [ 結束]。 exitToPwa 函式會將瀏覽器視窗位置變更為 SharePoint 主應用程式中的 [工作] 頁面, (也就是 URL 會變更為 <
https://ServerName/pwa/Tasks.aspx>) 。 圖 18 顯示 T1 工作和 PWA 新增工作 分別顯示 80% 完成。Figure 18. 確認工作已在 Project Web App 中更新
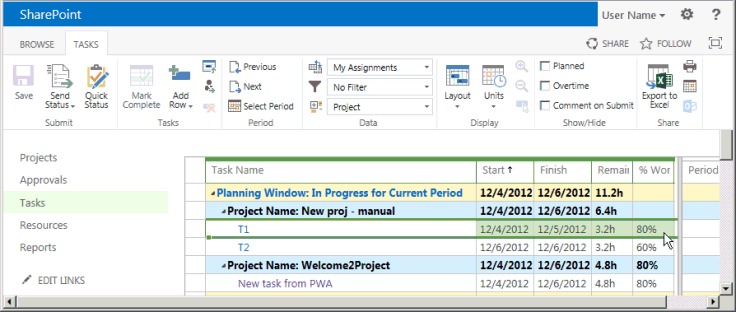 驗證中更新的工作
更新的狀態在 2013 Project 專業版 顯示之前,必須先提交變更以供核准,然後再由專案經理核准。
測試會顯示在 QuickStatus 應用程式中應進行的數個其他變更,以改善可用性。 例如:
應該會有額外的錯誤檢查和文字框值的驗證。 目前,使用者可以輸入非數值或完成百分比的負值,這會導致不友善的錯誤訊息。 例如,使用負值時,錯誤訊息為 錯誤更新指派:PJClientCallableException:StatusingSetDataValueInvalid。
除了數據列編號之外,空白文本框的錯誤訊息還可以列出專案和工作。
成功訊息可能包含已更新的工作清單;或者,如果 updateAssignments 函式成功,它可以執行自動頁面重新整理,並以不同的色彩和粗體字型顯示更新的工作或百分比。
為了避免非常大的數據表,工作分派數據表應限制為完成小於 100% 的工作。 或者,新增選項以顯示所有工作。 此問題也可以使用 jQuery 型方格而不是數據表來解決,您可以在其中輕鬆地實作篩選和網格線分頁。
由於 QuickStatus 應用程式不會提交狀態,因此功能區 [工作] 索引標籤上的[快速狀態] 圖示在邏輯上會是 [工作] 群組中的第一個圖示,而不是 [提交] 群組中的最後一個圖示。
由於 onGetAssignmentsSuccess 函式會初始化 btnSubmitUpdate 按鈕文字,但其他按鈕文字值會在 HTML 中初始化,因此當 getAssignments 函式執行時,頁面會保持部分初始化狀態。 如果文字值都是以 HTML 初始化,則頁面上的按鈕會顯示更一致。
最重要的是,您應該在生產應用程式中修改 QuickStatus 應用程式所使用的方法,其中會變更指派完成百分比。 如需詳細資訊,請參閱 後續步驟一 節。
QuickStatus 應用程式的範例程序代碼
Default.aspx檔案
下列程式代碼位於 QuickStatus 專案的 檔案中Pages\Default.aspx:
<%-- The following lines are ASP.NET directives needed when using SharePoint components --%>
<%@ Page Inherits="Microsoft.SharePoint.WebPartPages.WebPartPage, Microsoft.SharePoint, Version=15.0.0.0,
Culture=neutral, PublicKeyToken=71e9bce111e9429c" MasterPageFile="~masterurl/default.master" Language="C#" %>
<%@ Register TagPrefix="Utilities" Namespace="Microsoft.SharePoint.Utilities" Assembly="Microsoft.SharePoint, Version=15.0.0.0,
Culture=neutral, PublicKeyToken=71e9bce111e9429c" %>
<%@ Register TagPrefix="WebPartPages" Namespace="Microsoft.SharePoint.WebPartPages" Assembly="Microsoft.SharePoint, Version=15.0.0.0,
Culture=neutral, PublicKeyToken=71e9bce111e9429c" %>
<%@ Register TagPrefix="SharePoint" Namespace="Microsoft.SharePoint.WebControls" Assembly="Microsoft.SharePoint, Version=15.0.0.0,
Culture=neutral, PublicKeyToken=71e9bce111e9429c" %>
<%-- The markup and script in the following Content element will be placed in the <head> of the page.
For production deployment, change the .debug.js JavaScript references to .js. --%>
<asp:Content ContentPlaceHolderID="PlaceHolderAdditionalPageHead" runat="server">
<script type="text/javascript" src="../Scripts/jquery-1.7.1.min.js"></script>
<script type="text/javascript" src="/_layouts/15/sp.runtime.debug.js"></script>
<script type="text/javascript" src="/_layouts/15/sp.debug.js"></script>
<script type="text/javascript" src="/_layouts/15/ps.debug.js"></script>
<!-- CSS styles -->
<link rel="Stylesheet" type="text/css" href="../Content/App.css" />
<!-- Add your JavaScript to the following file -->
<script type="text/javascript" src="../Scripts/App.js"></script>
</asp:Content>
<%-- The markup and script in the following Content element will be placed in the <body> of the page --%>
<asp:Content ContentPlaceHolderID="PlaceHolderMain" runat="server">
<form>
    <fieldset>
    <legend>Select assigned tasks</legend>
    <table id="assignmentsTable">
        <caption id="tableCaption">Replace caption</caption>
        <thead>
        <tr id="headerRow">
            <th>Project name</th>
            <th><input type="checkbox" id="headercheckbox" checked="checked" />Task name</th>
            <th>Actual work</th>
            <th>% complete</th>
            <th>Remaining work</th>
            <th>Due date</th>
        </tr>
        </thead>
    </table>
    </fieldset>
    <div id="inputPercentComplete" >
    Set percent complete for all selected assignments, or leave this
    <br /> field blank and set percent complete for individual assignments:
    <input type="text" name="percentComplete" id="pctComplete" size="4"  maxlength="4" />
    </div>
    <div id="submitResult">
    <p><button id="btnSubmitUpdate" type="button" class="bottomButtons" ></button></p>
    <p id="message"></p>
    </div>
    <div id="refreshPage">
    <p><button id="btnRefresh" type="button" class="bottomButtons" >Refresh</button></p>
    </div>
    <div id="exitPage">
    <p><button id="btnExit" type="button" class="bottomButtons" >Exit</button></p>
    </div>
</form>
</asp:Content>
App.js 檔案
下列程式代碼位於 QuickStatus 專案的 檔案中Scripts\App.js:
var projContext;
var pwaWeb;
var projUser;
// This code runs when the DOM is ready and creates a ProjectContext object.
// The ProjectContext object is required to use the JSOM for Project Server.
$(document).ready(function () {
projContext = PS.ProjectContext.get_current();
pwaWeb = projContext.get_web();
getUserInfo();
getAssignments();
// Bind a click event handler to the table header check box, which sets the row check boxes
// to the selected state of the header check box, and sets the results message to an empty string.
$('#headercheckbox').live('click', function (event) {
$('input:checkbox:not(#headercheckbox)').attr('checked', this.checked);
$get("message").innerText = "";
});
// Bind a click event handler to the row check boxes. If any row check box is cleared, clear
// the header check box. If all of the row check boxes are selected, select the header check box.
$('input:checkbox:not(#headercheckbox)').live('click', function (event) {
var isChecked = true;
$('input:checkbox:not(#headercheckbox)').each(function () {
if (this.checked == false) isChecked = false;
$get("message").innerText = "";
});
$("#headercheckbox").attr('checked', isChecked);
});
});
// Get information about the current user.
function getUserInfo() {
projUser = pwaWeb.get_currentUser();
projContext.load(projUser);
projContext.executeQueryAsync(onGetUserNameSuccess,
// Anonymous function to execute if getUserInfo fails.
function (sender, args) {
alert('Failed to get user name. Error: ' + args.get_message());
});
}
// This function is executed if the getUserInfo call is successful.
// Replace the contents of the 'caption' paragraph with the project user name.
function onGetUserNameSuccess() {
var prefaceInfo = 'Assignments for ' + projUser.get_title();
$('#tableCaption').text(prefaceInfo);
}
 // Get the collection of assignments for the current user.
 function getAssignments() {
     assignments = PS.EnterpriseResource.getSelf(projContext).get_assignments();
     // Register the request that you want to run on the server. The optional "Include" parameter
     // requests only the specified properties for each assignment in the collection.
     projContext.load(assignments,
         'Include(Project, Name, ActualWork, ActualWorkMilliseconds, PercentComplete, RemainingWork, Finish, Task)');
     // Run the request on the server.
     projContext.executeQueryAsync(onGetAssignmentsSuccess,
         // Anonymous function to execute if getAssignments fails.
         function (sender, args) {
             alert('Failed to get assignments. Error: ' + args.get_message());
         });
 }
// Get the enumerator, iterate through the assignment collection,
// and add each assignment to the table.
function onGetAssignmentsSuccess(sender, args) {
if (assignments.get_count() > 0) {
var assignmentsEnumerator = assignments.getEnumerator();
var projName = "";
var prevProjName = "3D2A8045-4920-4B31-B3E7-9D0C5195FC70"; // Any unique name.
var taskNum = 0;
var chkTask = "";
var txtPctComplete = "";
// Constants for creating input controls in the table.
var INPUTCHK = '<input type="checkbox" class="chkTask" checked="checked" id="chk';
var LBLCHK = '<label for="chk';
var INPUTTXT = '<input type="text" size="4" maxlength="4" class="txtPctComplete" id="txt';
while (assignmentsEnumerator.moveNext()) {
var statusAssignment = assignmentsEnumerator.get_current();
projName = statusAssignment.get_project().get_name();
// Get an integer value for the number of milliseconds of actual work, such as 3600000.
var actualWorkMilliseconds = statusAssignment.get_actualWorkMilliseconds();
// Get a string value for the assignment actual work, such as "1h". Not used here.
var actualWork = statusAssignment.get_actualWork();
if (projName === prevProjName) {
projName = "";
}
prevProjName = statusAssignment.get_project().get_name();
// Create a row for the assignment information.
var row = assignmentsTable.insertRow();
taskNum++;
// Create an HTML string with a check box and task name label, for example:
// <input type="checkbox" class="chkTask" checked="checked" id="chk1" />
// <label for="chk1">Task 1</label>
chkTask = INPUTCHK + taskNum + '" /> ' + LBLCHK + taskNum + '">'
+ statusAssignment.get_name() + '</label>';
txtPctComplete = INPUTTXT + taskNum + '" />';
// Insert cells for the assignment properties.
row.insertCell().innerHTML = '<strong>' + projName + '</strong>';
row.insertCell().innerHTML = chkTask;
row.insertCell().innerText = actualWorkMilliseconds / 3600000 + 'h';
row.insertCell().innerHTML = txtPctComplete;
row.insertCell().innerText = statusAssignment.get_remainingWork();
row.insertCell().innerText = statusAssignment.get_finish();
// Initialize the percent complete cell.
$get("txt" + taskNum).innerText = statusAssignment.get_percentComplete() + '%'
}
}
else {
$('p#message').attr('style', 'color: #0f3fdb'); // Blue text.
$get("message").innerText = projUser.get_title() + ' has no assignments'
}
// Initialize the button properties.
$get("btnSubmitUpdate").onclick = function() { updateAssignments(); };
$get("btnSubmitUpdate").innerText = 'Update';
$get('btnRefresh').onclick = function () { window.location.reload(true); };
$get('btnExit').onclick = function () { exitToPwa(); };
}
// Update all selected assignments. If the bottom percent complete field is blank,
// use the value in the % complete field of each selected row in the table.
function updateAssignments() {
// Get percent complete from the bottom text box.
var pctCompleteMain = getNumericValue($('#pctComplete').val()).trim();
var pctComplete = pctCompleteMain;
var assignmentsEnumerator = assignments.getEnumerator();
var taskNum = 0;
var taskRow = "";
var indexPercent = "";
var doSubmit = true;
while (assignmentsEnumerator.moveNext()) {
var pctCompleteRow = "";
taskRow = "chk" + ++taskNum;
if ($get(taskRow).checked) {
var statusAssignment = assignmentsEnumerator.get_current();
if (pctCompleteMain === "") {
// Get percent complete from the text box field in the table row.
pctCompleteRow = getNumericValue($('#txt' + taskNum).val());
pctComplete = pctCompleteRow;
}
// If both percent complete fields are empty, show an error.
if (pctCompleteMain === "" && pctCompleteRow === "") {
$('p#message').attr('style', 'color: #e11500'); // Red text.
$get("message").innerHTML =
'<b>Error:</b> Both <i>Percent complete</i> fields are empty, in row '
+ taskNum
+ ' and in the bottom textbox.<br/>One of those fields must have a valid percent.'
+ '<p>Please refresh the page and try again.</p>';
doSubmit = false;
taskNum = 0;
break;
}
if (doSubmit) statusAssignment.set_percentComplete(pctComplete);
}
}
// Save and submit the assignment updates.
if (doSubmit) {
assignments.update();
assignments.submitAllStatusUpdates();
projContext.executeQueryAsync(function (source, args) {
$('p#message').attr('style', 'color: #0faa0d'); // Green text.
$get("message").innerText = 'Assignments have been updated.';
}, function (source, args) {
$('p#message').attr('style', 'color: #e11500'); // Red text.
$get("message").innerText = 'Error updating assignments: ' + args.get_message();
});
}
}
// Get the numeric part for percent complete, from a string.
// For example, with "20 %", return "20".
function getNumericValue(pctComplete) {
pctComplete = pctComplete.trim();
pctComplete = pctComplete.replace(/ /g, ""); // Remove interior spaces.
indexPercent = pctComplete.indexOf('%', 0);
if (indexPercent > -1) pctComplete = pctComplete.substring(0, indexPercent);
return pctComplete;
}
     // Exit the QuickStatus page and go back to the Tasks page in Project Web App.
     function exitToPwa() {
         // Get the SharePoint host URL, which is the top page of PWA, and add the Tasks page.
         var spHostUrl = decodeURIComponent(getQueryStringParameter('SPHostUrl'))
                         + "/Tasks.aspx";
         // Set the top window for the QuickStatus IFrame to the Tasks page.
         window.top.location.href = spHostUrl;
     }
     // Get a specified query string parameter from the {StandardTokens} URL option string.
     function getQueryStringParameter(urlParameterKey) {
         var docUrl = document.URL;
         var params = docUrl.split('?')[1].split('&');
         for (var i = 0; i < params.length; i++) {
             var theParam = params[i].split('=');
             if (theParam[0] == urlParameterKey)
                 return decodeURIComponent(theParam[1]);
         }
     }
App.css檔案
下列 CSS 程式代碼位於 QuickStatus 專案的 檔案中Content\App.css:
/* Custom styles for the QuickStatus app. */
/*============= Table elements ========================================*/
table {
width: 90%;
}
caption {
font-size: 16px;
padding-bottom: 5px;
font-weight: bold;
color: gray;
}
table th {
background-color: gray;
color: white;
}
table td, th {
width: auto;
text-align: left;
padding: 2px;
border: solid 1px whitesmoke;
color: gray;
}
/*=== Class for check boxes added to rows
*/
.chkTask {
width: 12px;
height: 12px;
color: gray;
}
/*========== DIV id for the Percent Complete text box ================*/
#inputPercentComplete {
position: fixed;
top: auto;
height: auto;
padding-top: 20px;
margin-left: 30px;
}
/*========== DIV id for the Submit Result button ====================*/
#submitResult {
position: fixed;
top: auto;
height: auto;
padding-top: 60px;
}
/*========== DIV id for the Refresh Page button ====================*/
#refreshPage {
position: fixed;
top: auto;
height: auto;
padding-top: 60px;
margin-left: 120px;
}
/*========== DIV id for the Exit Page button ====================*/
#exitPage {
position: fixed;
top: auto;
height: auto;
padding-top: 60px;
margin-left: 240px;
}
/*========== Class for the buttons at the bottom of the page =======*/
.bottomButtons {
color: gray;
font-weight: bold;
font-size: 12px;
border-color: darkgreen;
border-width: thin;
}
Elements.xml 功能區的檔案
下列 XML 定義適用於功能區上 [工作] 索引標籤上新增的按鈕,位於 QuickStatus 專案的 檔案中RibbonQuickStatusAction\Elements.xml:
<?xml version="1.0" encoding="utf-8"?>
<Elements xmlns="http://schemas.microsoft.com/sharepoint/">
<CustomAction Id="21ea3aaf-79e5-4aac-9479-8eef14b4d9df.RibbonQuickStatusAction"
Location="CommandUI.Ribbon">
<CommandUIExtension>
<!--
Add a button that invokes the QuickStatus app. The Quick Status button is displayed as
the third control in the Page group (the group title is "Submit").
-->
<CommandUIDefinitions>
<CommandUIDefinition Location="Ribbon.ContextualTabs.MyWork.Home.Page.Controls._children">
<Button Id="Ribbon.ContextualTabs.MyWork.Home.Page.QuickStatus"
Alt="Quick Status app"
Sequence="30"
Command="Invokae_QuickStatus"
LabelText="Quick Status"
TemplateAlias="o1"
Image16by16="_layouts/15/1033/images/ps16x16.png"
Image16by16Left="-80"
Image16by16Top="-144"
Image32by32="_layouts/15/1033/images/ps32x32.png"
Image32by32Left="-32"
Image32by32Top="-288"
ToolTipTitle="Quick Status"
ToolTipDescription="Run the QuickStatus app" />
</CommandUIDefinition>
</CommandUIDefinitions>
    <CommandUIHandlers>
        <CommandUIHandler Command="Invoke_QuickStatus"
                          CommandAction="~appWebUrl/Pages/Default.aspx?{StandardTokens}"/>
    </CommandUIHandlers>
</CommandUIExtension >
</CustomAction>
</Elements>
AppManifest.xml 檔案
以下是 QuickStatus 專案之應用程式指令清單的 XML,其中包含更新多個專案中應用程式使用者指派狀態所需的兩個許可權要求範圍:
    <?xml version="1.0" encoding="utf-8" ?>
    <!--Created:cb85b80c-f585-40ff-8bfc-12ff4d0e34a9-->
    <App xmlns="http://schemas.microsoft.com/sharepoint/2012/app/manifest"
        Name="QuickStatus"
        ProductID="{bbc497e7-1221-4d7b-a0ae-141a99546008}"
        Version="1.0.0.0"
        SharePointMinVersion="15.0.0.0"
    >
    <Properties>
        <Title>Quick Status Update</Title>
        <StartPage>~appWebUrl/Pages/Default.aspx?{StandardTokens}</StartPage>
    </Properties>
    <AppPrincipal>
        <Internal />
    </AppPrincipal>
    <AppPermissionRequests>
        <AppPermissionRequest Scope="https://sharepoint/projectserver/statusing" Right="SubmitStatus" />
        <AppPermissionRequest Scope="https://sharepoint/projectserver/projects" Right="Read" />
    </AppPermissionRequests>
    </App>
AppIcon.png 檔案
QuickStatus 應用程式的完整 Visual Studio 解決方案包含自定義 AppIcon.png 檔案。 方案將包含在 Project 2013 SDK 下載中。
後續步驟
QuickStatus 應用程式是一個相對簡單的範例,說明如何撰寫可安裝在 Project Server 2013 和 Project Online 上的應用程式。 測試 QuickStatus 應用程式一節會列出數個改善,以提升可用性。 QuickStatus 應用程式會使用 JavaScript 函式來更新 Project Web App 的指派狀態。 但是,變更工作分派完成百分比並不是建議的專案管理作法。 另一種方法是更新指派工作的實際開始日期和剩餘工期。 如需問題的討論,請參閱 MPUG 電子報中的更新 更好 。