重要
Azure Stack Edge Pro FPGA 裝置於 2024 年 2 月達到生命周期結束。
本文將逐步引導您建立IoT Edge模組,以使用 Azure Stack Edge Pro FPGA 裝置進行部署。 Azure Stack Edge Pro FPGA 是一種記憶體解決方案,可讓您處理數據,並透過網路傳送至 Azure。
您可以使用 Azure IoT Edge 模組搭配 Azure Stack Edge Pro FPGA,在數據移至 Azure 時轉換數據。 本文中使用的模組會實作邏輯,將檔案從本機共用複製到 Azure Stack Edge Pro FPGA 裝置上的雲端共用。
在本文中,您將瞭解如何:
- 建立容器登錄來儲存和管理模組(Docker 映像)。
- 建立IoT Edge模組,以部署在 Azure Stack Edge Pro FPGA 裝置上。
關於IoT Edge模組
您的 Azure Stack Edge Pro FPGA 裝置可以部署和執行 IoT Edge 模組。 Edge 模組基本上是執行特定工作的 Docker 容器,例如從裝置擷取訊息、轉換訊息或將訊息傳送至 IoT 中樞。 在本文中,您將建立一個模組,將檔案從本機共用複製到 Azure Stack Edge Pro FPGA 裝置上的雲端共用。
- 檔案會寫入 Azure Stack Edge Pro FPGA 儲存裝置上的本地共用。
- 檔案事件產生器會為每個寫入本機共用的檔案建立檔案事件。 修改檔案時也會產生檔案事件。 檔案事件接著會傳送至 IoT Edge 中樞(在 IoT Edge 運行時間中)。
- IoT Edge 自定義模組會處理檔案事件,以建立檔案事件物件,該物件也包含檔案的相對路徑。 模組會使用相對檔案路徑產生絕對路徑,並將檔案從本機共用複製到雲端共用。 模組接著會從本機共用中刪除檔案。
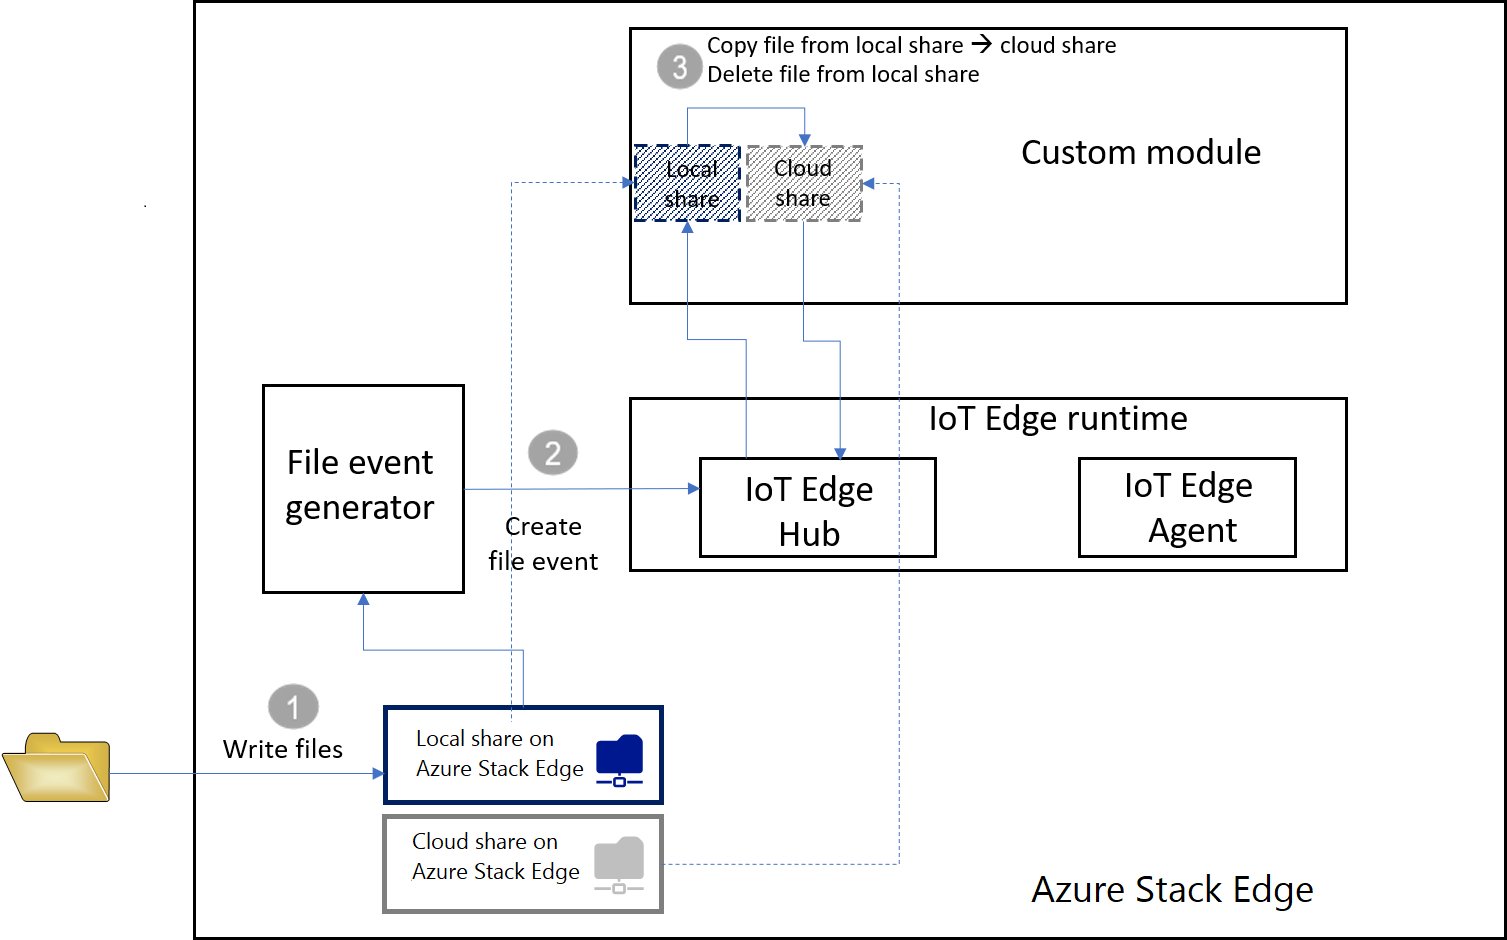
檔案在雲端共享中之後,會自動上傳至您的 Azure 記憶體帳戶。
先決條件
開始之前,請確定您有:
正在執行的 Azure Stack Edge Pro FPGA 裝置。
- 裝置也有相關聯的IoT中樞資源。
- 裝置已設定 Edge 計算角色。 如需詳細資訊,請移至 設定 Azure Stack Edge Pro FPGA 的計算。
下列開發資源:
建立容器登錄
Azure 容器登錄是 Azure 中的私人 Docker 登錄,您可以在其中儲存和管理私人 Docker 容器映射。 雲端中可用的兩個熱門 Docker 登錄服務是 Azure Container Registry 和 Docker Hub。 本文使用 Container Registry。
從瀏覽器登錄到 Azure 入口網站。
選取 [建立資源 > 容器 > 容器登錄]。 按一下 建立。
提供:
Azure 中唯一 登錄名稱,其中包含 5 到 50 個英數位元。
選擇 訂用帳戶。
建立新的或選擇現有的 資源群組。
選取 位置。 我們建議此位置與與 Azure Stack Edge 資源相關聯的位置相同。
將 系統管理員使用者 切換為 [啟用]。
將 SKU 設定為 Basic。
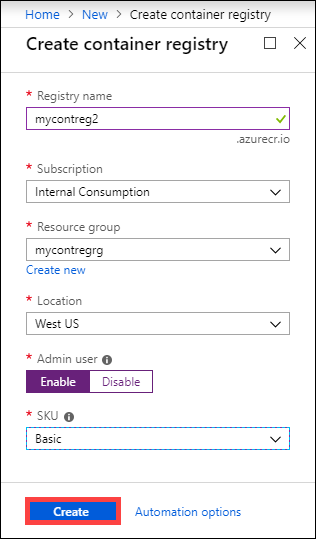
選擇 建立。
建立容器登錄之後,請流覽至它,然後選取 [存取金鑰] 。
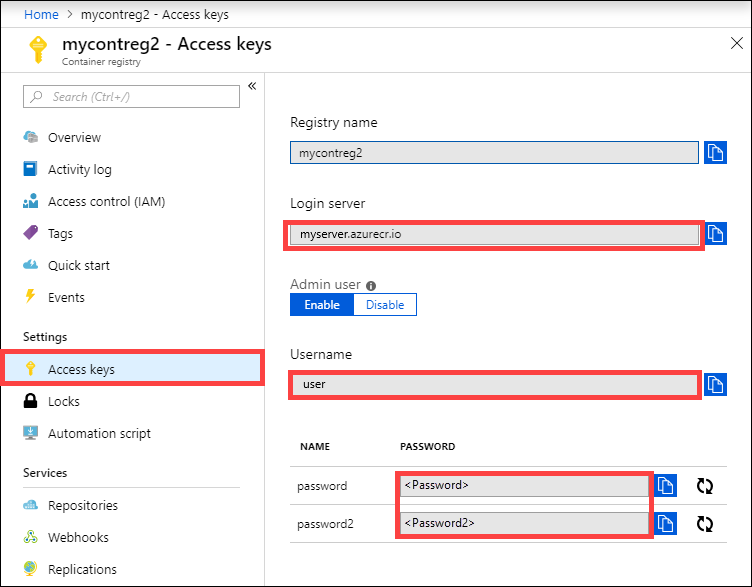
複製 Login server、Username和 Password的值。 您稍後會使用這些值將 Docker 映像發佈至登錄,並將登錄認證新增至 Azure IoT Edge 運行時間。
建立IoT Edge模組專案
下列步驟會根據 .NET Core 2.1 SDK 建立 IoT Edge 模組專案。 專案使用 Visual Studio Code 和 Azure IoT Edge 擴充功能。
建立新的解決方案
建立 C# 解決方案範本,您可以使用自己的程式代碼自訂。
在 Visual Studio Code 中,選取 [檢視] [檢視] > [命令選擇區] 以開啟 VS Code 命令選擇區。
在命令選擇區中,輸入並執行命令 Azure:登入,並遵循指示登入您的 Azure 帳戶。 如果您已經登入,您可以略過此步驟。
在命令選擇區中,輸入並執行命令 Azure IoT Edge:新的 IoT Edge 解決方案。 在命令選擇區中,提供下列資訊來建立您的解決方案:
選取您要在其中建立解決方案的資料夾。
提供解決方案的名稱,或接受預設 EdgeSolution。

選擇 C# 模組 作為模組範本。
以您想要指定的名稱取代預設模組名稱,在此情況下,它會 FileCopyModule。

指定您在上一節中建立的容器登錄,作為第一個模組的映像存放庫。 將 localhost:5000 取代為您複製的登入伺服器值。
最後一個字串看起來像
<Login server name>/<Module name>。 在這裡範例中,字串為:mycontreg2.azurecr.io/filecopymodule。
前往檔案> 開啟資料夾。
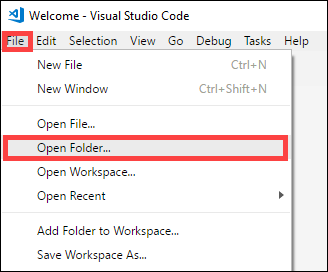
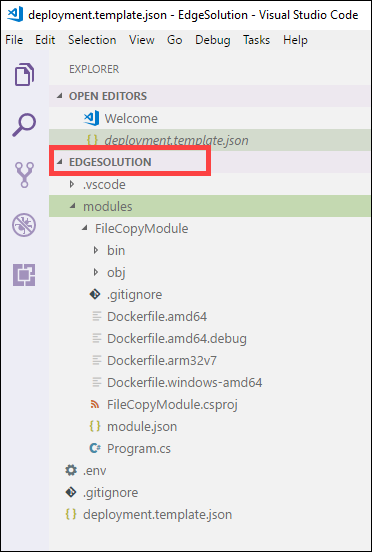
流覽並指向您稍早建立的 EdgeSolution 資料夾。 VS Code 視窗會載入您的 IoT Edge 解決方案工作區及其五個最上層元件。 您不會編輯 .vscode 資料夾、.gitignore 檔案、.env 檔案,以及本文中的 deployment.template.json。
您修改的唯一元件是modules資料夾。 此資料夾具有模組和 Docker 檔案的 C# 程式代碼,可建置模組作為容器映像。
使用自定義程式代碼更新模組
在 VS Code 總管中,開啟 模組 > FileCopyModule > Program.cs。
在 FileCopyModule 命名空間頂端,針對稍後使用的型別新增下列 using 語句。 Microsoft.Azure.Devices.Client.Transport.Mqtt 是將訊息傳送至 IoT Edge 中樞的通訊協定。
namespace FileCopyModule
{
    using Microsoft.Azure.Devices.Client.Transport.Mqtt;
    using Newtonsoft.Json;
將 InputFolderPath 和 OutputFolderPath 變數新增至 Program 類別。
class Program
    {
        static int counter;
        private const string InputFolderPath = "/home/input";
        private const string OutputFolderPath = "/home/output";
緊接在上一個步驟之後,新增 FileEvent 類別來定義訊息本文。
/// <summary>
/// The FileEvent class defines the body of incoming messages.
/// </summary>
private class FileEvent
{
    public string ChangeType { get; set; }

    public string ShareRelativeFilePath { get; set; }

    public string ShareName { get; set; }
}
在 Init 方法中,程式代碼會建立及設定 ModuleClient 物件。 此物件可連線到本機 Azure IoT Edge 執行環境,並使用 MQTT 通訊協定來傳送和接收訊息。 Init 方法中使用的連接字串是由 IoT Edge 執行時間提供給模組。 程式代碼會註冊 FileCopy 回呼,以透過 input1 端點從 IoT Edge 中樞接收訊息。 以下列程式代碼取代 Init 方法。
/// <summary>
/// Initializes the ModuleClient and sets up the callback to receive
/// messages containing file event information
/// </summary>
static async Task Init()
{
    MqttTransportSettings mqttSetting = new MqttTransportSettings(TransportType.Mqtt_Tcp_Only);
    ITransportSettings[] settings = { mqttSetting };

    // Open a connection to the IoT Edge runtime
    ModuleClient ioTHubModuleClient = await ModuleClient.CreateFromEnvironmentAsync(settings);
    await ioTHubModuleClient.OpenAsync();
    Console.WriteLine("IoT Hub module client initialized.");

    // Register callback to be called when a message is received by the module
    await ioTHubModuleClient.SetInputMessageHandlerAsync("input1", FileCopy, ioTHubModuleClient);
}
請移除 PipeMessage 方法的程式代碼,並在同一位置插入 FileCopy的程式代碼。
    /// <summary>
    /// This method is called whenever the module is sent a message from the IoT Edge Hub.
    /// This method deserializes the file event, extracts the corresponding relative file path, and creates the absolute input file path using the relative file path and the InputFolderPath.
    /// This method also forms the absolute output file path using the relative file path and the OutputFolderPath. It then copies the input file to output file and deletes the input file after the copy is complete.
    /// </summary>
    static async Task<MessageResponse> FileCopy(Message message, object userContext)
    {
        int counterValue = Interlocked.Increment(ref counter);

        try
        {
            byte[] messageBytes = message.GetBytes();
            string messageString = Encoding.UTF8.GetString(messageBytes);
            Console.WriteLine($"Received message: {counterValue}, Body: [{messageString}]");

            if (!string.IsNullOrEmpty(messageString))
            {
                var fileEvent = JsonConvert.DeserializeObject<FileEvent>(messageString);

                string relativeFileName = fileEvent.ShareRelativeFilePath.Replace("\\", "/");
                string inputFilePath = InputFolderPath + relativeFileName;
                string outputFilePath = OutputFolderPath + relativeFileName;

                if (File.Exists(inputFilePath))
                {
                    Console.WriteLine($"Moving input file: {inputFilePath} to output file: {outputFilePath}");
                    var outputDir = Path.GetDirectoryName(outputFilePath);
                    if (!Directory.Exists(outputDir))
                    {
                        Directory.CreateDirectory(outputDir);
                    }

                    File.Copy(inputFilePath, outputFilePath, true);
                    Console.WriteLine($"Copied input file: {inputFilePath} to output file: {outputFilePath}");
                    File.Delete(inputFilePath);
                    Console.WriteLine($"Deleted input file: {inputFilePath}");
                }
                else
                {
                    Console.WriteLine($"Skipping this event as input file doesn't exist: {inputFilePath}");
                }
            }
        }
        catch (Exception ex)
        {
            Console.WriteLine("Caught exception: {0}", ex.Message);
            Console.WriteLine(ex.StackTrace);
        }

        Console.WriteLine($"Processed event.");
        return MessageResponse.Completed;
    }
儲存此檔案。
您也可以 下載此項目的現有程式代碼範例。 然後,您可以驗證您針對此範例中 program.cs 檔案儲存的檔案。
建置IoT Edge解決方案
在上一節中,您已建立IoT Edge解決方案,並將程式代碼新增至FileCopyModule,以將檔案從本機共用複製到雲端共用。 現在,您必須將解決方案建置為容器映像,並將其推送至您的容器登錄。
在 VSCode 中,移至 [終端機] > [新增終端機] 以開啟新的 Visual Studio Code 整合式終端機。
在整合式終端機中輸入下列命令,以登入 Docker。
docker login <ACR login server> -u <ACR username>使用您從容器登錄複製的登入伺服器和用戶名稱。
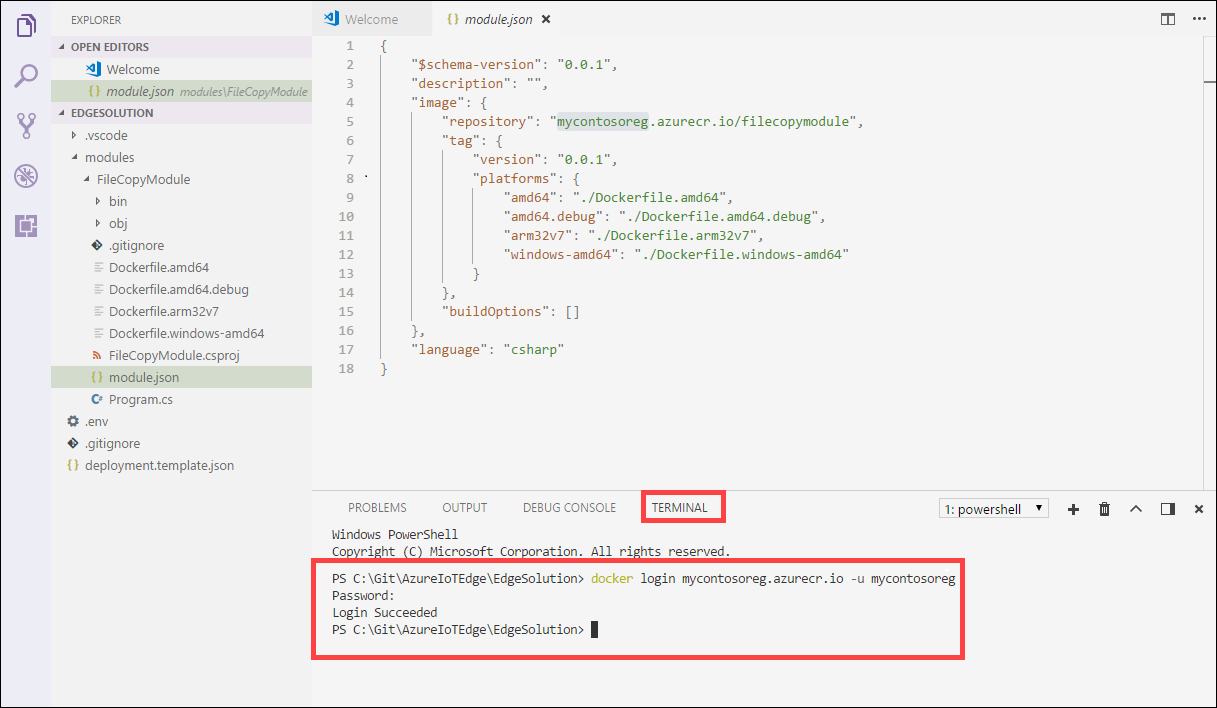
出現密碼提示時,請提供密碼。 您也可以從 Azure 入口網站中容器登錄中 存取金鑰 擷取登入伺服器、使用者名稱和密碼的值。
提供認證之後,您可以將模組映像推送至 Azure 容器登錄。 在 VS Code Explorer 中,以滑鼠右鍵按兩下 module.json 檔案,然後選取 [建置和推送 IoT Edge] 解決方案 。

當您告訴 Visual Studio Code 建置解決方案時,它會在整合式終端機中執行兩個命令:docker build 和 docker push。 這兩個命令會建置您的程式代碼、將 CSharpModule.dll容器化,然後將程式代碼推送至您在初始化解決方案時指定的容器登錄。
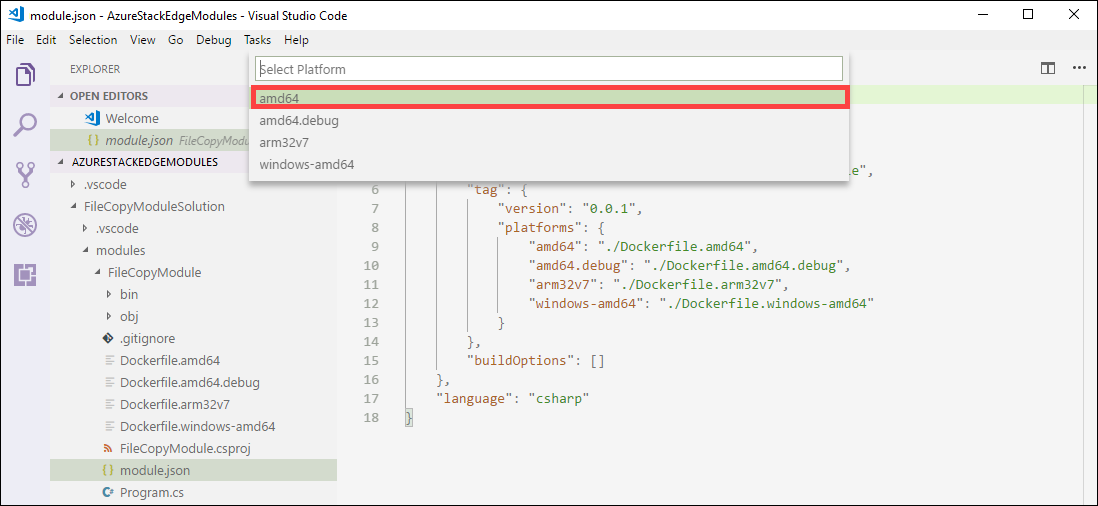
系統會提示您選擇模組平臺。 選取 amd64 對應至Linux。
重要
僅支援Linux模組。
您可能會看到下列警告,您可以忽略:
Program.cs(77,44):警告 CS1998:這個異步方法缺少 'await' 運算符,而且會同步執行。 請考慮使用 'await' 運算符來等候非封鎖 API 呼叫,或 'await Task.Run(...)' 在背景線程上執行 CPU 系結工作。
您可以在 VS Code 整合式終端機中看到具有標籤的完整容器映射位址。 圖片位址是根據格式為
<repository>:<version>-<platform>的 module.json 檔案中的資訊建置的。 本文中應該看起來像mycontreg2.azurecr.io/filecopymodule:0.0.1-amd64。
後續步驟
若要在 Azure Stack Edge Pro FPGA 上部署並執行此模組,請參閱 新增模組中的步驟。