Restore data to the same location
Azure DevOps Server 2022 | Azure DevOps Server 2020 | Azure DevOps Server 2019 | TFS 2018
You can restore data from a backup to the same server and instance of SQL Server for Azure DevOps from which that data was backed up. For example, you may want to restore a corrupted set of databases to the last known good state.
Note
Check out the Back up and Restore concepts page for an introduction to restoring data on the same server for Azure DevOps Server.
SharePoint integration with Azure DevOps Server is deprecated with TFS 2017 and later versions.
Prerequisites
To perform this procedure, you must be a member of the following groups or have the following permissions:
- A member of the Administrators security group on the server or servers running the administration console for Azure DevOps.
- Either a member of the SQL Server System Administrator security group, or your SQL Server Perform Back Up and Create Maintenance Plan permission must be set to Allow on the instance of SQL Server that hosts the databases.
- A member of the sysadmin security group for the database instance for Azure DevOps and for the Analysis Services instance of the warehouse database.
- An authorized user of the TFS_Warehouse database.
- A member of the TFSEXECROLE database role.
- If the deployment uses SharePoint Products, a member of the Farm Administrators group for the farm to which the SharePoint Products databases are being restored.
For more information, see User Account Control.
Step 1: Stop services
Stopping the services helps protect against data loss or corruption during the restoration process, particularly if you rename databases.
On the server that is running the application-tier services for Azure DevOps, open a Command Prompt window, and change directories to Drive:\%programfiles%\Azure DevOps Server 2019\Tools.
Enter the following command:
TFSServiceControl quiesceFor more information, see TFSServiceControl command.
Step 2: Rename databases
Before you can use the Restore wizard to restore a database that Azure DevOps Server, you must first take it offline, and then rename it.
Stop databases
Open SQL Server Management Studio.
Note
For more information about how to restore databases, see Implement restore scenarios for SQL Server databases.
The Connect to Server dialog box opens.
In Server type, select Database Engine.
In Server name, enter or select the name of the data-tier server and database instance, and then select Connect.
Note
If SQL Server is installed on a cluster, the server name is the name of the cluster and not the computer name.
SQL Server Management Studio opens.
Expand the Databases node to show the list of databases that make up the data tier for Azure DevOps.
Rename and then stop each database you want to restore, following the guidance for your version of SQL Server. Give the database a name indicating it is the old version of the database you will replace with the restored version. For example, you could rename TFS_DefaultCollection to TFS_DefaultCollection_Old.
Step 3: Restore Azure DevOps databases
You can restore data for Azure DevOps Server by using the Restore wizard in the administration console in Azure DevOps Server. The Restore wizard also restores the encryption key used for reporting.
Restore databases
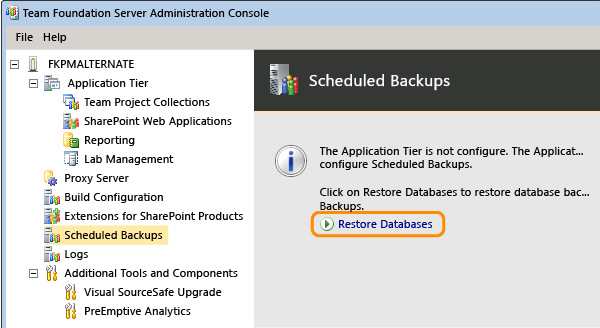
Open the administration console for Azure DevOps Server, navigate to Scheduled Backups, and start the Restore Databases wizard.

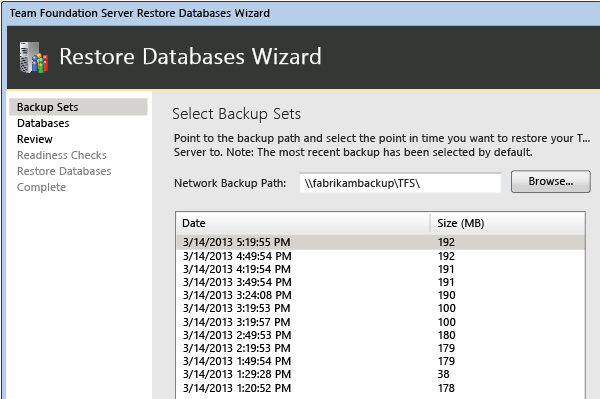
Specify the path to the backup set and select the set to use for restoration.

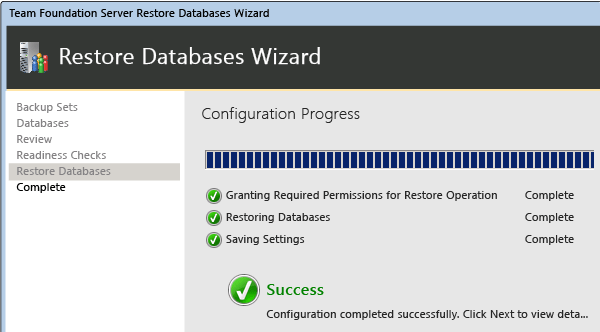
Complete the wizard and restore the databases.

Step 4: Update all service accounts
You must update the service account for Azure DevOps Server (TFSService) and the data sources account (TFSReports). Even if these accounts have not changed, you must update the information to ensure that the identity and the format of the accounts are appropriate.
Update service accounts
On the server that is running SQL Server Reporting Services, open Computer Management, and start the following components if they are not already started:
- ReportServer or ReportServer$InstanceName (application pool)
- SQL Server Reporting Services (TFSINSTANCE)
On the application-tier server, open a Command Prompt window, and change directories to Drive:\%programfiles%\Azure DevOps Server 2019\Tools.
At the command prompt, enter the following command to add the service account for Azure DevOps, where DatabaseName is the name of the configuration database (by default, TFS_Configuration):
TfsConfig Accounts /add /AccountType:ApplicationTier /account: AccountName
For more information, see Accounts command.
Use the Accounts command to add the data sources account for the report server and the proxy account for Azure DevOps Proxy Server, if your deployment uses these resources.
Step 5: Rebuild the data warehouse
You can rebuild the data warehouse instead of restoring the TFS_Warehouse and TFS_Analysis databases. It may require a significant amount of time to rebuild the warehouse if your deployment contains a lot of data. However, this strategy helps ensure that all data is properly synchronized. When you rebuild the warehouse, Azure DevOps Server creates an instance of it, which you must then process to populate it by using data from the operational stores.
Note
If you restored the TFS_Warehouse and TFS_Analysis databases in the previous section, you do not have to perform the following procedure.
Rebuild the warehouse
On the server that is running the application-tier services for Azure DevOps, open a Command Prompt window, and change directories to
Drive:\\%programfiles%\\Azure DevOps Server 2019\\Tools.Enter the following command:
TFSConfig rebuildwarehouse /all /ReportingDataSourcePassword: Password
where Password is the password for the data sources account for Reporting Services (TFSReports).
Wait until the command completes.
On the report server, open Internet Explorer and enter the following string in the Address bar:
http://localhost:8080/>VirtualDirectory/TeamFoundation/Administration/v3.0/WarehouseControlService.asmxFor VirtualDirectory, enter the virtual directory for Internet Information Services (IIS) that was specified when Azure DevOps Server was installed. By default, this directory is named tfs.
The WarehouseControlWebService page opens.
Note
The Microsoft Azure DevOps Server Application Pool must be running for the Warehouse Control web service to be available.
Select GetProcessingStatus, and then select Invoke.
Important
The service should return a value of Idle for all jobs, which indicates that the cube is not being processed. If a different value is returned, repeat this step until Idle is returned for all jobs.
On the WarehouseControlWebService page, select ProcessAnalysisDatabase, and then select Invoke.
A browser window opens. The service returns True when it successfully starts to process the cube and False if it is not successful or if the cube is currently being processed.
To determine when the cube has been processed, return to the WarehouseControlWebService page, select GetProcessingStatus, and then select Invoke.
Processing is complete when the GetProcessingStatus service returns a value of Idle for all jobs.
On the application-tier server for Azure DevOps, open Computer Management, and start the Visual Studio Team Foundation Background Job Service.
Step 6: Clear the data cache on application-tier servers
Each application-tier server in your deployment of Azure DevOps uses a file cache so users can quickly download files from the data-tier server. When you restore a deployment, you should clear this cache on each application-tier server. Otherwise, mismatched file IDs could cause problems when users download files from version control. If your deployment uses Azure DevOps Proxy Server, you must also clear the data cache on each server that is configured as a proxy.
Note
By clearing the data caches, you can help prevent the download of incorrect versions of files in version control. You should routinely do this unless you are replacing all hardware in your deployment as part of your restoration. If you are replacing all hardware, you can skip this procedure.
Clear the data cache
On a server that is running the application-tier services for Azure DevOps or that is configured with Azure DevOps Proxy Server, open a Command Prompt window and change directories to Drive:\%programfiles%\Azure DevOps Server 2019\Application Tier\Web Services\_tfs_data.
Delete everything in the _tfs_data directory.
Repeat these steps for each application-tier server and each server that is running Azure DevOps Proxy Server in your deployment.
Step 7: Restart services
After you restore the data, you must restart the services to return the server to an operational state.
Restart services
On the server that is running the application-tier services for Azure DevOps, open a Command Prompt window, and change directories to Drive:\%programfiles%\Azure DevOps Server 2019\Tools.
Enter the following command:
TFSServiceControl unquiesce
For more information, see TFSServiceControl command.
Step 8: Refresh the caches on client computers
Refresh the cache for tracking work items on client computers
On the new server, open Internet Explorer.
In the Address bar, enter the following address to connect to the ClientService web service:
http://PublicURL/VirtualDirectory:8080/WorkItemTracking/v3.0/ClientService.asmxNote
Even if you are logged on with administrative credentials, you may need to start Internet Explorer as an administrator, and you may be prompted for your credentials.
Select StampWorkitemCache, and then select Invoke. The StampWorkitemCache method returns no data.
Refresh the version control cache on client computers
On the client computer, open a Command Prompt window with administrative permissions, and change directories to
Drive:\Program Files (x86)\Microsoft Visual Studio 12.0\Common7\IDE.At the command prompt, enter the following command, including the URL of the collection, which includes the server name and the port number of the new server:
tf workspaces /collection:http://ServerName:Port/VirtualDirectoryName/CollectionNameIn the example deployment, a developer needs to refresh the version control cache for a project that is a member of the DefaultCollection collection, which is hosted in the FabrikamPrime deployment of Azure DevOps Server:
tf workspaces /collection:http://FabrikamPrime:8080/tfs/DefaultCollectionFor more information, see Workspaces command.