範例:使用 Python (封存) 建立自訂技能
此範例已封存且不支援。 其說明如何使用 Python 和Visual Studio Code建立 Web API 自訂技能。 此範例使用實作自訂技能介面的 Azure 函式 。
必要條件
請檢閱自訂技能介面,查看自訂技能應實作的輸入和輸出。
設定您的環境。 我們遵循快速入門:使用 Python 和 Visual Studio Code 在 Azure 中建立函數,使用 Visual Studio Code 和 Python 擴充功能來設定無伺服器 Azure 函數。 快速入門會引導您安裝下列工具和元件:
建立 Azure 函式
此範例會使用 Azure 函數來說明裝載 Web API 的概念,但也可能有其他適用的方法。 只要您符合認知技能的介面需求,採取的方式並不重要。 不過,Azure Functions 能讓您輕鬆建立自訂技能。
建立函數的專案
Visual Studio Code 中的 Azure Functions 專案範本會建立本機專案,該專案可以發佈至 Azure 中的函數應用程式。 函式應用程式可讓您將多個函式群組為邏輯單位,以便您管理、部署和共用資源。
- 在 Visual Studio Code 中按 F1 以開啟命令選擇區。 在命令選擇區中,搜尋並選取
Azure Functions: Create new project...。 - 選擇您專案工作區的目錄位置,然後選擇 [選取]。 請勿使用已屬於另一個工作區的專案資料夾。
- 為您的函數應用程式專案選取語言。 針對此教學課程,選取 [Python]。
- 選取 Python 版本 (Azure Functions 支援 3.7.5 版)。
- 為專案的第一個函數選取範本。 選取 [HTTP 觸發程序],在新的函數應用程式中建立由 HTTP 觸發的函數。
- 提供函數名稱。 在此情況下,請使用 Concatenator
- 選取 [函數] 做為驗證層級。 您將使用函數存取金鑰以呼叫函數的 HTTP 端點。
- 指定您開啟專案的方式。 在此步驟中,請選取 [新增至工作區],在目前的工作區建立函數應用程式。
Visual Studio Code 會在新的工作區中建立函式應用程式專案。 此專案包含 host.json 和 local.settings.jsonconfiguration 檔案,以及任何語言特定的專案檔。
系統也會在函數應用程式專案的 Concatenator 資料夾中,建立由 HTTP 觸發的新函數。 資料夾內會有一個名為 "__init__.py" 的檔案,其中具有下列內容:
import logging

import azure.functions as func


def main(req: func.HttpRequest) -> func.HttpResponse:
    logging.info('Python HTTP trigger function processed a request.')

    name = req.params.get('name')
    if not name:
        try:
            req_body = req.get_json()
        except ValueError:
            pass
        else:
            name = req_body.get('name')

    if name:
        return func.HttpResponse(f"Hello {name}!")
    else:
        return func.HttpResponse(
             "Please pass a name on the query string or in the request body",
             status_code=400
        )
現在讓我們修改該程式碼,以遵循自訂技能介面。 使用下列內容來取代預設程式碼:
import logging
import azure.functions as func
import json

def main(req: func.HttpRequest) -> func.HttpResponse:
    logging.info('Python HTTP trigger function processed a request.')

    try:
        body = json.dumps(req.get_json())
    except ValueError:
        return func.HttpResponse(
             "Invalid body",
             status_code=400
        )

    if body:
        result = compose_response(body)
        return func.HttpResponse(result, mimetype="application/json")
    else:
        return func.HttpResponse(
             "Invalid body",
             status_code=400
        )


def compose_response(json_data):
    values = json.loads(json_data)['values']

    # Prepare the Output before the loop
    results = {}
    results["values"] = []

    for value in values:
        output_record = transform_value(value)
        if output_record != None:
            results["values"].append(output_record)
    return json.dumps(results, ensure_ascii=False)

## Perform an operation on a record
def transform_value(value):
    try:
        recordId = value['recordId']
    except AssertionError  as error:
        return None

    # Validate the inputs
    try:
        assert ('data' in value), "'data' field is required."
        data = value['data']
        assert ('text1' in data), "'text1' field is required in 'data' object."
        assert ('text2' in data), "'text2' field is required in 'data' object."
    except AssertionError  as error:
        return (
            {
            "recordId": recordId,
            "errors": [ { "message": "Error:" + error.args[0] }   ]
            })

    try:
        concatenated_string = value['data']['text1'] + " " + value['data']['text2']
        # Here you could do something more interesting with the inputs

    except:
        return (
            {
            "recordId": recordId,
            "errors": [ { "message": "Could not complete operation for record." }   ]
            })

    return ({
            "recordId": recordId,
            "data": {
                "text": concatenated_string
                    }
            })
transform_value 方法會在單一記錄上執行作業。 您可以修改方法以符合特定需求。 請記得執行任何必要的輸入驗證,並在作業無法完成時傳回所有錯誤和警告。
在本機上對程式碼進行偵錯
Visual Studio Code 可讓您輕鬆地對程式碼進行偵錯。 按「F5」或前往 [偵錯] 功能表,然後選取 [開始偵錯]。
您可以在程式碼上設定任何中斷點,方法是在感興趣的行上按一下「F9」。
開始偵錯之後,您的函數會在本機上執行。 您可以使用 Postman 或 Fiddler 之類的工具來向 localhost 發出要求。 請注意終端視窗上的本機端點位置。
在 Azure 中建立函式應用程式
如果您對函數行為感到滿意,就可以將其發佈。 到目前為止,您都是在本機上執行工作。 在本節中,您將在 Azure 建立函數應用程式,然後將本機專案部署至您建立的應用程式。
從 Visual Studio Code 建立應用程式
在 Visual Studio Code 中按 F1 以開啟命令選擇區。 在命令選擇區中,搜尋並選取 [在 Azure 建立函數應用程式]。
如果您有多個使用中訂用帳戶,請針對此應用程式選取訂用帳戶。
輸入函數應用程式的全域唯一名稱。 輸入有效的 URL 名稱。
選取執行階段堆疊,並選擇您在本機上執行的語言版本。
選取應用程式的位置。 可能的話,請選擇同時裝載搜尋服務的相同區域。
建立應用程式需要幾分鐘的時間。 建立完成後,您會在作用中訂用帳戶的 [資源] 和 [函數應用程式] 底下看到新應用程式。
部署至 Azure
請停留在 Visual Studio Code 中,按 F1 以開啟命令選擇區。 在命令選擇區中,搜尋並選取 [部署至函數應用程式...]。
選取您建立的函數應用程式。
確認您要繼續執行,然後選取 [部署]。 您可以在輸出視窗中監視部署狀態。
切換至 Azure 入口網站,瀏覽至 [所有資源]。 使用您在上一個步驟中提供的全域唯一名稱,藉此搜尋您部署的函數應用程式。
提示
您也可以在 Visual Studio Code 中以滑鼠右鍵按一下函數應用程式,然後選取 [在入口網站中開啟]。
在入口網站中,選取左側的 [函數],然後選取您建立的函數。
在函數的概觀頁面中,選取命令列頂端的 [取得函數 URL]。 這可讓您複製 URL 以呼叫函數。
![Azure 入口網站中 [取得函數 URL] 命令的螢幕擷取畫面。](media/cognitive-search-custom-skill-python/get-function-url.png)
在 Azure 測試函式
使用您複製的預設主機鍵和 URL,從 Azure 入口網站內測試函數。
在左側的 [開發人員] 底下,選取 [程式碼 + 測試]。
在命令列中選取 [測試/執行]。
針對輸入,請使用 Post、預設索引鍵,然後將其貼入要求本文:
{
    "values": [
        {
            "recordId": "e1",
            "data":
            {
                "text1":  "Hello",
                "text2":  "World"
            }
        },
        {
            "recordId": "e2",
            "data": "This is an invalid input"
        }
    ]
}
選取 [執行]。
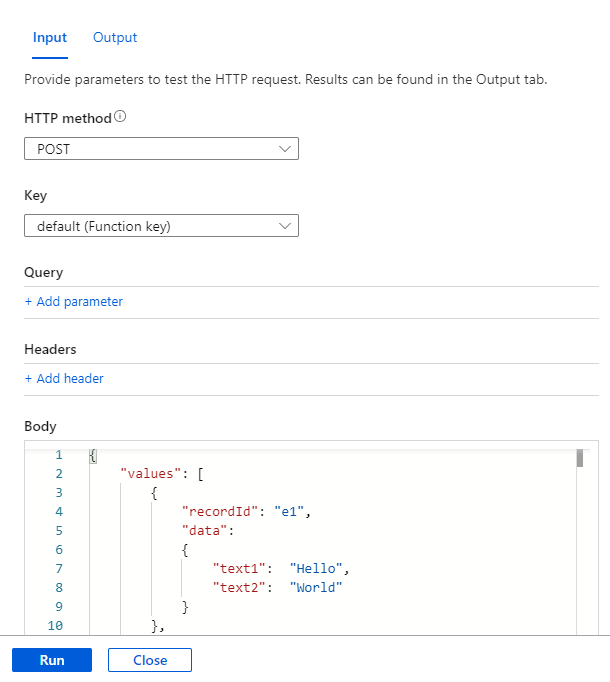
此範例所產生的結果,應該與您先前在本機環境中執行函數時看到的結果相同。
新增至技能集
有了新的自訂技能之後,就可以將它加入您的技能集。 下列範例說明如何呼叫技能,以將文件的標題和作者串連至單一欄位,我們稱此技能為 merged_title_author。
將 [your-function-url-here] 取代為為新 Azure 函數的 URL。
{
    "skills": [
      "[... other existing skills in the skillset are here]",
      {
        "@odata.type": "#Microsoft.Skills.Custom.WebApiSkill",
        "description": "Our new search custom skill",
        "uri": "https://[your-function-url-here]",
          "context": "/document/merged_content/organizations/*",
          "inputs": [
            {
              "name": "text1",
              "source": "/document/metadata_title"
            },
            {
              "name": "text2",
              "source": "/document/metadata_author"
            },
          ],
          "outputs": [
            {
              "name": "text",
              "targetName": "merged_title_author"
            }
          ]
      }
  ]
}
請記得在索引子定義中新增 "outputFieldMapping",以將 "merged_title_author" 傳送至搜尋索引中的 "fullname" 欄位。
"outputFieldMappings": [
    {
        "sourceFieldName": "/document/content/merged_title_author",
        "targetFieldName": "fullname"
    }
]