本主題涵蓋將一般化非受控磁碟上傳至記憶體帳戶,然後使用上傳的磁碟建立新的 VM。 一般化的 VHD 映射已使用 Sysprep 移除了您所有的個人帳戶資訊。
如果您想要從記憶體帳戶中的特製化 VHD 建立 VM,請參閱 從特製化 VHD 建立 VM。
本主題涵蓋使用記憶體帳戶,但我們建議客戶改用受控磁碟。 如需如何使用受控磁碟準備、上傳和建立新 VM 的完整逐步解說,請參閱使用受控磁碟 從上傳至 Azure 的一般化 VHD 建立新的 VM。
準備虛擬機
一般化 VHD 已使用 Sysprep 移除了您所有的個人帳戶資訊。 如果您想使用 VHD 作為映像檔來建立新的 VM,您應該:
- 準備 Windows VHD 用於上傳至 Azure。
- 使用 Sysprep 將虛擬機一般化
使用 Sysprep 將 Windows 虛擬機一般化
本節說明如何將 Windows 虛擬機一般化,以做為映射使用。 Sysprep 會移除您所有的個人帳戶資訊以及其他資料,並準備電腦作為映像檔使用。 如需 Sysprep 的詳細資訊,請參閱如何使用 Sysprep:簡介。
請確定 Sysprep 支援電腦上執行的伺服器角色。 如需詳細資訊,請參閱 伺服器角色的 Sysprep 支援
這很重要
如果您在第一次將 VHD 上傳至 Azure 之前執行 Sysprep,請先確定您已 備妥 VM ,再執行 Sysprep。
登入 Windows 虛擬機器。
以系統管理員身分開啟 [命令提示字元] 視窗。 將目錄變更為 %windir%\system32\sysprep,然後執行
sysprep.exe。在 [ 系統準備工具] 對話框中,選取 [ 輸入系統現成體驗] (OOBE),並確定已選取 [ 一般化 ] 複選框。
在 [ 關機選項] 中,選取 [ 關機]。
按一下 [確定]。
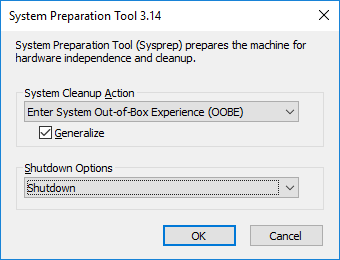
當 Sysprep 完成時,它會關閉虛擬機。
這很重要
在您完成將 VHD 上傳至 Azure 或從 VM 建立映像之前,請勿重新啟動 VM。 如果 VM 意外重新啟動,請執行 Sysprep 再次將其一般化。
上傳 VHD
將 VHD 上傳至 Azure 記憶體帳戶。
登入 Azure
如果您尚未安裝 PowerShell 1.4 版或更新版本,請閱讀 如何安裝和設定 Azure PowerShell。
開啟 Azure PowerShell 並登入您的 Azure 帳戶。 隨即開啟彈出視窗,讓您輸入 Azure 帳戶認證。
Connect-AzAccount取得可用的訂用帳戶標識碼。
Get-AzSubscription使用訂用帳戶標識碼設定正確的訂用帳戶。 將
<subscriptionID>替換為正確訂閱的 ID。Select-AzSubscription -SubscriptionId "<subscriptionID>"
取得記憶體帳戶
您需要 Azure 中的記憶體帳戶來儲存上傳的 VM 映像。 您可以使用現有的記憶體帳戶或建立新的記憶體帳戶。
若要顯示可用的記憶體帳戶,請輸入:
Get-AzStorageAccount
如果您想要使用現有的記憶體帳戶,請繼續進行上傳 VM 映射一節。
如果您需要建立記憶體帳戶,請遵循下列步驟:
您需要應在其中建立記憶體帳戶的資源群組名稱。 若要瞭解您訂用帳戶中的所有資源群組,請輸入:
Get-AzResourceGroup若要在美國西部區域中建立名為 myResourceGroup 的資源群組,請輸入:
New-AzResourceGroup -Name myResourceGroup -Location "West US"使用 New-AzStorageAccount Cmdlet,在此資源群組中建立名為 mystorageaccount 的記憶體帳戶:
New-AzStorageAccount -ResourceGroupName myResourceGroup -Name mystorageaccount -Location "West US" `
    -SkuName "Standard_LRS" -Kind "Storage"
開始上傳
使用 Add-AzVhd Cmdlet 將映像上傳至記憶體帳戶中的容器。 此範例會將 myVHD.vhd 檔案從 "C:\Users\Public\Documents\Virtual hard disks\" 上傳至 myResourceGroup 資源群組中名為 mystorageaccount 的記憶體帳戶。 檔案會放入名為 mycontainer 的容器中,而新的檔名將會是 myUploadedVHD.vhd。
$rgName = "myResourceGroup"
$urlOfUploadedImageVhd = "https://mystorageaccount.blob.core.windows.net/mycontainer/myUploadedVHD.vhd"
Add-AzVhd -ResourceGroupName $rgName -Destination $urlOfUploadedImageVhd `
    -LocalFilePath "C:\Users\Public\Documents\Virtual hard disks\myVHD.vhd"
如果成功,您會收到如下所示的回應:
MD5 hash is being calculated for the file C:\Users\Public\Documents\Virtual hard disks\myVHD.vhd.
MD5 hash calculation is completed.
Elapsed time for the operation: 00:03:35
Creating new page blob of size 53687091712...
Elapsed time for upload: 01:12:49

LocalFilePath           DestinationUri
-------------           --------------
C:\Users\Public\Doc...  https://mystorageaccount.blob.core.windows.net/mycontainer/myUploadedVHD.vhd
視您的網路連線和 VHD 檔案的大小而定,此命令可能需要一段時間才能完成。
建立新的 VM
您現在可以使用上傳的 VHD 來建立新的 VM。
設定 VHD 的 URI
要使用的 VHD URI 格式為:https:// mystorageaccount.blob.core.windows.net/mycontainer/MyVhdName.vhd。 在此範例中,名為 myVHD 的 VHD 位於容器 mycontainer 中的記憶體帳戶 mystorageaccount 中。
$imageURI = "https://mystorageaccount.blob.core.windows.net/mycontainer/myVhd.vhd"
建立虛擬網路
建立 虛擬網路的 vNet 和子網。
建立子網。 下列範例會在資源群組 myResourceGroup 中建立名為 mySubnet 的子網,位址前綴為 10.0.0.0/24。
$rgName = "myResourceGroup"
$subnetName = "mySubnet"
$singleSubnet = New-AzVirtualNetworkSubnetConfig -Name $subnetName -AddressPrefix 10.0.0.0/24
建立虛擬網路。 下列範例會在美國西部位置建立名為 myVnet 的虛擬網路,地址前綴為 10.0.0.0/16。
$location = "WestUS"
$vnetName = "myVnet"
$vnet = New-AzVirtualNetwork -Name $vnetName -ResourceGroupName $rgName -Location $location `
    -AddressPrefix 10.0.0.0/16 -Subnet $singleSubnet
建立公用IP位址和網路介面
若要啟用與虛擬網路中虛擬機的通訊,您需要 公用IP位址 和網路介面。
建立公用 IP 位址。 此範例會建立名為 myPip 的公用 IP 位址。
$ipName = "myPip"
$pip = New-AzPublicIpAddress -Name $ipName -ResourceGroupName $rgName -Location $location `
    -AllocationMethod Dynamic
建立 NIC。 此範例會建立名為 myNic 的 NIC。
$nicName = "myNic"
$nic = New-AzNetworkInterface -Name $nicName -ResourceGroupName $rgName -Location $location `
    -SubnetId $vnet.Subnets[0].Id -PublicIpAddressId $pip.Id
建立網路安全組和 RDP 規則
若要能夠使用 RDP 登入 VM,您必須具備允許埠 3389 上 RDP 存取的安全性規則。
此範例會建立名為 myNsg 的 NSG,其中包含名為 myRdpRule 的規則,以允許透過埠 3389 的 RDP 流量。 如需 NSG 的詳細資訊,請參閱 使用 PowerShell 在 Azure 中開啟 VM 的埠。
$nsgName = "myNsg"

$rdpRule = New-AzNetworkSecurityRuleConfig -Name myRdpRule -Description "Allow RDP" `
    -Access Allow -Protocol Tcp -Direction Inbound -Priority 110 `
    -SourceAddressPrefix Internet -SourcePortRange * `
    -DestinationAddressPrefix * -DestinationPortRange 3389

$nsg = New-AzNetworkSecurityGroup -ResourceGroupName $rgName -Location $location `
    -Name $nsgName -SecurityRules $rdpRule
建立虛擬網路的變數
建立已完成虛擬網路的變數。
$vnet = Get-AzVirtualNetwork -ResourceGroupName $rgName -Name $vnetName
建立 VM
下列 PowerShell 腳本示範如何設定虛擬機組態,並使用上傳的 VM 映射作為新安裝的來源。
# Enter a new user name and password to use as the local administrator account
    # for remotely accessing the VM.
    $cred = Get-Credential

    # Name of the storage account where the VHD is located. This example sets the
    # storage account name as "myStorageAccount"
    $storageAccName = "myStorageAccount"

    # Name of the virtual machine. This example sets the VM name as "myVM".
    $vmName = "myVM"

    # Size of the virtual machine. This example creates "Standard_D2_v2" sized VM.
    # See the VM sizes documentation for more information:
    # https://azure.microsoft.com/documentation/articles/virtual-machines-windows-sizes/
    $vmSize = "Standard_D2_v2"

    # Computer name for the VM. This examples sets the computer name as "myComputer".
    $computerName = "myComputer"

    # Name of the disk that holds the OS. This example sets the
    # OS disk name as "myOsDisk"
    $osDiskName = "myOsDisk"

    # Assign a SKU name. This example sets the SKU name as "Standard_LRS"
    # Valid values for -SkuName are: Standard_LRS - locally redundant storage, Standard_ZRS - zone redundant
    # storage, Standard_GRS - geo redundant storage, Standard_RAGRS - read access geo redundant storage,
    # Premium_LRS - premium locally redundant storage.
    $skuName = "Standard_LRS"

    # Get the storage account where the uploaded image is stored
    $storageAcc = Get-AzStorageAccount -ResourceGroupName $rgName -AccountName $storageAccName

    # Set the VM name and size
    $vmConfig = New-AzVMConfig -VMName $vmName -VMSize $vmSize

    #Set the Windows operating system configuration and add the NIC
    $vm = Set-AzVMOperatingSystem -VM $vmConfig -Windows -ComputerName $computerName `
        -Credential $cred -ProvisionVMAgent -EnableAutoUpdate
    $vm = Add-AzVMNetworkInterface -VM $vm -Id $nic.Id

    # Create the OS disk URI
    $osDiskUri = '{0}vhds/{1}-{2}.vhd' `
        -f $storageAcc.PrimaryEndpoints.Blob.ToString(), $vmName.ToLower(), $osDiskName

    # Configure the OS disk to be created from the existing VHD image (-CreateOption fromImage).
    $vm = Set-AzVMOSDisk -VM $vm -Name $osDiskName -VhdUri $osDiskUri `
        -CreateOption fromImage -SourceImageUri $imageURI -Windows

    # Create the new VM
    New-AzVM -ResourceGroupName $rgName -Location $location -VM $vm
確認 VM 已建立
完成時,您應該會在 Azure 入口網站的 [ 瀏覽>虛擬機] 底下,或使用下列 PowerShell 命令來看到新建立的 VM:
    $vmList = Get-AzVM -ResourceGroupName $rgName
    $vmList.Name
後續步驟
若要使用 Azure PowerShell 管理新的虛擬機,請參閱 使用 Azure Resource Manager 和 PowerShell 管理虛擬機。