Applies to: ![]() Visual Studio
Visual Studio ![]() Visual Studio for Mac
Visual Studio for Mac
Note
This article applies to Visual Studio 2017. If you're looking for the latest Visual Studio documentation, see Visual Studio documentation. We recommend upgrading to the latest version of Visual Studio. Download it here
After you've authenticated to GitHub, Visual Studio can improve your GitHub workflow. One of those improvements is the ability to push (also known as publishing) a local project straight to GitHub with a single click. The final stage in a simple Git workflow is to push changes to your remote.
A remote is a safe place to store your code in the cloud. It's typically referred to as origin/main (or origin/master), where "origin" is the default name for a remote. For more information about this terminology, see the Git Branching - Remote Branches page on the Git website.
While this article references GitHub repositories, you can work remotely with the Git provider of your choice, such as GitHub, GitLab, or Azure DevOps.
Here's how to push to a remote in Visual Studio.
Make sure you've got a file open to work on that's in a previously created or cloned repo.
Make a change to the file, save it, select the Git Changes tab, and then commit the change.
In the Git Changes window, notice the link text that includes the number of incoming and outgoing commits. In the following example, the link text reads 1 outgoing / 0 incoming.
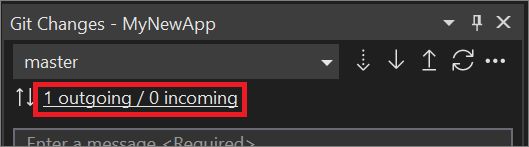
The "outgoing" text represents the number of commits that haven't yet been pushed to the remote, while the "incoming" text represents the commits that've been fetched but not yet pulled from the remote.
To push to your remote, select Push button, or select Push from the Git menu.
Next steps
To continue your journey, visit the Fetch, pull, and sync in Visual Studio page.