警告
截至 2018 年 4 月 10 日,Google 已淘汰 GCM。 下列檔和範例專案可能不再維護。 Google 的 GCM 伺服器和用戶端 API 將於 2019 年 5 月 29 日移除。 Google 建議將 GCM 應用程式遷移至 Firebase 雲端通訊 (FCM)。 如需 GCM 淘汰和移轉的詳細資訊,請參閱 Google 雲端通訊 - 已淘汰。
若要使用 Firebase 雲端傳訊搭配 Xamarin 開始使用遠端通知,請參閱 搭配 FCM 的遠端通知。
本逐步解說提供如何使用Google雲端通訊在 Xamarin.Android 應用程式中實作遠端通知(也稱為推播通知)的逐步說明。 它描述您必須實作以與Google Cloud Messaging (GCM) 通訊的各種類別,它說明如何在Android指令清單中設定許可權以存取GCM,並示範使用範例測試程式進行端對端傳訊。
GCM 通知概觀
在本逐步解說中,我們將建立使用Google雲端通訊 (GCM) 實作遠端通知的 Xamarin.Android 應用程式(也稱為 推播通知)。 我們將實作使用 GCM 進行遠端傳訊的各種意圖和接聽程式服務,我們將使用模擬應用程式伺服器的命令行程式來測試我們的實作。
您必須先取得必要的認證才能繼續進行本逐步解說,才能使用Google的 GCM 伺服器;此程式會在Google雲端通訊中說明。 特別是,您需要 API 金鑰 和 寄件者識別碼 ,才能插入本逐步解說中所示的範例程式代碼。
我們將使用下列步驟來建立已啟用 GCM 的 Xamarin.Android 用戶端應用程式:
- 安裝與 GCM 伺服器通訊所需的其他套件。
- 設定應用程式許可權以存取 GCM 伺服器。
- 實作程式代碼來檢查Google Play服務是否存在。
- 實作與 GCM 交涉註冊令牌的註冊意圖服務。
- 實作從 GCM 接聽註冊令牌更新的實例識別碼接聽程序服務。
- 實作 GCM 接聽程式服務,以透過 GCM 從應用程式伺服器接收遠端訊息。
此應用程式將使用稱為 主題傳訊的新 GCM 功能。 在主題訊息中,應用程式伺服器會將訊息傳送至主題,而不是傳送至個別裝置的清單。 訂閱該主題的裝置可以接收主題訊息作為推播通知。
當用戶端應用程式準備就緒時,我們將實作命令行 C# 應用程式,以透過 GCM 將推播通知傳送至我們的用戶端應用程式。
逐步解說
首先,讓我們建立名為 RemoteNotifications 的新空白解決方案。 接下來,讓我們將新的 Android 專案新增至以 Android 應用程式範本為基礎的此解決方案。 讓我們呼叫此專案 ClientApp。 (如果您不熟悉建立 Xamarin.Android 專案,請參閱 Hello, Android.) ClientApp 專案將包含透過 GCM 接收遠端通知的 Xamarin.Android 用戶端應用程式程式代碼。
新增必要的套件
在我們可以實作用戶端應用程式程式代碼之前,我們必須安裝數個套件,我們將用來與 GCM 通訊。 此外,如果尚未安裝 Google Play Store 應用程式,我們必須將 Google Play Store 應用程式新增至裝置。
新增 Xamarin Google Play Services GCM 套件
若要從Google雲端傳訊接收訊息, Google Play服務 架構必須存在於裝置上。 如果沒有此架構,Android 應用程式就無法從 GCM 伺服器接收訊息。 Google Play 服務會在 Android 裝置開機時在背景執行,悄悄地接聽來自 GCM 的訊息。 當這些訊息送達時,Google Play 服務會將訊息轉換成意圖,然後將這些意圖廣播至已註冊這些意圖的應用程式。
在 Visual Studio 中,以滑鼠右鍵按兩下 [ 參考 > 管理 NuGet 套件...];在 Visual Studio for Mac 中,以滑鼠右鍵按兩下 [套件 > 新增套件...]。搜尋 Xamarin Google Play 服務 - GCM ,並將此套件安裝到 ClientApp 專案中:

當您安裝 Xamarin Google Play Services - GCM 時, 會自動安裝 Xamarin Google Play Services - Base 。 如果您收到錯誤,請將專案的 [最低 Android] 設定變更為 [使用 SDK 編譯] 版本以外的值,然後再試一次 NuGet 安裝。
接下來,編輯 MainActivity.cs 並新增下列 using 語句:
using Android.Gms.Common;
using Android.Util;
這可讓我們的程式代碼使用Google Play服務 GMS 套件中的類型,並新增記錄功能,我們將用來追蹤使用 GMS 的交易。
Google Play 商店
若要從 GCM 接收訊息,必須在裝置上安裝 Google Play Store 應用程式。 (每當在裝置上安裝 Google Play 應用程式時,Google Play 商店也會安裝,因此它很可能已經安裝在您的測試裝置上。如果沒有Google Play,Android 應用程式就無法從 GCM 接收訊息。 如果您尚未在您的裝置上安裝 Google Play Store 應用程式,請造訪 Google Play 網站以下載並安裝 Google Play。
或者,您可以使用執行 Android 2.2 或更新版本的 Android 模擬器,而不是測試裝置(您不需要在 Android 模擬器上安裝 Google Play Store)。 不過,如果您使用模擬器,則必須使用Wi-Fi連線到 GCM,而且您必須在Wi-Fi防火牆中開啟數個埠,如本逐步解說稍後所述。
設定套件名稱
在 Google Cloud Messaging 中,我們為已啟用 GCM 的應用程式指定套件名稱(此套件名稱也會作為 與 API 金鑰和寄件者標識碼相關聯的應用程式 識別符)。 讓我們開啟 ClientApp 專案的屬性,並將套件名稱設定為這個字串。 在這裡範例中,我們將套件名稱設定為 com.xamarin.gcmexample:

請注意,如果此套件名稱與我們在 Google Developer 控制台中輸入的套件名稱不 完全 相符,用戶端應用程式將無法從 GCM 接收註冊令牌。
將許可權新增至 Android 指令清單
Android 應用程式必須設定下列許可權,才能接收來自 Google 雲端通訊的通知:
com.google.android.c2dm.permission.RECEIVE– 授與應用程式的許可權,以註冊和接收來自Google Cloud Messaging 的訊息。 (是什麼c2dm意思?這代表 雲端到裝置傳訊,這是 GCM 現已淘汰的前身。GCM 在其許多權限字串中仍然使用c2dm。android.permission.WAKE_LOCK– (選擇性) 防止裝置 CPU 在接聽訊息時進入睡眠狀態。android.permission.INTERNET– 授與因特網存取權,讓用戶端應用程式可以與 GCM 通訊。.permission.C2D_MESSAGEpackage_name – 向 Android 註冊應用程式,並要求獨佔接收所有 C2D(雲端到裝置)訊息的許可權。 package_name前置詞與您的應用程式標識碼相同。
我們將在 Android 指令清單中設定這些許可權。 讓我們編輯 AndroidManifest.xml ,並以下列 XML 取代內容:
<?xml version="1.0" encoding="utf-8"?>
<manifest xmlns:android="http://schemas.android.com/apk/res/android"
    package="YOUR_PACKAGE_NAME"
    android:versionCode="1"
    android:versionName="1.0"
    android:installLocation="auto">
    <uses-permission android:name="com.google.android.c2dm.permission.RECEIVE" />
    <uses-permission android:name="android.permission.WAKE_LOCK" />
    <uses-permission android:name="android.permission.INTERNET" />
    <uses-permission android:name="YOUR_PACKAGE_NAME.permission.C2D_MESSAGE" />
    <permission android:name="YOUR_PACKAGE_NAME.permission.C2D_MESSAGE"
                android:protectionLevel="signature" />
    <application android:label="ClientApp" android:icon="@drawable/Icon">
    </application>
</manifest>
在上述 XML 中,將YOUR_PACKAGE_NAME變更為用戶端應用程式專案的套件名稱。 例如: com.xamarin.gcmexample 。
檢查Google Play服務
在本逐步解說中,我們會使用UI中的單 TextView 一來建立裸骨應用程式。 此應用程式不會直接表示與 GCM 的互動。 相反地,我們將監看輸出視窗以查看應用程式與 GCM 的交握方式,而我們會檢查通知匣中是否有新通知送達。
首先,讓我們建立訊息區域的版面配置。 編輯 Resources.layout.Main.axml ,並以下列 XML 取代內容:
<?xml version="1.0" encoding="utf-8"?>
<LinearLayout xmlns:android="http://schemas.android.com/apk/res/android"
    android:orientation="vertical"
    android:layout_width="match_parent"
    android:layout_height="match_parent"
    android:padding="10dp">
    <TextView
        android:text=" "
        android:layout_width="wrap_content"
        android:layout_height="wrap_content"
        android:id="@+id/msgText"
        android:textAppearance="?android:attr/textAppearanceMedium"
        android:padding="10dp" />
</LinearLayout>
儲存 Main.axml 並關閉它。
當用戶端應用程式啟動時,我們想要在嘗試連絡 GCM 之前,先確認 Google Play 服務是否可用。 編輯 MainActivity.cs , count 並將實例變數宣告取代為下列實例變數宣告:
TextView msgText;
接下來,將下列方法新增至 MainActivity 類別:
public bool IsPlayServicesAvailable ()
{
    int resultCode = GoogleApiAvailability.Instance.IsGooglePlayServicesAvailable (this);
    if (resultCode != ConnectionResult.Success)
    {
        if (GoogleApiAvailability.Instance.IsUserResolvableError (resultCode))
            msgText.Text = GoogleApiAvailability.Instance.GetErrorString (resultCode);
        else
        {
            msgText.Text = "Sorry, this device is not supported";
            Finish ();
        }
        return false;
    }
    else
    {
        msgText.Text = "Google Play Services is available.";
        return true;
    }
}
此程式代碼會檢查裝置,以查看是否已安裝Google Play服務 APK。 如果未安裝,訊息會顯示在訊息區域中,指示使用者從 Google Play 商店下載 APK(或在裝置的系統設定中啟用)。 因為我們想要在用戶端應用程式啟動時執行這項檢查,所以我們會在的結尾新增對這個方法的 OnCreate呼叫。
接下來,將方法取代 OnCreate 為下列程序代碼:
protected override void OnCreate (Bundle bundle)
{
    base.OnCreate (bundle);

    SetContentView (Resource.Layout.Main);
    msgText = FindViewById<TextView> (Resource.Id.msgText);

    IsPlayServicesAvailable ();
}
此程式代碼會檢查Google Play服務 APK是否存在,並將結果寫入訊息區域。
讓我們完全重建並執行應用程式。 您應該會看到類似下列螢幕快照的畫面:

如果您未取得此結果,請確認您的裝置上已安裝Google Play服務 APK,且 Xamarin Google Play Services - GCM 套件已新增至 ClientApp 專案,如先前所述。 如果您收到建置錯誤,請嘗試清除方案並再次建置專案。
接下來,我們將撰寫程式代碼來連絡 GCM 並取得註冊令牌。
向 GCM 註冊
應用程式必須先向 GCM 註冊並取得註冊令牌,應用程式才能從應用程式伺服器接收遠端通知。 向 GCM 註冊應用程式的工作是由我們建立的 來處理 IntentService 。 我們會 IntentService 執行下列步驟:
使用 InstanceID API 來產生安全性令牌,以授權我們的用戶端應用程式存取應用程式伺服器。 作為回報,我們會從 GCM 取得註冊令牌。
將註冊令牌轉送至應用程式伺服器(如果應用程式伺服器需要的話)。
訂閱一或多個通知主題通道。
實作這個 IntentService之後,我們將測試它,以查看我們是否從 GCM 取得註冊令牌。
新增名為 RegistrationIntentService.cs 的新檔案,並以下列專案取代範本程式代碼:
using System;
using Android.App;
using Android.Content;
using Android.Util;
using Android.Gms.Gcm;
using Android.Gms.Gcm.Iid;

namespace ClientApp
{
    [Service(Exported = false)]
    class RegistrationIntentService : IntentService
    {
        static object locker = new object();

        public RegistrationIntentService() : base("RegistrationIntentService") { }

        protected override void OnHandleIntent (Intent intent)
        {
            try
            {
                Log.Info ("RegistrationIntentService", "Calling InstanceID.GetToken");
                lock (locker)
                {
                    var instanceID = InstanceID.GetInstance (this);
                    var token = instanceID.GetToken (
                        "YOUR_SENDER_ID", GoogleCloudMessaging.InstanceIdScope, null);

                    Log.Info ("RegistrationIntentService", "GCM Registration Token: " + token);
                    SendRegistrationToAppServer (token);
                    Subscribe (token);
                }
            }
            catch (Exception e)
            {
                Log.Debug("RegistrationIntentService", "Failed to get a registration token");
                return;
            }
        }

        void SendRegistrationToAppServer (string token)
        {
            // Add custom implementation here as needed.
        }

        void Subscribe (string token)
        {
            var pubSub = GcmPubSub.GetInstance(this);
            pubSub.Subscribe(token, "/topics/global", null);
        }
    }
}
在上述範例程式代碼中,將YOUR_SENDER_ID變更為用戶端應用程式專案的發件者標識碼。 若要取得項目的寄件者識別碼:
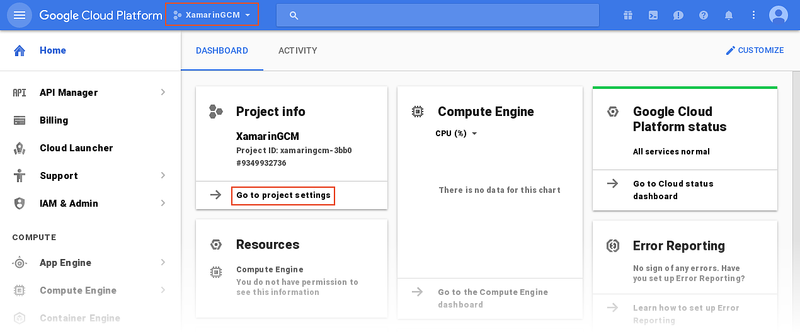
登入Google Cloud Console,然後從下拉功能表中選取您的項目名稱。 在針對項目顯示的 [ 項目資訊] 窗格中,按兩下 [移至項目設定]:
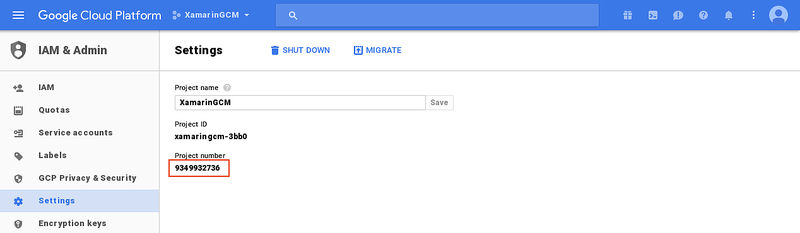
在 [設定] 頁面上,找出 [項目編號] – 這是您專案的寄件人標識碼:


我們想要在應用程式開始執行時啟動 RegistrationIntentService 。 編輯 MainActivity.cs 並修改 OnCreate 方法,以便在 RegistrationIntentService 檢查 Google Play 服務是否存在之後啟動:
protected override void OnCreate (Bundle bundle)
{
    base.OnCreate (bundle);

    SetContentView(Resource.Layout.Main);
    msgText = FindViewById<TextView> (Resource.Id.msgText);

    if (IsPlayServicesAvailable ())
    {
        var intent = new Intent (this, typeof (RegistrationIntentService));
        StartService (intent);
    }
}
現在讓我們看看 的每個 RegistrationIntentService 區段,以瞭解其運作方式。
首先,我們會使用下列屬性標註 , RegistrationIntentService 以指出服務不會由系統具現化:
[Service (Exported = false)]
建構函式會將 RegistrationIntentService 背景工作線程 命名為 RegistrationIntentService ,讓偵錯更容易。
public RegistrationIntentService() : base ("RegistrationIntentService") { }
的核心功能 RegistrationIntentService 位於方法中 OnHandleIntent 。 讓我們逐步解說此程式碼,以瞭解其如何使用 GCM 註冊應用程式。
要求註冊令牌
OnHandleIntent 首先會呼叫Google的 InstanceID.GetToken 方法,以向 GCM 要求註冊令牌。 我們會將此程式代碼包裝在 中 lock ,以防範同時發生多個註冊意圖的可能性, lock 可確保這些意圖會循序處理。 如果我們無法取得註冊令牌,則會擲回例外狀況,並記錄錯誤。 如果註冊成功, token 則會設定為我們從 GCM 取回的註冊令牌:
static object locker = new object ();
...
try
{
    lock (locker)
    {
        var instanceID = InstanceID.GetInstance (this);
        var token = instanceID.GetToken (
            "YOUR_SENDER_ID", GoogleCloudMessaging.InstanceIdScope, null);
        ...
    }
}
catch (Exception e)
{
    Log.Debug ...
將註冊令牌轉送至應用程式伺服器
如果我們取得註冊令牌(也就是未擲回任何例外狀況),我們會呼叫 SendRegistrationToAppServer 來將用戶的註冊令牌與應用程式維護的伺服器端帳戶(如果有的話)產生關聯。 由於此實作取決於應用程式伺服器的設計,因此這裡會提供空的方法:
void SendRegistrationToAppServer (string token)
{
    // Add custom implementation here as needed.
}
在某些情況下,應用程式伺服器不需要用戶的註冊令牌;在此情況下,可以省略這個方法。 將註冊令牌傳送至應用程式伺服器時, SendRegistrationToAppServer 應該維護布爾值,以指出令牌是否已傳送至伺服器。 如果這個布爾值為 false, SendRegistrationToAppServer 請將令牌傳送至應用程式伺服器,否則,令牌已在先前的呼叫中傳送至應用程式伺服器。
訂閱通知主題
接下來,我們會呼叫 方法來 Subscribe 指示要訂閱通知主題的 GCM。 在 Subscribe中,我們會呼叫 GcmPubSub.Subscribe API,以將用戶端應用程式訂閱至 下 /topics/global的所有訊息:
void Subscribe (string token)
{
    var pubSub = GcmPubSub.GetInstance(this);
    pubSub.Subscribe(token, "/topics/global", null);
}
如果我們要接收通知訊息,應用程式伺服器必須傳送通知訊息 /topics/global 。 請注意,下的主題名稱 /topics 可以是您想要的任何專案,只要應用程式伺服器和用戶端應用程式都同意這些名稱。 (在這裡,我們選擇名稱 global 來指出我們想要在應用程式伺服器支援的所有主題上接收訊息。
實作實例標識碼接聽程序服務
註冊令牌是唯一且安全的;不過,在應用程式重新安裝或安全性問題時,用戶端應用程式 (或 GCM) 可能需要重新整理註冊令牌。 基於這個理由,我們必須實 InstanceIdListenerService 作 ,以回應來自 GCM 的令牌重新整理要求。
新增名為 InstanceIdListenerService.cs 的新檔案,並以下列專案取代範本程式代碼:
using Android.App;
using Android.Content;
using Android.Gms.Gcm.Iid;

namespace ClientApp
{
    [Service(Exported = false), IntentFilter(new[] { "com.google.android.gms.iid.InstanceID" })]
    class MyInstanceIDListenerService : InstanceIDListenerService
    {
        public override void OnTokenRefresh()
        {
            var intent = new Intent (this, typeof (RegistrationIntentService));
            StartService (intent);
        }
    }
}
以下列屬性標註 InstanceIdListenerService ,指出服務不會由系統具現化,而且它可以接收 GCM 註冊令牌(也稱為 實例標識符)重新整理要求:
[Service(Exported = false), IntentFilter(new[] { "com.google.android.gms.iid.InstanceID" })]
OnTokenRefresh我們服務中的 方法會啟動 RegistrationIntentService ,以便攔截新的註冊令牌。
使用 GCM 測試註冊
讓我們完全重建並執行應用程式。 如果您從 GCM 成功收到註冊令牌,註冊令牌應該會顯示在輸出視窗中。 例如:
D/Mono    ( 1934): Assembly Ref addref ClientApp[0xb4ac2400] -> Xamarin.GooglePlayServices.Gcm[0xb4ac2640]: 2
I/RegistrationIntentService( 1934): Calling InstanceID.GetToken
I/RegistrationIntentService( 1934): GCM Registration Token: f8LdveCvXig:APA91bFIsjUAbP-V8TPQdLR89qQbEJh1SYG38AcCbBUf34z5gSdUc5OsXrgs93YFiGcRSRafPfzkz23lf3-LvYV1CwrFheMjHgwPeFSh12MywnRIhz
處理下游訊息
到目前為止,我們實作的程序代碼只是「設定」程序代碼;它會檢查 Google Play 服務是否已安裝,並與 GCM 和應用程式伺服器交涉,以準備我們的用戶端應用程式以接收遠端通知。 不過,我們尚未實作實際接收和處理下游通知訊息的程序代碼。 若要這樣做,我們必須實 作 GCM 接聽程序服務。 此服務會接收來自應用程式伺服器的主題訊息,並在本機將訊息廣播為通知。 在實作此服務之後,我們將建立測試程式以將訊息傳送至 GCM,以便我們查看我們的實作是否正常運作。
新增通知圖示
讓我們先新增一個小圖示,在啟動通知時會出現在通知區域中。 您可以將此圖示複製到您的專案,或建立自己的自定義圖示。 我們會將圖示檔案 命名為ic_stat_button_click.png ,並將其複製到 Resources/drawable 資料夾。 請記得使用 [新增 > 現有專案... ] 將這個圖示檔包含在專案中。
實作 GCM 接聽程式服務
新增名為 GcmListenerService.cs 的新檔案,並以下列專案取代範本程式代碼:
using Android.App;
using Android.Content;
using Android.OS;
using Android.Gms.Gcm;
using Android.Util;

namespace ClientApp
{
    [Service (Exported = false), IntentFilter (new [] { "com.google.android.c2dm.intent.RECEIVE" })]
    public class MyGcmListenerService : GcmListenerService
    {
        public override void OnMessageReceived (string from, Bundle data)
        {
            var message = data.GetString ("message");
            Log.Debug ("MyGcmListenerService", "From:    " + from);
            Log.Debug ("MyGcmListenerService", "Message: " + message);
            SendNotification (message);
        }

        void SendNotification (string message)
        {
            var intent = new Intent (this, typeof(MainActivity));
            intent.AddFlags (ActivityFlags.ClearTop);
            var pendingIntent = PendingIntent.GetActivity (this, 0, intent, PendingIntentFlags.OneShot);

            var notificationBuilder = new Notification.Builder(this)
                .SetSmallIcon (Resource.Drawable.ic_stat_ic_notification)
                .SetContentTitle ("GCM Message")
                .SetContentText (message)
                .SetAutoCancel (true)
                .SetContentIntent (pendingIntent);

            var notificationManager = (NotificationManager)GetSystemService(Context.NotificationService);
            notificationManager.Notify (0, notificationBuilder.Build());
        }
    }
}
讓我們看看每個 GcmListenerService 區段以瞭解其運作方式。
首先,我們會使用 屬性加上批 GcmListenerService 注,指出此服務不會由系統具現化,而且我們會包含意圖篩選,以指出它接收 GCM 訊息:
[Service (Exported = false), IntentFilter (new [] { "com.google.android.c2dm.intent.RECEIVE" })]
從 GCM 接收訊息時 GcmListenerService , OnMessageReceived 會叫用 方法。 這個方法會從傳入 Bundle的 擷取訊息內容、記錄訊息內容(因此我們可以在輸出視窗中檢視它),並呼叫 SendNotification 以使用接收的訊息內容啟動本機通知:
var message = data.GetString ("message");
Log.Debug ("MyGcmListenerService", "From:    " + from);
Log.Debug ("MyGcmListenerService", "Message: " + message);
SendNotification (message);
方法 SendNotification 會使用 Notification.Builder 來建立通知,然後使用 NotificationManager 來啟動通知。 實際上,這會將遠端通知訊息轉換成要呈現給使用者的本機通知。
如需使用 Notification.Builder 和 NotificationManager的詳細資訊,請參閱 本機通知。
在指令清單中宣告接收者
在我們可以從 GCM 接收訊息之前,我們必須在 Android 指令清單中宣告 GCM 接聽程式。 讓我們編輯 AndroidManifest.xml ,並以下列 XML 取代 區 <application> 段:
<application android:label="RemoteNotifications" android:icon="@drawable/Icon">
    <receiver android:name="com.google.android.gms.gcm.GcmReceiver"
              android:exported="true"
              android:permission="com.google.android.c2dm.permission.SEND">
        <intent-filter>
            <action android:name="com.google.android.c2dm.intent.RECEIVE" />
            <action android:name="com.google.android.c2dm.intent.REGISTRATION" />
            <category android:name="YOUR_PACKAGE_NAME" />
        </intent-filter>
    </receiver>
</application>
在上述 XML 中,將YOUR_PACKAGE_NAME變更為用戶端應用程式專案的套件名稱。 在我們的逐步解說範例中,套件名稱為 com.xamarin.gcmexample。
讓我們看看此 XML 中的每個設定有何用途:
| 設定 | 描述 |
|---|---|
com.google.android.gms.gcm.GcmReceiver |
宣告我們的應用程式會實作 GCM 接收者,以擷取並處理傳入的推播通知訊息。 |
com.google.android.c2dm.permission.SEND |
宣告只有 GCM 伺服器可以將訊息直接傳送至應用程式。 |
com.google.android.c2dm.intent.RECEIVE |
意圖篩選應用程式處理來自 GCM 的廣播訊息的廣告。 |
com.google.android.c2dm.intent.REGISTRATION |
意圖篩選廣告,我們的應用程式會處理新的註冊意圖(也就是我們已實作實例標識碼接聽程序服務)。 |
或者,您可以使用這些屬性裝飾GcmListenerService,而不是在 XML 中指定它們;在這裡,我們會在 AndroidManifest.xml 中指定它們,以便更容易遵循程式碼範例。
建立訊息傳送者以測試應用程式
讓我們將 C# 桌面控制台應用程式專案新增至方案,並將其稱為 MessageSender。 我們將使用此主控台應用程式來模擬應用程式伺服器, 它會透過 GCM 將通知訊息傳送至 ClientApp 。
新增 Json.NET 套件
在此主控台應用程式中,我們要建置 JSON 承載,其中包含我們想要傳送至用戶端應用程式的通知訊息。 我們將使用 MessageSender 中的 Json.NET 套件,讓您更輕鬆地建置 GCM 所需的 JSON 物件。 在 Visual Studio 中,以滑鼠右鍵按兩下 [ 參考 > 管理 NuGet 套件...];在 Visual Studio for Mac 中,以滑鼠右鍵按兩下 [套件 > 新增套件...]。
讓我們搜尋 Json.NET 套件,並將其安裝在專案中:

新增 System.Net.Http 的參考
我們也需要新增 的參考 System.Net.Http ,以便具現化 HttpClient ,以便將測試訊息傳送至 GCM。 在 MessageSender 專案中,以滑鼠右鍵按兩下 [ 參考 > 新增參考 ],然後向下捲動,直到您看到 System.Net.Http 為止。 在 System.Net.Http 旁放置複選標記,然後按兩下 [確定]。
實作傳送測試訊息的程序代碼
在 MessageSender 中,編輯 Program.cs ,並以下列程式代碼取代內容:
using System;
using System.Net.Http;
using System.Net.Http.Headers;
using System.Text;
using System.Threading.Tasks;
using Newtonsoft.Json.Linq;

namespace MessageSender
{
    class MessageSender
    {
        public const string API_KEY = "YOUR_API_KEY";
        public const string MESSAGE = "Hello, Xamarin!";

        static void Main (string[] args)
        {
            var jGcmData = new JObject();
            var jData = new JObject();

            jData.Add ("message", MESSAGE);
            jGcmData.Add ("to", "/topics/global");
            jGcmData.Add ("data", jData);

            var url = new Uri ("https://gcm-http.googleapis.com/gcm/send");
            try
            {
                using (var client = new HttpClient())
                {
                    client.DefaultRequestHeaders.Accept.Add(
                        new MediaTypeWithQualityHeaderValue("application/json"));

                    client.DefaultRequestHeaders.TryAddWithoutValidation (
                        "Authorization", "key=" + API_KEY);

                    Task.WaitAll(client.PostAsync (url,
                        new StringContent(jGcmData.ToString(), Encoding.Default, "application/json"))
                            .ContinueWith(response =>
                            {
                                Console.WriteLine(response);
                                Console.WriteLine("Message sent: check the client device notification tray.");
                            }));
                }
            }
            catch (Exception e)
            {
                Console.WriteLine("Unable to send GCM message:");
                Console.Error.WriteLine(e.StackTrace);
            }
        }
    }
}
在上述程式代碼中,將 YOUR_API_KEY變更為用戶端應用程式專案的 API 金鑰。
此測試應用程式伺服器會將下列 JSON 格式的訊息傳送至 GCM:
{
  "to": "/topics/global",
  "data": {
    "message": "Hello, Xamarin!"
  }
}
接著,GCM 會將此訊息轉送至用戶端應用程式。 讓我們建置 MessageSender 並開啟控制台視窗,以便從命令行執行它。
請嘗試
現在我們已經準備好測試客戶端應用程式。 如果您使用模擬器,或裝置透過Wi-Fi與 GCM 通訊,您必須在防火牆上開啟下列 TCP 連接埠,GCM 訊息才能通過:5228、5229 和 5230。
啟動用戶端應用程式並監看輸出視窗。 RegistrationIntentService從 GCM 成功接收註冊令牌之後,輸出視窗應該會顯示具有記錄輸出的令牌,如下所示:
I/RegistrationIntentService(16103): GCM Registration Token: eX9ggabZV1Q:APA91bHjBnQXMUeBOT6JDiLpRt8m2YWtY ...
此時,用戶端應用程式已準備好接收遠端通知訊息。 從命令行執行 MessageSender.exe 程式,將 「Hello, Xamarin」 通知訊息傳送至客戶端應用程式。 如果您尚未建置 MessageSender 專案,請立即這麼做。
若要在 Visual Studio 下執行 MessageSender.exe ,請開啟命令提示字元、變更為 MessageSender/bin/Debug 目錄,然後直接執行命令:
MessageSender.exe
若要在 Visual Studio for Mac 下執行 MessageSender.exe ,請開啟終端機會話、變更為 MessageSender/bin/Debug 目錄,並使用 mono 執行 MessageSender.exe
mono MessageSender.exe
訊息可能需要一分鐘的時間才能透過 GCM 傳播,並返回用戶端應用程式。 如果成功收到訊息,我們應該會在輸出視窗中看到類似下列的輸出:
D/MyGcmListenerService(16103): From:    /topics/global
D/MyGcmListenerService(16103): Message: Hello, Xamarin!
此外,您應該注意到通知匣中已出現新的通知圖示:
![]()
當您開啟通知匣以檢視通知時,您應該會看到我們的遠端通知:

恭喜您,您的應用程式已收到其第一個遠端通知!
請注意,如果應用程式已強制停止,將不會再收到 GCM 訊息。 若要在強制停止之後繼續通知,必須手動重新啟動應用程式。 如需此 Android 原則的詳細資訊,請參閱 啟動已停止應用程式 上的控件和此 堆疊溢位文章。
摘要
本逐步解說詳細說明在 Xamarin.Android 應用程式中實作遠端通知的步驟。 它描述如何安裝 GCM 通訊所需的其他套件,並說明如何設定應用程式許可權以存取 GCM 伺服器。 它提供的範例程式代碼說明如何檢查 Google Play 服務是否存在、如何實作註冊意圖服務和實例標識碼接聽程式服務,以與 GCM 交涉以進行註冊令牌,以及如何實作接收和處理遠端通知訊息的 GCM 接聽程式服務。 最後,我們實作命令行測試程式,透過 GCM 將測試通知傳送至用戶端應用程式。