ListView 的外觀取決於所顯示之數據列的配置。 若要變更 的外觀 ListView,請使用不同的數據列配置。
內建數據列檢視
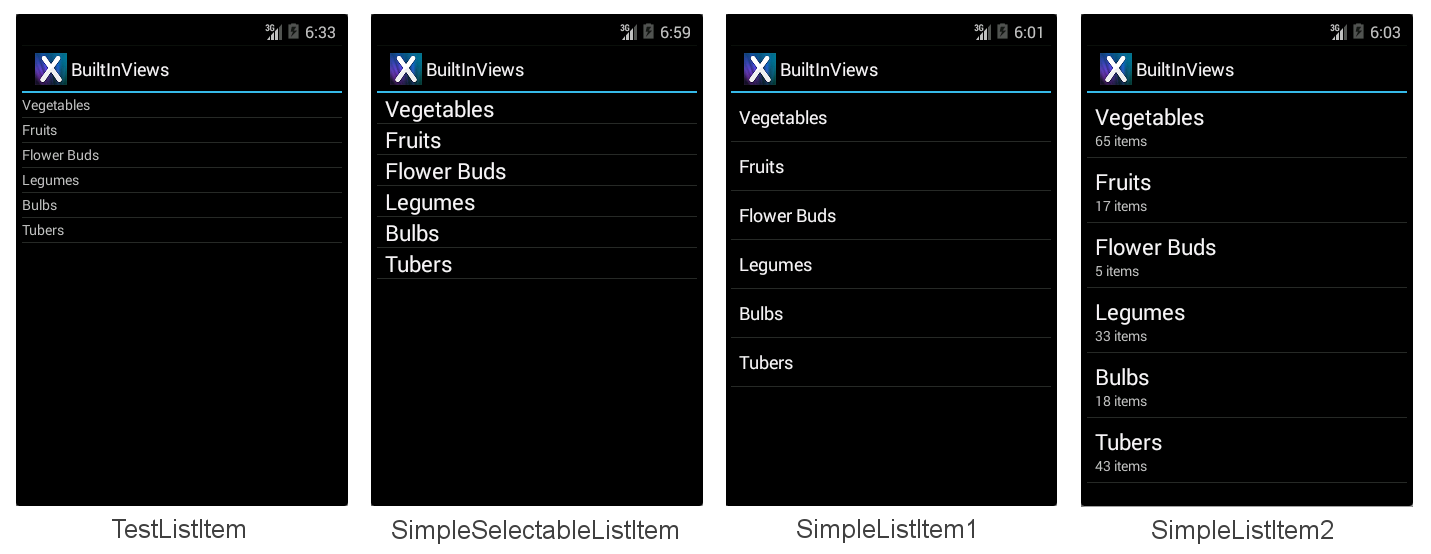
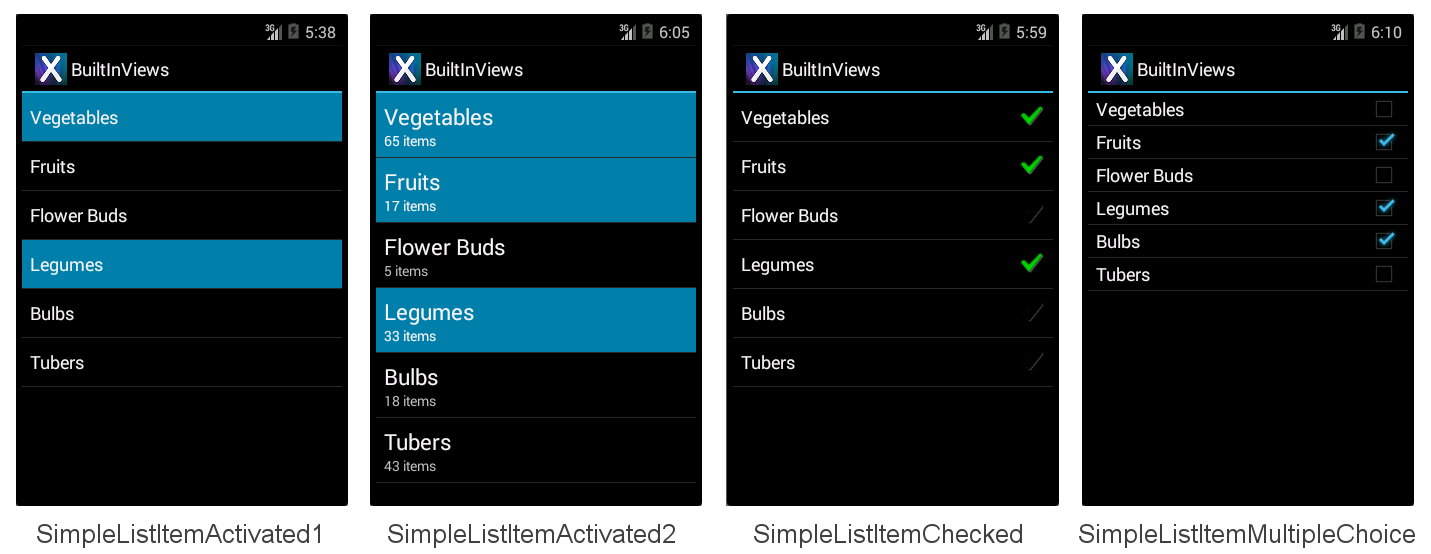
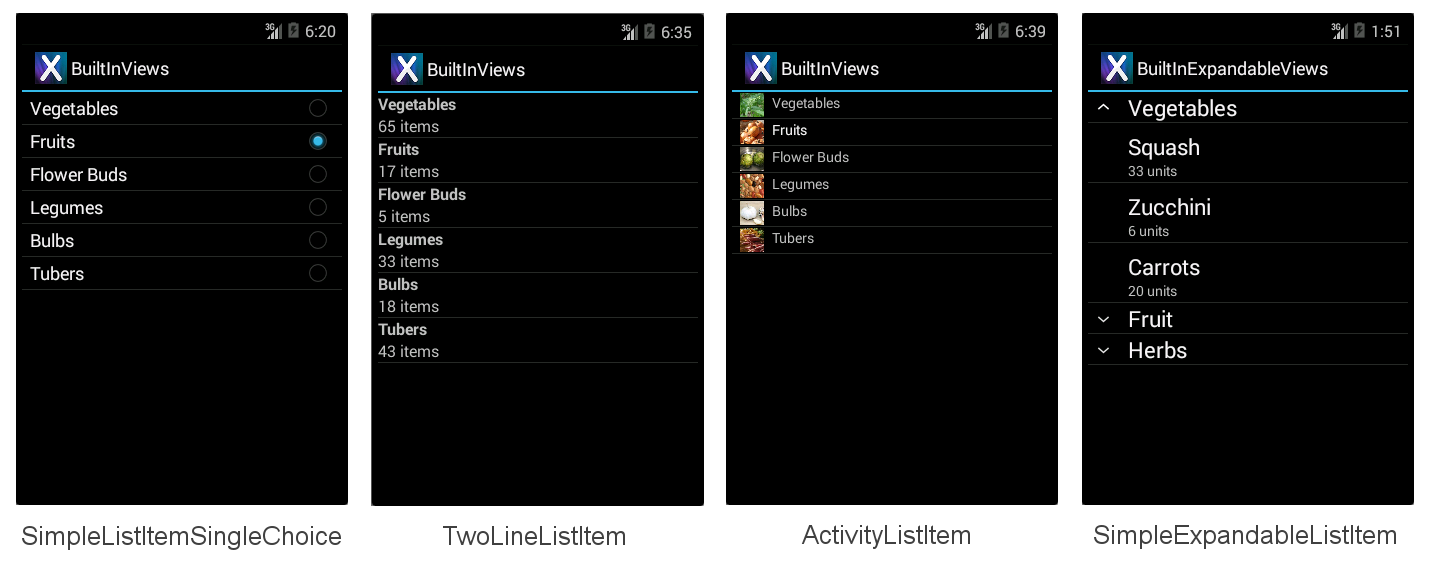
有十二個內建檢視可使用 Android.Resource.Layout 來參考:
TestListItem – 具有最小格式的單行文字。
SimpleListItem1 – 單行文字。
SimpleListItem2 – 兩行文字。
SimpleSelectableListItem – 支援單一或多個項目選取的單行文字(在 API 層級 11 中新增)。
SimpleListItemActivated1 – 類似於 SimpleListItem1 ,但背景色彩會指出何時選取數據列(在 API 層級 11 中新增)。
SimpleListItemActivated2 – 類似於 SimpleListItem2,但背景色彩表示選取數據列時(在 API 層級 11 中新增)。
SimpleListItemChecked – 顯示複選標記以指出選取專案。
SimpleListItemMultipleChoice – 顯示複選框來指出多重選擇選取專案。
SimpleListItemSingleChoice – 顯示單選按鈕,以表示互斥選取專案。
TwoLineListItem – 兩行文字。
ActivityListItem – 具有影像的單行文字。
SimpleExpandableListItem – 依類別分組數據列,而且每個群組都可以展開或折疊。
每個內建數據列檢視都有與其相關聯的內建樣式。 這些螢幕快照顯示每個檢視的顯示方式:
BuiltInViews/HomeScreenAdapter.cs範例檔案(在 BuiltInViews 解決方案中)包含產生不可展開清單項目畫面的程式碼。 檢視是在 方法中設定, GetView 如下所示:
view = context.LayoutInflater.Inflate(Android.Resource.Layout.SimpleListItem1, null);
然後,可以參考標準控件標識符 Text1來設定檢視的屬性, Text2 然後在 Icon 下 Android.Resource.Id 設定檢視不包含的屬性,或擲回例外狀況:
view.FindViewById<TextView>(Android.Resource.Id.Text1).Text = item.Heading;
view.FindViewById<TextView>(Android.Resource.Id.Text2).Text = item.SubHeading;
view.FindViewById<ImageView>(Android.Resource.Id.Icon).SetImageResource(item.ImageResourceId); // only use with ActivityListItem
BuiltInExpandableViews/ExpandableScreenAdapter.cs 範例檔案(在 BuiltInViews 解決方案中)包含產生 SimpleExpandableListItem 畫面的程式代碼。 群組檢視是在 方法中設定, GetGroupView 如下所示:
view = context.LayoutInflater.Inflate(Android.Resource.Layout.SimpleExpandableListItem1, null);
子檢視是在 方法中設定, GetChildView 如下所示:
view = context.LayoutInflater.Inflate(Android.Resource.Layout.SimpleExpandableListItem2, null);
然後,可以參考標準和 Text1 控件標識符,以設定群組檢視和 Text2 子檢視的屬性,如上所示。 SimpleExpandableListItem 螢幕快照 (如上所示) 提供單行群組檢視 (SimpleExpandableListItem1) 和雙行子檢視 (SimpleExpandableListItem2) 的範例。 或者,可以針對兩行設定群組檢視(SimpleExpandableListItem2),而子檢視可以設定為一行(SimpleExpandableListItem1),或者群組檢視和子檢視可以有相同的行數。
Accessories
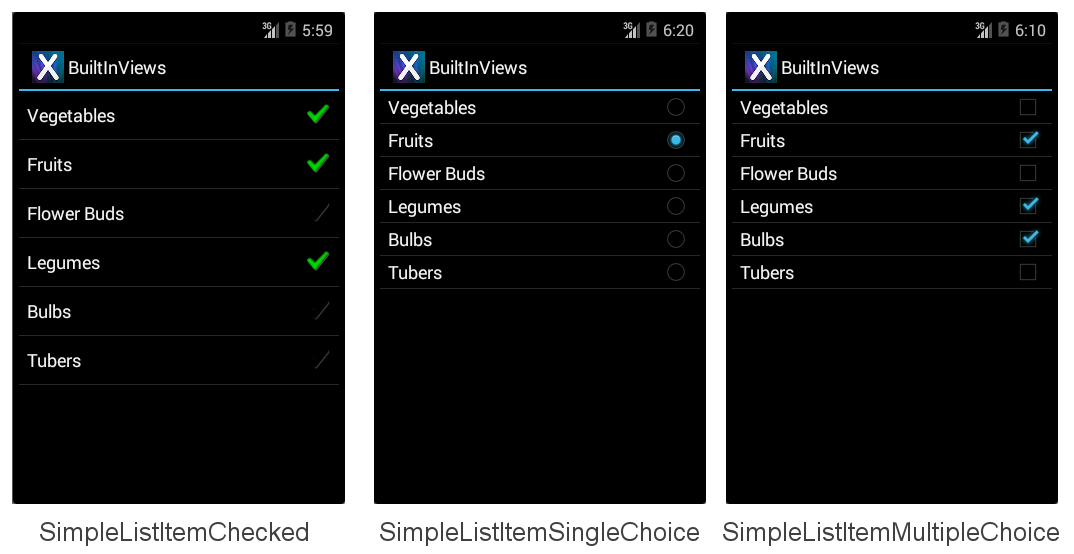
數據列可以將配件新增至檢視右側,以指出選取狀態:
SimpleListItemChecked – 建立具有複選做為指標的單一選取清單。
SimpleListItemSingleChoice – 建立單選按鈕類型清單,其中只能選擇一個選項。
SimpleListItemMultipleChoice – 建立多個選項的複選框類型清單。
上述配件會依各自的順序在下列畫面中說明:
若要顯示其中一個配件,請將必要的配置資源標識符傳遞給適配卡,然後手動設定所需數據列的選取狀態。 這一行程式代碼示範如何使用下列其中一個設定來建立和指派 Adapter :
ListAdapter = new ArrayAdapter<String>(this, Android.Resource.Layout.SimpleListItemChecked, items);
不論顯示的配件為何,本身 ListView 都支援不同的選取模式。 若要避免混淆,請使用 Single 選取模式搭配 SingleChoice 配件和 Checked 或 Multiple 模式搭配 MultipleChoice 樣式。 選取模式是由 ChoiceMode 的 ListView屬性所控制。
處理 API 層級
舊版的 Xamarin.Android 實作列舉做為整數屬性。 最新版本引進了適當的 .NET 列舉型別,可讓您更輕鬆地探索潛在的選項。
視您的目標 API 層級而定, ChoiceMode 是整數或列舉。 如果您想要以 Gingerbread API 為目標,則範例檔案 AccessoryViews/HomeScreen.cs 已加上區塊批注:
// For targeting Gingerbread the ChoiceMode is an int, otherwise it is an
// enumeration.

lv.ChoiceMode = Android.Widget.ChoiceMode.Single; // 1
//lv.ChoiceMode = Android.Widget.ChoiceMode.Multiple; // 2
//lv.ChoiceMode = Android.Widget.ChoiceMode.None; // 0

// Use this block if targeting Gingerbread or lower
/*
lv.ChoiceMode = 1; // Single
//lv.ChoiceMode = 0; // none
//lv.ChoiceMode = 2; // Multiple
//lv.ChoiceMode = 3; // MultipleModal
*/
以程式設計方式選取專案
手動設定哪些專案是使用 SetItemChecked 方法完成的(可以多次呼叫多個選取專案):
// Set the initially checked row ("Fruits")
lv.SetItemChecked(1, true);
程序代碼也需要偵測與多個選取範圍不同的單一選取專案。 若要判斷已在模式中 Single 選取哪一個數據列,請使用 CheckedItemPosition integer 屬性:
FindViewById<ListView>(Android.Resource.Id.List).CheckedItemPosition
若要判斷已在模式中 Multiple 選取哪些資料列,您需要循環執行 CheckedItemPositions SparseBooleanArray。 疏鬆陣列就像只包含值已變更之專案的字典,因此您必須周游整個陣列 true 尋找值,以了解清單中已選取的內容,如下列代碼段所示:
var sparseArray = FindViewById<ListView>(Android.Resource.Id.List).CheckedItemPositions;
for (var i = 0; i < sparseArray.Size(); i++ )
{
   Console.Write(sparseArray.KeyAt(i) + "=" + sparseArray.ValueAt(i) + ",");
}
Console.WriteLine();
建立自定義數據列配置
四個內建數據列檢視非常簡單。 若要顯示更複雜的版面配置(例如電子郵件清單、推文或聯繫人資訊),則需要自定義檢視。 自定義檢視通常會宣告為 Resources/Layout 目錄中的 AXML 檔案,然後由自定義配接器使用其資源識別碼載入。 檢視可以包含任意數目的顯示類別(例如 TextViews、ImageViews 和其他控件),以及自定義色彩、字型和版面配置。
此範例與先前的範例有幾種不同:
繼承自
Activity,而非ListActivity。 您可以自定義任何ListView的數據列,不過其他控制項也可以包含在版面配置中Activity(例如標題、按鈕或其他使用者介面元素)。 本範例會在 上方ListView新增標題來說明。需要畫面的 AXML 版面配置檔案;在上述範例中,
ListActivity不需要配置檔案。 這個 AXML 包含ListView控制項宣告。需要 AXML 版面配置檔案才能轉譯每個數據列。 此 AXML 檔案包含具有自訂字型和色彩設定的文字和影像控制件。
使用選擇性的自定義選取器 XML 檔案,在選取資料列時設定數據列的外觀。
實作
Adapter會從覆寫傳回自定義版面GetView配置。ItemClick必須以不同的方式宣告 (事件處理程式附加至ListView.ItemClick,而不是 在 中ListActivity覆寫OnListItemClick)。
以下詳述這些變更,從建立活動的檢視和自定義數據列檢視開始,然後涵蓋對配接器和活動的修改以轉譯這些變更。
將 ListView 新增至活動配置
因為 HomeScreen 不再繼承自 ListActivity 它沒有默認檢視,因此必須針對 HomeScreen 的檢視建立版面配置 AXML 檔案。 在此範例中,檢視會有標題 (使用 TextView) 和 ListView 來顯示數據。 配置定義於 Resources/Layout/HomeScreen.axml 檔案中,如下所示:
<?xml version="1.0" encoding="utf-8"?>
<LinearLayout xmlns:android="http://schemas.android.com/apk/res/android"
   android:orientation="vertical"
   android:layout_width="fill_parent"
   android:layout_height="fill_parent">
    <TextView android:id="@+id/Heading"
        android:text="Vegetable Groups"
        android:layout_width="fill_parent"
        android:layout_height="wrap_content"
        android:background="#00000000"
        android:textSize="30dp"
        android:textColor="#FF267F00"
        android:textStyle="bold"
        android:padding="5dp"
    />
    <ListView android:id="@+id/List"
        android:layout_width="fill_parent"
        android:layout_height="fill_parent"
        android:cacheColorHint="#FFDAFF7F"
    />
</LinearLayout>
搭配 Activity 自定義版面配置使用 的優點在於 ListActivity能夠將其他控件新增至畫面,例如此範例中的標題 TextView 。
建立自定義數據列配置
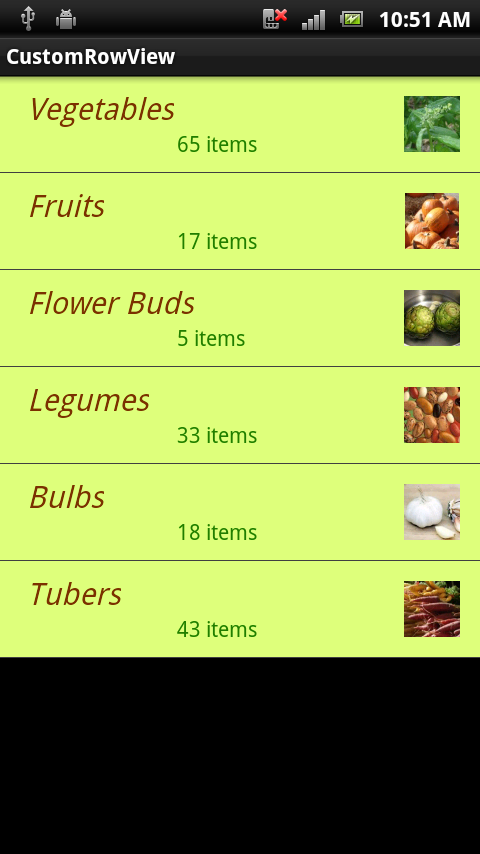
需要另一個AXML版面配置檔案,才能包含清單檢視中顯示之每個數據列的自定義版面配置。 在此範例中,數據列會有綠色背景、棕色文字和靠右對齊的影像。 要宣告此配置的 Android XML 標記說明於 Resources/Layout/CustomView.axml:
<?xml version="1.0" encoding="utf-8"?>
<RelativeLayout  xmlns:android="http://schemas.android.com/apk/res/android"
   android:layout_width="fill_parent"
   android:layout_height="wrap_content"
   android:background="#FFDAFF7F"
   android:padding="8dp">
    <LinearLayout android:id="@+id/Text"
       android:orientation="vertical"
       android:layout_width="wrap_content"
       android:layout_height="wrap_content"
       android:paddingLeft="10dip">
        <TextView
         android:id="@+id/Text1"
         android:layout_width="wrap_content"
         android:layout_height="wrap_content"
         android:textColor="#FF7F3300"
         android:textSize="20dip"
         android:textStyle="italic"
         />
        <TextView
         android:id="@+id/Text2"
         android:layout_width="wrap_content"
         android:layout_height="wrap_content"
         android:textSize="14dip"
         android:textColor="#FF267F00"
         android:paddingLeft="100dip"
         />
    </LinearLayout>
    <ImageView
        android:id="@+id/Image"
        android:layout_width="48dp"
        android:layout_height="48dp"
        android:padding="5dp"
        android:src="@drawable/icon"
        android:layout_alignParentRight="true" />
</RelativeLayout >
雖然自定義數據列配置可以包含許多不同的控件,但捲動效能可能會受到複雜設計和使用影像的影響(特別是如果必須透過網路載入它們)。 如需解決卷動效能問題的詳細資訊,請參閱Google的文章。
參考自定義數據列檢視
自定義配接器範例的實作位於 HomeScreenAdapter.cs中。 索引鍵方法是 GetView 它會使用資源標識碼 Resource.Layout.CustomView載入自定義 AXML 的位置,然後在傳回之前,先在檢視中的每個控件上設定屬性。 顯示完整的配接器類別:
public class HomeScreenAdapter : BaseAdapter<TableItem> {
   List<TableItem> items;
   Activity context;
   public HomeScreenAdapter(Activity context, List<TableItem> items)
       : base()
   {
       this.context = context;
       this.items = items;
   }
   public override long GetItemId(int position)
   {
       return position;
   }
   public override TableItem this[int position]
   {
       get { return items[position]; }
   }
   public override int Count
   {
       get { return items.Count; }
   }
   public override View GetView(int position, View convertView, ViewGroup parent)
   {
       var item = items[position];
       View view = convertView;
       if (view == null) // no view to re-use, create new
           view = context.LayoutInflater.Inflate(Resource.Layout.CustomView, null);
       view.FindViewById<TextView>(Resource.Id.Text1).Text = item.Heading;
       view.FindViewById<TextView>(Resource.Id.Text2).Text = item.SubHeading;
       view.FindViewById<ImageView>(Resource.Id.Image).SetImageResource(item.ImageResourceId);
       return view;
   }
}
參考活動中的自定義 ListView
因為 類別 HomeScreen 現在繼承自 Activity, ListView 因此 會在 類別中宣告欄位,以保存 AXML 中宣告之控件的參考:
ListView listView;
類別接著必須使用 方法載入活動的自定義版面配置 AXML SetContentView 。 然後 ListView ,它可以在版面配置中找到控件,然後建立並指派配接器,並指派 Click 處理程式。 OnCreate 方法的程序代碼如下所示:
SetContentView(Resource.Layout.HomeScreen); // loads the HomeScreen.axml as this activity's view
listView = FindViewById<ListView>(Resource.Id.List); // get reference to the ListView in the layout

// populate the listview with data
listView.Adapter = new HomeScreenAdapter(this, tableItems);
listView.ItemClick += OnListItemClick;  // to be defined
最後 ItemClick ,必須定義處理程式;在此情況下,它只會顯示 Toast 訊息:
void OnListItemClick(object sender, AdapterView.ItemClickEventArgs e)
{
   var listView = sender as ListView;
   var t = tableItems[e.Position];
   Android.Widget.Toast.MakeText(this, t.Heading, Android.Widget.ToastLength.Short).Show();
}
產生的畫面看起來像這樣:
自訂數據列選取器色彩
當觸及數據列時,應該針對使用者意見反應反白顯示。 當自定義檢視指定為 CustomView.axml 的背景色彩時,它也會覆寫選取醒目提示。 CustomView.axml 中的這一行程式代碼會將背景設為淺綠色,但也表示在觸控數據列時沒有視覺指標:
android:background="#FFDAFF7F"
若要重新啟用醒目提示行為,以及自定義所使用的色彩,請改為將背景屬性設定為自定義選取器。 選取器會宣告預設背景色彩以及醒目提示色彩。 Resources/Drawable/CustomSelector.xml檔案包含下列宣告:
<?xml version="1.0" encoding="utf-8"?>
<selector xmlns:android="http://schemas.android.com/apk/res/android">
<item android:state_pressed="false"
  android:state_selected="false"
  android:drawable="@color/cellback" />
<item android:state_pressed="true" >
  <shape>
     <gradient
      android:startColor="#E77A26"
        android:endColor="#E77A26"
        android:angle="270" />
  </shape>
</item>
<item android:state_selected="true"
  android:state_pressed="false"
  android:drawable="@color/cellback" />
</selector>
若要參考自定義選取器,請將 CustomView.axml 中的背景屬性變更為:
android:background="@drawable/CustomSelector"
選取的數據列和對應的 Toast 訊息現在看起來像這樣:
防止在自定義版面配置上閃爍
Android 會嘗試藉由快取版面配置資訊來改善卷動的 ListView 效能。 如果您有長時間的捲動數據清單,則也應該在活動 AXML 定義中的宣告上ListView設定 android:cacheColorHint 屬性(與自定義數據列配置的背景相同色彩值)。 若使用者捲動具有自定義數據列背景色彩的清單,若無法包含此提示,可能會導致「閃爍」。
