本逐步解說示範如何撰寫回應不同觸控事件類型的程序代碼。 每個範例都包含在不同的畫面中:
- 觸控範例 – 如何響應觸控事件。
- 手勢辨識器範例 – 如何使用內建手勢辨識器。
- 自定義手勢辨識器範例 – 如何建置自定義手勢辨識器。
每個區段都包含從頭開始撰寫程式代碼的指示。
請遵循下列指示,將程式代碼新增至分鏡腳本,並瞭解iOS中可用的不同類型的觸控事件。
觸控範例
在此範例中,我們將示範一些觸控 API。 請遵循下列步驟來新增實作觸控事件所需的程式代碼:
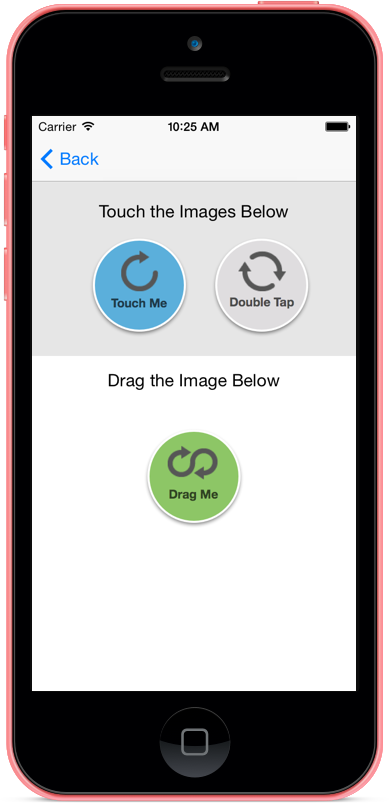
開啟專案 Touch_Start。 請先執行專案,以確定所有專案都沒問題,然後觸控 [ 觸控範例 ] 按鈕。 您應該會看到類似以下的畫面(雖然沒有任何按鈕可以運作):
編輯檔案 TouchViewController.cs, 並將下列兩個實例變數新增至 類別
TouchViewController:#region Private Variables private bool imageHighlighted = false; private bool touchStartedInside; #endregion實作
TouchesBegan方法,如下列程式代碼所示:public override void TouchesBegan(NSSet touches, UIEvent evt) { base.TouchesBegan(touches, evt); // If Multitouch is enabled, report the number of fingers down TouchStatus.Text = string.Format ("Number of fingers {0}", touches.Count); // Get the current touch UITouch touch = touches.AnyObject as UITouch; if (touch != null) { // Check to see if any of the images have been touched if (TouchImage.Frame.Contains(touch.LocationInView(TouchView))) { // Fist image touched TouchImage.Image = UIImage.FromBundle("TouchMe_Touched.png"); TouchStatus.Text = "Touches Began"; } else if (touch.TapCount == 2 && DoubleTouchImage.Frame.Contains(touch.LocationInView(TouchView))) { // Second image double-tapped, toggle bitmap if (imageHighlighted) { DoubleTouchImage.Image = UIImage.FromBundle("DoubleTapMe.png"); TouchStatus.Text = "Double-Tapped Off"; } else { DoubleTouchImage.Image = UIImage.FromBundle("DoubleTapMe_Highlighted.png"); TouchStatus.Text = "Double-Tapped On"; } imageHighlighted = !imageHighlighted; } else if (DragImage.Frame.Contains(touch.LocationInView(View))) { // Third image touched, prepare to drag touchStartedInside = true; } } }此方法的運作方式是檢查
UITouch物件,如果物件存在,請根據觸控發生的位置執行一些動作:- 在 TouchImage 內 – 在標籤中顯示文字
Touches Began並變更影像。 - 在 DoubleTouchImage 內 – 如果手勢是按兩下,請變更顯示的影像。
- 在 DragImage 內 – 設定旗標,指出觸控已啟動。 方法
TouchesMoved會使用此旗標來判斷是否DragImage應該在畫面周圍移動,如下一個步驟所示。
上述程式代碼只會處理個別觸控,如果用戶在螢幕上移動手指,則仍然沒有行為。 若要響應移動,請實
TouchesMoved作,如下列程式代碼所示:public override void TouchesMoved(NSSet touches, UIEvent evt) { base.TouchesMoved(touches, evt); // get the touch UITouch touch = touches.AnyObject as UITouch; if (touch != null) { //==== IMAGE TOUCH if (TouchImage.Frame.Contains(touch.LocationInView(TouchView))) { TouchStatus.Text = "Touches Moved"; } //==== IMAGE DRAG // check to see if the touch started in the drag me image if (touchStartedInside) { // move the shape float offsetX = touch.PreviousLocationInView(View).X - touch.LocationInView(View).X; float offsetY = touch.PreviousLocationInView(View).Y - touch.LocationInView(View).Y; DragImage.Frame = new RectangleF(new PointF(DragImage.Frame.X - offsetX, DragImage.Frame.Y - offsetY), DragImage.Frame.Size); } } }這個方法會取得
UITouch對象,然後檢查觸控發生的位置。 如果觸控發生在TouchImage中,則會在螢幕上顯示 [觸控移動] 文字。如果
touchStartedInside為 true,則我們知道使用者有手指,DragImage並移動它。 當用戶在畫面上移動手指時,程式代碼將會移動DragImage。- 在 TouchImage 內 – 在標籤中顯示文字
我們需要處理當使用者將手指從螢幕上抬起,或iOS取消觸控事件時的情況。 為此,我們將實
TouchesEnded作 ,TouchesCancelled如下所示:public override void TouchesCancelled(NSSet touches, UIEvent evt) { base.TouchesCancelled(touches, evt); // reset our tracking flags touchStartedInside = false; TouchImage.Image = UIImage.FromBundle("TouchMe.png"); TouchStatus.Text = ""; } public override void TouchesEnded(NSSet touches, UIEvent evt) { base.TouchesEnded(touches, evt); // get the touch UITouch touch = touches.AnyObject as UITouch; if (touch != null) { //==== IMAGE TOUCH if (TouchImage.Frame.Contains(touch.LocationInView(TouchView))) { TouchImage.Image = UIImage.FromBundle("TouchMe.png"); TouchStatus.Text = "Touches Ended"; } } // reset our tracking flags touchStartedInside = false; }這兩種方法都會將
touchStartedInside旗標重設為 false。TouchesEnded也會顯示在TouchesEnded畫面上。此時,觸控範例畫面已完成。 請注意畫面在與每個影像互動時如何變更,如下列螢幕快照所示:


手勢辨識器範例
上 一節 示範如何使用觸控事件在畫面上拖曳物件。 在本節中,我們將移除觸控事件,並示範如何使用下列手勢辨識器:
- ,
UIPanGestureRecognizer用於將影像拖曳到螢幕上。 UITapGestureRecognizer要回應螢幕上按兩下的 。
請遵循下列步驟來實作手勢辨識器:
編輯檔案 GestureViewController.cs 並新增下列實例變數:
#region Private Variables
private bool imageHighlighted = false;
private RectangleF originalImageFrame = RectangleF.Empty;
#endregion
我們需要此實例變數來追蹤影像先前的位置。 平移手勢辨識器會使用
originalImageFrame值來計算重新繪製畫面上影像所需的位移。將下列方法新增至控制器:
private void WireUpDragGestureRecognizer()
{
    // Create a new tap gesture
    UIPanGestureRecognizer gesture = new UIPanGestureRecognizer();

    // Wire up the event handler (have to use a selector)
    gesture.AddTarget(() => HandleDrag(gesture));  // to be defined

    // Add the gesture recognizer to the view
    DragImage.AddGestureRecognizer(gesture);
}
此程式代碼會具現化
UIPanGestureRecognizer實例,並將其新增至檢視。 請注意,我們會以 方法HandleDrag的形式將目標指派給手勢, 這個方法會在下一個步驟中提供。若要實作 HandleDrag,請將下列程式代碼新增至控制器:
private void HandleDrag(UIPanGestureRecognizer recognizer)
{
    // If it's just began, cache the location of the image
    if (recognizer.State == UIGestureRecognizerState.Began)
    {
        originalImageFrame = DragImage.Frame;
    }

    // Move the image if the gesture is valid
    if (recognizer.State != (UIGestureRecognizerState.Cancelled | UIGestureRecognizerState.Failed
        | UIGestureRecognizerState.Possible))
    {
        // Move the image by adding the offset to the object's frame
        PointF offset = recognizer.TranslationInView(DragImage);
        RectangleF newFrame = originalImageFrame;
        newFrame.Offset(offset.X, offset.Y);
        DragImage.Frame = newFrame;
    }
}
上述程式代碼會先檢查手勢辨識器的狀態,然後在畫面上移動影像。 有了此程序代碼,控制器現在可以支援將一個影像拖曳到畫面上。
UITapGestureRecognizer新增 ,以變更在 DoubleTouchImage 中顯示的影像。 將下列方法新增至GestureViewController控制器:private void WireUpTapGestureRecognizer() { // Create a new tap gesture UITapGestureRecognizer tapGesture = null; // Report touch Action action = () => { TouchStatus.Text = string.Format("Image touched at: {0}",tapGesture.LocationOfTouch(0, DoubleTouchImage)); // Toggle the image if (imageHighlighted) { DoubleTouchImage.Image = UIImage.FromBundle("DoubleTapMe.png"); } else { DoubleTouchImage.Image = UIImage.FromBundle("DoubleTapMe_Highlighted.png"); } imageHighlighted = !imageHighlighted; }; tapGesture = new UITapGestureRecognizer(action); // Configure it tapGesture.NumberOfTapsRequired = 2; // Add the gesture recognizer to the view DoubleTouchImage.AddGestureRecognizer(tapGesture); }此程式代碼與的程式
UIPanGestureRecognizer代碼非常類似,但不是針對我們使用Action的目標使用委派。我們需要做的最後一件事是修改
ViewDidLoad,讓它呼叫我們剛才新增的方法。 變更 ViewDidLoad,使其類似下列程式代碼:public override void ViewDidLoad() { base.ViewDidLoad(); Title = "Gesture Recognizers"; // Save initial state originalImageFrame = DragImage.Frame; WireUpTapGestureRecognizer(); WireUpDragGestureRecognizer(); }請注意,我們也會初始化 的值
originalImageFrame。執行應用程式,並與兩個映像互動。 下列螢幕快照是這些互動的其中一個範例:


自定義手勢辨識器
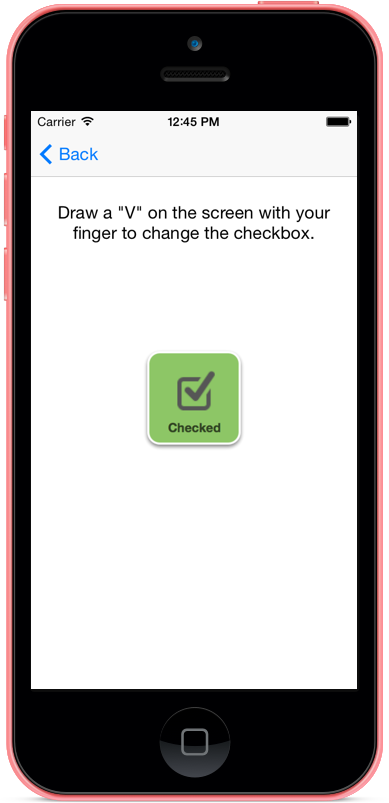
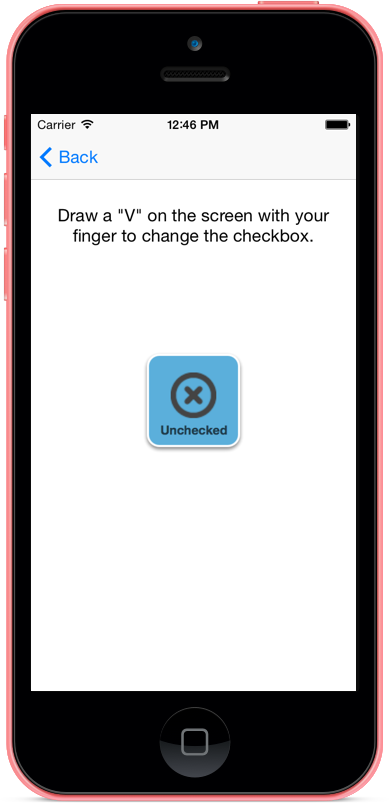
在本節中,我們將套用先前各節的概念,以建置自定義手勢辨識器。 自定義手勢辨識器會子類別 UIGestureRecognizer,而且會在使用者在螢幕上繪製 「V」 時辨識,然後切換位圖。 下列螢幕快照是此畫面的範例:

請遵循下列步驟來建立自定義手勢辨識器:
將新的類別新增至名為
CheckmarkGestureRecognizer的專案,並使其看起來像下列程式代碼:using System; using CoreGraphics; using Foundation; using UIKit; namespace Touch { public class CheckmarkGestureRecognizer : UIGestureRecognizer { #region Private Variables private CGPoint midpoint = CGPoint.Empty; private bool strokeUp = false; #endregion #region Override Methods /// <summary> /// Called when the touches end or the recognizer state fails /// </summary> public override void Reset() { base.Reset(); strokeUp = false; midpoint = CGPoint.Empty; } /// <summary> /// Is called when the fingers touch the screen. /// </summary> public override void TouchesBegan(NSSet touches, UIEvent evt) { base.TouchesBegan(touches, evt); // we want one and only one finger if (touches.Count != 1) { base.State = UIGestureRecognizerState.Failed; } Console.WriteLine(base.State.ToString()); } /// <summary> /// Called when the touches are cancelled due to a phone call, etc. /// </summary> public override void TouchesCancelled(NSSet touches, UIEvent evt) { base.TouchesCancelled(touches, evt); // we fail the recognizer so that there isn't unexpected behavior // if the application comes back into view base.State = UIGestureRecognizerState.Failed; } /// <summary> /// Called when the fingers lift off the screen /// </summary> public override void TouchesEnded(NSSet touches, UIEvent evt) { base.TouchesEnded(touches, evt); // if (base.State == UIGestureRecognizerState.Possible && strokeUp) { base.State = UIGestureRecognizerState.Recognized; } Console.WriteLine(base.State.ToString()); } /// <summary> /// Called when the fingers move /// </summary> public override void TouchesMoved(NSSet touches, UIEvent evt) { base.TouchesMoved(touches, evt); // if we haven't already failed if (base.State != UIGestureRecognizerState.Failed) { // get the current and previous touch point CGPoint newPoint = (touches.AnyObject as UITouch).LocationInView(View); CGPoint previousPoint = (touches.AnyObject as UITouch).PreviousLocationInView(View); // if we're not already on the upstroke if (!strokeUp) { // if we're moving down, just continue to set the midpoint at // whatever point we're at. when we start to stroke up, it'll stick // as the last point before we upticked if (newPoint.X >= previousPoint.X && newPoint.Y >= previousPoint.Y) { midpoint = newPoint; } // if we're stroking up (moving right x and up y [y axis is flipped]) else if (newPoint.X >= previousPoint.X && newPoint.Y <= previousPoint.Y) { strokeUp = true; } // otherwise, we fail the recognizer else { base.State = UIGestureRecognizerState.Failed; } } } Console.WriteLine(base.State.ToString()); } #endregion } }當 屬性變更為
Recognized或Ended時,State會呼叫 Reset 方法。 這是重設自定義手勢辨識器中任何內部狀態集的時間。 現在,類別可以在使用者下次與應用程式互動時開始全新,並準備好重新嘗試辨識手勢。現在我們已定義自定義手勢辨識器 (
CheckmarkGestureRecognizer) 編輯 CustomGestureViewController.cs 檔案,並新增下列兩個實例變數:#region Private Variables private bool isChecked = false; private CheckmarkGestureRecognizer checkmarkGesture; #endregion若要具現化及設定我們的手勢辨識器,請將下列方法新增至控制器:
private void WireUpCheckmarkGestureRecognizer()
{
    // Create the recognizer
    checkmarkGesture = new CheckmarkGestureRecognizer();

    // Wire up the event handler
    checkmarkGesture.AddTarget(() => {
        if (checkmarkGesture.State == (UIGestureRecognizerState.Recognized | UIGestureRecognizerState.Ended))
        {
            if (isChecked)
            {
                CheckboxImage.Image = UIImage.FromBundle("CheckBox_Unchecked.png");
            }
            else
            {
                CheckboxImage.Image = UIImage.FromBundle("CheckBox_Checked.png");
            }
            isChecked = !isChecked;
        }
    });

    // Add the gesture recognizer to the view
    View.AddGestureRecognizer(checkmarkGesture);
}
編輯
ViewDidLoad,讓它呼叫WireUpCheckmarkGestureRecognizer,如下列代碼段所示:public override void ViewDidLoad() { base.ViewDidLoad(); // Wire up the gesture recognizer WireUpCheckmarkGestureRecognizer(); }執行應用程式,並嘗試在螢幕上繪製 「V」。。 您應該看到顯示影像的變更,如下列螢幕快照所示:


上述三個區段示範了回應 iOS 中觸控事件的不同方式:使用觸控事件、內建手勢辨識器,或使用自定義手勢辨識器。