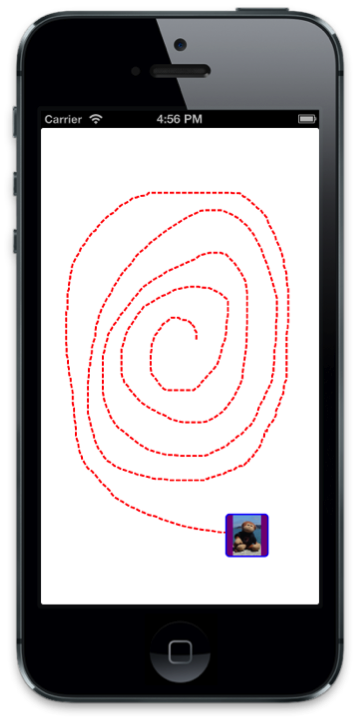
在本逐步解說中,我們將使用核心圖形繪製路徑,以響應觸控輸入。 然後,我們將新增 CALayer ,其中包含我們將沿著路徑產生動畫效果的影像。
下列螢幕快照顯示已完成的應用程式:

繪製路徑
在
DemoView中,將變數新增CGPath至 類別,並在建構函式中具現化它。 同時宣告兩個CGPoint變數 和latestPointinitialPoint,我們將用來擷取我們建構路徑的觸控點:public class DemoView : UIView { CGPath path; CGPoint initialPoint; CGPoint latestPoint; public DemoView () { BackgroundColor = UIColor.White; path = new CGPath (); } }使用指示詞新增以下項目:
using CoreGraphics;
using CoreAnimation;
using Foundation;
接下來,覆寫
TouchesBegan和 並TouchesMoved,新增下列實作,分別擷取初始觸控點和每個後續觸控點:public override void TouchesBegan (NSSet touches, UIEvent evt){ base.TouchesBegan (touches, evt); UITouch touch = touches.AnyObject as UITouch; if (touch != null) { initialPoint = touch.LocationInView (this); } } public override void TouchesMoved (NSSet touches, UIEvent evt){ base.TouchesMoved (touches, evt); UITouch touch = touches.AnyObject as UITouch; if (touch != null) { latestPoint = touch.LocationInView (this); SetNeedsDisplay (); } }SetNeedsDisplay每次觸控移動時,都會呼叫 ,以便在Draw下一個執行循環傳遞上呼叫 。我們會將線條新增至 方法中的
Draw路徑,並使用紅色虛線來繪製 。 使用如下所示的程式代碼來實Draw作:public override void Draw (CGRect rect){ base.Draw (rect); if (!initialPoint.IsEmpty) { //get graphics context using(CGContext g = UIGraphics.GetCurrentContext ()){ //set up drawing attributes g.SetLineWidth (2); UIColor.Red.SetStroke (); //add lines to the touch points if (path.IsEmpty) { path.AddLines (new CGPoint[]{initialPoint, latestPoint}); } else { path.AddLineToPoint (latestPoint); } //use a dashed line g.SetLineDash (0, new nfloat[] { 5, 2 * (nfloat)Math.PI }); //add geometry to graphics context and draw it g.AddPath (path); g.DrawPath (CGPathDrawingMode.Stroke); } } }
如果我們現在執行應用程式,我們可以觸控以在畫面上繪製,如下列螢幕快照所示:

沿著路徑產生動畫
既然我們已經實作程式代碼以允許使用者繪製路徑,讓我們新增程式代碼以動畫顯示沿著繪製路徑的圖層。
首先,將變數新增
CALayer至 類別,並在建構函式中建立變數:public class DemoView : UIView { … CALayer layer; public DemoView (){ … //create layer layer = new CALayer (); layer.Bounds = new CGRect (0, 0, 50, 50); layer.Position = new CGPoint (50, 50); layer.Contents = UIImage.FromFile ("monkey.png").CGImage; layer.ContentsGravity = CALayer.GravityResizeAspect; layer.BorderWidth = 1.5f; layer.CornerRadius = 5; layer.BorderColor = UIColor.Blue.CGColor; layer.BackgroundColor = UIColor.Purple.CGColor; }接下來,當使用者從螢幕抬起手指時,我們會將圖層新增為檢視層次的子圖層。 然後,我們將使用路徑建立主要畫面格動畫,以動畫顯示層次的
Position。若要完成這項作業,我們需要覆寫
TouchesEnded並新增下列程序代碼:public override void TouchesEnded (NSSet touches, UIEvent evt) { base.TouchesEnded (touches, evt); //add layer with image and animate along path if (layer.SuperLayer == null) Layer.AddSublayer (layer); // create a keyframe animation for the position using the path layer.Position = latestPoint; CAKeyFrameAnimation animPosition = (CAKeyFrameAnimation)CAKeyFrameAnimation.FromKeyPath ("position"); animPosition.Path = path; animPosition.Duration = 3; layer.AddAnimation (animPosition, "position"); }立即執行應用程式,並在繪圖之後新增具有影像的圖層,並沿著繪製路徑移動:

摘要
在本文中,我們逐步解說了將圖形和動畫概念系結在一起的範例。 首先,我們示範如何使用核心圖形來繪製路徑, UIView 以響應用戶觸控。 然後,我們示範如何使用核心動畫,讓影像沿著該路徑移動。