iOS 11 會將下列新功能新增至 MapKit:
縮放時自動分組標記
此範例示範如何實作新的 iOS 11 註釋叢集功能。
1.建立 MKPointAnnotation 子類別
點批註類別代表地圖上的每個標記。 您可以使用 或 從陣列使用 MapView.AddAnnotation()MapView.AddAnnotations()個別新增它們。
點批註類別沒有視覺表示法,它們只需要代表與標記相關聯的數據(最重要的是, Coordinate 地圖上的緯度和經度屬性),以及任何自定義屬性:
public class Bike : MKPointAnnotation
{
  public BikeType Type { get; set; } = BikeType.Tricycle;
  public Bike(){}
  public Bike(NSNumber lat, NSNumber lgn, NSNumber type)
  {
    Coordinate = new CLLocationCoordinate2D(lat.NFloatValue, lgn.NFloatValue);
    switch(type.NUIntValue) {
      case 0:
        Type = BikeType.Unicycle;
        break;
      case 1:
        Type = BikeType.Tricycle;
        break;
    }
  }
}
2.建立單一 MKMarkerAnnotationView 標記的子類別
標記批註檢視是每個批註的視覺表示法,並使用下列屬性來設定樣式:
- MarkerTintColor – 標記的色彩。
- GlyphText – 標記中顯示的文字。
- GlyphImage – 設定標記中顯示的影像。
- DisplayPriority – 當地圖擠滿標記時,決定圖層順序(堆棧行為)。 使用、 或
DefaultLow的DefaultHighRequired其中一個 。
若要支援自動叢集,您也必須設定:
- ClusteringIdentifier – 這會控制哪些標記會聚集在一起。 您可以針對所有標記使用相同的標識碼,或使用不同的標識符來控制它們群組在一起的方式。
[Register("BikeView")]
public class BikeView : MKMarkerAnnotationView
{
  public static UIColor UnicycleColor = UIColor.FromRGB(254, 122, 36);
  public static UIColor TricycleColor = UIColor.FromRGB(153, 180, 44);
  public override IMKAnnotation Annotation
  {
    get {
      return base.Annotation;
    }
    set {
      base.Annotation = value;

      var bike = value as Bike;
      if (bike != null){
        ClusteringIdentifier = "bike";
        switch(bike.Type){
          case BikeType.Unicycle:
            MarkerTintColor = UnicycleColor;
            GlyphImage = UIImage.FromBundle("Unicycle");
            DisplayPriority = MKFeatureDisplayPriority.DefaultLow;
            break;
          case BikeType.Tricycle:
            MarkerTintColor = TricycleColor;
            GlyphImage = UIImage.FromBundle("Tricycle");
            DisplayPriority = MKFeatureDisplayPriority.DefaultHigh;
            break;
        }
      }
    }
  }
3.建立 MKAnnotationView 來代表標記的叢集
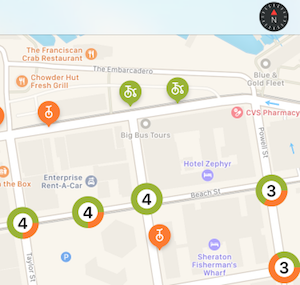
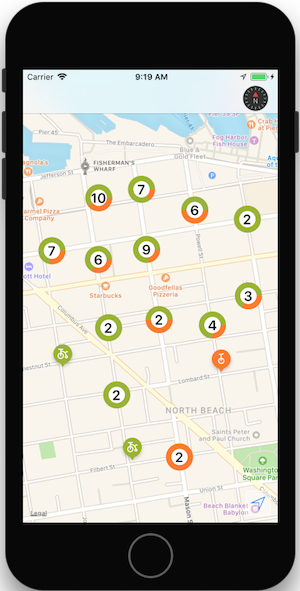
雖然代表標記 叢集的批註檢視可能是 簡單的影像,但使用者預期應用程式會提供關於有多少標記已分組在一起的視覺提示。
此範例會使用 CoreGraphics 來轉譯叢集中的標記數目,以及每個標記類型比例的圓形圖形表示。
您也應該設定:
- DisplayPriority – 當地圖擠滿標記時,決定圖層順序(堆棧行為)。 使用、 或
DefaultLow的DefaultHighRequired其中一個 。 - CollisionMode –
Circle或Rectangle。
[Register("ClusterView")]
public class ClusterView : MKAnnotationView
{
  public static UIColor ClusterColor = UIColor.FromRGB(202, 150, 38);
  public override IMKAnnotation Annotation
  {
    get {
      return base.Annotation;
    }
    set {
      base.Annotation = value;
      var cluster = MKAnnotationWrapperExtensions.UnwrapClusterAnnotation(value);
      if (cluster != null)
      {
        var renderer = new UIGraphicsImageRenderer(new CGSize(40, 40));
        var count = cluster.MemberAnnotations.Length;
        var unicycleCount = CountBikeType(cluster.MemberAnnotations, BikeType.Unicycle);

        Image = renderer.CreateImage((context) => {
          // Fill full circle with tricycle color
          BikeView.TricycleColor.SetFill();
          UIBezierPath.FromOval(new CGRect(0, 0, 40, 40)).Fill();
          // Fill pie with unicycle color
          BikeView.UnicycleColor.SetFill();
          var piePath = new UIBezierPath();
          piePath.AddArc(new CGPoint(20,20), 20, 0, (nfloat)(Math.PI * 2.0 * unicycleCount / count), true);
          piePath.AddLineTo(new CGPoint(20, 20));
          piePath.ClosePath();
          piePath.Fill();
          // Fill inner circle with white color
          UIColor.White.SetFill();
          UIBezierPath.FromOval(new CGRect(8, 8, 24, 24)).Fill();
          // Finally draw count text vertically and horizontally centered
          var attributes = new UIStringAttributes() {
            ForegroundColor = UIColor.Black,
            Font = UIFont.BoldSystemFontOfSize(20)
          };
          var text = new NSString($"{count}");
          var size = text.GetSizeUsingAttributes(attributes);
          var rect = new CGRect(20 - size.Width / 2, 20 - size.Height / 2, size.Width, size.Height);
          text.DrawString(rect, attributes);
        });
      }
    }
  }
  public ClusterView(){}
  public ClusterView(MKAnnotation annotation, string reuseIdentifier) : base(annotation, reuseIdentifier)
  {
    DisplayPriority = MKFeatureDisplayPriority.DefaultHigh;
    CollisionMode = MKAnnotationViewCollisionMode.Circle;
    // Offset center point to animate better with marker annotations
    CenterOffset = new CoreGraphics.CGPoint(0, -10);
  }
  private nuint CountBikeType(IMKAnnotation[] members, BikeType type) {
    nuint count = 0;
    foreach(Bike member in members){
      if (member.Type == type) ++count;
    }
    return count;
  }
}
4.註冊檢視類別
建立並新增至檢視檢視控件時,註冊批注檢視類型以啟用自動叢集行為,因為地圖會放大和縮小:
MapView.Register(typeof(BikeView), MKMapViewDefault.AnnotationViewReuseIdentifier);
MapView.Register(typeof(ClusterView), MKMapViewDefault.ClusterAnnotationViewReuseIdentifier);
5.轉譯地圖!
呈現地圖時,批註標記會根據縮放層級進行叢集或轉譯。 當縮放層級變更時,標記會以動畫方式進出叢集。
如需使用 MapKit 顯示資料的詳細資訊,請參閱 地圖 一節。
指南針按鈕
iOS 11 新增了從地圖中彈出指南針的功能,並在檢視中的其他地方轉譯指南針。
建立看起來像指南針的按鈕(包括地圖方向變更時的實時動畫),並在另一個控件上轉譯它。

下列程式代碼會建立指南針按鈕,並在導覽列上呈現它:
var compass = MKCompassButton.FromMapView(MapView);
compass.CompassVisibility = MKFeatureVisibility.Visible;
NavigationItem.RightBarButtonItem = new UIBarButtonItem(compass);
MapView.ShowsCompass = false; // so we don't have two compasses!
ShowsCompass屬性可用來控制地圖檢視檢視內預設指南針的可見性。
縮放檢視
使用 MKScaleView.FromMapView() 方法,在檢視中新增其他位置的縮放比例,以取得縮放檢視的實例,以在檢視階層中新增其他地方。
var scale = MKScaleView.FromMapView(MapView);
scale.LegendAlignment = MKScaleViewAlignment.Trailing;
scale.TranslatesAutoresizingMaskIntoConstraints = false;
View.AddSubview(scale); // constraints omitted for simplicity
MapView.ShowsScale = false; // so we don't have two scale displays!
ShowsScale屬性可用來控制地圖檢視檢視內預設指南針的可見性。
用戶追蹤按鈕
用戶追蹤按鈕會將地圖置中使用者目前的位置。 MKUserTrackingButton.FromMapView()使用 方法來取得按鈕的實體、套用格式變更,以及在檢視階層中的其他位置新增 。

var button = MKUserTrackingButton.FromMapView(MapView);
button.Layer.BackgroundColor = UIColor.FromRGBA(255,255,255,80).CGColor;
button.Layer.BorderColor = UIColor.White.CGColor;
button.Layer.BorderWidth = 1;
button.Layer.CornerRadius = 5;
button.TranslatesAutoresizingMaskIntoConstraints = false;
View.AddSubview(button); // constraints omitted for simplicity