iOS 8 提供的 AVFoundation Framework 手動相機控制程式可讓行動應用程式完全控制 iOS 裝置的相機。 這種精細的控制等級可以用來建立專業層級的相機應用程式,並藉由調整相機的參數,同時拍攝靜止影像或視訊,提供藝術家組合。
這些控件在開發科學或工業應用程式時也很有用,其中結果較不適合影像的正確性或美性,而且更適合用來醒目提示所拍攝影像的一些特徵或元素。
AVFoundation 擷取物件
無論是使用 iOS 裝置上的相機拍攝視訊還是靜止影像,用來擷取這些影像的程式基本上都相同。 這是使用預設自動相機控制元件的應用程式,或利用新手動相機控制件的應用程式:

輸入會透過 AVCaptureDeviceInput AVCaptureConnection從擷取到 AVCaptureSession 。 結果是輸出為靜止影像或視訊串流。 整個程式是由 所 AVCaptureDevice控制。
提供的手動控件
使用 iOS 8 所提供的新 API,應用程式可以控制下列相機功能:
- 手動焦點 – 允許使用者直接控制焦點,應用程式可以提供對拍攝影像的更多控制權。
- 手動曝光 – 藉由提供對曝光的手動控制,應用程式可以提供更多自由給使用者,並允許他們達到風格化的外觀。
- 手動白平衡 – 白平衡 可用來調整影像中的色彩,通常使其看起來很逼真。 不同的光源有不同的色彩溫度,用來擷取影像的相機設定會調整以彌補這些差異。 同樣地,藉由允許使用者控制白平衡,用戶可以進行無法自動進行的調整。
iOS 8 提供現有 iOS API 的擴充功能和增強功能,以提供對影像擷取程式的更精細控制。
需求
完成本文中說明的步驟需要下列各項:
- Xcode 7+ 和 iOS 8 或更新版本 – Apple 的 Xcode 7 和 iOS 8 或更新 API 必須在開發人員的電腦上安裝和設定。
- Visual Studio for Mac – 應在使用者裝置上安裝及設定最新版本的 Visual Studio for Mac。
- iOS 8 裝置 – 執行最新版 iOS 8 的 iOS 裝置。 無法在 iOS 模擬器中測試相機功能。
一般AV擷取設定
在 iOS 裝置上錄製視訊時,一律需要一些一般設定程式碼。 本節將涵蓋從 iOS 裝置相機錄製視訊所需的最小設定,並在 中 UIImageView實時顯示該視訊。
輸出範例緩衝區委派
其中一個專案是用來監視範例輸出緩衝區的委派,並顯示從緩衝區擷取到 UIImageView 應用程式 UI 中的 影像。
下列例程會監視範例緩衝區並更新UI:
using System;
using Foundation;
using UIKit;
using System.CodeDom.Compiler;
using System.Collections.Generic;
using System.Linq;
using AVFoundation;
using CoreVideo;
using CoreMedia;
using CoreGraphics;

namespace ManualCameraControls
{
    public class OutputRecorder : AVCaptureVideoDataOutputSampleBufferDelegate
    {
        #region Computed Properties
        public UIImageView DisplayView { get; set; }
        #endregion

        #region Constructors
        public OutputRecorder ()
        {

        }
        #endregion

        #region Private Methods
        private UIImage GetImageFromSampleBuffer(CMSampleBuffer sampleBuffer) {

            // Get a pixel buffer from the sample buffer
            using (var pixelBuffer = sampleBuffer.GetImageBuffer () as CVPixelBuffer) {
                // Lock the base address
                pixelBuffer.Lock (0);

                // Prepare to decode buffer
                var flags = CGBitmapFlags.PremultipliedFirst | CGBitmapFlags.ByteOrder32Little;

                // Decode buffer - Create a new colorspace
                using (var cs = CGColorSpace.CreateDeviceRGB ()) {

                    // Create new context from buffer
                    using (var context = new CGBitmapContext (pixelBuffer.BaseAddress,
                        pixelBuffer.Width,
                        pixelBuffer.Height,
                        8,
                        pixelBuffer.BytesPerRow,
                        cs,
                        (CGImageAlphaInfo)flags)) {

                        // Get the image from the context
                        using (var cgImage = context.ToImage ()) {

                            // Unlock and return image
                            pixelBuffer.Unlock (0);
                            return UIImage.FromImage (cgImage);
                        }
                    }
                }
            }
        }
        #endregion

        #region Override Methods
        public override void DidOutputSampleBuffer (AVCaptureOutput captureOutput, CMSampleBuffer sampleBuffer, AVCaptureConnection connection)
        {
            // Trap all errors
            try {
                // Grab an image from the buffer
                var image = GetImageFromSampleBuffer(sampleBuffer);

                // Display the image
                if (DisplayView !=null) {
                    DisplayView.BeginInvokeOnMainThread(() => {
                        // Set the image
                        if (DisplayView.Image != null) DisplayView.Image.Dispose();
                        DisplayView.Image = image;

                        // Rotate image to the correct display orientation
                        DisplayView.Transform = CGAffineTransform.MakeRotation((float)Math.PI/2);
                    });
                }

                // IMPORTANT: You must release the buffer because AVFoundation has a fixed number
                // of buffers and will stop delivering frames if it runs out.
                sampleBuffer.Dispose();
            }
            catch(Exception e) {
                // Report error
                Console.WriteLine ("Error sampling buffer: {0}", e.Message);
            }
        }
        #endregion
    }
}
有了此例程, AppDelegate 即可修改 以開啟AV擷取會話來錄製即時影片摘要。
建立AV擷取會話
AV 擷取會話可用來控制從iOS裝置相機錄製即時視訊,而且需要影片才能進入iOS應用程式。 由於範例 ManualCameraControl 應用程式在數個不同的位置使用擷取會話,因此它會在中 AppDelegate 設定,並提供給整個應用程式使用。
執行下列動作來修改應用程式的 AppDelegate ,並新增必要的程式碼:
按兩下
AppDelegate.cs方案總管中的檔案,以開啟它進行編輯。將下列 using 語句新增至檔案頂端:
using System;
using Foundation;
using UIKit;
using System.CodeDom.Compiler;
using System.Collections.Generic;
using System.Linq;
using AVFoundation;
using CoreVideo;
using CoreMedia;
using CoreGraphics;
using CoreFoundation;
將下列私用變數和計算屬性新增至
AppDelegate類別:#region Private Variables private NSError Error; #endregion #region Computed Properties public override UIWindow Window {get;set;} public bool CameraAvailable { get; set; } public AVCaptureSession Session { get; set; } public AVCaptureDevice CaptureDevice { get; set; } public OutputRecorder Recorder { get; set; } public DispatchQueue Queue { get; set; } public AVCaptureDeviceInput Input { get; set; } #endregion覆寫完成的方法,並將它變更為:
public override void FinishedLaunching (UIApplication application)
{
    // Create a new capture session
    Session = new AVCaptureSession ();
    Session.SessionPreset = AVCaptureSession.PresetMedium;

    // Create a device input
    CaptureDevice = AVCaptureDevice.DefaultDeviceWithMediaType (AVMediaType.Video);
    if (CaptureDevice == null) {
        // Video capture not supported, abort
        Console.WriteLine ("Video recording not supported on this device");
        CameraAvailable = false;
        return;
    }

    // Prepare device for configuration
    CaptureDevice.LockForConfiguration (out Error);
    if (Error != null) {
        // There has been an issue, abort
        Console.WriteLine ("Error: {0}", Error.LocalizedDescription);
        CaptureDevice.UnlockForConfiguration ();
        return;
    }

    // Configure stream for 15 frames per second (fps)
    CaptureDevice.ActiveVideoMinFrameDuration = new CMTime (1, 15);

    // Unlock configuration
    CaptureDevice.UnlockForConfiguration ();

    // Get input from capture device
    Input = AVCaptureDeviceInput.FromDevice (CaptureDevice);
    if (Input == null) {
        // Error, report and abort
        Console.WriteLine ("Unable to gain input from capture device.");
        CameraAvailable = false;
        return;
    }

    // Attach input to session
    Session.AddInput (Input);

    // Create a new output
    var output = new AVCaptureVideoDataOutput ();
    var settings = new AVVideoSettingsUncompressed ();
    settings.PixelFormatType = CVPixelFormatType.CV32BGRA;
    output.WeakVideoSettings = settings.Dictionary;

    // Configure and attach to the output to the session
    Queue = new DispatchQueue ("ManCamQueue");
    Recorder = new OutputRecorder ();
    output.SetSampleBufferDelegate (Recorder, Queue);
    Session.AddOutput (output);

    // Let tabs know that a camera is available
    CameraAvailable = true;
}
儲存對檔案所做的變更。
有了此程式代碼,即可輕鬆地實作手動相機控件以進行實驗和測試。
手動焦點
藉由允許使用者直接控制焦點,應用程式可以提供對拍攝影像的更藝術控制。
例如,專業攝影師可以軟化影像的焦點,以達到 博克效果。 或者,建立 焦點提取效果。
對於科學家或醫學應用程式的寫入者,應用程式可能想要以程式設計方式移動鏡頭進行實驗。 新的 API 可讓終端使用者或應用程式在拍攝影像時控制焦點的方式。
焦點的運作方式
在討論在 IOS 8 應用程式中控制焦點的詳細數據之前。 讓我們快速瞭解焦點在 iOS 裝置中的運作方式:

光線會進入 iOS 裝置上的相機鏡頭,並將焦點放在影像感測器上。 鏡頭與感測器之間的距離控制焦點(影像將呈現最尖銳的區域)與感測器的關係。 鏡頭距離感測器越遠,距離物體看起來最銳利,距離物體越近,物體看起來最銳利。
在 iOS 裝置中,鏡頭會透過磁力和彈簧更接近或更遠的感測器。 因此,鏡頭的確切定位是不可能的,因為它會因裝置到裝置而有所不同,而且可能會受到如裝置方向或裝置和彈簧年齡等參數的影響。
重要焦點詞彙
處理焦點時,開發人員應該熟悉幾個詞彙:
- 欄位 深度 – 最接近與最遠焦點對象之間的距離。
- 巨集 - 這是焦點光譜的近端,也是鏡頭可以聚焦的最接近距離。
- 無限 – 這是焦點光譜的遠端,也是鏡頭可以聚焦的最遠距離。
- 超focal Distance – 這是焦點光譜中的點,其中框架中最遠的物件只是在焦點的遠端。 換句話說,這是最大化欄位深度的焦點位置。
- 鏡頭位置 – 這就是控制上述所有字詞的內容。 這是鏡頭與感測器的距離,因此是焦點控制器。
考慮到這些詞彙和知識,新的手動焦點控件可以在iOS 8應用程式中成功實作。
現有的焦點控制件
iOS 7 和舊版,透過 FocusMode屬性提供現有的焦點控件,如下所示:
AVCaptureFocusModeLocked– 焦點鎖定在單一焦點點。AVCaptureFocusModeAutoFocus– 相機會將鏡頭掃過所有焦點,直到它找到尖銳的焦點,然後停留在那裡。AVCaptureFocusModeContinuousAutoFocus– 每當相機偵測到失焦時,相機就會重新對焦。
現有的控件也透過FocusPointOfInterest 屬性提供可設定的景點,讓使用者可以點選以專注於特定區域。 應用程式也可以藉由監視 IsAdjustingFocus 屬性來追蹤鏡頭移動。
此外,屬性所提供的 AutoFocusRangeRestriction 範圍限制為:
AVCaptureAutoFocusRangeRestrictionNear– 將自動對焦限制在附近的深度。 在掃描 QR 代碼或條碼等情況下很有用。AVCaptureAutoFocusRangeRestrictionFar– 將自動對焦限制為遠距深度。 在已知無關的對象位於檢視字段(例如視窗框架)的情況下很有用。
最後, SmoothAutoFocus 有 屬性會減緩自動焦點演算法的速度,並在錄製視訊時以較小的增量逐步執行它,以避免移動成品。
iOS 8 中的新焦點控件
除了 iOS 7 和更新版本所提供的功能之外,下列功能現在可用於控制 iOS 8 中的焦點:
- 鎖定焦點時,鏡頭位置的完整手動控制。
- 任何焦點模式中鏡頭位置的索引鍵/值觀察。
為了實作上述功能,類別 AVCaptureDevice 已修改為包含只讀 LensPosition 屬性,用來取得相機鏡頭的目前位置。
若要手動控制鏡頭位置,擷取裝置必須處於鎖定的焦點模式。 範例:
CaptureDevice.FocusMode = AVCaptureFocusMode.Locked;
SetFocusModeLocked擷取裝置的 方法是用來調整相機鏡頭的位置。 您可以選擇性回呼例程,以在變更生效時取得通知。 範例:
ThisApp.CaptureDevice.LockForConfiguration(out Error);
ThisApp.CaptureDevice.SetFocusModeLocked(Position.Value,null);
ThisApp.CaptureDevice.UnlockForConfiguration();
如上述程式代碼所示,擷取裝置必須鎖定進行設定,才能變更 Lens Position。 有效的 Lens Position 值介於 0.0 和 1.0 之間。
手動焦點範例
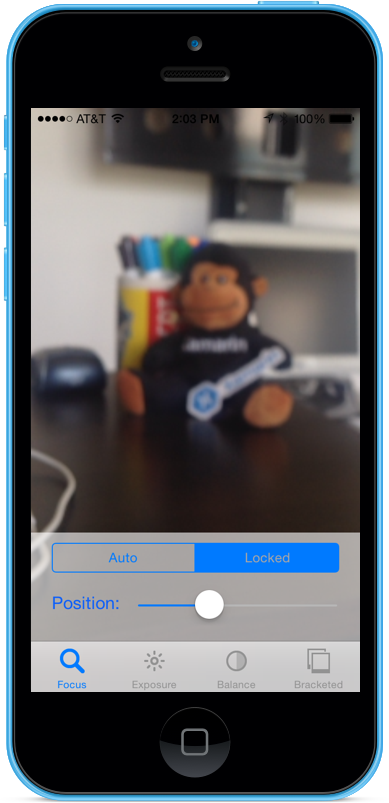
在一般 AV 擷取安裝程式程式代碼就緒后, UIViewController 可以將 新增至應用程式的分鏡腳本,並如下所示進行設定:

檢視包含下列主要元素:
UIImageView,顯示影片摘要。UISegmentedControl,將焦點模式從 [自動] 變更為 [鎖定]。UISlider,會顯示並更新目前的 Lens 位置。
請執行下列動作,以連接手動焦點控制器:
加入以下 using 陳述式:
using System;
using Foundation;
using UIKit;
using System.CodeDom.Compiler;
using System.Collections.Generic;
using System.Linq;
using AVFoundation;
using CoreVideo;
using CoreMedia;
using CoreGraphics;
using CoreFoundation;
using System.Timers;
新增下列私用變數:
#region Private Variables
private NSError Error;
private bool Automatic = true;
#endregion
新增下列計算屬性:
#region Computed Properties
public AppDelegate ThisApp {
    get { return (AppDelegate)UIApplication.SharedApplication.Delegate; }
}
public Timer SampleTimer { get; set; }
#endregion
覆寫 方法並
ViewDidLoad新增下列程序代碼:public override void ViewDidLoad () { base.ViewDidLoad (); // Hide no camera label NoCamera.Hidden = ThisApp.CameraAvailable; // Attach to camera view ThisApp.Recorder.DisplayView = CameraView; // Create a timer to monitor and update the UI SampleTimer = new Timer (5000); SampleTimer.Elapsed += (sender, e) => { // Update position slider Position.BeginInvokeOnMainThread(() =>{ Position.Value = ThisApp.Input.Device.LensPosition; }); }; // Watch for value changes Segments.ValueChanged += (object sender, EventArgs e) => { // Lock device for change ThisApp.CaptureDevice.LockForConfiguration(out Error); // Take action based on the segment selected switch(Segments.SelectedSegment) { case 0: // Activate auto focus and start monitoring position Position.Enabled = false; ThisApp.CaptureDevice.FocusMode = AVCaptureFocusMode.ContinuousAutoFocus; SampleTimer.Start(); Automatic = true; break; case 1: // Stop auto focus and allow the user to control the camera SampleTimer.Stop(); ThisApp.CaptureDevice.FocusMode = AVCaptureFocusMode.Locked; Automatic = false; Position.Enabled = true; break; } // Unlock device ThisApp.CaptureDevice.UnlockForConfiguration(); }; // Monitor position changes Position.ValueChanged += (object sender, EventArgs e) => { // If we are in the automatic mode, ignore changes if (Automatic) return; // Update Focus position ThisApp.CaptureDevice.LockForConfiguration(out Error); ThisApp.CaptureDevice.SetFocusModeLocked(Position.Value,null); ThisApp.CaptureDevice.UnlockForConfiguration(); }; }覆寫 方法並
ViewDidAppear新增下列專案,以在檢視載入時開始錄製:public override void ViewDidAppear (bool animated) { base.ViewDidAppear (animated); // Start udating the display if (ThisApp.CameraAvailable) { // Remap to this camera view ThisApp.Recorder.DisplayView = CameraView; ThisApp.Session.StartRunning (); SampleTimer.Start (); } }隨著相機處於自動模式,滑桿會在相機調整焦點時自動移動:

點選 [鎖定] 區段並拖曳位置滑桿以手動調整鏡頭位置:
停止應用程式。


上述程式代碼示範如何在相機處於自動模式時監視鏡頭位置,或使用滑桿來控制鏡頭位置時處於鎖定模式。
手動曝光
曝光是指相對於來源亮度的影像亮度,取決於感測器的光線命中多少,以及感測器的增益等級(ISO 對應)。 藉由提供對曝光的手動控制,應用程式可以為使用者提供更多自由,並讓他們達到風格化的外觀。
使用手動曝光控件,使用者可以從不切實際的明亮到黑暗和喜怒無情地拍攝影像:

同樣地,這可以自動使用科學應用程式的程式設計控件,或透過應用程式使用者介面所提供的手動控件來完成。 無論哪種方式,新的 iOS 8 曝光 API 都提供相機曝光設定的精細控制。
曝光的運作方式
討論在 IOS 8 應用程式中控制曝光的詳細數據之前。 讓我們快速瞭解曝光的運作方式:

用來控制曝光的三個基本元素如下:
- 快門速度 – 這是快門開啟讓光線進入相機感測器的時間長度。 快門打開的時間越短,光線越少,圖像越清晰(運動模糊少)。 快門打開越長,光線越亮,發生的動作越模糊。
- ISO 對應 – 這是從電影攝影借用的術語,是指電影中化學物質對光線的敏感度。 電影中的 ISO 值較低,穀物和更精細的色彩複製:數字感測器上的 ISO 值較低,但亮度較低。 ISO 值越高,影像越亮,但感測器雜訊就越亮。 數字感測器上的“ISO”是電子增益的測量值,而不是實體特徵。
- 鏡頭光圈 – 這是鏡頭開啟的大小。 在所有 iOS 裝置上,鏡頭光圈都是固定的,因此唯一可用來調整曝光的兩個值是快門速度和 ISO。
連續自動曝光的運作方式
瞭解手動曝光的運作方式之前,最好先了解持續自動曝光在iOS裝置中的運作方式。

第一個是自動曝光區塊,它有計算理想曝光的工作,並持續被喂計量統計數據。它使用這項資訊來計算 ISO 和快門速度的最佳混合,讓場景亮起。 此迴圈稱為 AE 迴圈。
鎖定曝光的運作方式
接下來,讓我們檢查鎖定暴露在iOS裝置中的運作方式。

同樣地,您有嘗試計算最佳 iOS 和持續時間值的自動曝光區塊。 不過,在此模式中,AE 區塊會與計量統計數據引擎中斷連線。
現有的曝光控制件
iOS 7 和更新版本,透過 ExposureMode 屬性提供下列現有的曝光控件:
AVCaptureExposureModeLocked– 範例場景一次,並在整個場景中使用這些值。AVCaptureExposureModeContinuousAutoExposure– 持續取樣場景,以確保場景已亮起。
ExposurePointOfInterest可用來點選以公開場景,方法是選取要公開的目標物件,而且應用程式可以監視屬性,以查看何時調整AdjustingExposure曝光。
iOS 8 中的新曝光控件
除了 iOS 7 和更新版本所提供的功能之外,下列功能現在可用於控制 iOS 8 中的曝光:
- 完全手動自定義曝光。
- 取得、設定和索引鍵/值觀察 IOS 和快門速度(持續時間)。
若要實作上述功能, AVCaptureExposureModeCustom 已新增模式。 當 中的相機是自訂模式時,可以使用下列程式代碼來調整曝光持續時間和 ISO:
CaptureDevice.LockForConfiguration(out Error);
CaptureDevice.LockExposure(DurationValue,ISOValue,null);
CaptureDevice.UnlockForConfiguration();
在 [自動] 和 [鎖定] 模式中,應用程式可以使用下列程式代碼來調整自動曝光例程的偏差:
CaptureDevice.LockForConfiguration(out Error);
CaptureDevice.SetExposureTargetBias(Value,null);
CaptureDevice.UnlockForConfiguration();
最小和最大設定範圍取決於應用程式執行中的裝置,因此不應該硬式編碼。 請改用下列屬性來取得最小值和最大值範圍:
CaptureDevice.MinExposureTargetBiasCaptureDevice.MaxExposureTargetBiasCaptureDevice.ActiveFormat.MinISOCaptureDevice.ActiveFormat.MaxISOCaptureDevice.ActiveFormat.MinExposureDurationCaptureDevice.ActiveFormat.MaxExposureDuration
如上述程式代碼所示,擷取裝置必須鎖定進行設定,才能進行曝光變更。
手動曝光範例
在一般 AV 擷取安裝程式程式代碼就緒后, UIViewController 可以將 新增至應用程式的分鏡腳本,並如下所示進行設定:

檢視包含下列主要元素:
UIImageView,顯示影片摘要。UISegmentedControl,將焦點模式從 [自動] 變更為 [鎖定]。- 顯示並更新 Offset、Duration、ISO 和 Bias 的四
UISlider個控件。
請執行下列動作,以連接手動曝光控制器:
加入以下 using 陳述式:
using System;
using Foundation;
using UIKit;
using System.CodeDom.Compiler;
using System.Collections.Generic;
using System.Linq;
using AVFoundation;
using CoreVideo;
using CoreMedia;
using CoreGraphics;
using CoreFoundation;
using System.Timers;
新增下列私用變數:
#region Private Variables
private NSError Error;
private bool Automatic = true;
private nfloat ExposureDurationPower = 5;
private nfloat ExposureMinimumDuration = 1.0f/1000.0f;
#endregion
新增下列計算屬性:
#region Computed Properties
public AppDelegate ThisApp {
    get { return (AppDelegate)UIApplication.SharedApplication.Delegate; }
}
public Timer SampleTimer { get; set; }
#endregion
覆寫 方法並
ViewDidLoad新增下列程序代碼:public override void ViewDidLoad () { base.ViewDidLoad (); // Hide no camera label NoCamera.Hidden = ThisApp.CameraAvailable; // Attach to camera view ThisApp.Recorder.DisplayView = CameraView; // Set min and max values Offset.MinValue = ThisApp.CaptureDevice.MinExposureTargetBias; Offset.MaxValue = ThisApp.CaptureDevice.MaxExposureTargetBias; Duration.MinValue = 0.0f; Duration.MaxValue = 1.0f; ISO.MinValue = ThisApp.CaptureDevice.ActiveFormat.MinISO; ISO.MaxValue = ThisApp.CaptureDevice.ActiveFormat.MaxISO; Bias.MinValue = ThisApp.CaptureDevice.MinExposureTargetBias; Bias.MaxValue = ThisApp.CaptureDevice.MaxExposureTargetBias; // Create a timer to monitor and update the UI SampleTimer = new Timer (5000); SampleTimer.Elapsed += (sender, e) => { // Update position slider Offset.BeginInvokeOnMainThread(() =>{ Offset.Value = ThisApp.Input.Device.ExposureTargetOffset; }); Duration.BeginInvokeOnMainThread(() =>{ var newDurationSeconds = CMTimeGetSeconds(ThisApp.Input.Device.ExposureDuration); var minDurationSeconds = Math.Max(CMTimeGetSeconds(ThisApp.CaptureDevice.ActiveFormat.MinExposureDuration), ExposureMinimumDuration); var maxDurationSeconds = CMTimeGetSeconds(ThisApp.CaptureDevice.ActiveFormat.MaxExposureDuration); var p = (newDurationSeconds - minDurationSeconds) / (maxDurationSeconds - minDurationSeconds); Duration.Value = (float)Math.Pow(p, 1.0f/ExposureDurationPower); }); ISO.BeginInvokeOnMainThread(() => { ISO.Value = ThisApp.Input.Device.ISO; }); Bias.BeginInvokeOnMainThread(() => { Bias.Value = ThisApp.Input.Device.ExposureTargetBias; }); }; // Watch for value changes Segments.ValueChanged += (object sender, EventArgs e) => { // Lock device for change ThisApp.CaptureDevice.LockForConfiguration(out Error); // Take action based on the segment selected switch(Segments.SelectedSegment) { case 0: // Activate auto exposure and start monitoring position Duration.Enabled = false; ISO.Enabled = false; ThisApp.CaptureDevice.ExposureMode = AVCaptureExposureMode.ContinuousAutoExposure; SampleTimer.Start(); Automatic = true; break; case 1: // Lock exposure and allow the user to control the camera SampleTimer.Stop(); ThisApp.CaptureDevice.ExposureMode = AVCaptureExposureMode.Locked; Automatic = false; Duration.Enabled = false; ISO.Enabled = false; break; case 2: // Custom exposure and allow the user to control the camera SampleTimer.Stop(); ThisApp.CaptureDevice.ExposureMode = AVCaptureExposureMode.Custom; Automatic = false; Duration.Enabled = true; ISO.Enabled = true; break; } // Unlock device ThisApp.CaptureDevice.UnlockForConfiguration(); }; // Monitor position changes Duration.ValueChanged += (object sender, EventArgs e) => { // If we are in the automatic mode, ignore changes if (Automatic) return; // Calculate value var p = Math.Pow(Duration.Value,ExposureDurationPower); var minDurationSeconds = Math.Max(CMTimeGetSeconds(ThisApp.CaptureDevice.ActiveFormat.MinExposureDuration),ExposureMinimumDuration); var maxDurationSeconds = CMTimeGetSeconds(ThisApp.CaptureDevice.ActiveFormat.MaxExposureDuration); var newDurationSeconds = p * (maxDurationSeconds - minDurationSeconds) +minDurationSeconds; // Update Focus position ThisApp.CaptureDevice.LockForConfiguration(out Error); ThisApp.CaptureDevice.LockExposure(CMTime.FromSeconds(p,1000*1000*1000),ThisApp.CaptureDevice.ISO,null); ThisApp.CaptureDevice.UnlockForConfiguration(); }; ISO.ValueChanged += (object sender, EventArgs e) => { // If we are in the automatic mode, ignore changes if (Automatic) return; // Update Focus position ThisApp.CaptureDevice.LockForConfiguration(out Error); ThisApp.CaptureDevice.LockExposure(ThisApp.CaptureDevice.ExposureDuration,ISO.Value,null); ThisApp.CaptureDevice.UnlockForConfiguration(); }; Bias.ValueChanged += (object sender, EventArgs e) => { // If we are in the automatic mode, ignore changes // if (Automatic) return; // Update Focus position ThisApp.CaptureDevice.LockForConfiguration(out Error); ThisApp.CaptureDevice.SetExposureTargetBias(Bias.Value,null); ThisApp.CaptureDevice.UnlockForConfiguration(); }; }覆寫 方法並
ViewDidAppear新增下列專案,以在檢視載入時開始錄製:public override void ViewDidAppear (bool animated) { base.ViewDidAppear (animated); // Start udating the display if (ThisApp.CameraAvailable) { // Remap to this camera view ThisApp.Recorder.DisplayView = CameraView; ThisApp.Session.StartRunning (); SampleTimer.Start (); } }隨著相機處於自動模式,滑桿會在相機調整曝光時自動移動:

點選 [鎖定] 區段並拖曳 [偏差] 滑桿,以手動調整自動曝光的偏差:

點選 [自定義] 區段並拖曳 [持續時間] 和 [ISO] 滑桿以手動控制曝光:
![拖曳 [持續時間] 和 [ISO] 滑桿以手動控制曝光](intro-to-manual-camera-controls-images/image15.png)
停止應用程式。


![拖曳 [持續時間] 和 [ISO] 滑桿以手動控制曝光](intro-to-manual-camera-controls-images/image15.png#lightbox)
上述程式代碼示範如何在相機處於自動模式時監視曝光設定,以及如何使用滑桿來控制處於鎖定模式或自定義模式時的曝光。
手動白平衡
白平衡控件可讓用戶調整影像中巨無異的平衡,使其看起來更逼真。 不同的光源有不同的色彩溫度,而且用來擷取影像的相機設定必須調整,以彌補這些差異。 同樣地,通過允許使用者控制白平衡,他們可以進行專業調整,自動例行公事無法達到藝術效果。

例如,日光有藍色的鑄造,而螢光白粉燈有更溫暖的黃色橙色色調。 (令人困惑地,「酷」色彩的色彩溫度高於「暖色」色彩。色彩溫度是實體量值,而不是感知溫度。
人類的頭腦非常善於補償色彩溫度的差異,但這是相機不能做的。 相機的運作方式是提升不同光譜的色彩,以調整色彩差異。
新的 iOS 8 曝光 API 可讓應用程式控制程式,並提供相機白平衡設定的精細控制。
白平衡的運作方式
在討論在 IOS 8 應用程式中控制白平衡的詳細數據之前。 讓我們快速瞭解白平衡的運作方式:
在色彩感知研究中, CIE 1931 RGB 色彩空間和 CIE 1931 XYZ 色彩空間是第一個以數學方式定義的色彩空間 。 他們於1931年由國際照明委員會(CIE)創建。

上圖顯示人類眼睛可見的所有色彩,從深藍色到明亮的綠色到明亮的紅色。 圖表上的任何點都可以使用 X 和 Y 值繪製,如上圖所示。
如圖表中所見,有 X 和 Y 值可以繪製在圖形上,而該圖形會超出人類視覺範圍,因此相機無法重現這些色彩。
上圖中較小的曲線稱為 Planckian Locus,其表示色彩溫度(以度為 kelvin),藍色側(熱度)較高,紅色側的數位較低(冷卻器)。 這些適用於一般光源情況。
在混合光源條件下,白平衡調整必須偏離 Planckian Locus,才能進行必要的變更。 在這些情況下,調整需要轉移到 CIE 尺規的綠色或紅色/洋紅邊。
iOS 裝置會藉由提升相反的色彩增益來補償色彩轉換。 例如,如果場景有太多的藍色,則紅色收益將提升以補償。 這些增益值會針對特定裝置進行校正,使其與裝置相依。
現有的白平衡控件
iOS 7 和更新版本透過 屬性提供下列現有的 White Balance 控制項 WhiteBalanceMode :
AVCapture WhiteBalance ModeLocked– 範例場景一次,並在整個場景中使用這些值。AVCapture WhiteBalance ModeContinuousAutoExposure– 持續取樣場景,以確保其平衡良好。
而且應用程式可以監視 AdjustingWhiteBalance 屬性,以查看何時調整曝光。
iOS 8 中的新白平衡控件
除了 iOS 7 和更新版本所提供的功能之外,下列功能現在可用於控制 iOS 8 中的 White Balance:
- 完全手動控制裝置 RGB 增益。
- 取得、設定和索引鍵/值 觀察裝置 RGB 收益。
- 支援使用灰色卡片的白平衡。
- 從裝置獨立色彩空間來回轉換例程。
若要實作上述功能, AVCaptureWhiteBalanceGain 結構已新增下列成員:
RedGainGreenGainBlueGain
最大白平衡收益目前為四(4),可從 屬性準備 MaxWhiteBalanceGain 。 因此,法律範圍從目前一(1)到 MaxWhiteBalanceGain (4)。
DeviceWhiteBalanceGains屬性可用來觀察目前的值。 當相機處於鎖定的白色平衡模式時,使用 SetWhiteBalanceModeLockedWithDeviceWhiteBalanceGains 來調整平衡收益。
轉換例程
轉換例程已新增至 iOS 8,以協助轉換裝置獨立色彩空間。 若要實作轉換例程, AVCaptureWhiteBalanceChromaticityValues 結構已新增下列成員:
X- 是從 0 到 1 的值。Y- 是從 0 到 1 的值。
AVCaptureWhiteBalanceTemperatureAndTintValues結構也已加入下列成員:
Temperature- 是 Kelvin 的浮點值。Tint- 是從 0 到 150 的綠色或洋紅的位移,正值指向綠色方向,對洋紅色為負值。
CaptureDevice.GetTemperatureAndTintValues使用 和 CaptureDevice.GetDeviceWhiteBalanceGains方法,在溫度和色調、色度和 RGB 取得色彩空間之間轉換。
注意
轉換例程越精確,要轉換的值越接近 Planckian Locus。
灰色卡片支援
Apple 使用 Gray World 一詞來參考 iOS 8 內建的灰卡支援。 它可讓使用者專注於至少涵蓋框架中心 50% 的實體灰卡,並使用該卡片來調整白平衡。 灰卡的目的是要達到白色,其看起來是中性。
這可以在應用程式中實作,方法是提示用戶將實體灰色卡片放在相機前面、監視 GrayWorldDeviceWhiteBalanceGains 屬性,並等到值落下為止。
然後,應用程式會使用 屬性的值來套用變更,鎖定 方法的 GrayWorldDeviceWhiteBalanceGains White Balance 收益SetWhiteBalanceModeLockedWithDeviceWhiteBalanceGains。
擷取裝置必須鎖定進行設定,才能進行白平衡變更。
手動白平衡範例
在一般 AV 擷取安裝程式程式代碼就緒后, UIViewController 可以將 新增至應用程式的分鏡腳本,並如下所示進行設定:

檢視包含下列主要元素:
UIImageView,顯示影片摘要。UISegmentedControl,將焦點模式從 [自動] 變更為 [鎖定]。- 顯示並更新 Temperature 和 Tint 的兩
UISlider個控件。 UIButton,用來取樣灰卡(灰色世界)空間,並使用這些值設定白色平衡。
請執行下列動作,以連接手動白平衡控制器:
加入以下 using 陳述式:
using System;
using Foundation;
using UIKit;
using System.CodeDom.Compiler;
using System.Collections.Generic;
using System.Linq;
using AVFoundation;
using CoreVideo;
using CoreMedia;
using CoreGraphics;
using CoreFoundation;
using System.Timers;
新增下列私用變數:
#region Private Variables
private NSError Error;
private bool Automatic = true;
#endregion
新增下列計算屬性:
#region Computed Properties
public AppDelegate ThisApp {
    get { return (AppDelegate)UIApplication.SharedApplication.Delegate; }
}
public Timer SampleTimer { get; set; }
#endregion
新增下列私人方法,以設定新的白平衡溫度和色調:
#region Private Methods
void SetTemperatureAndTint() {
    // Grab current temp and tint
    var TempAndTint = new AVCaptureWhiteBalanceTemperatureAndTintValues (Temperature.Value, Tint.Value);

    // Convert Color space
    var gains = ThisApp.CaptureDevice.GetDeviceWhiteBalanceGains (TempAndTint);

    // Set the new values
    if (ThisApp.CaptureDevice.LockForConfiguration (out Error)) {
        gains = NomralizeGains (gains);
        ThisApp.CaptureDevice.SetWhiteBalanceModeLockedWithDeviceWhiteBalanceGains (gains, null);
        ThisApp.CaptureDevice.UnlockForConfiguration ();
    }
}

AVCaptureWhiteBalanceGains NomralizeGains (AVCaptureWhiteBalanceGains gains)
{
    gains.RedGain = Math.Max (1, gains.RedGain);
    gains.BlueGain = Math.Max (1, gains.BlueGain);
    gains.GreenGain = Math.Max (1, gains.GreenGain);

    float maxGain = ThisApp.CaptureDevice.MaxWhiteBalanceGain;
    gains.RedGain = Math.Min (maxGain, gains.RedGain);
    gains.BlueGain = Math.Min (maxGain, gains.BlueGain);
    gains.GreenGain = Math.Min (maxGain, gains.GreenGain);

    return gains;
}
#endregion
覆寫 方法並
ViewDidLoad新增下列程序代碼:public override void ViewDidLoad () { base.ViewDidLoad (); // Hide no camera label NoCamera.Hidden = ThisApp.CameraAvailable; // Attach to camera view ThisApp.Recorder.DisplayView = CameraView; // Set min and max values Temperature.MinValue = 1000f; Temperature.MaxValue = 10000f; Tint.MinValue = -150f; Tint.MaxValue = 150f; // Create a timer to monitor and update the UI SampleTimer = new Timer (5000); SampleTimer.Elapsed += (sender, e) => { // Convert color space var TempAndTint = ThisApp.CaptureDevice.GetTemperatureAndTintValues (ThisApp.CaptureDevice.DeviceWhiteBalanceGains); // Update slider positions Temperature.BeginInvokeOnMainThread (() => { Temperature.Value = TempAndTint.Temperature; }); Tint.BeginInvokeOnMainThread (() => { Tint.Value = TempAndTint.Tint; }); }; // Watch for value changes Segments.ValueChanged += (sender, e) => { // Lock device for change if (ThisApp.CaptureDevice.LockForConfiguration (out Error)) { // Take action based on the segment selected switch (Segments.SelectedSegment) { case 0: // Activate auto focus and start monitoring position Temperature.Enabled = false; Tint.Enabled = false; ThisApp.CaptureDevice.WhiteBalanceMode = AVCaptureWhiteBalanceMode.ContinuousAutoWhiteBalance; SampleTimer.Start (); Automatic = true; break; case 1: // Stop auto focus and allow the user to control the camera SampleTimer.Stop (); ThisApp.CaptureDevice.WhiteBalanceMode = AVCaptureWhiteBalanceMode.Locked; Automatic = false; Temperature.Enabled = true; Tint.Enabled = true; break; } // Unlock device ThisApp.CaptureDevice.UnlockForConfiguration (); } }; // Monitor position changes Temperature.TouchUpInside += (sender, e) => { // If we are in the automatic mode, ignore changes if (Automatic) return; // Update white balance SetTemperatureAndTint (); }; Tint.TouchUpInside += (sender, e) => { // If we are in the automatic mode, ignore changes if (Automatic) return; // Update white balance SetTemperatureAndTint (); }; GrayCardButton.TouchUpInside += (sender, e) => { // If we are in the automatic mode, ignore changes if (Automatic) return; // Get gray card values var gains = ThisApp.CaptureDevice.GrayWorldDeviceWhiteBalanceGains; // Set the new values if (ThisApp.CaptureDevice.LockForConfiguration (out Error)) { ThisApp.CaptureDevice.SetWhiteBalanceModeLockedWithDeviceWhiteBalanceGains (gains, null); ThisApp.CaptureDevice.UnlockForConfiguration (); } }; }覆寫 方法並
ViewDidAppear新增下列專案,以在檢視載入時開始錄製:public override void ViewDidAppear (bool animated) { base.ViewDidAppear (animated); // Start udating the display if (ThisApp.CameraAvailable) { // Remap to this camera view ThisApp.Recorder.DisplayView = CameraView; ThisApp.Session.StartRunning (); SampleTimer.Start (); } }將變更儲存為程式碼並執行應用程式。
隨著相機處於自動模式,滑桿會在相機調整白平衡時自動移動:

點選 [鎖定] 區段並拖曳 Temp 和 Tint 滑桿以手動調整白平衡:
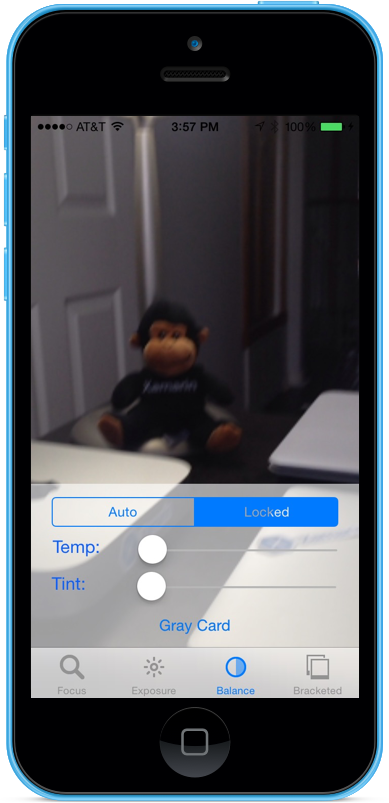
選取 [鎖定] 區段后,將實體灰色卡片放在相機前面,然後點選 [灰色卡片] 按鈕,將白色平衡調整為灰色世界:
![點選 [灰色卡片] 按鈕,將白色平衡調整為灰色世界](intro-to-manual-camera-controls-images/image21.png)
停止應用程式。


![點選 [灰色卡片] 按鈕,將白色平衡調整為灰色世界](intro-to-manual-camera-controls-images/image21.png#lightbox)
上述程式代碼示範如何在相機處於自動模式時監視白平衡設定,或使用滑桿來控制處於鎖定模式時的白平衡。
括弧擷取
括弧擷取是以上述手動相機控件中的設定為基礎,並允許應用程式以各種不同方式擷取時間。
簡單地說,括弧擷取是一連串的靜止影像,其中包含從圖片到圖片的各種設定。

使用 iOS 8 中的方括弧擷取,應用程式可以預設一系列的手動相機控件、發出單一命令,並讓目前的場景針對每個手動預設值傳回一系列影像。
括弧擷取基本概念
同樣地,括弧擷取是一連串的仍然影像,其設定會從圖片到圖片而有所不同。 可用的括弧擷取類型如下:
- 自動曝光括弧 – 其中所有影像都有不同的偏差量。
- 手動曝光括弧 – 所有影像都有不同的快門速度(持續時間)和 ISO 數量。
- 簡單高載括弧 – 一系列連續拍攝的靜止影像。
iOS 8 中的新括弧擷取控件
所有括弧擷取命令都會在類別中 AVCaptureStillImageOutput 實作。 CaptureStillImageBracket使用方法來取得具有指定設定陣列的一系列影像。
已實作兩個新的類別來處理設定:
AVCaptureAutoExposureBracketedStillImageSettings– 它有一個屬性,ExposureTargetBias用來設定自動曝光括弧的偏差。AVCaptureManualExposureBracketedStillImageSettings– 它有兩個屬性,ExposureDuration和ISO,用來設定手動曝光支架的快門速度和 ISO。
括弧擷取控件 Do's 和 Don'ts
可執行動作
以下是在 iOS 8 中使用括弧擷取控件時應該完成的事項清單:
- 藉由呼叫
PrepareToCaptureStillImageBracket方法,準備應用程式以取得最差情況的擷取情況。 - 假設範例緩衝區會來自相同的共用集區。
- 若要釋放先前準備呼叫所配置的記憶體,請再次呼叫
PrepareToCaptureStillImageBracket並傳送一個對象的陣列。
不建議執行
以下是在 iOS 8 中使用括弧擷取控件時,不應完成的事項清單:
- 請勿在單一擷取中混合括弧擷取設定類型。
- 不要在單一擷取中要求多個
MaxBracketedCaptureStillImageCount影像。
括弧擷取詳細數據
在 iOS 8 中使用括弧擷取時,應考慮下列詳細數據:
- 括號設定會暫時覆寫設定
AVCaptureDevice。 - 會忽略 Flash 和靜止影像防震設定。
- 所有影像都必須使用相同的輸出格式(jpeg、png 等)
- 視訊預覽可能會卸除畫面。
- 所有與 iOS 8 相容的裝置都支援括弧擷取。
考慮到這項資訊,讓我們看看在 iOS 8 中使用括弧擷取的範例。
括弧擷取範例
在一般 AV 擷取安裝程式程式代碼就緒后, UIViewController 可以將 新增至應用程式的分鏡腳本,並如下所示進行設定:

檢視包含下列主要元素:
UIImageView,顯示影片摘要。- 顯示擷取結果的三
UIImageViews個 。 UIScrollView,用來儲存影片摘要和結果檢視。UIButton,用來取得具有一些預設設定的括弧擷取。
執行下列動作,以連接方括弧擷取的檢視控制器:
加入以下 using 陳述式:
using System;
using System.Drawing;
using Foundation;
using UIKit;
using System.CodeDom.Compiler;
using System.Collections.Generic;
using System.Linq;
using AVFoundation;
using CoreVideo;
using CoreMedia;
using CoreGraphics;
using CoreFoundation;
using CoreImage;
新增下列私用變數:
#region Private Variables
private NSError Error;
private List<UIImageView> Output = new List<UIImageView>();
private nint OutputIndex = 0;
#endregion
新增下列計算屬性:
#region Computed Properties
public AppDelegate ThisApp {
    get { return (AppDelegate)UIApplication.SharedApplication.Delegate; }
}
#endregion
新增下列私人方法以建置必要的輸出映像檢視:
#region Private Methods
private UIImageView BuildOutputView(nint n) {

    // Create a new image view controller
    var imageView = new UIImageView (new CGRect (CameraView.Frame.Width * n, 0, CameraView.Frame.Width, CameraView.Frame.Height));

    // Load a temp image
    imageView.Image = UIImage.FromFile ("Default-568h@2x.png");

    // Add a label
    UILabel label = new UILabel (new CGRect (0, 20, CameraView.Frame.Width, 24));
    label.TextColor = UIColor.White;
    label.Text = string.Format ("Bracketed Image {0}", n);
    imageView.AddSubview (label);

    // Add to scrolling view
    ScrollView.AddSubview (imageView);

    // Return new image view
    return imageView;
}
#endregion
覆寫 方法並
ViewDidLoad新增下列程序代碼:public override void ViewDidLoad () { base.ViewDidLoad (); // Hide no camera label NoCamera.Hidden = ThisApp.CameraAvailable; // Attach to camera view ThisApp.Recorder.DisplayView = CameraView; // Setup scrolling area ScrollView.ContentSize = new SizeF (CameraView.Frame.Width * 4, CameraView.Frame.Height); // Add output views Output.Add (BuildOutputView (1)); Output.Add (BuildOutputView (2)); Output.Add (BuildOutputView (3)); // Create preset settings var Settings = new AVCaptureBracketedStillImageSettings[] { AVCaptureAutoExposureBracketedStillImageSettings.Create(-2.0f), AVCaptureAutoExposureBracketedStillImageSettings.Create(0.0f), AVCaptureAutoExposureBracketedStillImageSettings.Create(2.0f) }; // Wireup capture button CaptureButton.TouchUpInside += (sender, e) => { // Reset output index OutputIndex = 0; // Tell the camera that we are getting ready to do a bracketed capture ThisApp.StillImageOutput.PrepareToCaptureStillImageBracket(ThisApp.StillImageOutput.Connections[0],Settings,async (bool ready, NSError err) => { // Was there an error, if so report it if (err!=null) { Console.WriteLine("Error: {0}",err.LocalizedDescription); } }); // Ask the camera to snap a bracketed capture ThisApp.StillImageOutput.CaptureStillImageBracket(ThisApp.StillImageOutput.Connections[0],Settings, (sampleBuffer, settings, err) =>{ // Convert raw image stream into a Core Image Image var imageData = AVCaptureStillImageOutput.JpegStillToNSData(sampleBuffer); var image = CIImage.FromData(imageData); // Display the resulting image Output[OutputIndex++].Image = UIImage.FromImage(image); // IMPORTANT: You must release the buffer because AVFoundation has a fixed number // of buffers and will stop delivering frames if it runs out. sampleBuffer.Dispose(); }); }; }覆寫 方法並
ViewDidAppear新增下列程序代碼:public override void ViewDidAppear (bool animated) { base.ViewDidAppear (animated); // Start udating the display if (ThisApp.CameraAvailable) { // Remap to this camera view ThisApp.Recorder.DisplayView = CameraView; ThisApp.Session.StartRunning (); } }將變更儲存為程式碼並執行應用程式。
框住場景並點選 [擷取括弧] 按鈕:
![框住場景並點選 [擷取括弧] 按鈕](intro-to-manual-camera-controls-images/image24.png)
向左撥動以查看由括弧擷取拍攝的三個影像:

停止應用程式。
![框住場景並點選 [擷取括弧] 按鈕](intro-to-manual-camera-controls-images/image24.png#lightbox)

上述程式代碼示範如何在 iOS 8 中設定及取得自動曝光括弧擷取。
摘要
在本文中,我們已介紹 iOS 8 提供的新手動相機控件,並涵蓋其運作方式的基本概念。 我們提供了手動焦點、手動曝光和手動白平衡的範例。 最後,我們使用先前討論的手動相機控件,提供採用括弧擷取的範例