集合檢視允許使用任意版面配置來顯示內容。 它們可讓您輕鬆地立即建立類似網格線的配置,同時支援自定義版面配置。
類別中 UICollectionView 提供的集合檢視是iOS 6中引進使用版面配置在畫面上呈現多個專案的新概念。 提供數據給 UICollectionView 的模式,以建立專案並與這些項目互動,遵循iOS開發中常用的相同委派和數據源模式。
不過,集合檢視會使用與本身無關的 UICollectionView 版面配置子系統。 因此,只要提供不同的版面配置,即可輕鬆地變更集合檢視的呈現方式。
iOS 提供稱為 UICollectionViewFlowLayout 的版面配置類別,允許建立網格線之類的線條型配置,而不需要額外的工作。 此外,也可以建立自定義版面配置,以允許您可以想像的任何簡報。
UICollectionView 基本概念
類別 UICollectionView 是由三個不同的項目所組成:
- 數據格 – 每個項目的數據驅動檢視
- 補充檢視 – 與區段相關聯的數據驅動檢視。
- 裝飾檢視 – 版面配置所建立的非數據驅動檢視
儲存格
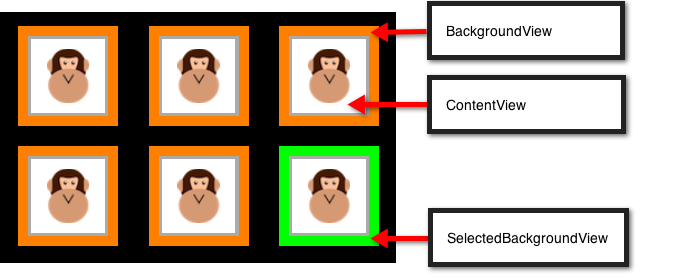
單元格是物件,代表集合檢視所呈現之數據集中的單一專案。 每個儲存格都是 類別的 UICollectionViewCell 實例,由三個不同的檢視組成,如下圖所示:
類別 UICollectionViewCell 具有下列每個檢視的屬性:
ContentView– 此檢視包含儲存格呈現的內容。 它會以螢幕上最上層的迭置順序呈現。SelectedBackgroundView– 儲存格內建支持選取專案。 此檢視可用來以視覺方式表示已選取單元格。 選取單元格時,它會轉譯在 正下方ContentView。BackgroundView– 儲存格也可以顯示背景,由呈現BackgroundView。 這個檢視會在下方SelectedBackgroundView轉譯。
藉由將 ContentView 設定為 小於 BackgroundView 和 SelectedBackgroundView, BackgroundView 即可用來以視覺方式框架內容,而 SelectedBackgroundView 會在選取儲存格時顯示 ,如下所示:
上述螢幕快照中的儲存格是藉由繼承 自 UICollectionViewCell 和 分別設定 ContentView、 SelectedBackgroundView 和 BackgroundView 屬性來建立,如下列程式代碼所示:
public class AnimalCell : UICollectionViewCell
{
        UIImageView imageView;

        [Export ("initWithFrame:")]
        public AnimalCell (CGRect frame) : base (frame)
        {
            BackgroundView = new UIView{BackgroundColor = UIColor.Orange};

            SelectedBackgroundView = new UIView{BackgroundColor = UIColor.Green};

            ContentView.Layer.BorderColor = UIColor.LightGray.CGColor;
            ContentView.Layer.BorderWidth = 2.0f;
            ContentView.BackgroundColor = UIColor.White;
            ContentView.Transform = CGAffineTransform.MakeScale (0.8f, 0.8f);

            imageView = new UIImageView (UIImage.FromBundle ("placeholder.png"));
            imageView.Center = ContentView.Center;
            imageView.Transform = CGAffineTransform.MakeScale (0.7f, 0.7f);

            ContentView.AddSubview (imageView);
        }

        public UIImage Image {
            set {
                imageView.Image = value;
            }
        }
}
補充檢視
補充檢視是檢視,這些檢視會呈現與 的每個區段 UICollectionView相關聯的資訊。 和儲存格一樣,補充檢視是數據驅動。 當 Cells 呈現數據源的項目數據時,補充檢視會顯示區段數據,例如書架中的書籍類別或音樂文檔庫中的音樂類型。
例如,補充檢視可用來呈現特定區段的標頭,如下圖所示:
若要使用補充檢視,必須先在 方法中 ViewDidLoad 註冊:
CollectionView.RegisterClassForSupplementaryView (typeof(Header), UICollectionElementKindSection.Header, headerId);
然後,必須使用 使用 GetViewForSupplementaryElement所建立 DequeueReusableSupplementaryView的 來傳回檢視,並且繼承自 UICollectionReusableView。 下列代碼段會產生上述螢幕快照中顯示的 SupplementaryView:
public override UICollectionReusableView GetViewForSupplementaryElement (UICollectionView collectionView, NSString elementKind, NSIndexPath indexPath)
        {
            var headerView = (Header)collectionView.DequeueReusableSupplementaryView (elementKind, headerId, indexPath);
            headerView.Text = "Supplementary View";
            return headerView;
        }
補充檢視比頁首和頁尾更泛型。 它們可以放置在集合檢視中的任何位置,並可由任何檢視組成,使其外觀完全可自定義。
裝飾檢視
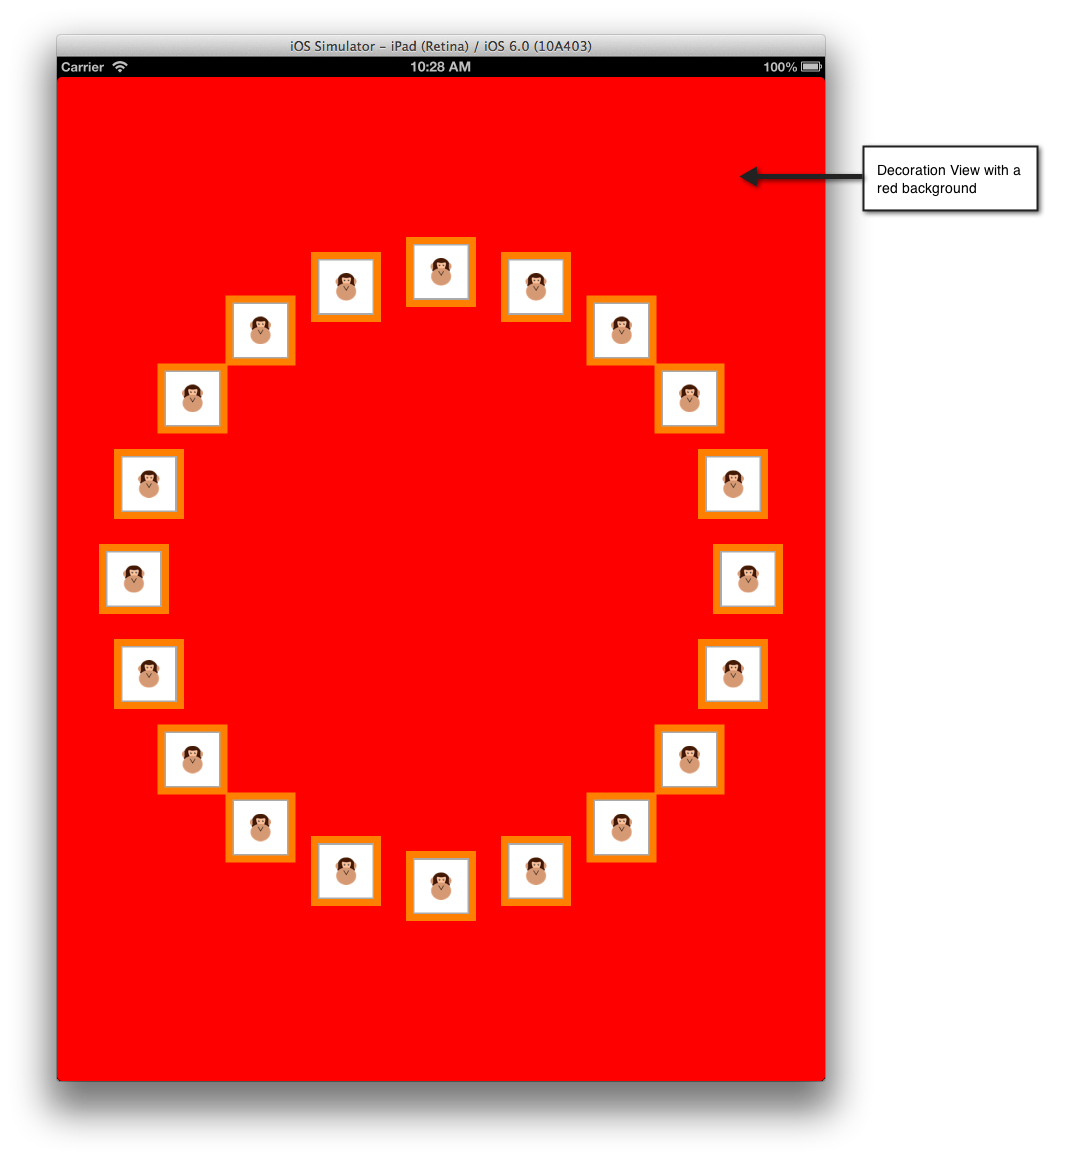
裝飾檢視純粹是可以顯示在 中的 UICollectionView視覺檢視。 與儲存格和補充檢視不同,它們不是數據驅動。 它們一律會在版面配置的子類別內建立,之後可以變更為內容的版面配置。 例如,裝飾檢視可用來呈現與 中 UICollectionView內容卷動的背景檢視,如下所示:
下列代碼段會將範例 CircleLayout 類別中的背景變更為紅色:
public class MyDecorationView : UICollectionReusableView
 {
   [Export ("initWithFrame:")]
   public MyDecorationView (CGRect frame) : base (frame)
   {
     BackgroundColor = UIColor.Red;
   }
 }
資料來源
如同 iOS 的其他部分,例如 UITableView 和 MKMapView, UICollectionView 會從 數據源取得其數據,該數據源會透過 UICollectionViewDataSource 類別在 Xamarin.iOS 中公開。 此類別負責提供內容給 UICollectionView ,例如:
- 單元格 – 從
GetCell方法傳回。 - 增補檢視 – 從
GetViewForSupplementaryElement方法傳回。 - 區段 數目 – 從
NumberOfSections方法傳回。 如果未實作,則預設為1。 - 每個區段 的項目數 – 從
GetItemsCount方法傳回。
UICollectionViewController
為了方便起見,可以使用 類別 UICollectionViewController 。這會自動設定為委派,下一節會討論此委派,以及其 UICollectionView 檢視的數據源。
UITableView如同 ,類別UICollectionView只會呼叫其數據源,以取得畫面上專案的 Cells。
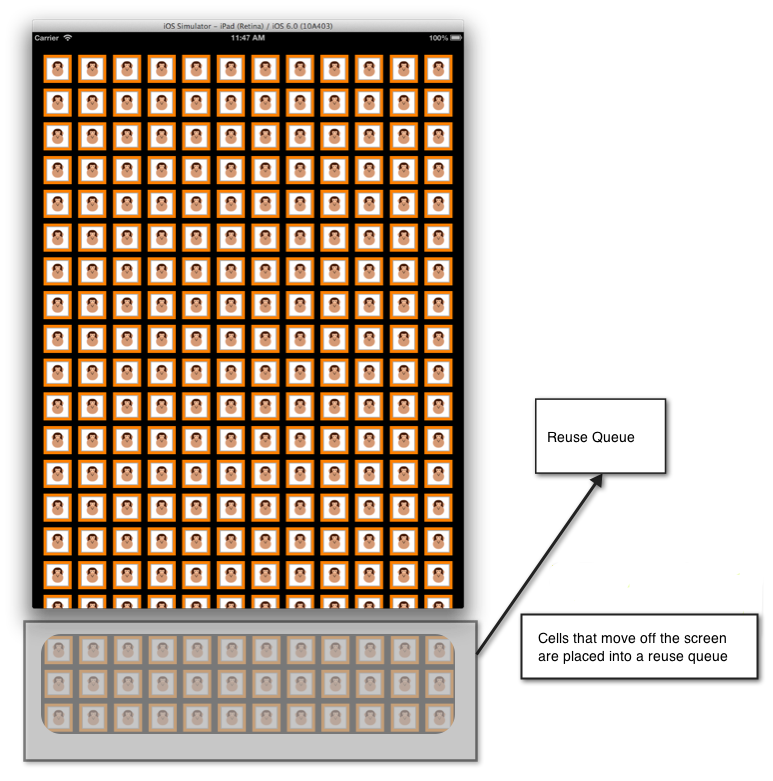
從畫面捲動的儲存格會放在佇列中以供重複使用,如下圖所示:
和已簡化UICollectionViewUITableView儲存格重複使用。 如果重複使用佇列中沒有儲存格,您就不再需要直接在數據源中建立儲存格,因為儲存格會向系統註冊。 如果在呼叫將 Cell 從重複使用佇列取消佇列時無法使用 Cell,iOS 會根據已註冊的類型或 nib 自動建立它。
相同的技術也適用於補充檢視。
例如,請考慮註冊 類別的下列程式代碼 AnimalCell :
static NSString animalCellId = new NSString ("AnimalCell");
CollectionView.RegisterClassForCell (typeof(AnimalCell), animalCellId);
UICollectionView當 因為儲存格的項目位於畫面上,因此需要儲存格時,會UICollectionView呼叫其數據源的 GetCell 方法。 類似於這與UITableView搭配運作的方式,此方法負責從支持資料設定 Cell,在此情況下會是類別 AnimalCell 。
下列程式代碼顯示 傳回 實例的 GetCell AnimalCell 實作:
public override UICollectionViewCell GetCell (UICollectionView collectionView, Foundation.NSIndexPath indexPath)
{
        var animalCell = (AnimalCell)collectionView.DequeueReusableCell (animalCellId, indexPath);

        var animal = animals [indexPath.Row];

        animalCell.Image = animal.Image;

        return animalCell;
}
的呼叫 DequeReusableCell 是儲存格從重複使用佇列中取消佇列的位置,或者,如果佇列中沒有數據格,則根據呼叫 CollectionView.RegisterClassForCell中註冊的類型所建立。
在此情況下,藉由註冊 AnimalCell 類別,iOS 會在內部建立新的 AnimalCell ,並在呼叫取消佇列數據格時傳回該儲存格,之後會使用動物類別中包含的影像進行設定,並傳回以顯示給 UICollectionView。
Delegate
類別 UICollectionView 會使用 型 UICollectionViewDelegate 別的委派來支援 與 中 UICollectionView內容的互動。 這允許控制:
- 單元格選取 – 判斷是否選取儲存格。
- 單元格醒目 提示 – 判斷儲存格目前是否正在觸碰。
- 單元格功能表 – 顯示給儲存格的功能表,以回應長按手勢。
如同數據源, UICollectionViewController 預設會將 設定為 的 UICollectionView委派。
單元格 HighLighting
按下 Cell 時,單元格會轉換成醒目提示狀態,而且在使用者從 Cell 中抬起手指之前,不會選取該儲存格。 這允許在實際選取單元格之前,暫時變更單元格的外觀。 選取時,會顯示儲存格的 SelectedBackgroundView 。 下圖顯示選取項目發生前反白顯示的狀態:
若要實作醒目提示,ItemHighlighted可以使用 的 UICollectionViewDelegate 和 ItemUnhighlighted 方法。 例如,下列程式代碼會在反白顯示儲存格時套用 的黃色背景 ContentView ,並在未反白顯示時套用白色背景,如上圖所示:
public override void ItemHighlighted (UICollectionView collectionView, NSIndexPath indexPath)
{
        var cell = collectionView.CellForItem(indexPath);
        cell.ContentView.BackgroundColor = UIColor.Yellow;
}

public override void ItemUnhighlighted (UICollectionView collectionView, NSIndexPath indexPath)
{
        var cell = collectionView.CellForItem(indexPath);
        cell.ContentView.BackgroundColor = UIColor.White;
}
停用選取範圍
在中 UICollectionView預設會啟用選取範圍。 若要停用選取,請覆寫 ShouldHighlightItem 並傳回 false,如下所示:
public override bool ShouldHighlightItem (UICollectionView collectionView, NSIndexPath indexPath)
{
        return false;
}
停用醒目提示時,也會停用選取單元格的程式。 此外,也有一個 ShouldSelectItem 方法可以直接控制選取範圍,不過如果 ShouldHighlightItem 已實作並傳回 false, ShouldSelectItem 則不會呼叫 。
ShouldSelectItem 允許在未實作時 ShouldHighlightItem 逐項開啟或關閉選取專案。 如果 實作 並傳回 true, ShouldHighlightItem 則它也允許反白顯示而不選取範圍,同時 ShouldSelectItem 傳回 false。
單元格功能表
中的每個 UICollectionView 儲存格都能夠顯示允許選擇性地剪下、複製和貼上的功能表。 若要在儲存格上建立編輯選單:
- 如果項目應該顯示功能表,請覆寫
ShouldShowMenu並傳回 true。 - 針對專案可執行的每個動作覆寫
CanPerformAction並傳回 true,這會是剪下、複製或貼上的任何動作。 - 覆寫
PerformAction以執行編輯、貼上作業的複本。
下列螢幕快照顯示長時間按下儲存格時的選單:
版面配置
UICollectionView 支援配置系統,可讓其所有元素、單元格、增補檢視和裝飾檢視的位置不受本身管理 UICollectionView 。
使用版面配置系統,應用程式可以支援版面配置,例如本文中所見的類似網格線的配置,以及提供自定義版面配置。
版面配置基本概念
中的 UICollectionView 版面配置定義於繼承自 UICollectionViewLayout的類別中。 配置實作負責建立 中 UICollectionView每個專案的版面配置屬性。 有兩種方式可以建立版面配置:
- 使用內
UICollectionViewFlowLayout建 。 - 繼承自
UICollectionViewLayout來提供自定義版面配置。
流程配置
類別 UICollectionViewFlowLayout 提供行型版面配置,適合在我們所看到的儲存格方格中排列內容。
若要使用流程配置:
- 建立 的
UICollectionViewFlowLayout實例:
var layout = new UICollectionViewFlowLayout ();
- 將 實體傳遞至 的
UICollectionView建構函式:
simpleCollectionViewController = new SimpleCollectionViewController (layout);
這是在方格中配置內容所需的所有專案。 此外,當方向變更時,處理 UICollectionViewFlowLayout 會適當地重新排列內容,如下所示:
區段內嵌
若要在 周圍 UIContentView提供一些空間,版面配置具有 SectionInset 類型的 UIEdgeInsets屬性。 例如,下列程式代碼會在 配置 UICollectionViewFlowLayout時,在每個 區段UIContentView周圍提供 50 像素的緩衝區:
var layout = new UICollectionViewFlowLayout ();
layout.SectionInset = new UIEdgeInsets (50,50,50,50);
這會導致區段的間距,如下所示:
子類別化 UICollectionViewFlowLayout
在直接使用 UICollectionViewFlowLayout 版本中,也可以進行子類別化,以進一步自定義一行內容的配置。 例如,這可以用來建立不會將單元格包裝成網格線的配置,而是建立具有水準捲動效果的單一數據列,如下所示:
若要透過子類別化來實作 UICollectionViewFlowLayout 此作業,需要:
- 初始化任何套用至版面配置本身的版面配置屬性,或建構函式中配置中的所有專案。
- 覆寫
ShouldInvalidateLayoutForBoundsChange,傳回 true,以便在變更界限UICollectionView時重新計算儲存格的配置。 在此情況下,這可確保套用至最中間儲存格之轉換的程式代碼將在捲動期間套用。 - 覆寫
TargetContentOffset,讓最中間的UICollectionView儲存格貼齊到中央,因為捲動停止。 - 覆寫
LayoutAttributesForElementsInRect以傳回 的UICollectionViewLayoutAttributes陣列。 每個UICollectionViewLayoutAttribute都包含如何配置特定項目的相關信息,包括其Center、SizeZIndex和Transform3D等屬性。
下列程式代碼顯示這類實作:
using System;
using CoreGraphics;
using Foundation;
using UIKit;
using CoreGraphics;
using CoreAnimation;

namespace SimpleCollectionView
{
  public class LineLayout : UICollectionViewFlowLayout
  {
    public const float ITEM_SIZE = 200.0f;
    public const int ACTIVE_DISTANCE = 200;
    public const float ZOOM_FACTOR = 0.3f;

    public LineLayout ()
    {
      ItemSize = new CGSize (ITEM_SIZE, ITEM_SIZE);
      ScrollDirection = UICollectionViewScrollDirection.Horizontal;
            SectionInset = new UIEdgeInsets (400,0,400,0);
      MinimumLineSpacing = 50.0f;
    }

    public override bool ShouldInvalidateLayoutForBoundsChange (CGRect newBounds)
    {
      return true;
    }

    public override UICollectionViewLayoutAttributes[] LayoutAttributesForElementsInRect (CGRect rect)
    {
      var array = base.LayoutAttributesForElementsInRect (rect);
            var visibleRect = new CGRect (CollectionView.ContentOffset, CollectionView.Bounds.Size);

      foreach (var attributes in array) {
        if (attributes.Frame.IntersectsWith (rect)) {
          float distance = (float)(visibleRect.GetMidX () - attributes.Center.X);
          float normalizedDistance = distance / ACTIVE_DISTANCE;
          if (Math.Abs (distance) < ACTIVE_DISTANCE) {
            float zoom = 1 + ZOOM_FACTOR * (1 - Math.Abs (normalizedDistance));
            attributes.Transform3D = CATransform3D.MakeScale (zoom, zoom, 1.0f);
            attributes.ZIndex = 1;
          }
        }
      }
      return array;
    }

    public override CGPoint TargetContentOffset (CGPoint proposedContentOffset, CGPoint scrollingVelocity)
    {
      float offSetAdjustment = float.MaxValue;
      float horizontalCenter = (float)(proposedContentOffset.X + (this.CollectionView.Bounds.Size.Width / 2.0));
      CGRect targetRect = new CGRect (proposedContentOffset.X, 0.0f, this.CollectionView.Bounds.Size.Width, this.CollectionView.Bounds.Size.Height);
      var array = base.LayoutAttributesForElementsInRect (targetRect);
      foreach (var layoutAttributes in array) {
        float itemHorizontalCenter = (float)layoutAttributes.Center.X;
        if (Math.Abs (itemHorizontalCenter - horizontalCenter) < Math.Abs (offSetAdjustment)) {
          offSetAdjustment = itemHorizontalCenter - horizontalCenter;
        }
      }
            return new CGPoint (proposedContentOffset.X + offSetAdjustment, proposedContentOffset.Y);
    }

  }
}
自訂版面配置
除了使用 UICollectionViewFlowLayout,版面配置也可以透過直接從 繼承來 UICollectionViewLayout完全自定義。
要覆寫的主要方法是:
PrepareLayout– 用於執行整個版面配置程式將使用的初始幾何計算。CollectionViewContentSize– 傳回用來顯示內容的區域大小。LayoutAttributesForElementsInRect– 如同稍早所示的UICollectionViewFlowLayout範例,這個方法可用來提供有關如何配置每個專案的相關信息UICollectionView。 不過,不同於UICollectionViewFlowLayout,在建立自定義配置時,您可以視需要放置專案。
例如,相同的內容可以在迴圈配置中呈現,如下所示:
版面配置的強大功能是,若要從類似網格線的配置變更為水平卷動版面配置,而後續到這個迴圈版面配置,只需要提供給 UICollectionView 的版面配置類別才能變更。 中 UICollectionView沒有任何 專案,其委派或數據原始程式代碼完全不會變更。
iOS 9 中的變更
在 iOS 9 中,集合檢視 (UICollectionView) 現在支持藉由新增新的默認手勢辨識器和數個新的支援方法,將專案重新排序成現成。
使用這些新方法,您可以輕鬆地在集合檢視中實作拖曳以重新排序,並可以選擇在重新排序程式的任何階段自定義項目外觀。
在本文中,我們將探討如何在 Xamarin.iOS 應用程式中實作拖曳到重新排序,以及 iOS 9 對集合檢視控件所做的一些其他變更:
重新排序專案
如上所述,iOS 9 中集合檢視的最重大變更之一,就是從現成新增簡單的拖曳到重新排序功能。
在 iOS 9 中,將重新排序新增至集合檢視的最快速方式是使用 UICollectionViewController。
集合檢視控制器現在有 屬性 InstallsStandardGestureForInteractiveMovement ,它新增了支援拖曳至集合中重新排序專案的標準 手勢辨識器 。
由於預設值為 true,因此您只需要實 MoveItem 作 類別的 UICollectionViewDataSource 方法,以支援拖曳到重新排序。 例如:
public override void MoveItem (UICollectionView collectionView, NSIndexPath sourceIndexPath, NSIndexPath destinationIndexPath)
{
  // Reorder our list of items
  ...
}
簡單重新排序範例
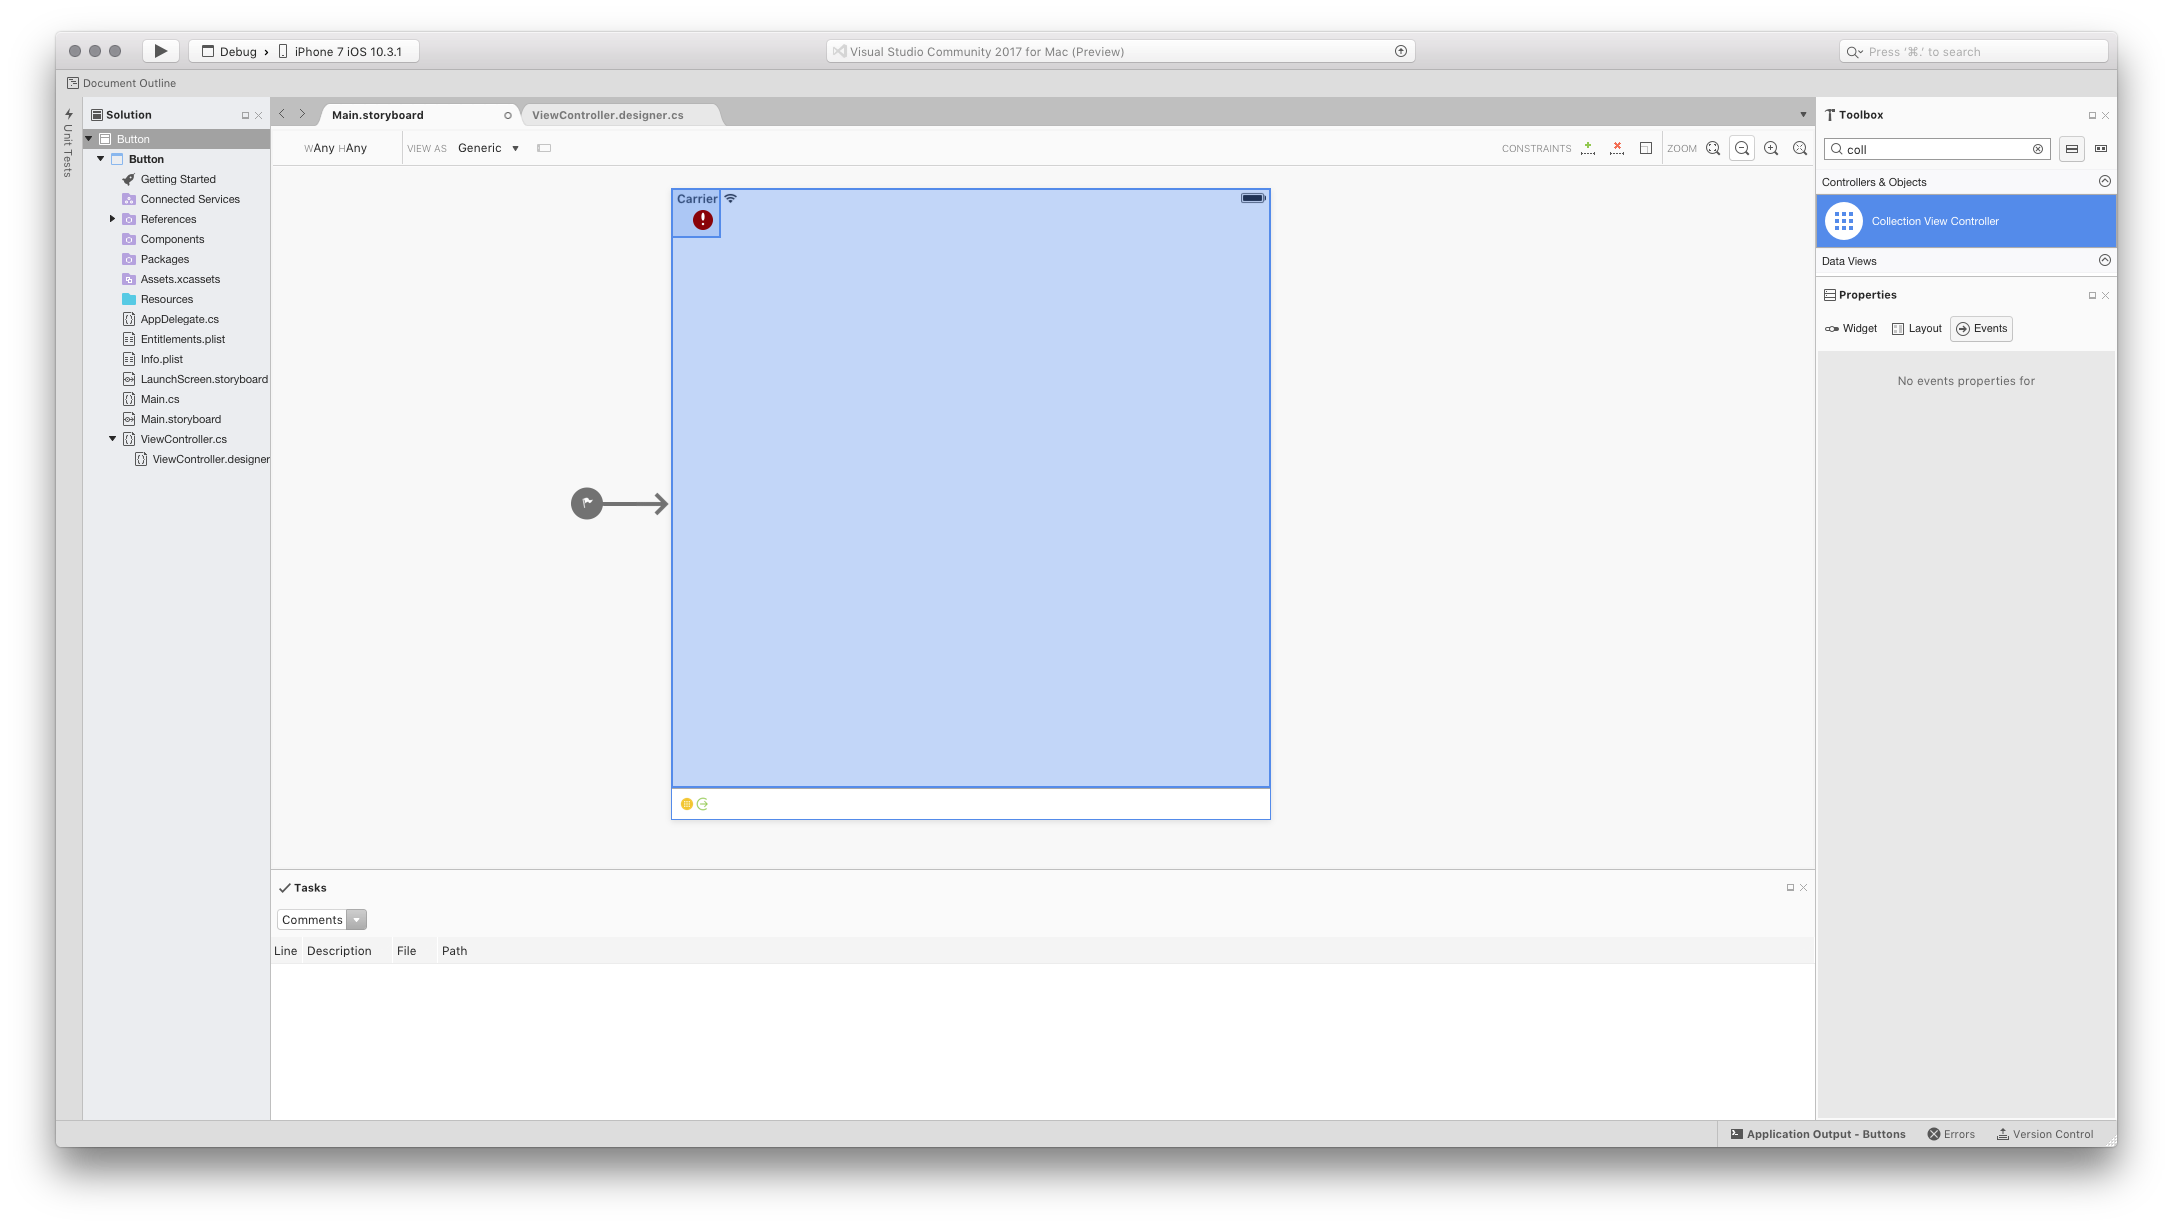
例如,啟動新的 Xamarin.iOS 專案並編輯 Main.storyboard 檔案。 UICollectionViewController將 拖曳到設計介面:
選取 [集合檢視] (從文件大綱執行此動作可能最簡單的方式)。 在 Properties Pad 的 [配置] 索引標籤中,設定下列大小,如下列螢幕快照所示:
- 單元格大小:寬度 – 60 |高度 – 60
- 標頭大小:寬度 – 0 |高度 – 0
- 頁尾大小:寬度 – 0 |高度 – 0
- 最小間距:單元格 – 8 |行 – 8
- 區段內嵌:Top – 16 |底部 – 16 |左 – 16 |右 – 16
接下來,編輯預設的儲存格:
- 將其背景色彩變更為藍色
- 新增標籤作為儲存格的標題
- 將重複使用識別碼設定為 儲存格
新增條件約束,讓標籤在儲存格變更大小時將標籤中:
在 CollectionViewCell 的 Property Pad 中,將 類別設定為 TextCollectionViewCell:
將集合可重複使用檢視設定為 Cell:
最後,選取標籤並將命名為 TextLabel:
編輯類別並 TextCollectionViewCell 新增下列屬性:
using System;
using Foundation;
using UIKit;

namespace CollectionView
{
  public partial class TextCollectionViewCell : UICollectionViewCell
  {
    #region Computed Properties
    public string Title {
      get { return TextLabel.Text; }
      set { TextLabel.Text = value; }
    }
    #endregion

    #region Constructors
    public TextCollectionViewCell (IntPtr handle) : base (handle)
    {
    }
    #endregion
  }
}
在這裡,標籤 Text 的屬性會公開為儲存格的標題,以便從程式代碼設定。
將新的 C# 類別新增至專案,並呼叫它 WaterfallCollectionSource。 編輯檔案,使其看起來如下:
using System;
using Foundation;
using UIKit;
using System.Collections.Generic;

namespace CollectionView
{
  public class WaterfallCollectionSource : UICollectionViewDataSource
  {
    #region Computed Properties
    public WaterfallCollectionView CollectionView { get; set;}
    public List<int> Numbers { get; set; } = new List<int> ();
    #endregion

    #region Constructors
    public WaterfallCollectionSource (WaterfallCollectionView collectionView)
    {
      // Initialize
      CollectionView = collectionView;

      // Init numbers collection
      for (int n = 0; n < 100; ++n) {
        Numbers.Add (n);
      }
    }
    #endregion

    #region Override Methods
    public override nint NumberOfSections (UICollectionView collectionView) {
      // We only have one section
      return 1;
    }

    public override nint GetItemsCount (UICollectionView collectionView, nint section) {
      // Return the number of items
      return Numbers.Count;
    }

    public override UICollectionViewCell GetCell (UICollectionView collectionView, NSIndexPath indexPath)
    {
      // Get a reusable cell and set {~~it's~>its~~} title from the item
      var cell = collectionView.DequeueReusableCell ("Cell", indexPath) as TextCollectionViewCell;
      cell.Title = Numbers [(int)indexPath.Item].ToString();

      return cell;
    }

    public override bool CanMoveItem (UICollectionView collectionView, NSIndexPath indexPath) {
      // We can always move items
      return true;
    }

    public override void MoveItem (UICollectionView collectionView, NSIndexPath sourceIndexPath, NSIndexPath destinationIndexPath)
    {
      // Reorder our list of items
      var item = Numbers [(int)sourceIndexPath.Item];
      Numbers.RemoveAt ((int)sourceIndexPath.Item);
      Numbers.Insert ((int)destinationIndexPath.Item, item);
    }
    #endregion
  }
}
這個類別會是我們集合檢視的數據源,並提供集合中每個儲存格的資訊。
請注意,會 MoveItem 實作 方法,以允許重新排序集合中的專案。
將另一個新的 C# 類別新增至專案,並呼叫它 WaterfallCollectionDelegate。 編輯此檔案,使其看起來如下:
using System;
using Foundation;
using UIKit;
using System.Collections.Generic;

namespace CollectionView
{
  public class WaterfallCollectionDelegate : UICollectionViewDelegate
  {
    #region Computed Properties
    public WaterfallCollectionView CollectionView { get; set;}
    #endregion

    #region Constructors
    public WaterfallCollectionDelegate (WaterfallCollectionView collectionView)
    {

      // Initialize
      CollectionView = collectionView;

    }
    #endregion

    #region Overrides Methods
    public override bool ShouldHighlightItem (UICollectionView collectionView, NSIndexPath indexPath) {
      // Always allow for highlighting
      return true;
    }

    public override void ItemHighlighted (UICollectionView collectionView, NSIndexPath indexPath)
    {
      // Get cell and change to green background
      var cell = collectionView.CellForItem(indexPath);
      cell.ContentView.BackgroundColor = UIColor.FromRGB(183,208,57);
    }

    public override void ItemUnhighlighted (UICollectionView collectionView, NSIndexPath indexPath)
    {
      // Get cell and return to blue background
      var cell = collectionView.CellForItem(indexPath);
      cell.ContentView.BackgroundColor = UIColor.FromRGB(164,205,255);
    }
    #endregion
  }
}
這會作為集合檢視的委派。 方法已覆寫,以在使用者與單元格互動時,在集合檢視中反白顯示單元格。
將最後一個 C# 類別新增至專案,並呼叫它 WaterfallCollectionView。 編輯此檔案,使其看起來如下:
using System;
using UIKit;
using System.Collections.Generic;
using Foundation;

namespace CollectionView
{
  [Register("WaterfallCollectionView")]
  public class WaterfallCollectionView : UICollectionView
  {

    #region Constructors
    public WaterfallCollectionView (IntPtr handle) : base (handle)
    {
    }
    #endregion

    #region Override Methods
    public override void AwakeFromNib ()
    {
      base.AwakeFromNib ();

      // Initialize
      DataSource = new WaterfallCollectionSource(this);
      Delegate = new WaterfallCollectionDelegate(this);

    }
    #endregion
  }
}
請注意,DataSourceDelegate從其分鏡文稿 (或 .xib 檔案) 建構集合檢視時,會設定上述建立的 和 。
再次編輯Main.storyboard檔案,然後選取集合檢視並切換至 [屬性]。 將 [ 類別 ] 設定為我們上述定義的自訂 WaterfallCollectionView 類別:
儲存您對 UI 所做的變更,然後執行應用程式。 如果使用者從清單中選取專案,並將其拖曳到新位置,其他專案就會在專案移出時自動產生動畫效果。 當使用者將專案放在新位置時,它會堅持該位置。 例如:
使用自定義手勢辨識器
如果您無法使用 UICollectionViewController 且必須使用一般 UIViewController,或如果您想要對拖放手勢進行更多控制,您可以建立自己的自定義手勢辨識器,並在檢視載入時將其新增至集合檢視。 例如:
public override void ViewDidLoad ()
{
  base.ViewDidLoad ();

  // Create a custom gesture recognizer
  var longPressGesture = new UILongPressGestureRecognizer ((gesture) => {

    // Take action based on state
    switch(gesture.State) {
    case UIGestureRecognizerState.Began:
      var selectedIndexPath = CollectionView.IndexPathForItemAtPoint(gesture.LocationInView(View));
      if (selectedIndexPath !=null) {
        CollectionView.BeginInteractiveMovementForItem(selectedIndexPath);
      }
      break;
    case UIGestureRecognizerState.Changed:
      CollectionView.UpdateInteractiveMovementTargetPosition(gesture.LocationInView(View));
      break;
    case UIGestureRecognizerState.Ended:
      CollectionView.EndInteractiveMovement();
      break;
    default:
      CollectionView.CancelInteractiveMovement();
      break;
    }

  });

  // Add the custom recognizer to the collection view
  CollectionView.AddGestureRecognizer(longPressGesture);
}
在這裡,我們使用數個新方法新增至集合檢視,以實作和控制拖曳作業:
BeginInteractiveMovementForItem- 標記移動作業的開始。UpdateInteractiveMovementTargetPosition- 會在專案的位置更新時傳送。EndInteractiveMovement- 標記項目移動的結尾。CancelInteractiveMovement- 標示使用者取消移動作業。
執行應用程式時,拖曳作業的運作方式與集合檢視隨附的默認拖曳手勢辨識器完全相同。
自訂版面配置和重新排序
在 iOS 9 中,已新增數個新方法,以在集合檢視中使用拖曳到重新排序和自定義版面配置。 若要探索這項功能,讓我們將自定義版面配置新增至集合。
首先,將名為 WaterfallCollectionLayout 的新 C# 類別新增至專案。 編輯它,使其看起來如下:
using System;
using Foundation;
using UIKit;
using System.Collections.Generic;
using CoreGraphics;

namespace CollectionView
{
  [Register("WaterfallCollectionLayout")]
  public class WaterfallCollectionLayout : UICollectionViewLayout
  {
    #region Private Variables
    private int columnCount = 2;
    private nfloat minimumColumnSpacing = 10;
    private nfloat minimumInterItemSpacing = 10;
    private nfloat headerHeight = 0.0f;
    private nfloat footerHeight = 0.0f;
    private UIEdgeInsets sectionInset = new UIEdgeInsets(0, 0, 0, 0);
    private WaterfallCollectionRenderDirection itemRenderDirection = WaterfallCollectionRenderDirection.ShortestFirst;
    private Dictionary<nint,UICollectionViewLayoutAttributes> headersAttributes = new Dictionary<nint, UICollectionViewLayoutAttributes>();
    private Dictionary<nint,UICollectionViewLayoutAttributes> footersAttributes = new Dictionary<nint, UICollectionViewLayoutAttributes>();
    private List<CGRect> unionRects = new List<CGRect>();
    private List<nfloat> columnHeights = new List<nfloat>();
    private List<UICollectionViewLayoutAttributes> allItemAttributes = new List<UICollectionViewLayoutAttributes>();
    private List<List<UICollectionViewLayoutAttributes>> sectionItemAttributes = new List<List<UICollectionViewLayoutAttributes>>();
    private nfloat unionSize = 20;
    #endregion

    #region Computed Properties
    [Export("ColumnCount")]
    public int ColumnCount {
      get { return columnCount; }
      set {
        WillChangeValue ("ColumnCount");
        columnCount = value;
        DidChangeValue ("ColumnCount");

        InvalidateLayout ();
      }
    }

    [Export("MinimumColumnSpacing")]
    public nfloat MinimumColumnSpacing {
      get { return minimumColumnSpacing; }
      set {
        WillChangeValue ("MinimumColumnSpacing");
        minimumColumnSpacing = value;
        DidChangeValue ("MinimumColumnSpacing");

        InvalidateLayout ();
      }
    }

    [Export("MinimumInterItemSpacing")]
    public nfloat MinimumInterItemSpacing {
      get { return minimumInterItemSpacing; }
      set {
        WillChangeValue ("MinimumInterItemSpacing");
        minimumInterItemSpacing = value;
        DidChangeValue ("MinimumInterItemSpacing");

        InvalidateLayout ();
      }
    }

    [Export("HeaderHeight")]
    public nfloat HeaderHeight {
      get { return headerHeight; }
      set {
        WillChangeValue ("HeaderHeight");
        headerHeight = value;
        DidChangeValue ("HeaderHeight");

        InvalidateLayout ();
      }
    }

    [Export("FooterHeight")]
    public nfloat FooterHeight {
      get { return footerHeight; }
      set {
        WillChangeValue ("FooterHeight");
        footerHeight = value;
        DidChangeValue ("FooterHeight");

        InvalidateLayout ();
      }
    }

    [Export("SectionInset")]
    public UIEdgeInsets SectionInset {
      get { return sectionInset; }
      set {
        WillChangeValue ("SectionInset");
        sectionInset = value;
        DidChangeValue ("SectionInset");

        InvalidateLayout ();
      }
    }

    [Export("ItemRenderDirection")]
    public WaterfallCollectionRenderDirection ItemRenderDirection {
      get { return itemRenderDirection; }
      set {
        WillChangeValue ("ItemRenderDirection");
        itemRenderDirection = value;
        DidChangeValue ("ItemRenderDirection");

        InvalidateLayout ();
      }
    }
    #endregion

    #region Constructors
    public WaterfallCollectionLayout ()
    {
    }

    public WaterfallCollectionLayout(NSCoder coder) : base(coder) {

    }
    #endregion

    #region Public Methods
    public nfloat ItemWidthInSectionAtIndex(int section) {

      var width = CollectionView.Bounds.Width - SectionInset.Left - SectionInset.Right;
      return (nfloat)Math.Floor ((width - ((ColumnCount - 1) * MinimumColumnSpacing)) / ColumnCount);
    }
    #endregion

    #region Override Methods
    public override void PrepareLayout ()
    {
      base.PrepareLayout ();

      // Get the number of sections
      var numberofSections = CollectionView.NumberOfSections();
      if (numberofSections == 0)
        return;

      // Reset collections
      headersAttributes.Clear ();
      footersAttributes.Clear ();
      unionRects.Clear ();
      columnHeights.Clear ();
      allItemAttributes.Clear ();
      sectionItemAttributes.Clear ();

      // Initialize column heights
      for (int n = 0; n < ColumnCount; n++) {
        columnHeights.Add ((nfloat)0);
      }

      // Process all sections
      nfloat top = 0.0f;
      var attributes = new UICollectionViewLayoutAttributes ();
      var columnIndex = 0;
      for (nint section = 0; section < numberofSections; ++section) {
        // Calculate section specific metrics
        var minimumInterItemSpacing = (MinimumInterItemSpacingForSection == null) ? MinimumColumnSpacing :
          MinimumInterItemSpacingForSection (CollectionView, this, section);

        // Calculate widths
        var width = CollectionView.Bounds.Width - SectionInset.Left - SectionInset.Right;
        var itemWidth = (nfloat)Math.Floor ((width - ((ColumnCount - 1) * MinimumColumnSpacing)) / ColumnCount);

        // Calculate section header
        var heightHeader = (HeightForHeader == null) ? HeaderHeight :
          HeightForHeader (CollectionView, this, section);

        if (heightHeader > 0) {
          attributes = UICollectionViewLayoutAttributes.CreateForSupplementaryView (UICollectionElementKindSection.Header, NSIndexPath.FromRowSection (0, section));
          attributes.Frame = new CGRect (0, top, CollectionView.Bounds.Width, heightHeader);
          headersAttributes.Add (section, attributes);
          allItemAttributes.Add (attributes);

          top = attributes.Frame.GetMaxY ();
        }

        top += SectionInset.Top;
        for (int n = 0; n < ColumnCount; n++) {
          columnHeights [n] = top;
        }

        // Calculate Section Items
        var itemCount = CollectionView.NumberOfItemsInSection(section);
        List<UICollectionViewLayoutAttributes> itemAttributes = new List<UICollectionViewLayoutAttributes> ();

        for (nint n = 0; n < itemCount; n++) {
          var indexPath = NSIndexPath.FromRowSection (n, section);
          columnIndex = NextColumnIndexForItem (n);
          var xOffset = SectionInset.Left + (itemWidth + MinimumColumnSpacing) * (nfloat)columnIndex;
          var yOffset = columnHeights [columnIndex];
          var itemSize = (SizeForItem == null) ? new CGSize (0, 0) : SizeForItem (CollectionView, this, indexPath);
          nfloat itemHeight = 0.0f;

          if (itemSize.Height > 0.0f && itemSize.Width > 0.0f) {
            itemHeight = (nfloat)Math.Floor (itemSize.Height * itemWidth / itemSize.Width);
          }

          attributes = UICollectionViewLayoutAttributes.CreateForCell (indexPath);
          attributes.Frame = new CGRect (xOffset, yOffset, itemWidth, itemHeight);
          itemAttributes.Add (attributes);
          allItemAttributes.Add (attributes);
          columnHeights [columnIndex] = attributes.Frame.GetMaxY () + MinimumInterItemSpacing;
        }
        sectionItemAttributes.Add (itemAttributes);

        // Calculate Section Footer
        nfloat footerHeight = 0.0f;
        columnIndex = LongestColumnIndex();
        top = columnHeights [columnIndex] - MinimumInterItemSpacing + SectionInset.Bottom;
        footerHeight = (HeightForFooter == null) ? FooterHeight : HeightForFooter(CollectionView, this, section);

        if (footerHeight > 0) {
          attributes = UICollectionViewLayoutAttributes.CreateForSupplementaryView (UICollectionElementKindSection.Footer, NSIndexPath.FromRowSection (0, section));
          attributes.Frame = new CGRect (0, top, CollectionView.Bounds.Width, footerHeight);
          footersAttributes.Add (section, attributes);
          allItemAttributes.Add (attributes);
          top = attributes.Frame.GetMaxY ();
        }

        for (int n = 0; n < ColumnCount; n++) {
          columnHeights [n] = top;
        }
      }

      var i =0;
      var attrs = allItemAttributes.Count;
      while(i < attrs) {
        var rect1 = allItemAttributes [i].Frame;
        i = (int)Math.Min (i + unionSize, attrs) - 1;
        var rect2 = allItemAttributes [i].Frame;
        unionRects.Add (CGRect.Union (rect1, rect2));
        i++;
      }

    }

    public override CGSize CollectionViewContentSize {
      get {
        if (CollectionView.NumberOfSections () == 0) {
          return new CGSize (0, 0);
        }

        var contentSize = CollectionView.Bounds.Size;
        contentSize.Height = columnHeights [0];
        return contentSize;
      }
    }

    public override UICollectionViewLayoutAttributes LayoutAttributesForItem (NSIndexPath indexPath)
    {
      if (indexPath.Section >= sectionItemAttributes.Count) {
        return null;
      }

      if (indexPath.Item >= sectionItemAttributes [indexPath.Section].Count) {
        return null;
      }

      var list = sectionItemAttributes [indexPath.Section];
      return list [(int)indexPath.Item];
    }

    public override UICollectionViewLayoutAttributes LayoutAttributesForSupplementaryView (NSString kind, NSIndexPath indexPath)
    {
      var attributes = new UICollectionViewLayoutAttributes ();

      switch (kind) {
      case "header":
        attributes = headersAttributes [indexPath.Section];
        break;
      case "footer":
        attributes = footersAttributes [indexPath.Section];
        break;
      }

      return attributes;
    }

    public override UICollectionViewLayoutAttributes[] LayoutAttributesForElementsInRect (CGRect rect)
    {
      var begin = 0;
      var end = unionRects.Count;
      List<UICollectionViewLayoutAttributes> attrs = new List<UICollectionViewLayoutAttributes> ();

      for (int i = 0; i < end; i++) {
        if (rect.IntersectsWith(unionRects[i])) {
          begin = i * (int)unionSize;
        }
      }

      for (int i = end - 1; i >= 0; i--) {
        if (rect.IntersectsWith (unionRects [i])) {
          end = (int)Math.Min ((i + 1) * (int)unionSize, allItemAttributes.Count);
          break;
        }
      }

      for (int i = begin; i < end; i++) {
        var attr = allItemAttributes [i];
        if (rect.IntersectsWith (attr.Frame)) {
          attrs.Add (attr);
        }
      }

      return attrs.ToArray();
    }

    public override bool ShouldInvalidateLayoutForBoundsChange (CGRect newBounds)
    {
      var oldBounds = CollectionView.Bounds;
      return (newBounds.Width != oldBounds.Width);
    }
    #endregion

    #region Private Methods
    private int ShortestColumnIndex() {
      var index = 0;
      var shortestHeight = nfloat.MaxValue;
      var n = 0;

      // Scan each column for the shortest height
      foreach (nfloat height in columnHeights) {
        if (height < shortestHeight) {
          shortestHeight = height;
          index = n;
        }
        ++n;
      }

      return index;
    }

    private int LongestColumnIndex() {
      var index = 0;
      var longestHeight = nfloat.MinValue;
      var n = 0;

      // Scan each column for the shortest height
      foreach (nfloat height in columnHeights) {
        if (height > longestHeight) {
          longestHeight = height;
          index = n;
        }
        ++n;
      }

      return index;
    }

    private int NextColumnIndexForItem(nint item) {
      var index = 0;

      switch (ItemRenderDirection) {
      case WaterfallCollectionRenderDirection.ShortestFirst:
        index = ShortestColumnIndex ();
        break;
      case WaterfallCollectionRenderDirection.LeftToRight:
        index = ColumnCount;
        break;
      case WaterfallCollectionRenderDirection.RightToLeft:
        index = (ColumnCount - 1) - ((int)item / ColumnCount);
        break;
      }

      return index;
    }
    #endregion

    #region Events
    public delegate CGSize WaterfallCollectionSizeDelegate(UICollectionView collectionView, WaterfallCollectionLayout layout, NSIndexPath indexPath);
    public delegate nfloat WaterfallCollectionFloatDelegate(UICollectionView collectionView, WaterfallCollectionLayout layout, nint section);
    public delegate UIEdgeInsets WaterfallCollectionEdgeInsetsDelegate(UICollectionView collectionView, WaterfallCollectionLayout layout, nint section);

    public event WaterfallCollectionSizeDelegate SizeForItem;
    public event WaterfallCollectionFloatDelegate HeightForHeader;
    public event WaterfallCollectionFloatDelegate HeightForFooter;
    public event WaterfallCollectionEdgeInsetsDelegate InsetForSection;
    public event WaterfallCollectionFloatDelegate MinimumInterItemSpacingForSection;
    #endregion
  }
}
這可以用來提供自定義的兩個數據行瀑布類型配置至集合檢視。
程序代碼會使用索引鍵/值編碼(透過 WillChangeValue 和 DidChangeValue 方法)為這個類別中的計算屬性提供數據系結。
接下來,編輯 WaterfallCollectionSource 並進行下列變更和新增:
private Random rnd = new Random();
...

public List<nfloat> Heights { get; set; } = new List<nfloat> ();
...

public WaterfallCollectionSource (WaterfallCollectionView collectionView)
{
  // Initialize
  CollectionView = collectionView;

  // Init numbers collection
  for (int n = 0; n < 100; ++n) {
    Numbers.Add (n);
    Heights.Add (rnd.Next (0, 100) + 40.0f);
  }
}
這會為清單中顯示的每個專案建立隨機高度。
接下來,編輯 類別 WaterfallCollectionView 並新增下列協助程序屬性:
public WaterfallCollectionSource Source {
  get { return (WaterfallCollectionSource)DataSource; }
}
這可讓您更輕鬆地從自定義版面配置取得我們的數據源(和專案高度)。
最後,編輯檢視控制器並新增下列程式代碼:
public override void AwakeFromNib ()
{
  base.AwakeFromNib ();

  var waterfallLayout = new WaterfallCollectionLayout ();

  // Wireup events
  waterfallLayout.SizeForItem += (collectionView, layout, indexPath) => {
    var collection = collectionView as WaterfallCollectionView;
    return new CGSize((View.Bounds.Width-40)/3,collection.Source.Heights[(int)indexPath.Item]);
  };

  // Attach the custom layout to the collection
  CollectionView.SetCollectionViewLayout(waterfallLayout, false);
}
這會建立自定義版面配置的實例、設定 事件以提供每個專案的大小,並將新版面配置附加至集合檢視。
如果我們再次執行 Xamarin.iOS 應用程式,集合檢視現在看起來會如下所示:
我們仍然可以像以前一樣拖曳到重新排序專案,但是專案現在會變更大小,使其在卸除時符合其新位置。
集合檢視變更
在下列各節中,我們將詳細探討 iOS 9 在集合檢視中對每個類別所做的變更。
UICollectionView
已對 iOS 9 的 UICollectionView 類別進行下列變更或新增:
BeginInteractiveMovementForItem– 標記拖曳作業的開始。CancelInteractiveMovement– 通知集合檢視使用者已取消拖曳作業。EndInteractiveMovement– 通知集合檢視使用者已完成拖曳作業。GetIndexPathsForVisibleSupplementaryElements– 傳回indexPath集合檢視區段中頁首或頁尾的 。GetSupplementaryView– 傳回指定的頁首或頁尾。GetVisibleSupplementaryViews– 傳回所有可見頁首和頁尾的清單。UpdateInteractiveMovementTargetPosition– 通知集合檢視使用者已在拖曳作業期間移動或移動專案。
UICollectionViewController
已對 UICollectionViewController iOS 9 中的 類別進行下列變更或新增:
InstallsStandardGestureForInteractiveMovement– 如果使用true自動支援拖曳到重新排序的新手勢辨識器。CanMoveItem– 如果指定的專案可以重新排序,通知集合檢視。GetTargetContentOffset– 用來取得指定集合檢視專案的位移。GetTargetIndexPathForMove– 取得indexPath拖曳作業指定項目的 。MoveItem– 移動清單中指定項目的順序。
UICollectionViewDataSource
已對 UICollectionViewDataSource iOS 9 中的 類別進行下列變更或新增:
CanMoveItem– 如果指定的專案可以重新排序,通知集合檢視。MoveItem– 移動清單中指定項目的順序。
UICollectionViewDelegate
已對 UICollectionViewDelegate iOS 9 中的 類別進行下列變更或新增:
GetTargetContentOffset– 用來取得指定集合檢視專案的位移。GetTargetIndexPathForMove– 取得indexPath拖曳作業指定項目的 。
UICollectionViewFlowLayout
已對 UICollectionViewFlowLayout iOS 9 中的 類別進行下列變更或新增:
SectionFootersPinToVisibleBounds– 將區段頁尾貼到可見的集合檢視界限。SectionHeadersPinToVisibleBounds– 將區段標頭貼到可見的集合檢視界限。
UICollectionViewLayout
已對 UICollectionViewLayout iOS 9 中的 類別進行下列變更或新增:
GetInvalidationContextForEndingInteractiveMovementOfItems– 當使用者完成拖曳或取消拖曳作業時,傳回拖曳作業結尾的失效內容。GetInvalidationContextForInteractivelyMovingItems– 傳回拖曳作業開始時的無效內容。GetLayoutAttributesForInteractivelyMovingItem– 在拖曳專案時取得指定專案的版面配置屬性。GetTargetIndexPathForInteractivelyMovingItem– 傳回indexPath拖曳項目時指定點的專案 。
UICollectionViewLayoutAttributes
已對 UICollectionViewLayoutAttributes iOS 9 中的 類別進行下列變更或新增:
CollisionBoundingPath– 傳回拖曳作業期間兩個項目的衝突路徑。CollisionBoundsType– 傳回拖曳作業期間發生的碰撞類型(即 )。UIDynamicItemCollisionBoundsType
UICollectionViewLayoutInvalidationContext
已對 UICollectionViewLayoutInvalidationContext iOS 9 中的 類別進行下列變更或新增:
InteractiveMovementTarget– 傳回拖曳作業的目標專案。PreviousIndexPathsForInteractivelyMovingItems– 傳indexPaths回拖曳以重新排序作業所涉及的其他專案。TargetIndexPathsForInteractivelyMovingItems– 傳回indexPaths因拖曳到重新排序作業而重新排序的專案。
UICollectionViewSource
已對 UICollectionViewSource iOS 9 中的 類別進行下列變更或新增:
CanMoveItem– 如果指定的專案可以重新排序,通知集合檢視。GetTargetContentOffset– 傳回將透過拖曳到重新排序作業移動之專案的位移。GetTargetIndexPathForMove– 傳回indexPath將在拖曳至重新排序作業期間移動之專案的 。MoveItem– 移動清單中指定項目的順序。
摘要
本文涵蓋 iOS 9 中集合檢視的變更,並說明如何在 Xamarin.iOS 中實作這些檢視。 它涵蓋在集合檢視中實作簡單的拖曳到重新排序動作;使用具有拖曳到重新排序的自定義手勢辨識器;以及拖曳到重新排序如何影響自定義集合檢視配置。


