您可以從使用 C# 建立的頁面直接參考 Xamarin.Forms iOS、Android 和 UWP 的原生檢視。 本文示範如何將原生檢視新增至 Xamarin.Forms 使用 C# 建立的版面配置,以及如何覆寫自定義檢視的配置,以更正其度量 API 使用量。
概觀
允許Content設定或具有Children集合的任何Xamarin.Forms控件都可以新增平臺特定檢視。 例如,iOS UILabel 可以直接新增至 ContentView.Content 屬性或 StackLayout.Children 集合。 不過,請注意,這項功能需要使用 #if 共用項目解決方案中的 Xamarin.Forms 定義,而且無法從 Xamarin.Forms .NET Standard 連結庫解決方案取得。
下列螢幕快照示範已新增至 Xamarin.FormsStackLayout的平臺特定檢視:

將平臺特定檢視新增至版面配置的能力是由每個平臺上的兩種 Xamarin.Forms 擴充方法所啟用:
在共享專案中使用這些方法 Xamarin.Forms 需要匯入適當的平臺特定 Xamarin.Forms 命名空間:
- iOS – Xamarin.Forms。Platform.iOS
- Android – Xamarin.Forms。Platform.Android
- 通用 Windows 平台 (UWP) - Xamarin.Forms。Platform.UWP
在每個平臺上新增平臺特定檢視
下列各節示範如何將平臺特定檢視新增至每個平臺上的 Xamarin.Forms 版面配置。
iOS
下列程式代碼範例示範如何將 新增 UILabel 至 StackLayout 和 ContentView:
var uiLabel = new UILabel {
  MinimumFontSize = 14f,
  Lines = 0,
  LineBreakMode = UILineBreakMode.WordWrap,
  Text = originalText,
};
stackLayout.Children.Add (uiLabel);
contentView.Content = uiLabel.ToView();
此範例假設 stackLayout 先前已在 XAML 或 C# 中建立 和 contentView 實例。
Android
下列程式代碼範例示範如何將 新增 TextView 至 StackLayout 和 ContentView:
var textView = new TextView (MainActivity.Instance) { Text = originalText, TextSize = 14 };
stackLayout.Children.Add (textView);
contentView.Content = textView.ToView();
此範例假設 stackLayout 先前已在 XAML 或 C# 中建立 和 contentView 實例。
通用 Windows 平台
下列程式代碼範例示範如何將 新增 TextBlock 至 StackLayout 和 ContentView:
var textBlock = new TextBlock
{
    Text = originalText,
    FontSize = 14,
    FontFamily = new FontFamily("HelveticaNeue"),
    TextWrapping = TextWrapping.Wrap
};
stackLayout.Children.Add(textBlock);
contentView.Content = textBlock.ToView();
此範例假設 stackLayout 先前已在 XAML 或 C# 中建立 和 contentView 實例。
覆寫自定義檢視的平臺度量
每個平臺上的自定義檢視通常只會針對其設計的版面配置案例正確實作測量。 例如,自定義檢視的設計可能只佔用裝置可用寬度的一半。 不過,與其他使用者共享之後,可能需要自定義檢視才能佔用裝置的完整可用寬度。 因此,在配置中 Xamarin.Forms 重複使用時,可能需要覆寫自定義檢視度量實作。 基於這個理由, Add 和 ToView 擴充方法會提供允許指定度量委派的覆寫,這可以在新增至 Xamarin.Forms 版面配置時覆寫自定義檢視配置。
下列各節示範如何覆寫自定義檢視的配置,以更正其度量 API 使用量。
iOS
下列程式代碼範例顯示 繼承自 UILabel的 CustomControl 類別:
public class CustomControl : UILabel
{
  public override string Text {
    get { return base.Text; }
    set { base.Text = value.ToUpper (); }
  }

  public override CGSize SizeThatFits (CGSize size)
  {
    return new CGSize (size.Width, 150);
  }
}
這個檢視的實例會新增至 StackLayout,如下列程式代碼範例所示:
var customControl = new CustomControl {
  MinimumFontSize = 14,
  Lines = 0,
  LineBreakMode = UILineBreakMode.WordWrap,
  Text = "This control has incorrect sizing - there's empty space above and below it."
};
stackLayout.Children.Add (customControl);
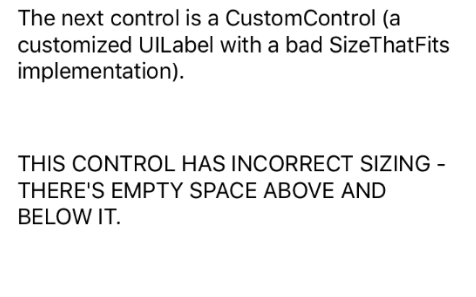
不過,因為覆 CustomControl.SizeThatFits 寫一律會傳回高度為 150,所以檢視會顯示上方和下方的空白空間,如下列螢幕快照所示:
此問題的解決方案是提供實 GetDesiredSizeDelegate 作,如下列程式代碼範例所示:
SizeRequest? FixSize (NativeViewWrapperRenderer renderer, double width, double height)
{
  var uiView = renderer.Control;

  if (uiView == null) {
    return null;
  }

  var constraint = new CGSize (width, height);

  // Let the CustomControl determine its size (which will be wrong)
  var badRect = uiView.SizeThatFits (constraint);

  // Use the width and substitute the height
  return new SizeRequest (new Size (badRect.Width, 70));
}
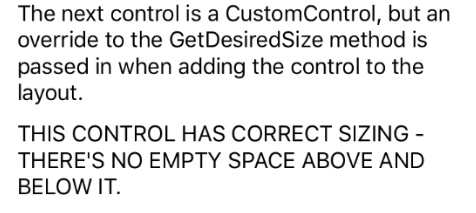
這個方法會使用 方法所提供的 CustomControl.SizeThatFits 寬度,但以 70 的高度取代 150 的高度。 CustomControl將 實體新增至 StackLayout時,FixSize可以將 方法指定為 GetDesiredSizeDelegate ,以修正 類別所提供的CustomControl錯誤度量:
stackLayout.Children.Add (customControl, FixSize);
這會導致自定義檢視正確顯示,且上方和下方沒有空白空間,如下列螢幕快照所示:
Android
下列程式代碼範例顯示 繼承自 TextView的 CustomControl 類別:
public class CustomControl : TextView
{
  public CustomControl (Context context) : base (context)
  {
  }

  protected override void OnMeasure (int widthMeasureSpec, int heightMeasureSpec)
  {
    int width = MeasureSpec.GetSize (widthMeasureSpec);

    // Force the width to half of what's been requested.
    // This is deliberately wrong to demonstrate providing an override to fix it with.
    int widthSpec = MeasureSpec.MakeMeasureSpec (width / 2, MeasureSpec.GetMode (widthMeasureSpec));

    base.OnMeasure (widthSpec, heightMeasureSpec);
  }
}
這個檢視的實例會新增至 StackLayout,如下列程式代碼範例所示:
var customControl = new CustomControl (MainActivity.Instance) {
  Text = "This control has incorrect sizing - it doesn't occupy the available width of the device.",
  TextSize = 14
};
stackLayout.Children.Add (customControl);
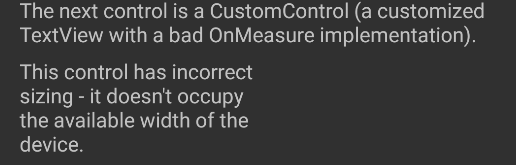
不過,因為 CustomControl.OnMeasure 覆寫一律會傳回要求的寬度的一半,因此檢視只會佔用裝置可用寬度的一半,如下列螢幕快照所示:
此問題的解決方案是提供實 GetDesiredSizeDelegate 作,如下列程式代碼範例所示:
SizeRequest? FixSize (NativeViewWrapperRenderer renderer, int widthConstraint, int heightConstraint)
{
  var nativeView = renderer.Control;

  if ((widthConstraint == 0 && heightConstraint == 0) || nativeView == null) {
    return null;
  }

  int width = Android.Views.View.MeasureSpec.GetSize (widthConstraint);
  int widthSpec = Android.Views.View.MeasureSpec.MakeMeasureSpec (
    width * 2, Android.Views.View.MeasureSpec.GetMode (widthConstraint));
  nativeView.Measure (widthSpec, heightConstraint);
  return new SizeRequest (new Size (nativeView.MeasuredWidth, nativeView.MeasuredHeight));
}
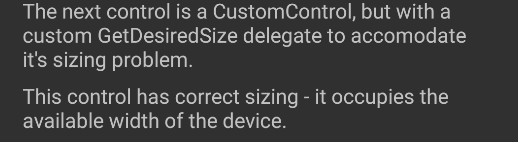
此方法會使用 方法所提供的 CustomControl.OnMeasure 寬度,但將其乘以 2。 CustomControl將 實體新增至 StackLayout時,FixSize可以將 方法指定為 GetDesiredSizeDelegate ,以修正 類別所提供的CustomControl錯誤度量:
stackLayout.Children.Add (customControl, FixSize);
這會導致自定義檢視正確顯示,佔用裝置的寬度,如下列螢幕快照所示:
通用 Windows 平台
下列程式代碼範例顯示 繼承自 Panel的 CustomControl 類別:
public class CustomControl : Panel
{
  public static readonly DependencyProperty TextProperty =
    DependencyProperty.Register(
      "Text", typeof(string), typeof(CustomControl), new PropertyMetadata(default(string), OnTextPropertyChanged));

  public string Text
  {
    get { return (string)GetValue(TextProperty); }
    set { SetValue(TextProperty, value.ToUpper()); }
  }

  readonly TextBlock textBlock;

  public CustomControl()
  {
    textBlock = new TextBlock
    {
      MinHeight = 0,
      MaxHeight = double.PositiveInfinity,
      MinWidth = 0,
      MaxWidth = double.PositiveInfinity,
      FontSize = 14,
      TextWrapping = TextWrapping.Wrap,
      VerticalAlignment = VerticalAlignment.Center
    };

    Children.Add(textBlock);
  }

  static void OnTextPropertyChanged(DependencyObject dependencyObject, DependencyPropertyChangedEventArgs args)
  {
    ((CustomControl)dependencyObject).textBlock.Text = (string)args.NewValue;
  }

  protected override Size ArrangeOverride(Size finalSize)
  {
      // This is deliberately wrong to demonstrate providing an override to fix it with.
      textBlock.Arrange(new Rect(0, 0, finalSize.Width/2, finalSize.Height));
      return finalSize;
  }

  protected override Size MeasureOverride(Size availableSize)
  {
      textBlock.Measure(availableSize);
      return new Size(textBlock.DesiredSize.Width, textBlock.DesiredSize.Height);
  }
}
這個檢視的實例會新增至 StackLayout,如下列程式代碼範例所示:
var brokenControl = new CustomControl {
  Text = "This control has incorrect sizing - it doesn't occupy the available width of the device."
};
stackLayout.Children.Add(brokenControl);
不過,因為 CustomControl.ArrangeOverride 覆寫一律會傳回要求的寬度的一半,因此檢視會裁剪為裝置可用寬度的一半,如下列螢幕快照所示:

此問題的解決方案是在將檢視新增至 StackLayout時提供ArrangeOverrideDelegate實作,如下列程式代碼範例所示:
stackLayout.Children.Add(fixedControl, arrangeOverrideDelegate: (renderer, finalSize) =>
{
    if (finalSize.Width <= 0 || double.IsInfinity(finalSize.Width))
    {
        return null;
    }
    var frameworkElement = renderer.Control;
    frameworkElement.Arrange(new Rect(0, 0, finalSize.Width * 2, finalSize.Height));
    return finalSize;
});
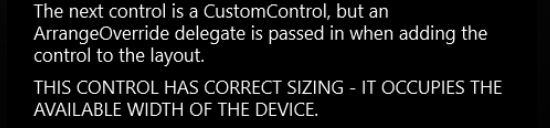
此方法會使用 方法所提供的 CustomControl.ArrangeOverride 寬度,但將其乘以 2。 這會導致自定義檢視正確顯示,佔用裝置的寬度,如下列螢幕快照所示:
摘要
本文說明如何將原生檢視新增至 Xamarin.Forms 使用 C# 建立的版面配置,以及如何覆寫自定義檢視的配置,以更正其度量 API 使用量。