建立 Razor 類別庫
在此練習中,您會在 Razor 類別庫中建立模態對話框,以便在預設 Blazor 範本應用程式中重複使用。
建立 Razor 類別庫專案
本課程模組使用 .NET 8.0 SDK。 確認您已在慣用的命令終端中執行下列命令來安裝 .NET 8.0:
dotnet --list-sdks
類似下列範例的輸出隨即出現:
6.0.317 [C:\Program Files\dotnet\sdk]
7.0.401 [C:\Program Files\dotnet\sdk]
8.0.100 [C:\Program Files\dotnet\sdk]
確定已列出開頭為 8 的版本。 如果未列出任何項目或找不到命令,請安裝最新的 .NET 8.0 SDK。
若要開始,請針對模態對話方塊元件建立 Razor 類別庫專案。 您可以使用 Visual Studio 來建立新專案,或可以在新的資料夾中使用 .NET 命令列工具建立專案,如下所示:
dotnet new razorclasslib -o FirstClassLibrary -f net8.0
建立模態對話框元件
接下來,使用適當的 CSS 檔案在專案中建立模態元件,並提供模態元件的初始格式。
重新命名 Component1.razor 檔案為 Modal.razor,並將
Component1.razor.css檔案命名為 Modal.razor.css。 Modal.razor 檔案會包含您將建立的元件,未來您可以將空白文字檔案新增至專案,並適當地使用 Razor 或 CSS 的內容加以格式化。將下列 Razor 內容新增至 Modal.razor 檔案:
@if (Show) {

 <div class="dialog-container">
  <div class="dialog">
   <div class="dialog-title">
    <h2>@Title</h2>
   </div>

   <div class="dialog-body">
    @ChildContent
   </div>

   <div class="dialog-buttons">
    <button class="btn btn-secondary mr-auto" @onclick="OnCancel">@CancelText</button>
    <button class="btn btn-success ml-auto" @onclick="OnConfirm">@ConfirmText</button>
   </div>

  </div>
 </div>

}

@code {

 [Parameter]
 public string Title { get; set; }

 [Parameter]
 public string CancelText { get; set; } = "Cancel";

 [Parameter]
 public string ConfirmText { get; set; } = "Ok";

 [Parameter]
 public RenderFragment ChildContent { get; set; }

 [Parameter]
 public bool Show { get; set; }


 [Parameter] public EventCallback OnCancel { get; set; }
 [Parameter] public EventCallback OnConfirm { get; set; }

}
此元件有多個良好的下列功能,可供您在專案間共用:
- 標題。
- [取消] 和 [確認] 按鈕,其中包含您可以設定的標籤,並按一下您可以管理的事件。
- 您可以透過
ChildContent參數設定元件的內部內容。 - 您可以使用
Show參數控制對話方塊的顯示狀態。
若要提供元件的預設格式設定,請將下列 CSS 新增至 Modal.razor.css 檔案:
.dialog-container {
 position: absolute;
 top: 0;
 bottom: 0;
 left: 0;
 right: 0;
 background-color: rgba(0,0,0,0.5);
 z-index: 2000;
 display: flex;
 animation: dialog-container-entry 0.2s;
}

@keyframes dialog-container-entry {
 0% {
   opacity: 0;
 }

 100% {
   opacity: 1;
 }
}

.dialog {
 background-color: white;
 box-shadow: 0 0 12px rgba(0,0,0,0.6);
 display: flex;
 flex-direction: column;
 z-index: 2000;
 align-self: center;
 margin: auto;
 width: 700px;
 max-height: calc(100% - 3rem);
 animation: dialog-entry 0.4s;
 animation-timing-function: cubic-bezier(0.075, 0.820, 0.165, 1.000);
}

@keyframes dialog-entry {
 0% {
   transform: translateY(30px) scale(0.95);
 }

 100% {
   transform: translateX(0px) scale(1.0);
 }
}

.dialog-title {
 background-color: #444;
 color: #fff2cc;
 padding: 1.3rem 0.5rem;
}

 .dialog-title h2 {
   color: white;
   font-size: 1.4rem;
   margin: 0;
   font-family: Arial, Helvetica, sans-serif;
   line-height: 1.3rem;
 }

.dialog-body {
 flex-grow: 1;
 padding: 0.5rem 3rem 1rem 0.5rem;
}

.dialog-buttons {
 height: 4rem;
 flex-shrink: 0;
 display: flex;
 align-items: center;
 background-color: #eee;
 padding: 0 1rem;
}
此標記會向標題列和底部按鈕列提供的一些預設色彩,使其比一組簡單的灰色 HTML 元素更有趣。
參考並使用強制回應元件
現在使用位於 FirstClassLibrary 專案中的強制回應元件,新增 Blazor 伺服器應用程式,並開始使用強制回應元件。
使用 Visual Studio 的新增專案功能,或執行下列命令,來在 FirstClassLibrary 專案旁邊的資料夾中建立名為 MyBlazorApp 的新 Blazor 伺服器專案:
dotnet new blazor -o MyBlazorApp -f net8.0使用 Visual Studio Add Reference 功能,或從 MyBlazorApp 資料夾中執行下列命令,在 MyBlazorApp 專案中新增 FirstClassLibrary 專案的參考:
dotnet add reference ../FirstClassLibrary
有了此專案參考,MyBlazorApp應用程式可以與 FirstClassLibrary 專案中的元件互動。
在 MyBlazorApp 應用程式的 Components 資料夾中將項目新增至 _Imports.razor 檔案結尾,讓參考強制回應元件更為容易。 如此一來,您可以參考模態元件,而無需為元件指定整個命名空間。
@using FirstClassLibrary將模態元件新增至此應用程式的起始頁面,即 Components/Pages/Home.razor 檔案
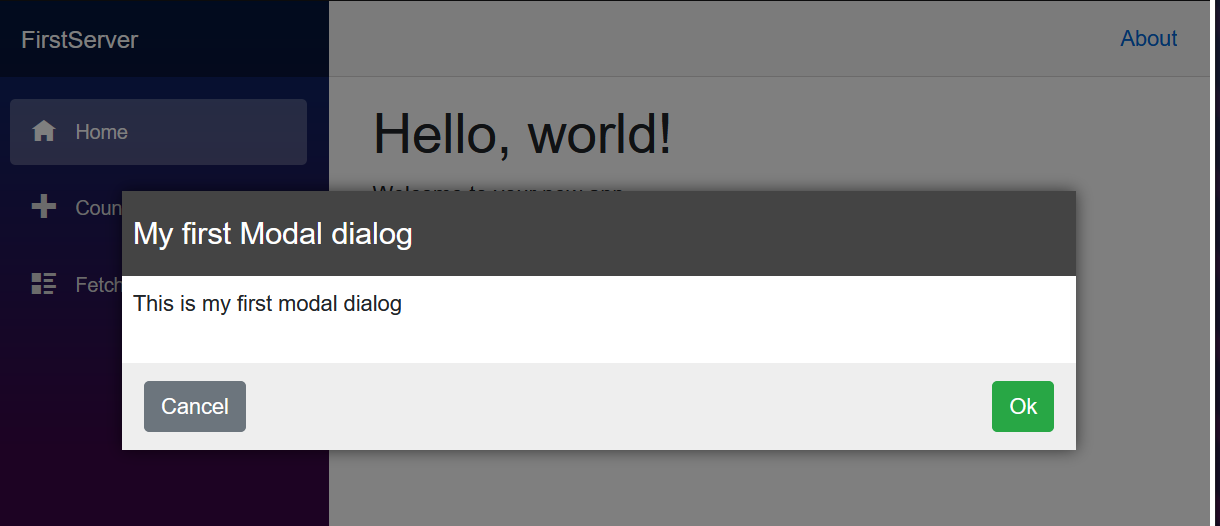
<Modal Title="My first Modal dialog" Show="true">
 <p>
   This is my first modal dialog
 </p>
</Modal>
a. 針對元件提供標題「我的第一個強制回應對話方塊。」
b. 新增要顯示在對話方塊中的簡短段落。 此內容會說明對話方塊的目的。
c. 使用Show參數將對話方塊設定為可見。
檢查您的工作
使用 啟動 dotnet run 應用程式,並在瀏覽器中瀏覽至該應用程式。 [我的第一個強制回應對話方塊] 對話方饋應顯示在畫面上的剩餘內容前方。