在 Visual Studio 中建立 .NET MAUI 專案
安裝並設定 .NET MAUI 工具之後,您就可以使用 Visual Studio 來組建 .NET MAUI (多平台應用程式使用者介面) 應用程式。
在本單元中,您將了解 Visual Studio 中的 .NET MAUI 範本結構。 您將使用此範本建立跨平台的行動和桌面應用程式。
如何開始使用
若要使用 Visual Studio 建立新的 .NET MAUI 專案,請在 [建立新專案] 對話方塊中選取 .NET MAUI 專案類型,然後選擇 [.NET MAUI 應用程式] 範本:
![Visual Studio 中 [建立新專案] 對話方塊的螢幕擷取畫面。使用者選取 .NET MAUI 應用程式範本。](../../dot-net-maui/build-mobile-and-desktop-apps/media/3-create-maui-app.png)
遵循精靈中的步驟來命名專案並指定位置。
新建立的 .NET MAUI 專案包含如下所示的項目:

.NET MAUI 專案結構和應用程式啟動
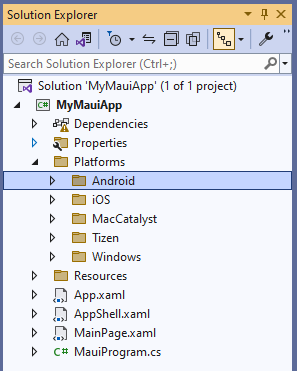
專案內容包括下列項目:
App.xaml。 此檔案定義應用程式在 XAML (Extensible Application Markup Language) 版面配置中使用的應用程式資源。 預設資源位於
Resources資料夾中,並為每個 .NET MAUI 內建控制項,定義應用程式整體色彩和預設樣式。 在這裡,您會看見以下顯示兩個合併在一起的資源字典:<?xml version = "1.0" encoding = "UTF-8" ?> <Application xmlns="http://schemas.microsoft.com/dotnet/2021/maui" xmlns:x="http://schemas.microsoft.com/winfx/2009/xaml" xmlns:local="clr-namespace:MyMauiApp" x:Class="MyMauiApp.App"> <Application.Resources> <ResourceDictionary> <ResourceDictionary.MergedDictionaries> <ResourceDictionary Source="Resources/Colors.xaml" /> <ResourceDictionary Source="Resources/Styles.xaml" /> </ResourceDictionary.MergedDictionaries> </ResourceDictionary> </Application.Resources> </Application>App.xaml.cs。 這檔案是 App.xaml 檔案的程式碼後置。 其定義 App 類別。 此類別在執行階段呈現應用程式。 此類別中的建構函式建立初始視窗,並指派給
MainPage屬性;此屬性決定應用程式開始執行時顯示哪個頁面。 此外,此類別還可讓您覆寫常用的平台中立應用程式生命週期事件處理常式。 事件包括OnStart、OnResume和OnSleep。 這些處理常式定義為Application基底類別的成員。 下列程式碼顯示範例:注意
您也可以覆寫應用程式第一次開始執行時的平台專用生命週期事件。 稍後再說明。
namespace MyMauiApp; public partial class App : Application { public App() { InitializeComponent(); MainPage = new AppShell(); } protected override void OnStart() { base.OnStart(); } protected override void OnResume() { base.OnResume(); } protected override void OnSleep() { base.OnSleep(); } }AppShell.xaml。 此檔案是 .NET MAUI 應用程式的主要結構。 .NET MAUI
Shell提供許多有利於多平台應用程式的功能,包括應用程式樣式、URI 型瀏覽,以及版面配置選項 (包括飛出視窗瀏覽和應用程式根目錄的索引標籤)。 預設範本提供單一頁面 (或ShellContent),在應用程式啟動時會放大。<?xml version="1.0" encoding="UTF-8" ?> <Shell x:Class="MyMauiApp.AppShell" xmlns="http://schemas.microsoft.com/dotnet/2021/maui" xmlns:x="http://schemas.microsoft.com/winfx/2009/xaml" xmlns:local="clr-namespace:MyMauiApp" Shell.FlyoutBehavior="Disabled"> <ShellContent Title="Home" ContentTemplate="{DataTemplate local:MainPage}" Route="MainPage" /> </Shell>MainPage.xaml。 此檔案包含使用者介面定義。 MAUI 應用程式範本產生的範例應用程式包含兩個標籤、一個按鈕和一個影像。 控制項透過
ScrollView括住的VerticalStackLayout來排列。VerticalStackLayout元素將控制項垂直排列 (堆疊),ScrollView可在檢視過大而無法顯示在裝置上時提供捲軸。 您打算將此檔案的內容取代為自己的 UI 版面配置。 如果您有多頁應用程式,也可以定義更多 XAML 頁面。<?xml version="1.0" encoding="utf-8" ?> <ContentPage xmlns="http://schemas.microsoft.com/dotnet/2021/maui" xmlns:x="http://schemas.microsoft.com/winfx/2009/xaml" x:Class="MyMauiApp.MainPage"> <ScrollView> <VerticalStackLayout Spacing="25" Padding="30,0" VerticalOptions="Center"> <Image Source="dotnet_bot.png" SemanticProperties.Description="Cute dot net bot waving hi to you!" HeightRequest="200" HorizontalOptions="Center" /> <Label Text="Hello, World!" SemanticProperties.HeadingLevel="Level1" FontSize="32" HorizontalOptions="Center" /> <Label Text="Welcome to .NET Multi-platform App UI" SemanticProperties.HeadingLevel="Level2" SemanticProperties.Description="Welcome to dot net Multi platform App U I" FontSize="18" HorizontalOptions="Center" /> <Button x:Name="CounterBtn" Text="Click me" SemanticProperties.Hint="Counts the number of times you click" Clicked="OnCounterClicked" HorizontalOptions="Center" /> </VerticalStackLayout> </ScrollView> </ContentPage>MainPage.xaml.cs。 這檔案包含頁面的程式碼後置。 在此檔案中,您定義各種事件處理常式的邏輯,以及頁面上的控制項所觸發的其他動作。 範例程式碼針對頁面上的按鈕實作
Clicked事件的處理常式。 程式碼只是遞增計數器變數,並在頁面上的標籤中顯示結果。 MAUI Essentials 程式庫中提供的 Semantic 服務支援協助工具。SemanticScreenReader類別的Announce靜態方法指定當使用者選取按鈕時,由螢幕助讀程式唸出的文字:namespace MyMauiApp; public partial class MainPage : ContentPage { int count = 0; public MainPage() { InitializeComponent(); } private void OnCounterClicked(object sender, EventArgs e) { count++; if (count == 1) CounterBtn.Text = $"Clicked {count} time"; else CounterBtn.Text = $"Clicked {count} times"; SemanticScreenReader.Announce(CounterBtn.Text); } }MauiProgram.cs。 每個原生平台各有不同的起點來建立和初始化應用程式。 您可以在專案的 Platforms 資料夾中找到此程式碼。 此程式碼是平台專用,但最後會呼叫
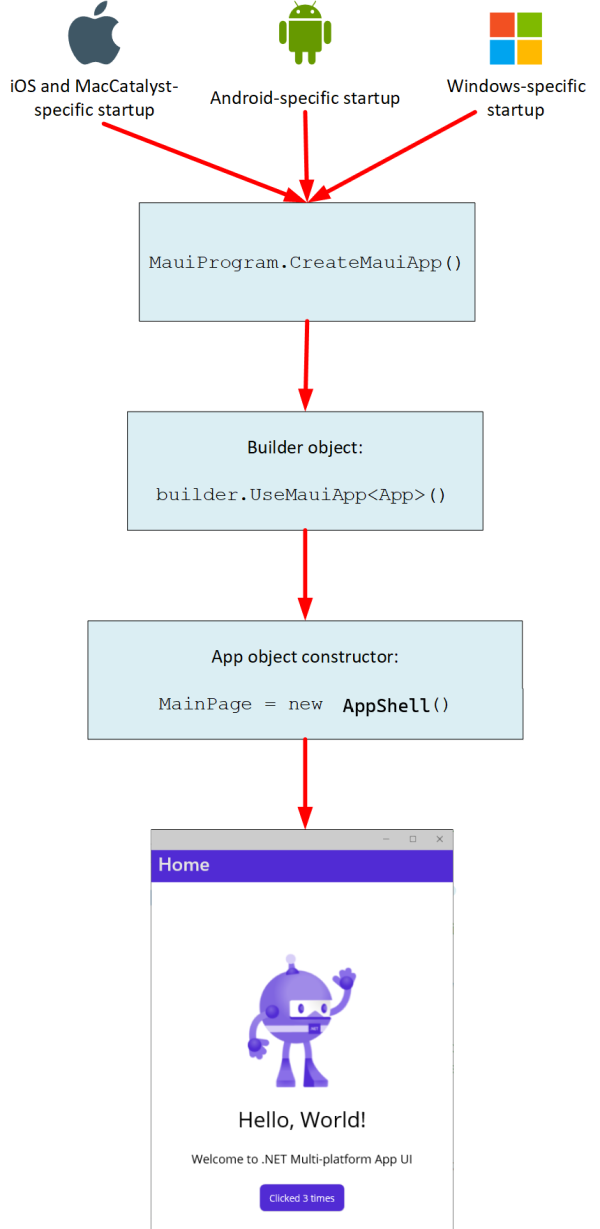
MauiProgram靜態類別的CreateMauiApp方法。 您可以使用CreateMauiApp方法建立應用程式建立器物件,以設定應用程式。 您至少需要使用應用程式建立器物件的UseMauiApp泛型方法,指定描述應用程式的類別;類型參數 (<App>) 指定應用程式類別。 應用程式建立器也提供方法來執行作業,例如註冊字型、設定相依性注入的服務、註冊控制項的自訂處理常式等。 下列程式碼示範使用應用程式建立器來註冊字型:namespace MyMauiApp; public static class MauiProgram { public static MauiApp CreateMauiApp() { var builder = MauiApp.CreateBuilder(); builder .UseMauiApp<App>() .ConfigureFonts(fonts => { fonts.AddFont("OpenSans-Regular.ttf", "OpenSansRegular"); fonts.AddFont("OpenSans-Semibold.ttf", "OpenSansSemibold"); }); return builder.Build(); } }Platforms。 此資料夾包含平台專用的初始化程式碼檔案和資源。 有 Android、iOS、MacCatalyst、Tizen 和 Windows 的資料夾。 在執行階段,應用程式以平台專用的方式啟動。 啟動流程的絕大部分已由 MAUI 程式庫的本質所抽離,但這些資料夾中的程式碼檔案有機制可連結您自己的自訂初始化。 重點是初始化完成時,平台專用程式碼會呼叫
MauiProgram.CreateMauiApp方法,此方法再建立並執行App物件,如前文所述。 例如,Android 資料夾中的 MainApplication.cs 檔案、iOS 和 MacCatalyst 資料夾中的 AppDelegate.cs 檔案,以及 Windows 資料夾中的 App.xaml.cs 檔案都包含覆寫:protected override MauiApp CreateMauiApp() => MauiProgram.CreateMauiApp();
下圖解說 .NET MAUI 應用程式啟動時的控制流程:

專案資源
主專案的專案檔案 (.csproj) 包含幾個值得注意的區段。 初始 PropertyGroup 指定專案的目標平台架構,以及一些項目,例如應用程式標題、識別碼、版本、顯示版本和支援的作業系統。 您可以視需要修改這些屬性。
<Project Sdk="Microsoft.NET.Sdk">

    <PropertyGroup>
        <TargetFrameworks>net6.0-android;net6.0-ios;net6.0-maccatalyst</TargetFrameworks>
        <TargetFrameworks Condition="$([MSBuild]::IsOSPlatform('windows'))">$(TargetFrameworks);net6.0-windows10.0.19041.0</TargetFrameworks>
        <!-- Uncomment to also build the tizen app. You will need to install tizen by following this: https://github.com/Samsung/Tizen.NET -->
        <!-- <TargetFrameworks>$(TargetFrameworks);net6.0-tizen</TargetFrameworks> -->
        <OutputType>Exe</OutputType>
        <RootNamespace>MyMauiApp</RootNamespace>
        <UseMaui>true</UseMaui>
        <SingleProject>true</SingleProject>
        <ImplicitUsings>enable</ImplicitUsings>

        <!-- Display name -->
        <ApplicationTitle>MyMauiApp</ApplicationTitle>

        <!-- App Identifier -->
        <ApplicationId>com.companyname.mymauiapp</ApplicationId>
        <ApplicationIdGuid>272B9ECE-E038-4E53-8553-E3C9EA05A5B2</ApplicationIdGuid>

        <!-- Versions -->
        <ApplicationDisplayVersion>1.0</ApplicationDisplayVersion>
        <ApplicationVersion>1</ApplicationVersion>

        <SupportedOSPlatformVersion Condition="$([MSBuild]::GetTargetPlatformIdentifier('$(TargetFramework)')) == 'ios'">14.2</SupportedOSPlatformVersion>
        <SupportedOSPlatformVersion Condition="$([MSBuild]::GetTargetPlatformIdentifier('$(TargetFramework)')) == 'maccatalyst'">14.0</SupportedOSPlatformVersion>
        <SupportedOSPlatformVersion Condition="$([MSBuild]::GetTargetPlatformIdentifier('$(TargetFramework)')) == 'android'">21.0</SupportedOSPlatformVersion>
        <SupportedOSPlatformVersion Condition="$([MSBuild]::GetTargetPlatformIdentifier('$(TargetFramework)')) == 'windows'">10.0.17763.0</SupportedOSPlatformVersion>
        <TargetPlatformMinVersion Condition="$([MSBuild]::GetTargetPlatformIdentifier('$(TargetFramework)')) == 'windows'">10.0.17763.0</TargetPlatformMinVersion>
        <SupportedOSPlatformVersion Condition="$([MSBuild]::GetTargetPlatformIdentifier('$(TargetFramework)')) == 'tizen'">6.5</SupportedOSPlatformVersion>
    </PropertyGroup>
    ...

</Project>
針對應用程式載入時,在出現第一個視窗之前出現的啟動顯示畫面,初始屬性群組下方的 ItemGroup 區段可讓您指定影像和色彩。 對於應用程式使用的字型、影像和資產,您也可以設定預設位置。
<Project Sdk="Microsoft.NET.Sdk">

    ...

   <ItemGroup>
        <!-- App Icon -->
        <MauiIcon Include="Resources\appicon.svg"
                  ForegroundFile="Resources\appiconfg.svg"
                  Color="#512BD4" />

        <!-- Splash Screen -->
        <MauiSplashScreen Include="Resources\appiconfg.svg"
                          Color="#512BD4"
                          BaseSize="128,128" />

        <!-- Images -->
        <MauiImage Include="Resources\Images\*" />
        <MauiImage Update="Resources\Images\dotnet_bot.svg"
                   BaseSize="168,208" />

        <!-- Custom Fonts -->
        <MauiFont Include="Resources\Fonts\*" />

        <!-- Raw Assets (also remove the "Resources\Raw" prefix) -->
        <MauiAsset Include="Resources\Raw\**"
                   LogicalName="%(RecursiveDir)%(Filename)%(Extension)" />
    </ItemGroup>

    ...

</Project>
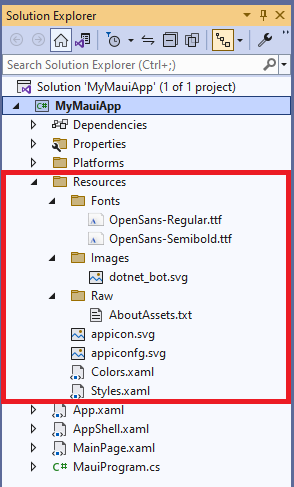
在 Visual Studio 的 [方案總管] 視窗中,您可以展開 Resources 資料夾來查看這些項目。 您可以將應用程式所需的其他任何字型、影像及其他圖形資源,新增至此資料夾和子資料夾。

您應該在應用程式開始執行時,向應用程式建立器物件註冊任何新增至字型資料夾的字型。 回想一下,MauiProgram 類別中的 CreateMauiApp 方法使用 ConfigureFonts 方法登錄字型:
public static class MauiProgram
{
    public static MauiApp CreateMauiApp()
    {
        var builder = MauiApp.CreateBuilder();
        builder
            ...
            .ConfigureFonts(fonts =>
            {
                fonts.AddFont("OpenSans-Regular.ttf", "OpenSansRegular");
            });

        ...
    }
}
在此範例中,AddFont 方法將字型與名稱 OpenSansRegular 建立關聯。 在頁面的 XAML 描述中或應用程式資源字典中,您可以指定此字型來設定項目的格式:
<Application ...">
    <Application.Resources>
        <ResourceDictionary>
            ...
            <Style TargetType="Button">
                ...
                <Setter Property="FontFamily" Value="OpenSansRegular" />
                ...
            </Style>

        </ResourceDictionary>
    </Application.Resources>
</Application>
使用 Platforms 資料夾下的 Android 和 iOS 資料夾中的 Resources 資料夾,以存放 Android 和 iOS 平台專用的資源。