練習 - 新增參數檔案與安全參數
在此練習中,您將建立一個參數檔案,用來為您先前建立的 Bicep 檔案提供值。 在相同的參數檔案中,您也會新增 Azure Key Vault 參考,以安全地傳遞敏感性資訊。
在此過程期間,您將執行下列工作:
- 新增一些安全參數。
- 建立參數檔案。
- 測試部署,以確保參數檔案有效。
- 建立金鑰保存庫與祕密。
- 更新參數檔案以參考金鑰保存庫秘密。
- 重新測試部署,以確保參數檔案仍然有效。
移除 App Service 方案 SKU 的預設值
若要讓您的範本在環境中運作,Azure App Service 方案的 SKU 詳細數據將會在參數檔案中提供,而不是預設值。
在 Visual Studio Code 的 main.bicep 檔案中,更新 appServicePlanSku 參數以移除其預設值。
@description('The name and tier of the App Service plan SKU.')
param appServicePlanSku object
新增參數
現在您需要新增 SQL 伺服器與資料庫。 首先,您將新增系統管理員登入與密碼的參數,以及資料庫 SKU。 您稍後會設定其值。
在 Visual Studio Code 的 main.bicep 檔案中,於目前的參數宣告下方新增 sqlServerAdministratorLogin、 sqlServerAdministratorPassword和 sqlDatabaseSku 參數。 當您完成時,您的參數宣告應類似於下列範例所示:
@description('The name of the environment. This must be dev, test, or prod.')
@allowed([
  'dev'
  'test'
  'prod'
])
param environmentName string = 'dev'

@description('The unique name of the solution. This is used to ensure that resource names are unique.')
@minLength(5)
@maxLength(30)
param solutionName string = 'toyhr${uniqueString(resourceGroup().id)}'

@description('The number of App Service plan instances.')
@minValue(1)
@maxValue(10)
param appServicePlanInstanceCount int = 1

@description('The name and tier of the App Service plan SKU.')
param appServicePlanSku object

@description('The Azure region into which the resources should be deployed.')
param location string = 'eastus'

@secure()
@description('The administrator login username for the SQL server.')
param sqlServerAdministratorLogin string

@secure()
@description('The administrator login password for the SQL server.')
param sqlServerAdministratorPassword string

@description('The name and tier of the SQL database SKU.')
param sqlDatabaseSku object
請注意,您不會指定 sqlServerAdministratorLogin 與 sqlServerAdministratorPassword 參數的預設值。 為安全參數新增預設值,是極不安全的做法。 此外,您也不會指定 sqlDatabaseSku 的預設值。 您將在參數檔案中指定值。
新增變數
在 Visual Studio Code 的 main.bicep 檔案中,於現有變數底下新增 sqlServerName 和 sqlDatabaseName 變數。 當您完成時,您的變數宣告應類似於下列範例所示:
var appServicePlanName = '${environmentName}-${solutionName}-plan'
var appServiceAppName = '${environmentName}-${solutionName}-app'
var sqlServerName = '${environmentName}-${solutionName}-sql'
var sqlDatabaseName = 'Employees'
新增 SQL 伺服器與資料庫資源
在 Visual Studio Code 的 main.bicep 檔案中,將下列程式代碼新增至檔案底部:
resource sqlServer 'Microsoft.Sql/servers@2024-05-01-preview' = {
  name: sqlServerName
  location: location
  properties: {
    administratorLogin: sqlServerAdministratorLogin
    administratorLoginPassword: sqlServerAdministratorPassword
  }
}

resource sqlDatabase 'Microsoft.Sql/servers/databases@2024-05-01-preview' = {
  parent: sqlServer
  name: sqlDatabaseName
  location: location
  sku: {
    name: sqlDatabaseSku.name
    tier: sqlDatabaseSku.tier
  }
}
儲存對檔案所做的變更。
驗證 Bicep 檔案
完成上述所有變更之後,Bicep 檔案看起來應該像下列範例:
@description('The name of the environment. This must be dev, test, or prod.')
@allowed([
  'dev'
  'test'
  'prod'
])
param environmentName string = 'dev'

@description('The unique name of the solution. This is used to ensure that resource names are unique.')
@minLength(5)
@maxLength(30)
param solutionName string = 'toyhr${uniqueString(resourceGroup().id)}'

@description('The number of App Service plan instances.')
@minValue(1)
@maxValue(10)
param appServicePlanInstanceCount int = 1

@description('The name and tier of the App Service plan SKU.')
param appServicePlanSku object

@description('The Azure region into which the resources should be deployed.')
param location string = 'eastus'

@secure()
@description('The administrator login username for the SQL server.')
param sqlServerAdministratorLogin string

@secure()
@description('The administrator login password for the SQL server.')
param sqlServerAdministratorPassword string

@description('The name and tier of the SQL database SKU.')
param sqlDatabaseSku object

var appServicePlanName = '${environmentName}-${solutionName}-plan'
var appServiceAppName = '${environmentName}-${solutionName}-app'
var sqlServerName = '${environmentName}-${solutionName}-sql'
var sqlDatabaseName = 'Employees'

resource appServicePlan 'Microsoft.Web/serverfarms@2024-04-01' = {
  name: appServicePlanName
  location: location
  sku: {
    name: appServicePlanSku.name
    tier: appServicePlanSku.tier
    capacity: appServicePlanInstanceCount
  }
}

resource appServiceApp 'Microsoft.Web/sites@2024-04-01' = {
  name: appServiceAppName
  location: location
  properties: {
    serverFarmId: appServicePlan.id
    httpsOnly: true
  }
}

resource sqlServer 'Microsoft.Sql/servers@2024-05-01-preview' = {
  name: sqlServerName
  location: location
  properties: {
    administratorLogin: sqlServerAdministratorLogin
    administratorLoginPassword: sqlServerAdministratorPassword
  }
}

resource sqlDatabase 'Microsoft.Sql/servers/databases@2024-05-01-preview' = {
  parent: sqlServer
  name: sqlDatabaseName
  location: location
  sku: {
    name: sqlDatabaseSku.name
    tier: sqlDatabaseSku.tier
  }
}
否則,請複製範例或調整範本,以符合範例。
建立參數檔案
開啟 Visual Studio Code,然後開啟 main.bicep 檔案所在的資料夾。 在相同的資料夾中,建立名為 main.parameters.dev.json的新檔案。
在 main.parameters.dev.json 檔案中,新增下列程序代碼:
{
  "$schema": "https://schema.management.azure.com/schemas/2019-04-01/deploymentParameters.json#",
  "contentVersion": "1.0.0.0",
  "parameters": {
    "appServicePlanSku": {
      "value": {
        "name": "F1",
        "tier": "Free"
      }
    },
    "sqlDatabaseSku": {
      "value": {
        "name": "Standard",
        "tier": "Standard"
      }
    }
  }
}
儲存對檔案所做的變更。
使用參數檔案部署 Bicep 範本
在終端中執行下列 Azure CLI 命令。 請注意,您正在提供部署的參數檔案。
az deployment group create \
  --name main \
  --template-file main.bicep \
  --parameters main.parameters.dev.json
在終端內執行下列 Azure PowerShell 命令。 請注意,您正在提供部署的參數檔案。
New-AzResourceGroupDeployment `
  -Name main `
  -TemplateFile main.bicep `
  -TemplateParameterFile main.parameters.dev.json
執行部署時,會提示您輸入 sqlServerAdministratorLogin 與 sqlServerAdministratorPassword 參數的值。 因為範本中已有指定 solutionName 的預設值,所以您不需要加以指定。 您不需要指定其他參數值,因為它們的值是在參數檔案中指定。
小提示
輸入安全參數時,您選擇的值必須符合下列規則:
- 避免為
sqlServerAdministratorLogin指定容易猜到的登入名稱,例如admin或root。 只能包含英數字元,且開頭必須是字母。 sqlServerAdministratorPassword的長度必須至少為 8 個字元,且必須包含小寫字母、大寫字母、數字及符號。 如需密碼複雜度的詳細資訊,請參閱 SQL Azure 密碼原則。
若參數值不符合需求,Azure SQL 將不會部署伺服器。
此外,「請務必記下您輸入的登入與密碼」。 您將在下一節中用到。
部署可能需要幾分鐘的時間才能完成。
建立金鑰保存庫與祕密
您的玩具公司已經有一個金鑰保存庫,包含了其部署所需的祕密。 若要模擬此案例,您將建立新的金鑰保存庫,並新增一些要使用的祕密。
在終端機中執行下列命令,以建立金鑰保存庫與祕密。 執行這些命令之前,請先更新變數值。 金鑰保存庫名稱必須是 3 到 24 個字元的全域唯一字串,只能包含大寫和小寫字母、連字號 (-) 和數字。 例如, demo-kv-1234567abcdefg。
謹慎
請確定您使用的登入與密碼,與上一個步驟中使用的相同。 若不同,下一個部署將無法順利完成。
針對 keyVaultName,將 YOUR-KEY-VAULT-NAME 取代為您的金鑰保存庫的名稱。 read 和 login 變數的 password 命令會提示您輸入值。 輸入時這些值不會顯示在終端中,也不會儲存在您的命令歷程記錄中。
若要保護 Bash 終端工作階段中的變數值,請注意下列項目:
- 變數值不會儲存為安全字串,而且可以透過在命令列輸入
$yourVariableName之類的命令或使用echo命令來顯示。 在此練習中,建立保存庫祕密之後,您可以執行read命令而不輸入值來移除每個變數的現有值。 az keyvault secret set會使用--value參數來建立祕密的值。 命令的輸出會顯示名為value的屬性,其中包含祕密的值。 您可以使用參數--output none來隱藏命令的整個輸出,如範例所示。
若要建立 keyVaultName、login 和 password 變數,請個別執行每個命令。 然後,您可以執行命令區塊來建立金鑰保存庫和祕密。
keyVaultName='YOUR-KEY-VAULT-NAME'
read -s -p "Enter the login name: " login
read -s -p "Enter the password: " password

az keyvault create --name $keyVaultName --location eastus --enabled-for-template-deployment true
az keyvault secret set --vault-name $keyVaultName --name "sqlServerAdministratorLogin" --value $login --output none
az keyvault secret set --vault-name $keyVaultName --name "sqlServerAdministratorPassword" --value $password --output none
備註
您要設定保存庫的 --enabled-for-template-deployment 設定,以便於 Azure 可以在部署期間,使用保存庫中的祕密。 若您未設定此設定,則根據預設,您的部署將無法存取保存庫中的祕密。
此外,執行部署的人員也必須擁有存取保存庫的權限。 因為您已建立金鑰保存庫 (您是擁有者),所以不需要在此練習中明確地授與權限。 針對您自己的保存庫,您需要授與祕密的存取權。
針對 keyVaultName,將 YOUR-KEY-VAULT-NAME 取代為您的金鑰保存庫的名稱。 Read-Host 和 login 變數的 password 命令會提示您輸入值。 輸入時這些值不會顯示在終端中,也不會儲存在您的命令歷程記錄中。 值會儲存為安全字串。
若要建立 keyVaultName、login 和 password 變數,請個別執行每個命令。 然後,您可以執行命令區塊來建立金鑰保存庫和祕密。
$keyVaultName = 'YOUR-KEY-VAULT-NAME'
$login = Read-Host "Enter the login name" -AsSecureString
$password = Read-Host "Enter the password" -AsSecureString

New-AzKeyVault -VaultName $keyVaultName -Location eastus -EnabledForTemplateDeployment
Set-AzKeyVaultSecret -VaultName $keyVaultName -Name 'sqlServerAdministratorLogin' -SecretValue $login
Set-AzKeyVaultSecret -VaultName $keyVaultName -Name 'sqlServerAdministratorPassword' -SecretValue $password
備註
您要設定保存庫的 -EnabledForTemplateDeployment 設定,以便於 Azure 可以在部署期間,使用保存庫中的祕密。 若您未設定此設定,則根據預設,您的部署將無法存取保存庫中的祕密。
此外,執行部署的人員也必須擁有存取保存庫的權限。 因為您已建立金鑰保存庫 (您是擁有者),所以不需要在此練習中明確地授與權限。 針對您自己的保存庫,您需要授與祕密的存取權。
取得金鑰保存庫的資源識別碼
若要在您的部署中使用金鑰保存庫祕密,則需要保存庫的資源識別碼。 執行下列命令,以擷取金鑰保存庫的資源識別碼:
az keyvault show --name $keyVaultName --query id --output tsv
(Get-AzKeyVault -Name $keyVaultName).ResourceId
資源識別碼看起來將如下列範例所示:
/subscriptions/aaaa0a0a-bb1b-cc2c-dd3d-eeeeee4e4e4e/resourceGroups/PlatformResources/providers/Microsoft.KeyVault/vaults/toysecrets
複製資源識別碼。 您將在下一個步驟中使用它。
將金鑰保存庫參考新增至參數檔案
在 main.parameters.dev.json 檔案中,在參數的右大括弧後面
sqlDatabaseSku附加下列代碼。 請務必以您在上一個步驟中所複製金鑰保存庫資源識別碼的值取代YOUR-KEY-VAULT-RESOURCE-ID。 完成之後,您的參數檔案看起來應該如下列範例所示:{ "$schema": "https://schema.management.azure.com/schemas/2019-04-01/deploymentParameters.json#", "contentVersion": "1.0.0.0", "parameters": { "appServicePlanSku": { "value": { "name": "F1", "tier": "Free" } }, "sqlDatabaseSku": { "value": { "name": "Standard", "tier": "Standard" } }, "sqlServerAdministratorLogin": { "reference": { "keyVault": { "id": "YOUR-KEY-VAULT-RESOURCE-ID" }, "secretName": "sqlServerAdministratorLogin" } }, "sqlServerAdministratorPassword": { "reference": { "keyVault": { "id": "YOUR-KEY-VAULT-RESOURCE-ID" }, "secretName": "sqlServerAdministratorPassword" } } } }儲存對檔案所做的變更。
使用參數檔案和 Azure Key Vault 引用來部署 Bicep 範本
在終端中執行下列 Azure CLI 命令。 您要提供參數檔案與 Bicep 檔案。
az deployment group create \
  --name main \
  --template-file main.bicep \
  --parameters main.parameters.dev.json
在終端內執行下列 Azure PowerShell 命令。 您要提供參數檔案與 Bicep 檔案。
New-AzResourceGroupDeployment `
  -Name main `
  -TemplateFile main.bicep `
  -TemplateParameterFile main.parameters.dev.json
這次會在執行部署時,提示您輸入 sqlServerAdministratorLogin 與 sqlServerAdministratorPassword 參數的值。 Azure 會改為從您的金鑰保存庫擷取值。
因為 Azure 資源已經存在,所以這次部署會更快速地完成。
檢查您的部署
在瀏覽器中,返回 Azure 入口網站。 移至您的資源群組。 您仍會看到一個成功的部署,因為此部署使用的名稱與第一個部署相同。
選取 [1 個成功] 連結。
選取名為 main 的部署。
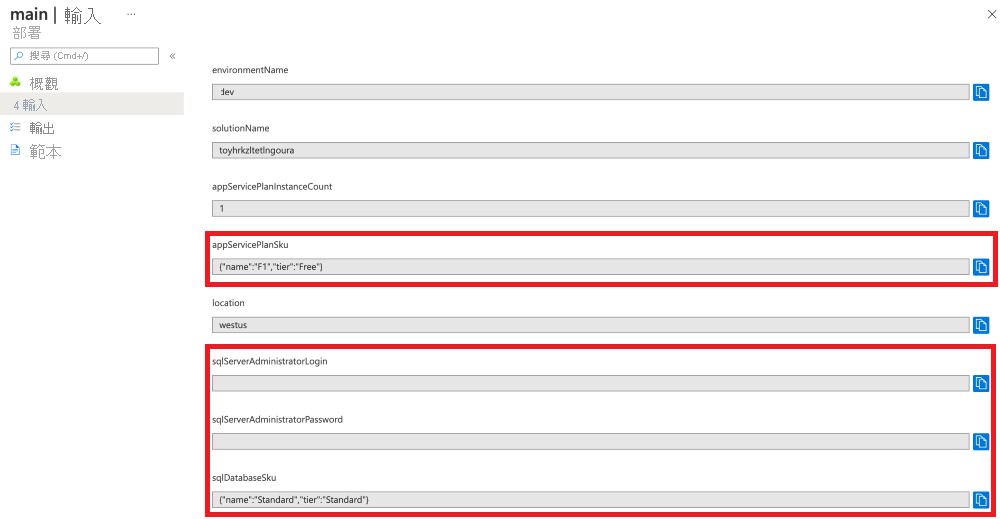
在左側功能表上,選取 [輸入]。
請注意,
appServicePlanSku和sqlDatabaseSku參數值都已設定為參數檔案中的值。 此外也請注意sqlServerAdministratorLogin與sqlServerAdministratorPassword參數值不會顯示,因為您已將@secure()裝飾項目套用至這些值。