練習 - 整合 Azure Cosmos DB 與 IoT 資料管線
此練習提供如何使用 Azure IoT Central 應用程式來收集、處理和儲存所產生 IoT 遙測的概觀。
在此練習中,您:
- 建立 Azure IoT Central 應用程式。
- 建立可記錄 HTTP 要求承載的 Azure 函式。
- 設定並驗證 Azure IoT Central 應用程式的 IoT 遙測規則。
必要條件
若要執行此練習,您需要:
- Microsoft 帳戶或具有 Microsoft Entra 租用戶中全域管理員角色的 Microsoft Entra 帳戶。 租用戶必須與 Azure 訂用帳戶中的擁有者或參與者角色相關聯。
- 若要完成練習單元,請設定 Azure Cosmos DB。
- 啟用中的 Azure 訂用帳戶。 如尚未擁有 Azure 訂用帳戶,請在開始之前先建立免費帳戶。
建立 Azure IoT Central 應用程式
瀏覽至 Azure 入口網站 中的 [建立 IoT Central 應用程式] 頁面。 若出現提示,請使用 Azure 帳戶登入。
輸入下列資訊:
欄位 描述 訂用帳戶 您要使用的 Azure 訂閱。 資源群組 您要使用的資源群組。 您可以建立新的資源群組,或使用現有的資源群組。 資源名稱 有效的 Azure 資源名稱,例如 adatum-iot-custom-application。 應用程式 URL 您的應用程式 URL 子網域,例如 adatum-iot-custom-application。 IoT Central 應用程式的 URL 看起來像 https://adatum-iot-custom-application.azureiotcentral.com。範本 店內分析 - 條件監視 區域 您想要使用的 Azure 區域。 定價方案 選取其中一個標準定價方案。 若要了解定價,請參閱 Azure IoT Central 定價。 選取 [檢閱 + 建立]。 然後選取建立。
當應用程式準備就緒時,您可以從 Azure 入口網站瀏覽至它:
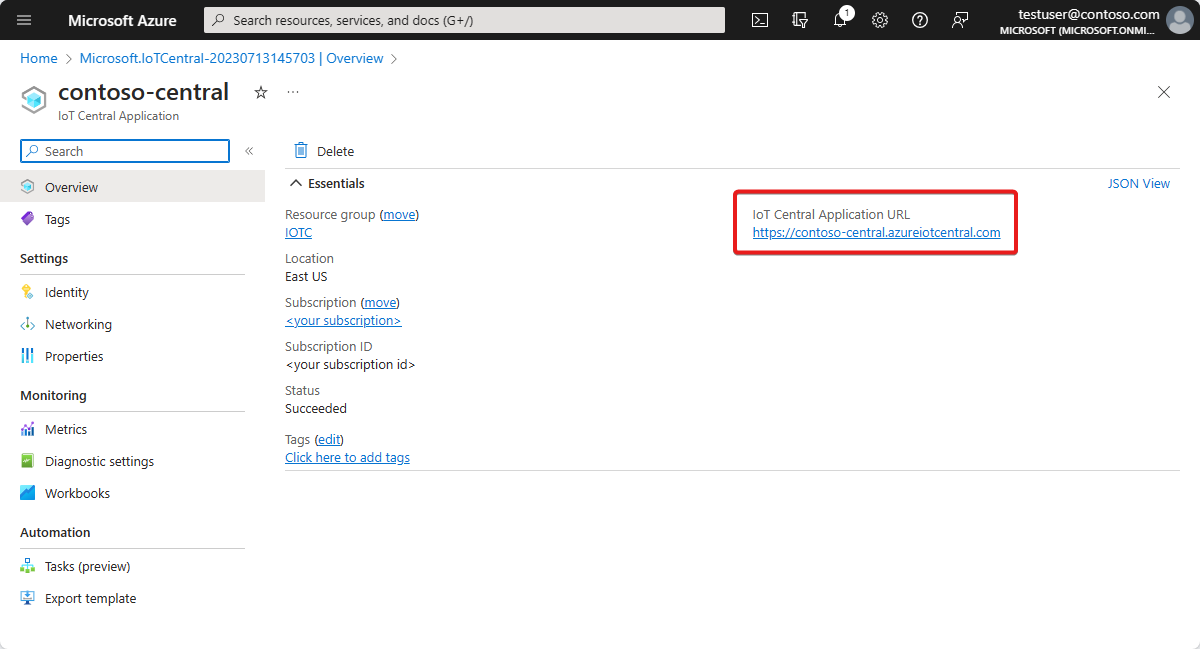
提示
若要列出您可以存取的所有 IoT Central 應用程式,請瀏覽至 [IoT Central 應用程式]。
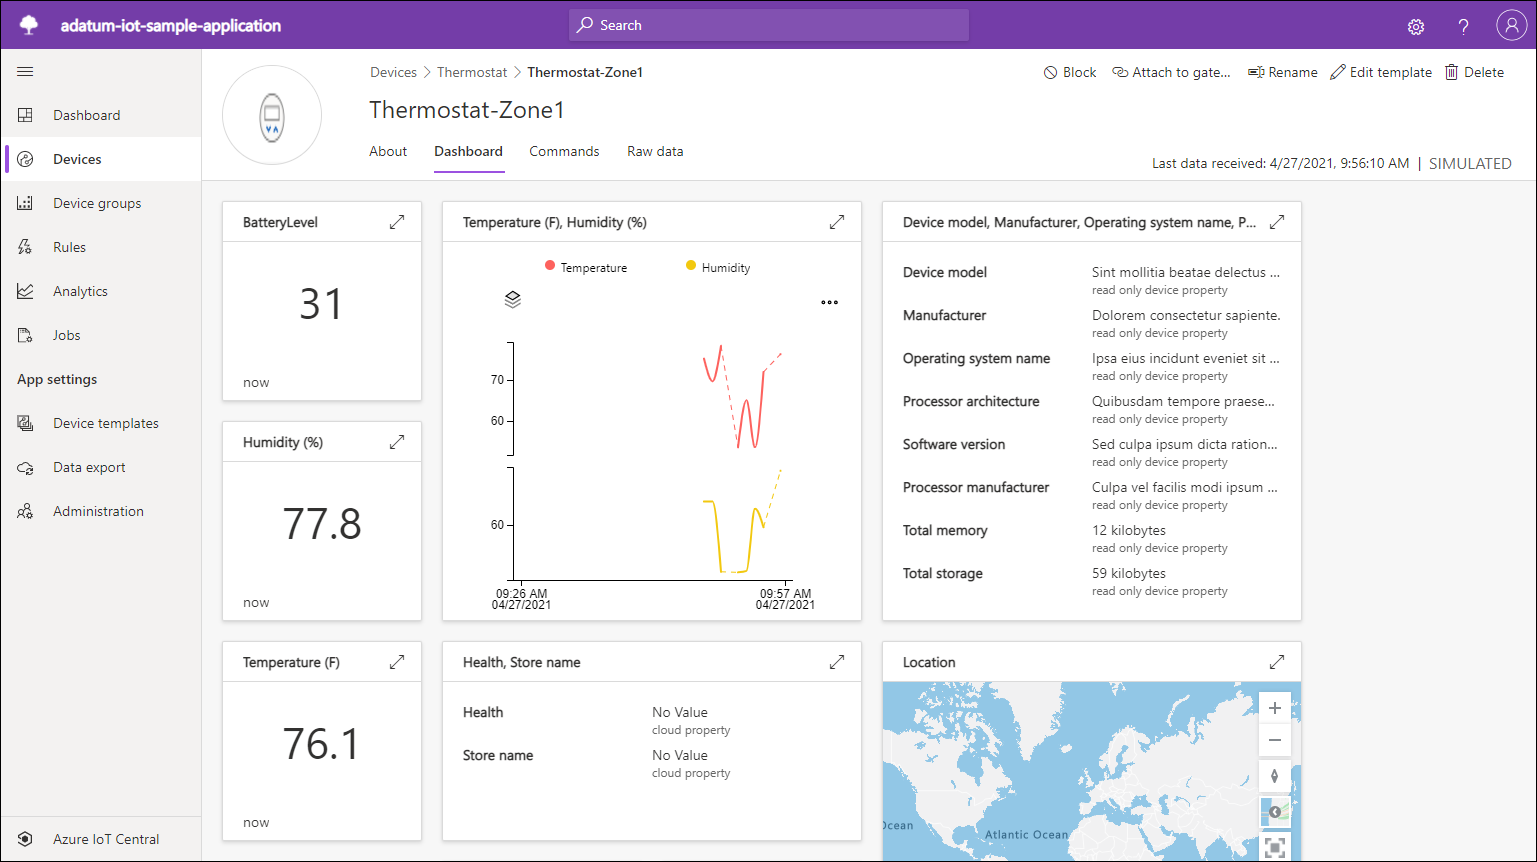
在幾分鐘或更少時間內,會顯示 [儀表板] 頁面。 檢閱範例 Azure IoT Central 應用程式的遙測和分析:
在 IoT Central 應用程式入口網站的 [儀表板] 頁面上,選取垂直功能表中的 [裝置]。
在 [控溫器] 區段中,選取 [Thermostat-Zone1]。
在 [Thermostat-Zone1] 窗格上,檢閱 [儀表板] 索引標籤的內容。
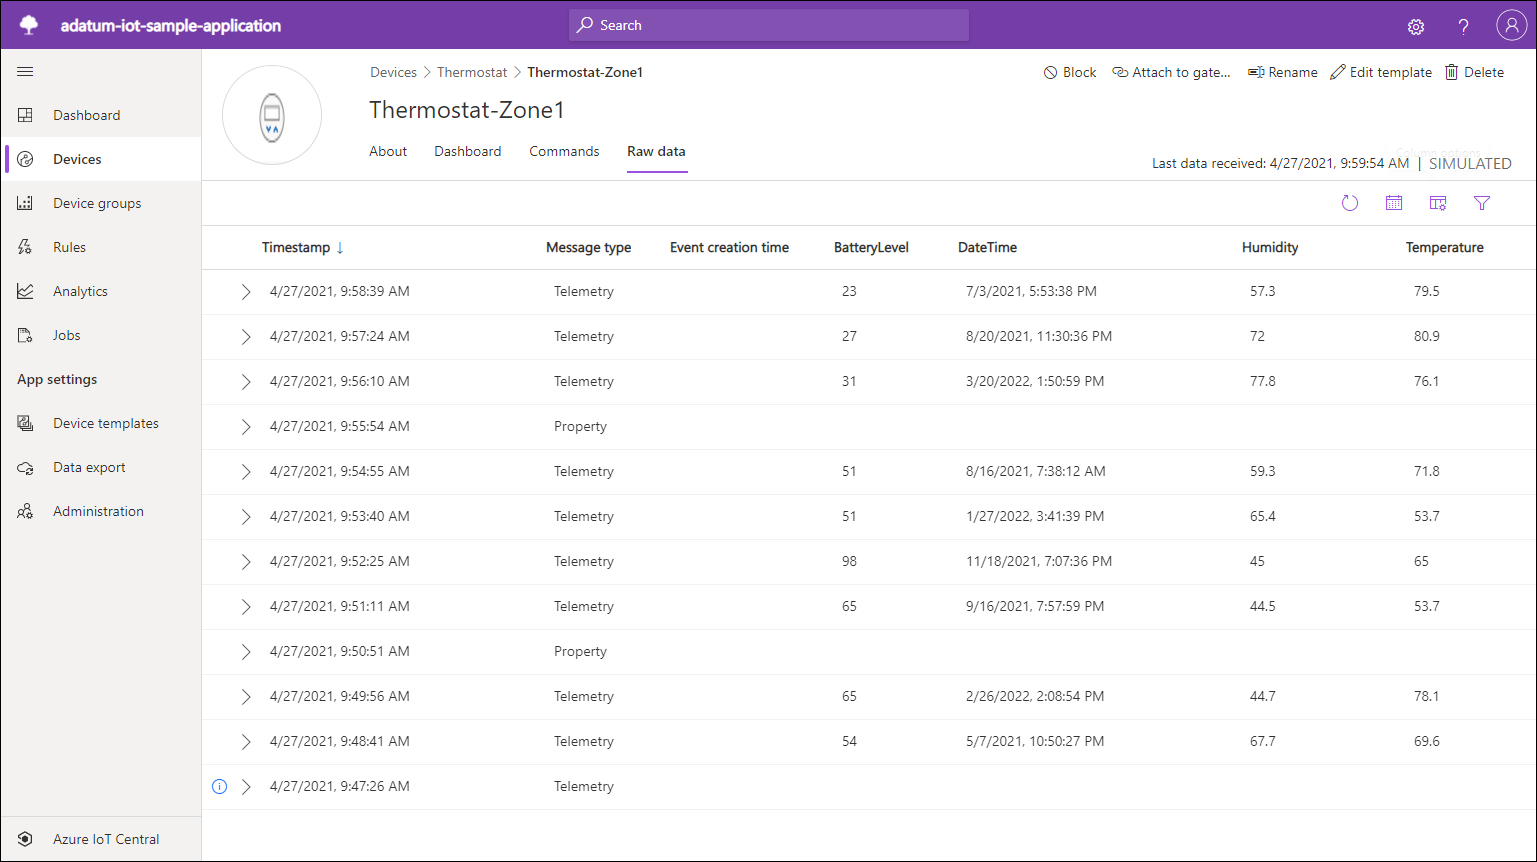
選取 [原始資料] 索引標籤,然後檢閱內容。
建立可記錄 HTTP 要求承載的 Azure 函式
在此工作中,您將建立實作 HTTP Webhook 功能的 Azure 函式應用程式。 套用此功能,藉由建立應用程式規則,從 Azure IoT Central 應用程式轉送遙測資料。
啟動網頁瀏覽器,瀏覽至 Azure 入口網站並登入您要在本課程模組中使用的 Azure 訂用帳戶。
使用 [搜尋資源、服務和文件] 文字輸入框來搜尋函數應用程式。
在 [函數應用程式] 窗格上,選取 [+ 建立]。
在 [基本] 索引標籤上,進行下列設定,然後選取 [檢閱 + 建立]。
設定 組態 訂用帳戶 選取您將在此課程模組中使用的 Azure 訂閱名稱。 資源群組 建立名為 function-app-RG 的新資源群組。 函數應用程式名稱 輸入由小寫字母、數字或連字號組成的唯一名稱,並以字母開頭。 發行 選取 [程式碼]。 執行階段堆疊 選取 .NET。 版本 選取 [版本 6 (LTS),內含式模型]。 區域 選取最接近您實驗室環境位置的 Azure 區域,最好符合您為 Azure IoT Central 部署選擇的位置。 作業系統 Windows 方案類型 使用量 (無伺服器) 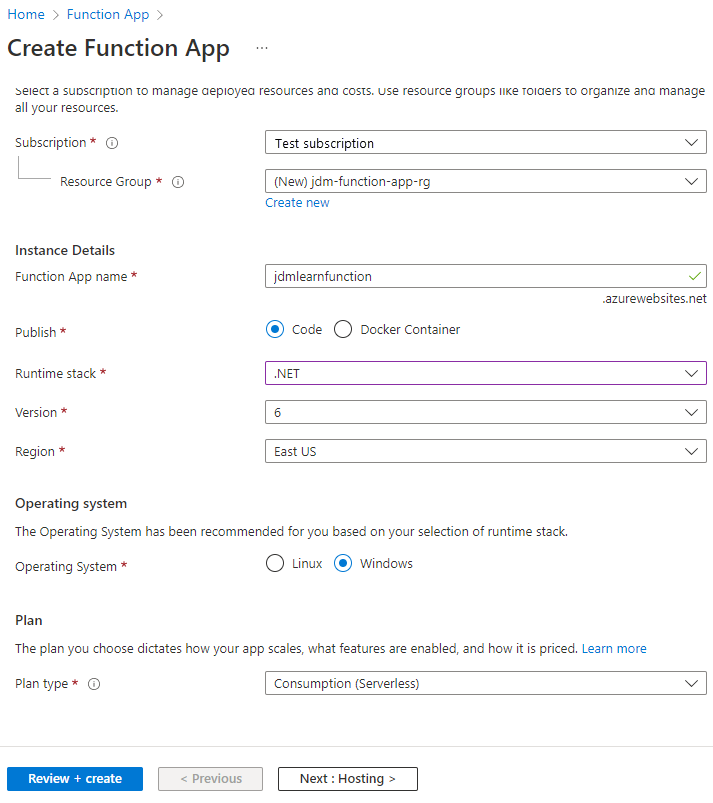
選取建立。
注意
等候 Azure 函數應用程式佈建完成。 這可能需要大約兩分鐘的時間。
當 Azure 函數應用程式部署完成時,請選取 [移至資源]。
在 [Azure 函式應用程式] 窗格的 [在 Azure 入口網站中建立] 底下,選取 [建立函式]。
在 [新增函式] 窗格上,指定下列設定,然後選取 [建立]。
設定 組態 開發環境 在入口網站中開發 範本 HTTP 觸發程序 新增函式 HttpTrigger1 授權等級 Function 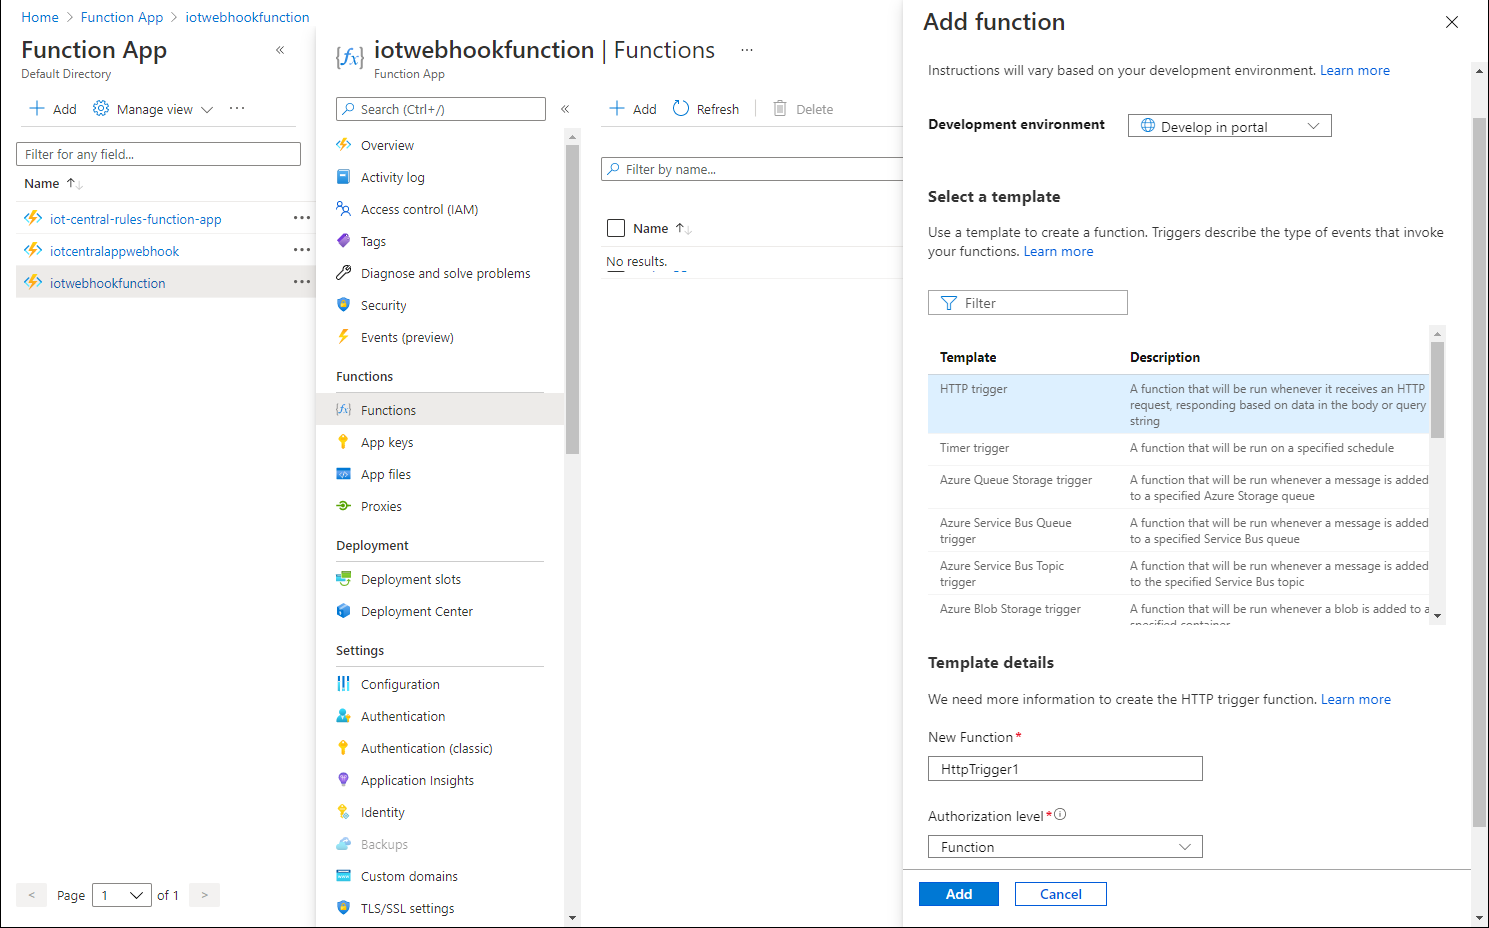
在 [HttpTrigger1] 窗格上,從功能表中選取 [整合]。
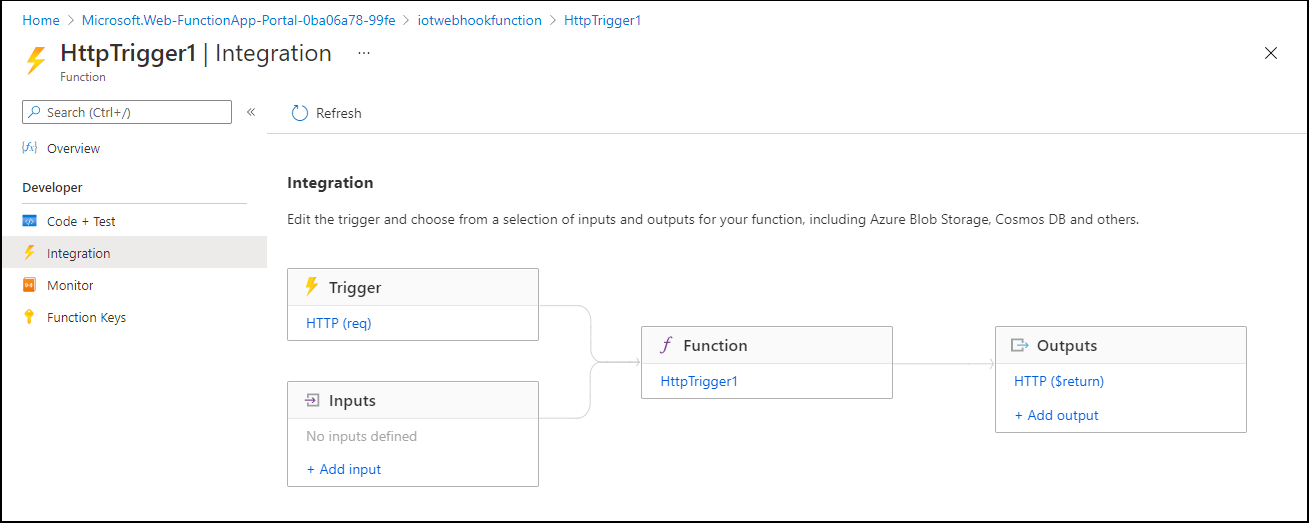
在矩形標籤 [輸出] 中,選取 [+ Add 輸出]。
設定下列設定,然後選取 [新增]:
設定 組態 繫結類型 選取 [Azure Cosmos DB]。 文件參數名稱 使用 outDoc 取代預設值。 資料庫名稱 輸入您在上一個練習中建立的資料庫名稱 iotdb。 集合名稱 輸入 iotcollection。 若為 true,則建立 Cosmos DB 資料庫 選取 [是] 。 Cosmos DB 帳戶連線 選取新增。 在 [新增 Cosmos DB 連線] 快顯視窗中,確定已選取 [Azure Cosmos DB 帳戶] 選項。 在 [資料庫帳戶] 下拉式清單中,選取代表您在前一個練習中建立的 Cosmos DB 帳戶的項目,然後選取 [確定]。 分割區索引鍵 (選用) 輸入 /pk/timestamp/deviceid。 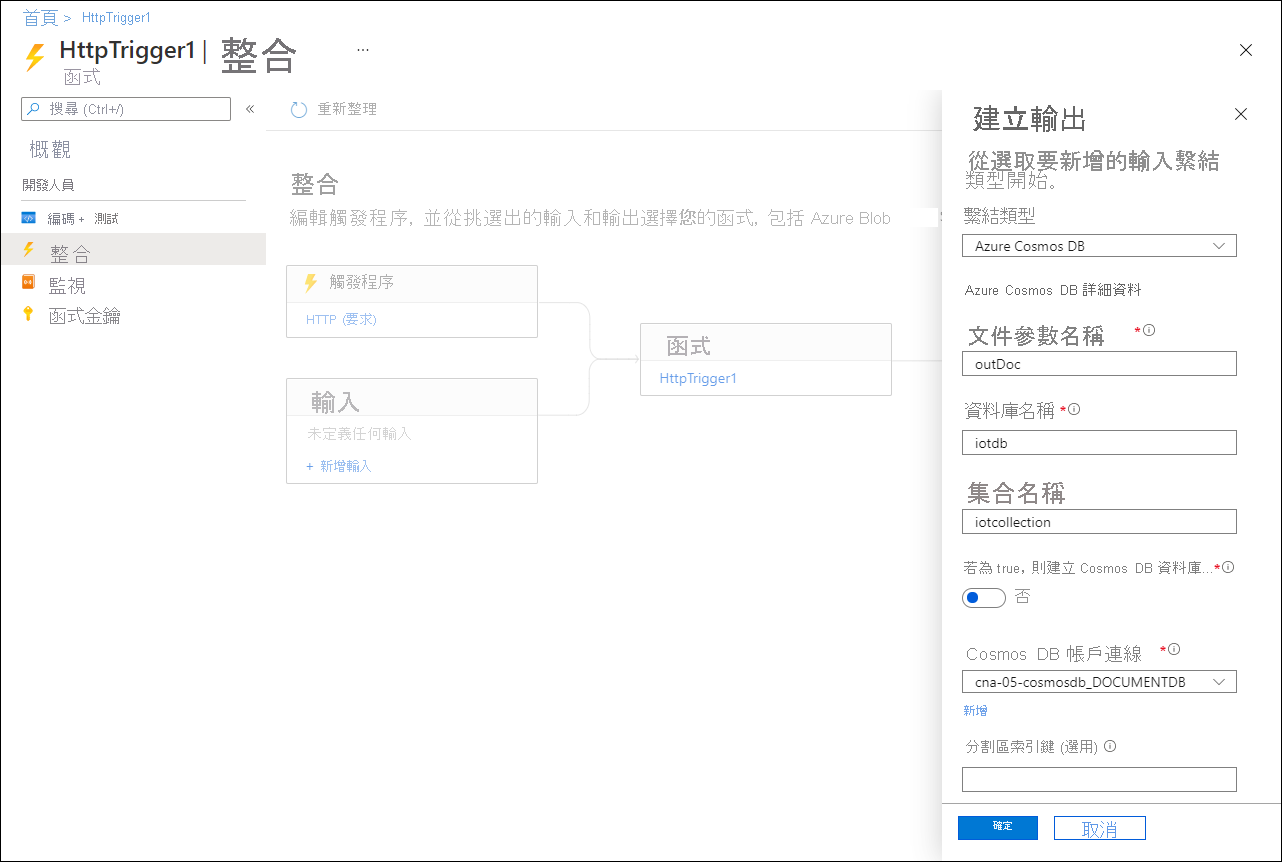
注意
選擇最佳的分割區索引鍵時,請務必考慮使用模式和 20 GB 的邏輯分割區大小限制。 例如,您可以建立包含 deviceId 和 date 組合的綜合分割區索引鍵。
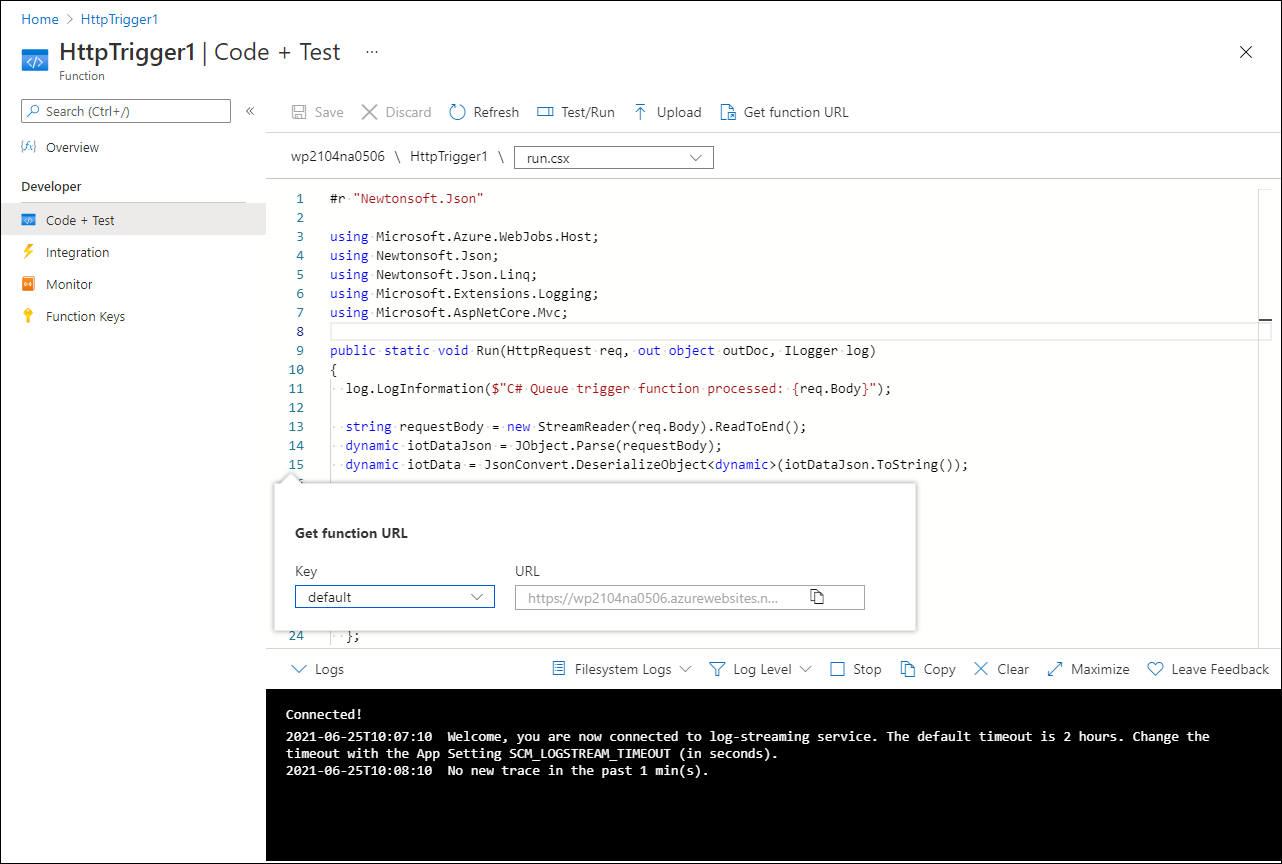
選取 [程式碼 + 測試]。
將以下列內容取代現有的程式碼,然後選取 [儲存]。
#r "Newtonsoft.Json"

using Microsoft.Azure.WebJobs.Host;
using Newtonsoft.Json;
using Newtonsoft.Json.Linq;
using Microsoft.Extensions.Logging;
using Microsoft.AspNetCore.Mvc;

public static void Run(HttpRequest req, out object outDoc, ILogger log)
{
  log.LogInformation($"C# Queue trigger function processed: {req.Body}");

  string requestBody = new StreamReader(req.Body).ReadToEnd();
  dynamic iotDataJson = JObject.Parse(requestBody);
  dynamic iotData = JsonConvert.DeserializeObject<dynamic>(iotDataJson.ToString());

  log.LogInformation($"{iotData}");

  outDoc = new {
    pk = iotData.device.id + "-" + iotData.timestamp.ToString("yyyyMMdd"),
    timestamp = iotData.timestamp,
    deviceId = iotData.device.id,
    temperature = iotData.device.telemetry.Thermostat_1o.temp.value
  };
}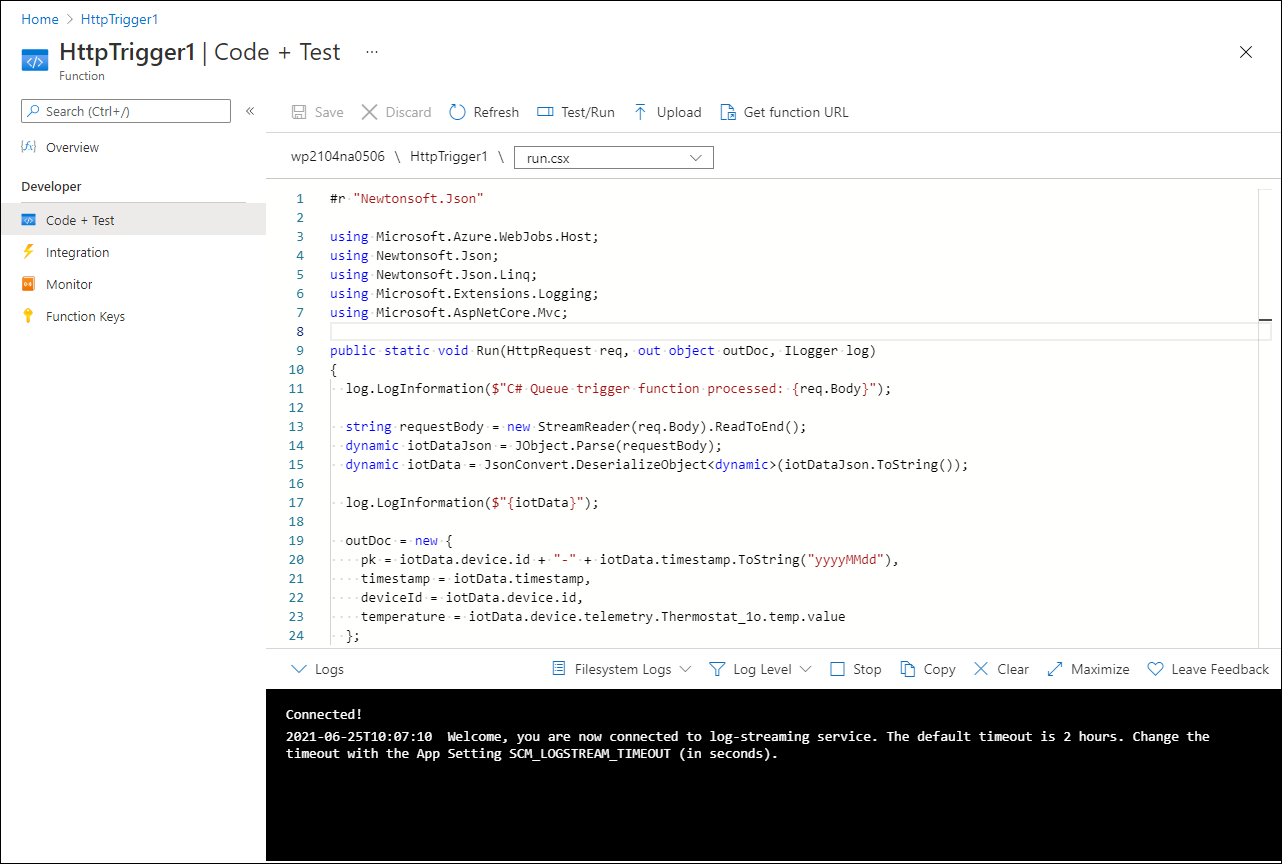
注意
該函式會記錄 HTTP 要求以 JSON 為基礎的承載,並建構個別 JSON 元素,以儲存在與您所設定函式輸出對應的目標 Cosmos DB 集合的個別文件中。 您可以使用 pk 元素,其中包含串連的 deviceId 屬性和所收集遙測資料點的日期,作為分割區索引鍵。
選取 [取得函式 URL] 以取得函式索引鍵,並記錄其值。
設定並驗證 Azure IoT Central 應用程式的 IoT 遙測規則
切換回顯示您先前在此練習中建立的 Azure IoT Central 應用程式的 [裝置] 頁面的網頁瀏覽器視窗。
在 IoT Central 應用程式入口網站的垂直功能表中,選取的 [規則]。
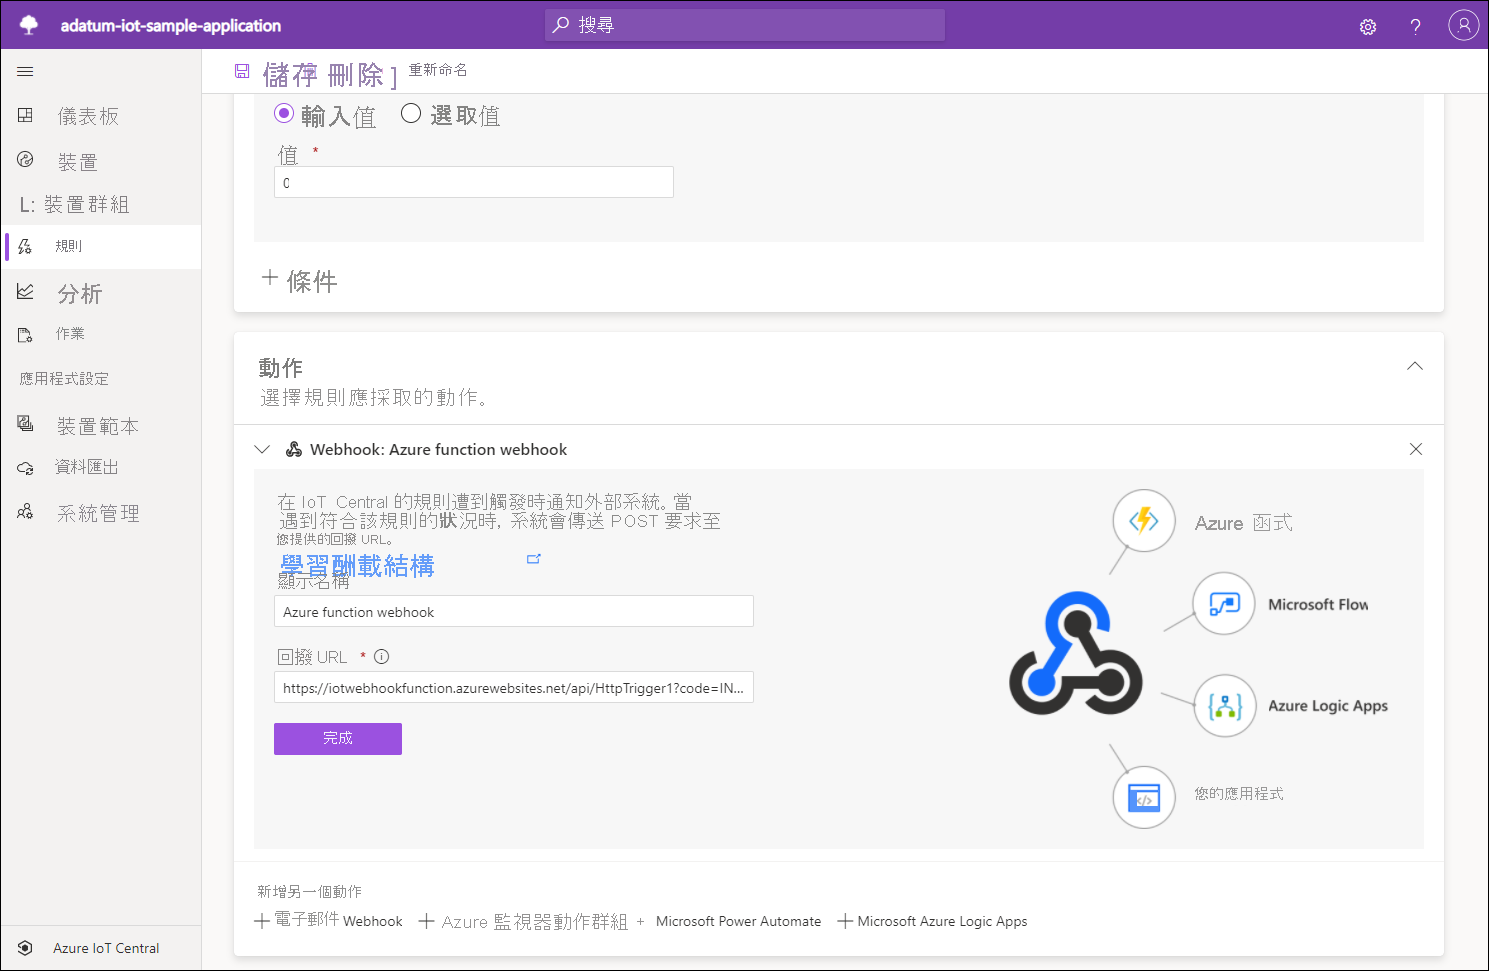
選取 [+ 新增],然後設定下列設定:
設定 組態 規則名稱 輸入 Adatum IoT 遙測規則。 裝置範本 選取 [控溫器]。 時間彙總 確定設定已關閉。 遙測 選取 [溫度]。 運算子 選取 [大於]。 輸入值 輸入 0。 動作 選取 [+ Webhook]。 顯示名稱 輸入 Azure 函式 Webhook。 回撥 URL 貼上您在本練習上一個工作中記錄的 Azure 函式 URL 值。 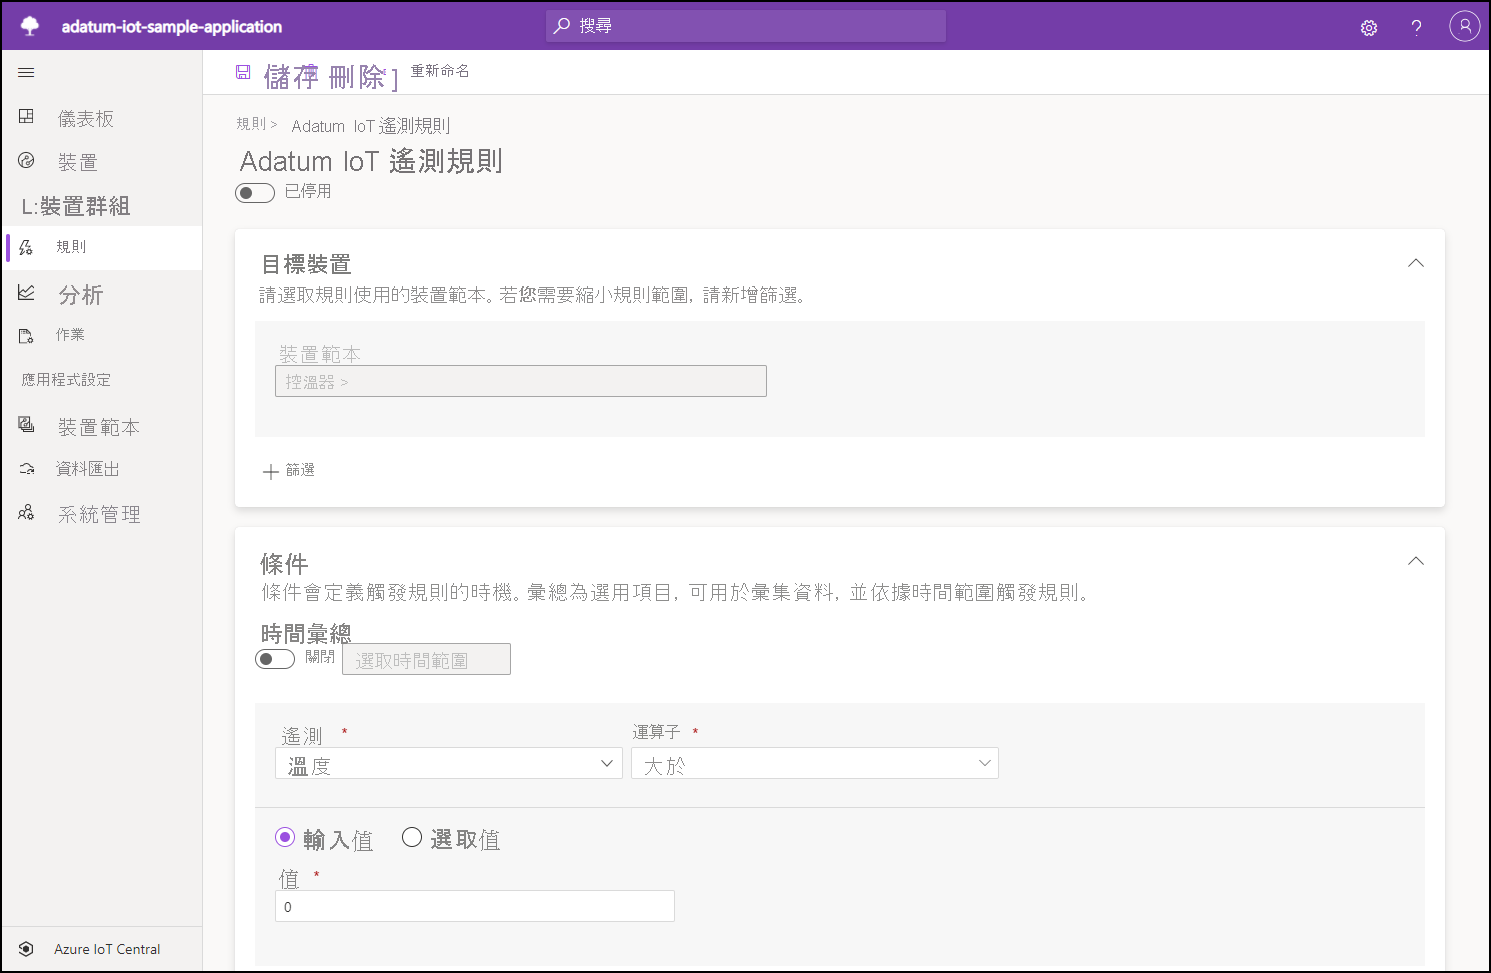
注意
溫度遙測值是刻意人為降低,以叫用 Webhook 功能並觸發函式。 在實際案例中,您會調整以與可保證您要儲存的資料收集會在目標 Cosmos DB 集合中的條件對應。
選取 [完成],然後選取 [儲存]。
切換回原本的網頁瀏覽器視窗,其中顯示 Azure 入口網站中的 [HttpTrigger1 | 編碼 + 測試] 窗格。
選取 [監視],然後選取 [記錄] 索引標籤。
驗證 [記錄] 窗格是否顯示為了回應 HTTP 觸發程序而產生的訊息,此觸發程序源自您稍早在此工作中所設定的 Azure IoT Central 應用程式 Webhook。
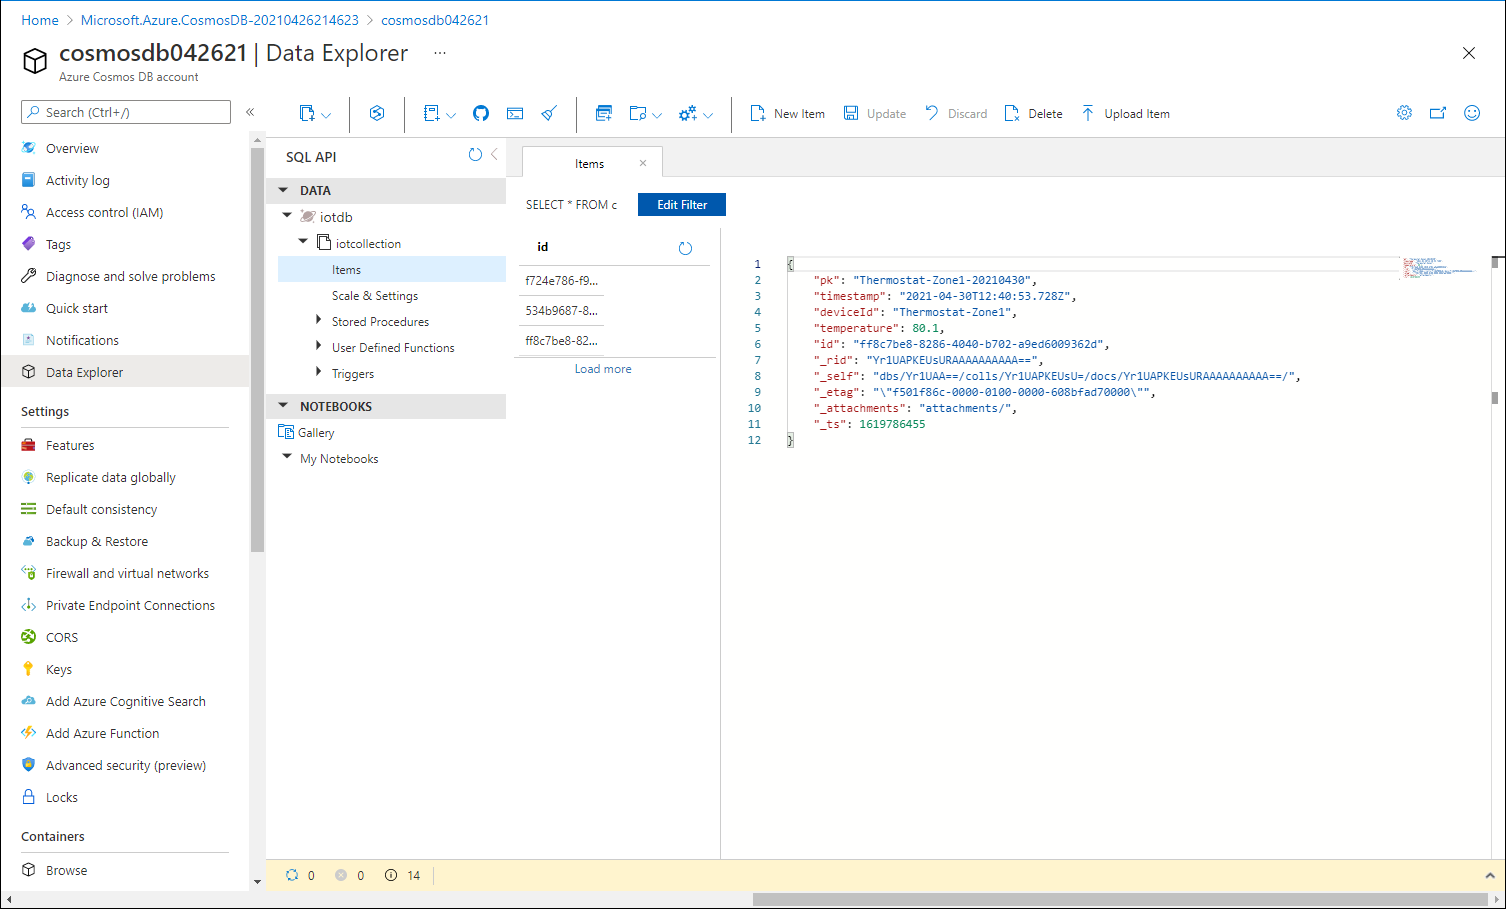
切換至顯示您在先前的練習中所佈建 Cosmos DB 帳戶的 [資料總管] 窗格的網頁瀏覽器視窗。
在 [NOSQL API] 區段中,選取圓形箭號 [重新整理] 按鈕,展開 [iotdb] 節點及其內的 [iotcollection]。 選取 [項目] 節點,然後選取項目清單中的第一份文件。
驗證 [資料總管] 視窗中 [項目] 索引標籤的 [詳細資料] 窗格會顯示由已向 Azure Central IoT 應用程式註冊的裝置所產生並由 Azure 函式處理的遙測資料,包括 pk、timestamp、deviceId 和 temperature。
結果
恭喜! 您已完成本課程模組的第二個練習。 在此練習中,您已建立 Azure IoT Central 應用程式。