練習 - 將 Next.js Web 應用程式與 Azure AD 整合
此練習將引導您完成與 Microsoft Entra ID 整合的簡單 Next.js 型應用程式設定程序。
在本練習中,您將會:
- 註冊 Microsoft Entra 應用程式。
- 實作簡單的 Microsoft Entra 整合 Next.js 型應用程式。
- 驗證 Next.js 型應用程式的 Microsoft Entra 整合。
必要條件
若要執行此練習,您將需要:
- Azure 訂用帳戶。
- Microsoft 帳戶或 Microsoft Entra 帳戶,這在與 Azure 訂用帳戶相關聯的 Microsoft Entra 租用戶中具有全域管理員角色,而在 Azure 訂用帳戶中具有擁有者或參與者角色。
- 已完成本課程模組的第一個和第二個練習。
- 已安裝或可安裝 Node.js 和 Git 的電腦。
注意
如需安裝 Node.js 的資訊,請參閱 Node.js Downloads (Node.js 下載)。 如需 Git 的相關資訊,請參閱 Git 下載。 開始此練習之前,請先安裝這兩者。
使用 Microsoft Entra ID 註冊應用程式
若要實作範例 Next.js 型應用程式以使用 Microsoft Entra 驗證存取適用於 PostgreSQL 的 Azure 資料庫,您必須先建立 Microsoft Entra 應用程式物件和對應的安全性主體。 這可讓 Next.js 型應用程式在存取資料庫物件時模擬 Microsoft Entra 使用者。
如有必要,請啟動網頁瀏覽器,巡覽至 Azure 入口網站,並登入以存取您將在本課程模組中使用的 Azure 訂用帳戶。
使用 [搜尋資源、服務和文件] 文字輸入框,搜尋 Microsoft Entra ID,然後在結果清單中選取 [Microsoft Entra ID]。
在 [Microsoft Entra ID] 刀鋒視窗上,於垂直功能表的 [管理] 區段中選取 [應用程式註冊]。
在 [應用程式註冊] 刀鋒視窗上,選取 [+ 新增註冊]。
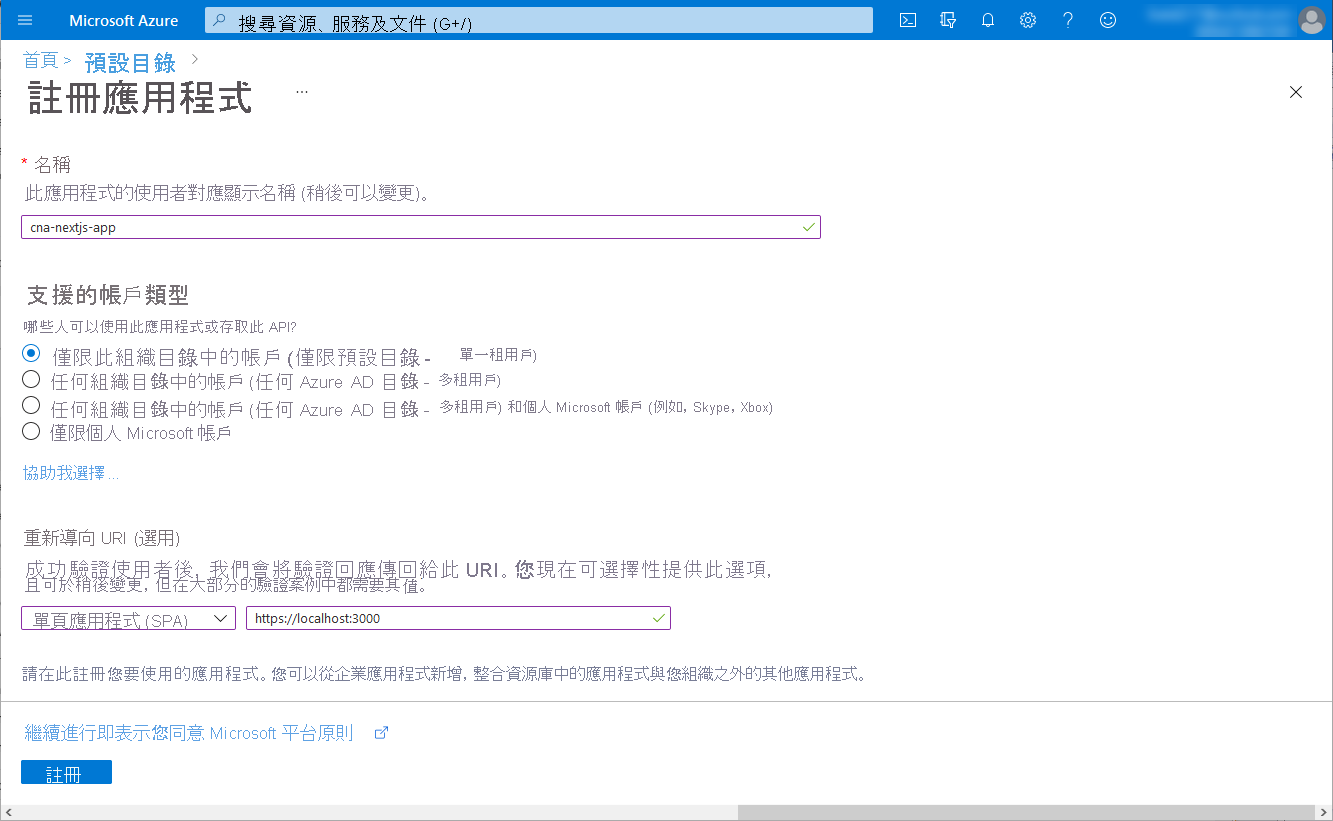
在 [註冊應用程式] 刀鋒視窗的 [名稱] 文字方塊中,輸入 cna-nextjs-app。
在 [支援的帳戶類型] 區段中,確定已選取 [僅此組織目錄中的帳戶 (僅預設目錄 - 單一租用戶)] 選項。 在 [重新導向 URI (選用)] 區段中,將 [單頁應用程式 (SPA)] 項目設定為 http://localhost:3000,然後選取 [註冊]。
注意
您此時可以選擇為已註冊的 Microsoft Entra 應用程式設定多租用戶支援。 不過,此方法的詳細涵蓋範圍不在本課程模組的討論範圍內。
注意
部署應用程式之後,您必須修改 [重新導向 URI (選用)] 值以反映其實際 URL。
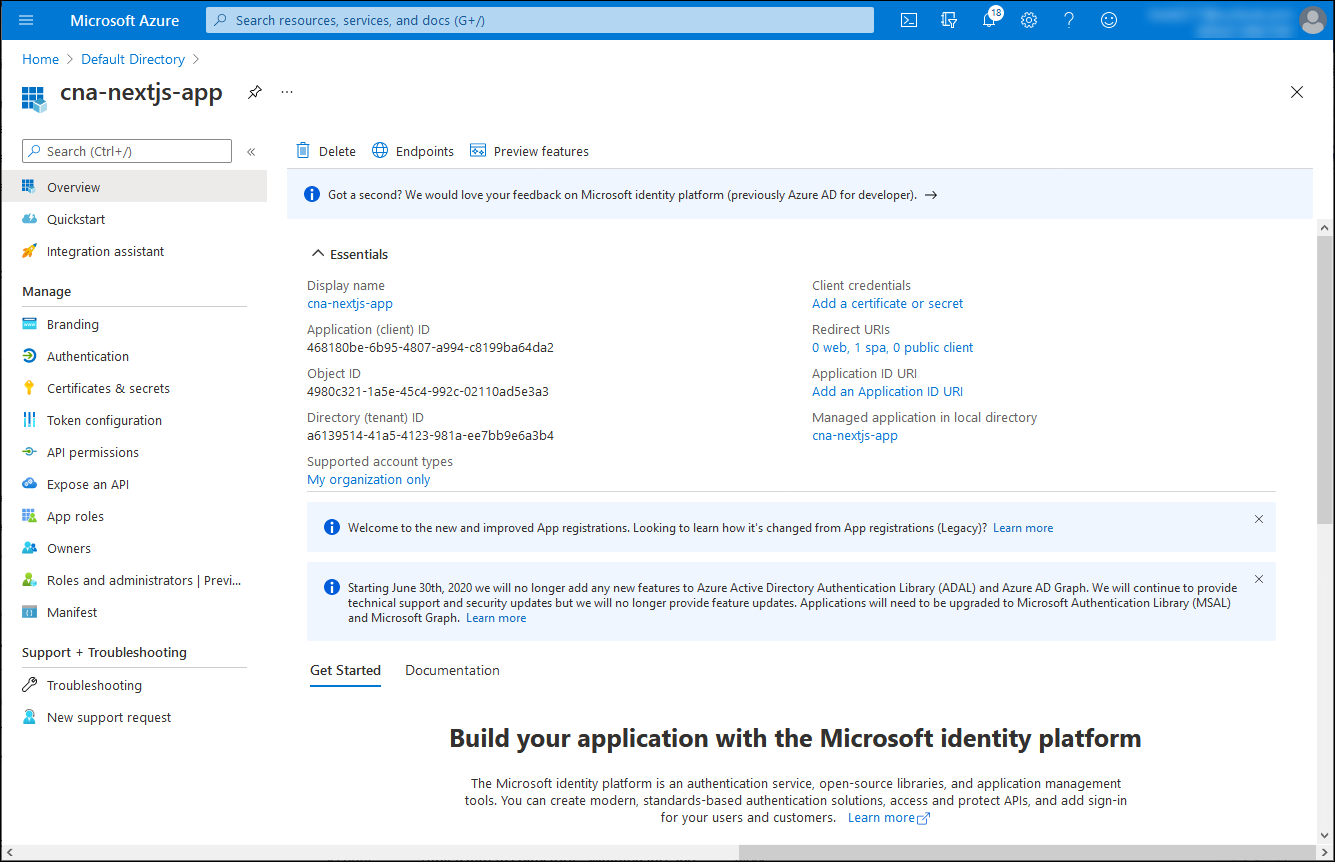
在 [cna-nextjs-app] 刀鋒視窗上,檢閱產生的設定,並記錄 [應用程式 (用戶端) 識別碼] 和 [目錄 (租用戶) 識別碼] 屬性的值。
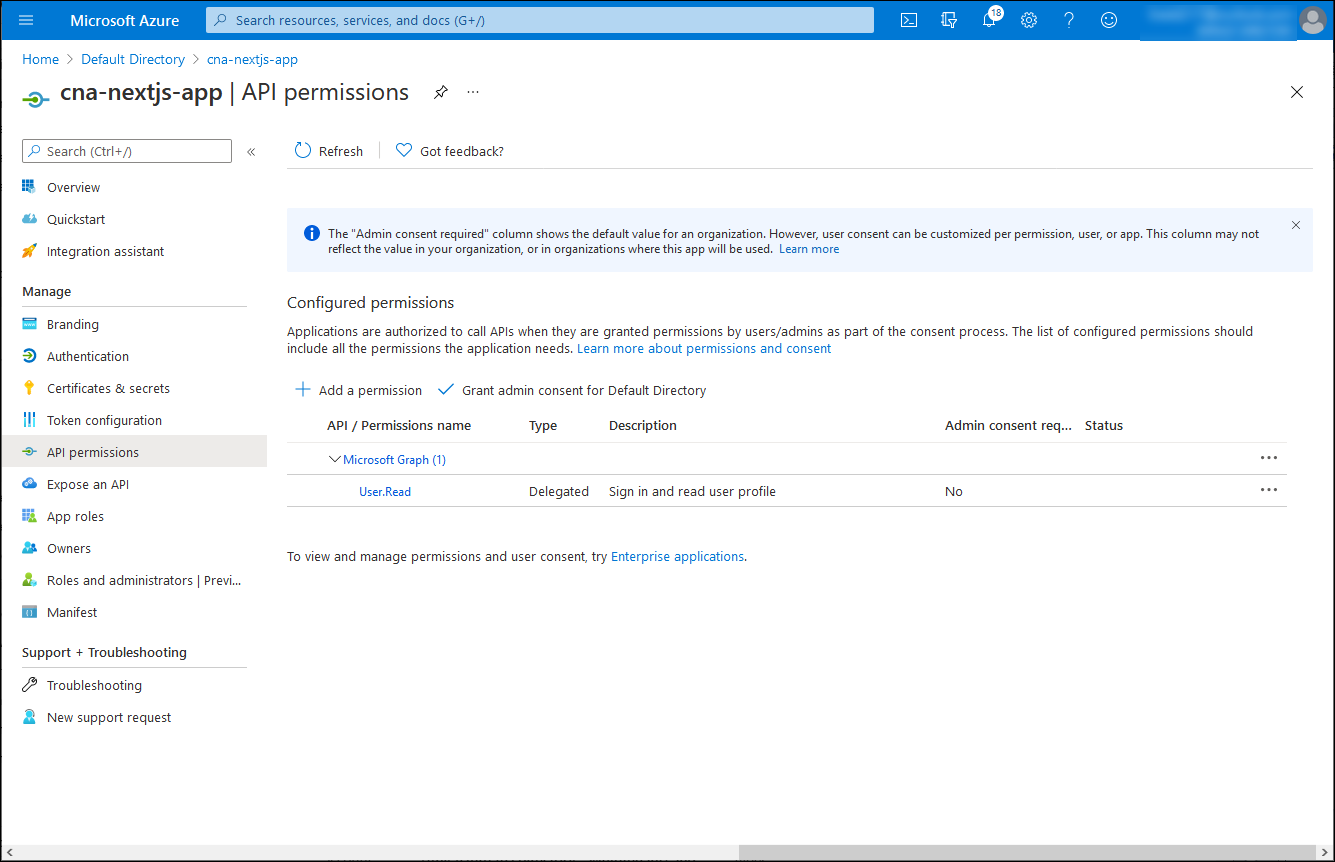
在 [cna-nextjs-app] 刀鋒視窗上,於垂直功能表的 [管理] 區段中選取 [API 權限]。
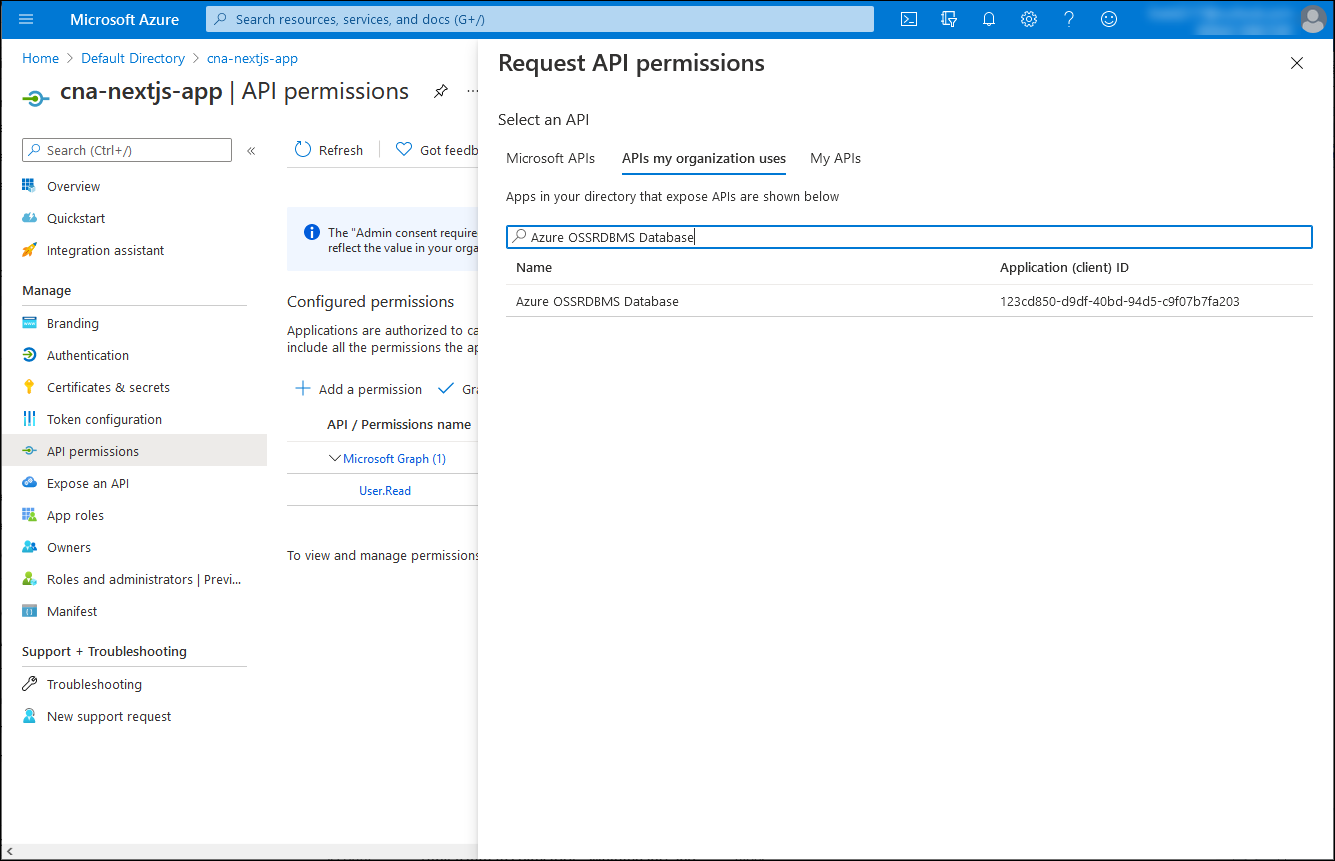
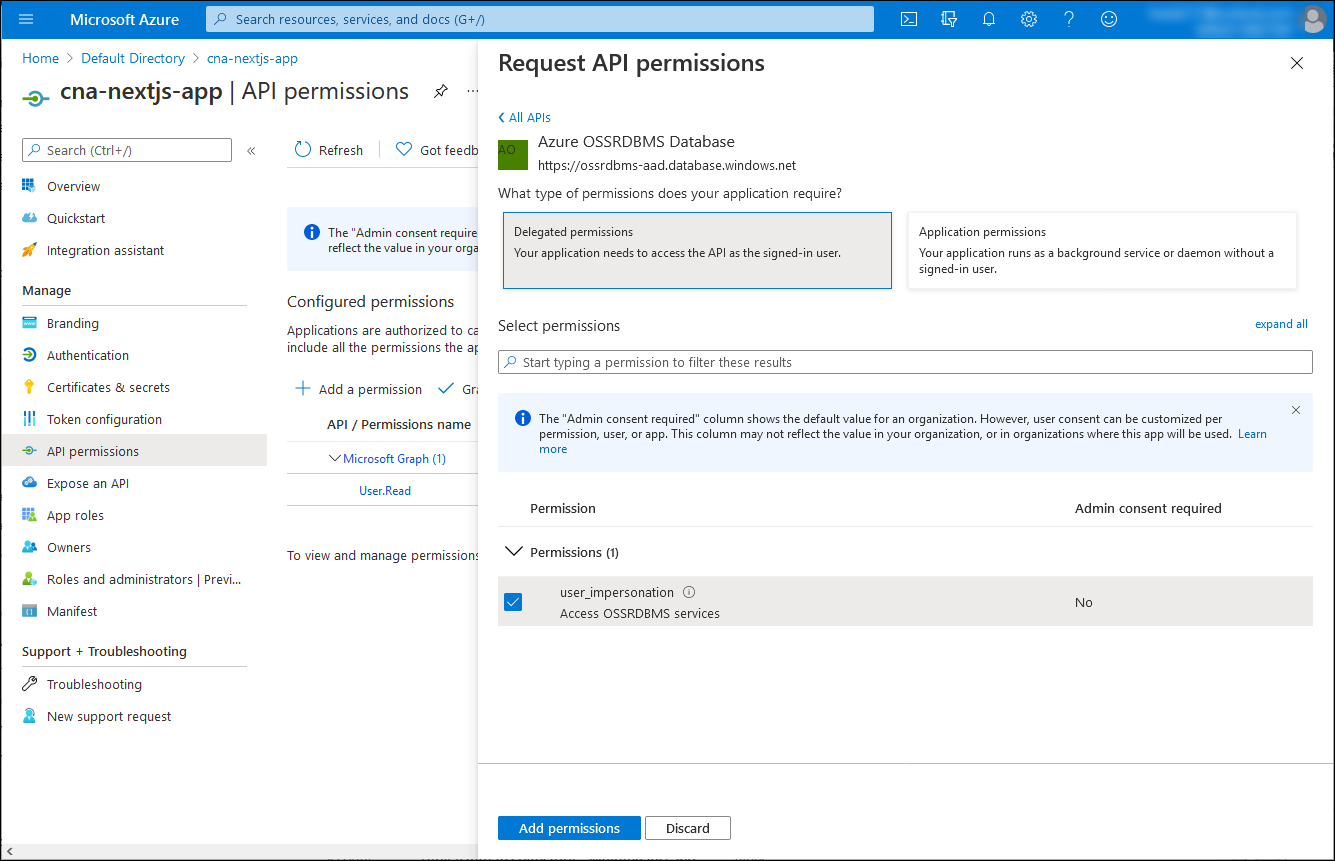
在 [cna-nextjs-app | API 權限] 刀鋒視窗的 [要求 API 權限] 刀鋒視窗上選取 [+ 新增權限],選取 [我的組織使用的 API] 索引標籤,在搜尋文字方塊中輸入 Azure OSSRDBMS Database,然後在結果清單中選取 [Azure OSSRDBMS Database]。
在 [要求 API 權限] 窗格上,依序選取 [委派的權限]、[user_impersonation] 核取方塊和 [新增權限]。
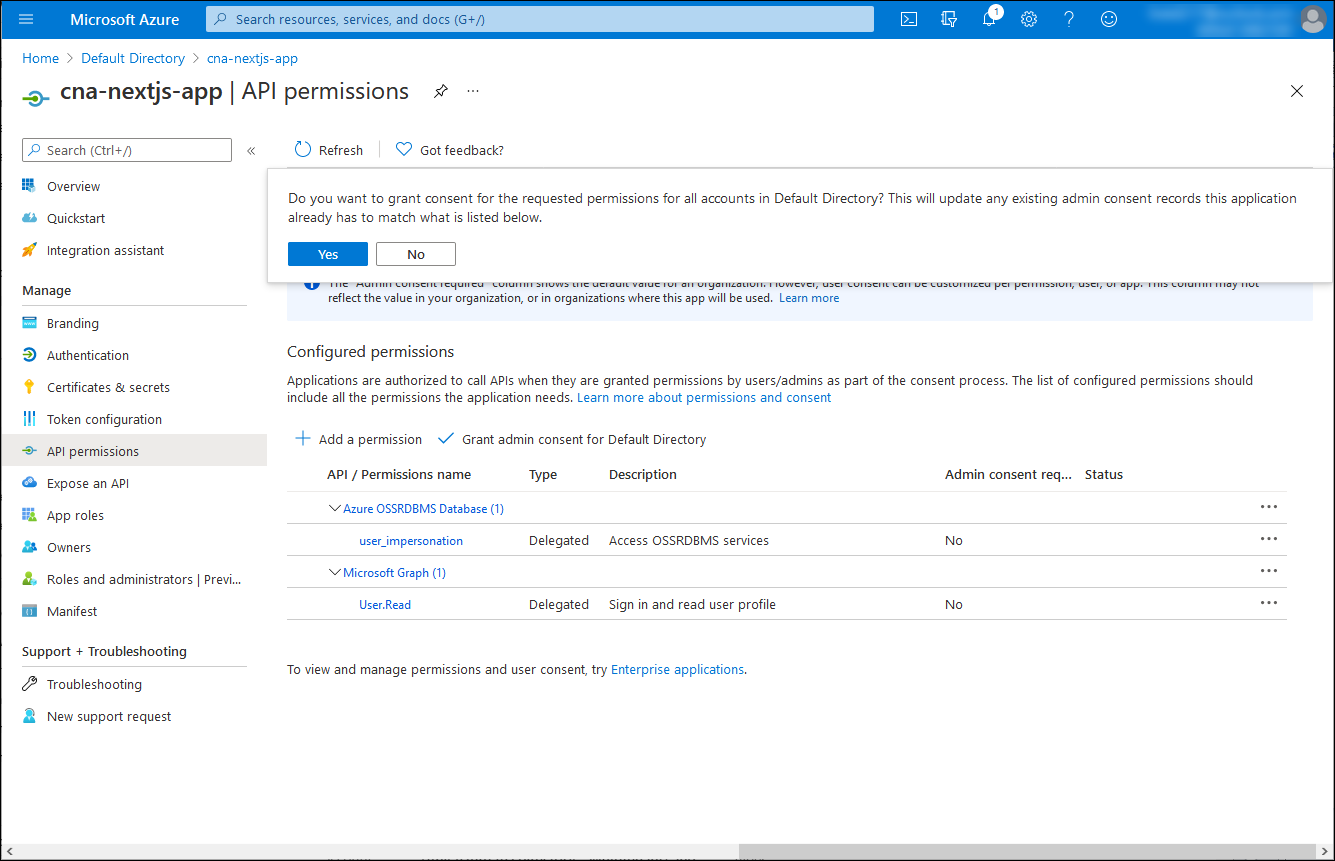
回到 [cna-nextjs-app | API 權限] 刀鋒視窗,選取 [授與預設目錄的管理員同意],並在出現確認提示時選取 [是]。
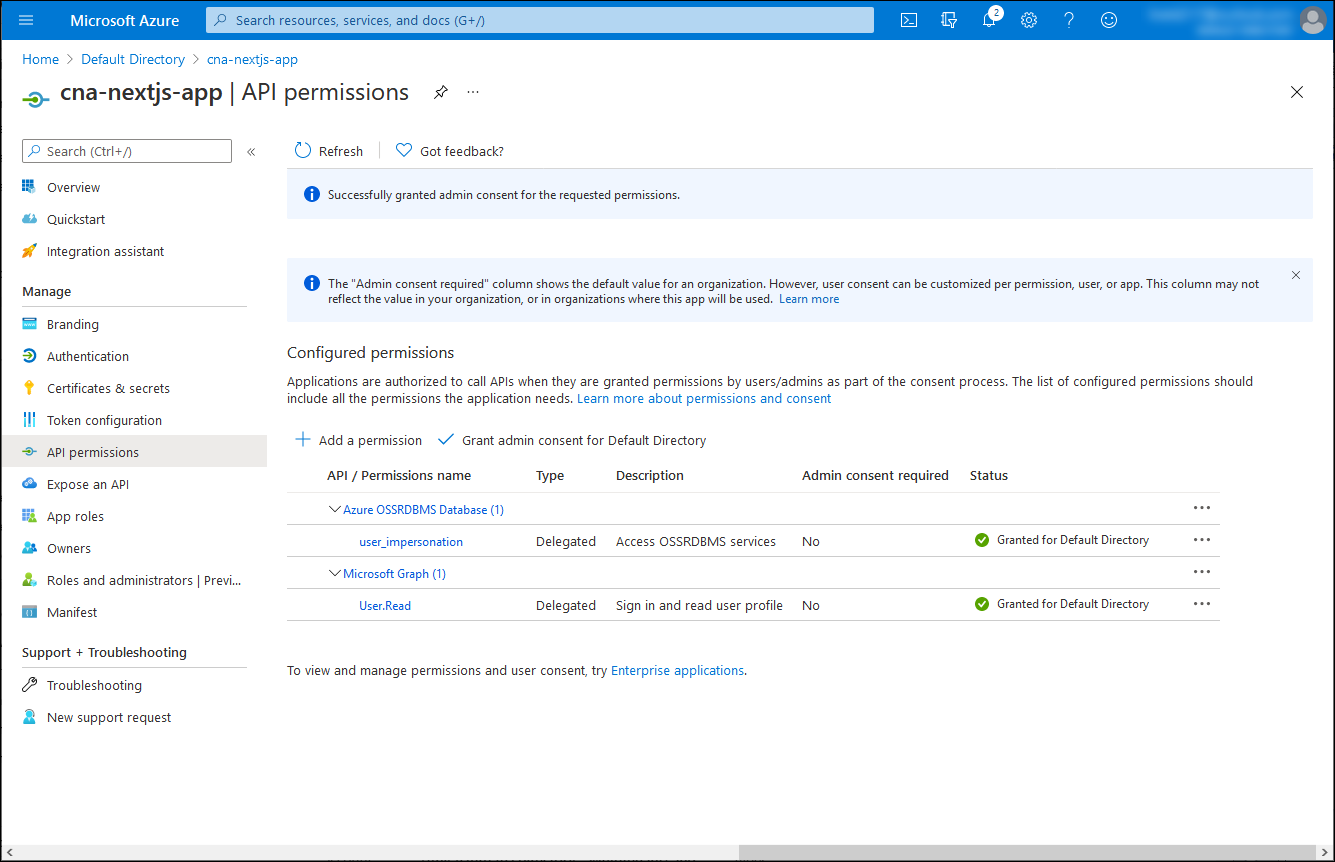
在 [cna-nextjs-app | API 權限] 刀鋒視窗上,確認已授與權限。
實作簡單的 Microsoft Entra 整合 Next.js 型應用程式
在 Microsoft Entra 租用戶中註冊應用程式之後,您現在可以繼續進行其實作。 為了簡化工作,您將複製包含範例 Next.js 程式碼的 GitHub 存放庫,並進行自訂以與 Microsoft Entra 租用戶整合。
在您的本機電腦上,啟動 Node.js 命令提示字元。
注意
請務必使用您電腦上本機安裝的 Node.js 執行這項操作。
從 Node.js 命令提示字元,執行下列命令以複製 GitHub 存放庫,其中包含將在此練習中使用的範例 Next.js 應用程式程式碼:
git clone https://github.com/MicrosoftDocs/mslearn-cloud-native-apps.git執行下列命令,以切換至裝載 GitHub 存放庫複製品的目錄:
cd ./mslearn-cloud-native-apps/m06u07使用慣用的文字編輯器檢閱 ./src/App.jsx 檔案的內容,其中會從 Microsoft Entra 擷取單頁應用程式的存取權杖:
注意
此範例程式碼是以教學課程:從 React 單頁應用程式 (SPA) 使用驗證碼流程登入使用者並呼叫 Microsoft Graph API 為依據。
./src/App.jsx 檔案包含下列內容:
import React, { useState } from "react";
import { AuthenticatedTemplate, UnauthenticatedTemplate, useMsal } from "@azure/msal-react";
import { loginRequest } from "./authConfig";
import { PageLayout } from "./components/PageLayout";
import { ProfileData } from "./components/ProfileData";
import { callMsGraph } from "./graph";
import Button from "react-bootstrap/Button";
import "./styles/App.css";

var accessToken = '';

/**
 * Renders information about the signed-in user or a button to retrieve data about the user
 */
const ProfileContent = () => {
    const { instance, accounts } = useMsal();
    const [graphData, setGraphData] = useState(null);

    function RequestProfileData() {
        // Silently acquires an access token which is then attached to a request for MS Graph data
        instance.acquireTokenSilent({
            ...loginRequest,
            account: accounts[0]
        }).then((response) => {
            accessToken = response.accessToken;
            callMsGraph(response.accessToken).then(response => setGraphData(response));
        });
    }

    return (
        <>
            <h5 className="card-title">Welcome {accounts[0].name}</h5>
            {graphData ?
                <ProfileData graphData={graphData} />
                :
                <Button variant="secondary" onClick={RequestProfileData}>Request Profile Information</Button>
            }
            <p>{accessToken}</p>
        </>
    );
};

/**
 * If a user is authenticated the ProfileContent component above is rendered. Otherwise, a message indicating a user is not authenticated is rendered.
 */
const MainContent = () => {
    return (
        <div className="App">
            <AuthenticatedTemplate>
                <ProfileContent />
            </AuthenticatedTemplate>

            <UnauthenticatedTemplate>
                <h5 className="card-title">Please sign-in to review your profile information.</h5>
                </UnauthenticatedTemplate>
        </div>
    );
};

export default function App() {
    return (
        <PageLayout>
            <MainContent />
        </PageLayout>
    );
}
使用慣用的文字編輯器檢閱 ./src/authConfig.js 檔案的內容,其中會儲存必要的資訊,以識別您在此練習上一個工作中註冊的目標 Microsoft Entra 應用程式。
./src/authConfig.js 檔案包含下列內容:
/*
 * Copyright (c) Microsoft Corporation. All rights reserved.
 * Licensed under the MIT License.
 */

import { LogLevel } from "@azure/msal-browser";

/**
 * Configuration object to be passed to MSAL instance on creation.
 * For a full list of MSAL.js configuration parameters, visit:
 * https://github.com/AzureAD/microsoft-authentication-library-for-js/blob/dev/lib/msal-browser/docs/configuration.md
 */
export const msalConfig = {
    auth: {
        clientId: "<client_ID>",
        authority: "https://login.microsoftonline.com/<tenant_ID>",
        redirectUri: "http://localhost:3000"
    },
    cache: {
        cacheLocation: "sessionStorage", // This configures where your cache will be stored
        storeAuthStateInCookie: false, // Set this to "true" if you are having issues on IE11 or Edge
    },
    system: {
        loggerOptions: {
            loggerCallback: (level, message, containsPii) => {
                if (containsPii) {
                    return;
                }
                switch (level) {
                    case LogLevel.Error:
                        console.error(message);
                        return;
                    case LogLevel.Info:
                        console.info(message);
                        return;
                    case LogLevel.Verbose:
                        console.debug(message);
                        return;
                    case LogLevel.Warning:
                        console.warn(message);
                        return;
                }
            }
        }
    }
};

/**
 * Scopes you add here will be prompted for user consent during sign-in.
 * By default, MSAL.js will add OIDC scopes (openid, profile, email) to any login request.
 * For more information about OIDC scopes, visit:
 * https://learn.microsoft.com/azure/active-directory/develop/v2-permissions-and-consent#openid-connect-scopes
 */
export const loginRequest = {
    scopes: ["User.Read"]
};

/**
 * Add here the scopes to request when obtaining an access token for MS Graph API. For more information, review:
 * https://github.com/AzureAD/microsoft-authentication-library-for-js/blob/dev/lib/msal-browser/docs/resources-and-scopes.md
 */
export const graphConfig = {
    graphMeEndpoint: "https://graph.microsoft.com/v1.0/me"
};
在顯示 ./src/authConfig.js 檔案內容的文字編輯器中,將
<client_ID>和<tenant_ID>預留位置取代為您在此練習上一個工作中識別的個別值。在顯示 ./src/authConfig.js 檔案內容的文字編輯器中,將
scopes: ["User.Read"]項目取代為scopes: ["User.Read","https://ossrdbms-aad.database.windows.net/user_impersonation"]。儲存變更並關閉檔案。
驗證 Next.js 型應用程式的 Microsoft Entra 整合。
您已經準備好驗證應用程式的 Microsoft Entra 整合。 您可以將其容器化,但為了簡單起見,請先在 Node.js 開發環境中的電腦本機上執行。 這可讓您快速驗證其功能,並確定是否可以將其容器化。
從 Node.js 命令提示字元,執行下列命令以安裝範例 Next.js 應用程式的相依性套件:
npm install注意
等候安裝程序完成。
從 Node.js 命令提示字元,執行下列命令以建置 Next.js 應用程式:
npm run-script build注意
等候建置程序完成。
從 Node.js 命令提示字元,執行下列命令以啟動 Next.js 應用程式:
npm run-script start注意
這會自動開啟瀏覽器視窗,並顯示 [歡迎使用適用於 JavaScript 的 Microsoft 驗證程式庫 - React 快速入門] 頁面。
關閉顯示 [歡迎使用適用於 JavaScript 的 Microsoft 驗證程式庫 - React 快速入門] 頁面的網頁瀏覽器視窗,以無痕/InPrivate 模式啟動另一個網頁瀏覽器視窗,然後巡覽至 http://localhost:3000 URL。
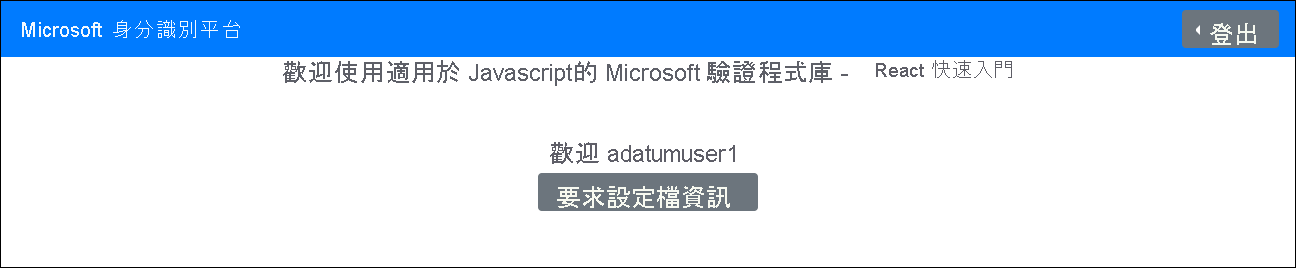
在 [歡迎使用適用於 JavaScript 的 Microsoft 驗證程式庫 - React 快速入門] 頁面上,選取 [登入],然後在展開的功能表中選取 [使用快顯登入]。

當系統提示登入時,請使用 adatumuser1userPrincipalName 及其密碼 Pa55w.rd1234 進行驗證。
注意
您已在本課程模組的第一個練習中建立此使用者帳戶。
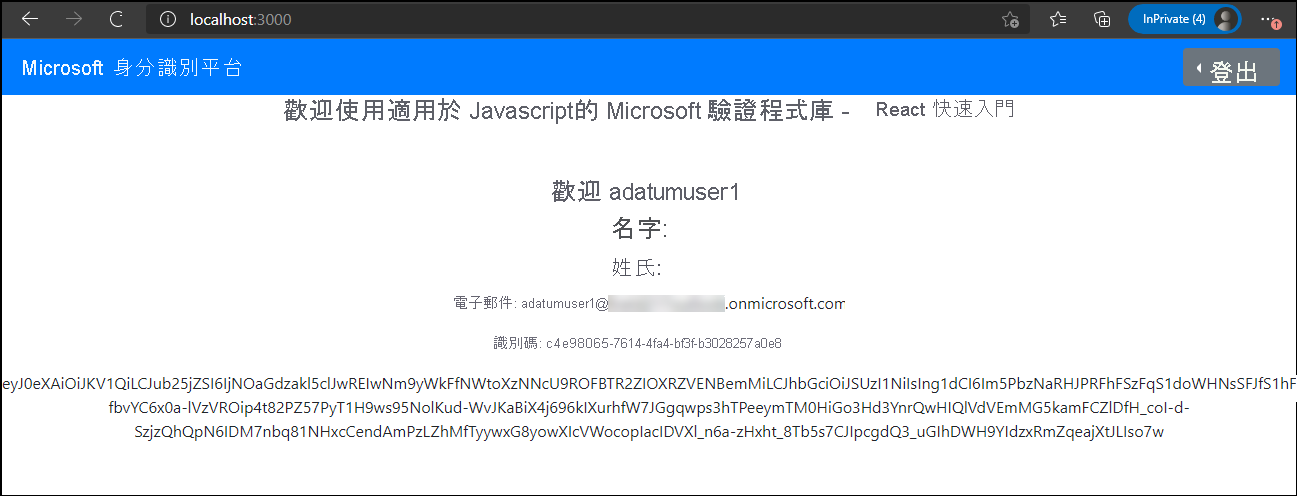
在 [歡迎使用適用於 JavaScript 的 Microsoft 驗證程式庫 - React 快速入門] 頁面上,選取 [要求設定檔資訊]。
注意
確認輸出包含 adatumuser1 Microsoft Entra 使用者帳戶的電子郵件、識別碼和存取權杖。
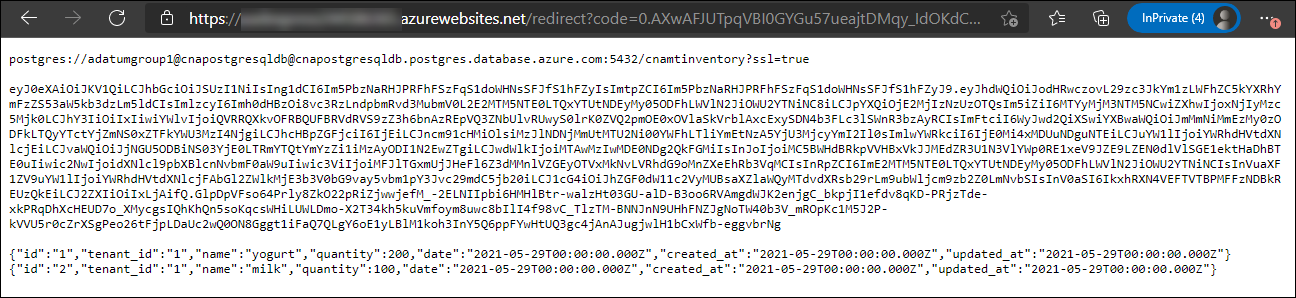
在相同的網頁瀏覽器視窗中開啟另一個瀏覽器索引標籤,然後瀏覽至您在上一個練習中部署的 Web 應用程式。
注意
URL 應具有下列格式:
https://<webapp_name>.azurewebsites.net/auth注意
確認結果網頁顯示第一個租用戶的清查資料。
注意
如果初始嘗試失敗,請再試一次。
關閉無痕/InPrivate 模式的網頁瀏覽器視窗。
注意
現在,您會重複與 contosouser1 相同的步驟順序,並確認您也可以存取清查資料及顯示對應至第二個租用戶的一組記錄。
以無痕/InPrivate 模式啟動另一個網頁瀏覽器視窗,並巡覽至 http://localhost:3000 URL。
在 [歡迎使用適用於 JavaScript 的 Microsoft 驗證程式庫 - React 快速入門] 頁面上,選取 [登入],然後在展開的功能表中選取 [使用快顯登入]。
當系統提示登入時,請使用 contosouser1userPrincipalName 及其密碼 Pa55w.rd1234 進行驗證。
注意
您已在本課程模組的第一個練習中建立此使用者帳戶。
注意
如果出現提示,請接受存取要求並變更 contosouser1 帳戶的密碼。
在 [歡迎使用適用於 JavaScript 的 Microsoft 驗證程式庫 - React 快速入門] 頁面上,選取 [要求設定檔資訊]。
注意
確認輸出包含 contosouser1 Microsoft Entra 使用者帳戶的電子郵件、識別碼和存取權杖。
在相同的網頁瀏覽器視窗中開啟另一個瀏覽器索引標籤,然後瀏覽至您在上一個練習中部署的 Web 應用程式。
注意
確認結果網頁顯示第二個租用戶的清查資料。

結果
恭喜! 您已完成本課程模組的第三個練習。 在此練習中,您已實作簡單的 AD 整合 Next.js 型應用程式,並確認其功能。
清除資源
為了避免因為使用 Azure 資源而產生不必要的費用,請刪除您在本課程模組上一個練習中建立的 postgresql-db-RG 和 cna-aadexpress-RG 資源群組。 若要進行此作業,請在 Azure 入口網站中,瀏覽至這三個資源群組各自的窗格,然後在工具列中選取 [刪除資源群組] 項目。 在 [輸入資源群組名稱] 文字方塊中,輸入資源群組的名稱,然後選取 [刪除]。