練習 - 部署訂用帳戶範圍的資源
重要
您必須有自己的 Azure 訂用帳戶才能執行本練習,且可能會產生費用。 如果您還沒有 Azure 訂用帳戶,請在開始前建立免費帳戶。
Teddybear 專案已全面展開,R&D 小組正在等候您將新的 Azure 訂用帳戶存取權授與專案。 您已建立訂用帳戶,但在授與小組存取權之前,您必須確定其只會部署符合小組原則的虛擬機器。 小組告訴過您,不想要部署 F 或 G 系列虛擬機器。
在此練習中,您將建立 Bicep 範本,以根據小組的原則設定訂用帳戶。
在此過程中,您將會:
- 建立要在部署訂用帳戶範圍的 Bicep 範本。
- 新增 Azure 原則定義和指派。
- 部署範本並驗證結果。
此練習需要您擁有部署訂用帳戶範圍資源的權限。 如果您無法使用目前的 Azure 帳戶來滿足這些需求,可以取得免費的試用版,並建立新的 Azure 訂用帳戶和租用戶。 或者,您也可以略過此練習中的部署步驟。
此練習使用適用於 Visual Studio Code 的 Bicep 延伸模組。 請務必在 Visual Studio Code 中安裝此延伸模組。
建立訂用帳戶範圍的範本
打開 Visual Studio Code。
建立名為 main.bicep 的新檔案。
儲存空檔案,讓 Visual Studio Code 載入 Bicep 工具。
您可以選取 [檔案]>[另存新檔],或在 Windows 中選取Ctrl+S (macOS 為 ⌘+S)。 請務必記住您儲存檔案的位置。 例如,您可能需要建立指令碼資料夾來儲存檔案。
將下列內容新增至 main.bicep 檔案。 很快就會開始部署範本。 建議您手動輸入此內容,而不是採用複製並貼上的方式,以便觀察工具如何協助您撰寫 Bicep 檔案。
targetScope = 'subscription'這行程式碼會告訴 Bicep 您的範本即將部署在訂用帳戶範圍中。
新增原則定義
在您剛才新增的行下方,新增下列變數定義:
var policyDefinitionName = 'DenyFandGSeriesVMs'在檔案底部,新增下列 Azure 原則定義:
resource policyDefinition 'Microsoft.Authorization/policyDefinitions@2020-03-01' = {
  name: policyDefinitionName
  properties: {
    policyType: 'Custom'
    mode: 'All'
    parameters: {}
    policyRule: {
      if: {
        allOf: [
          {
            field: 'type'
            equals: 'Microsoft.Compute/virtualMachines'
          }
          {
            anyOf: [
              {
                field: 'Microsoft.Compute/virtualMachines/sku.name'
                like: 'Standard_F*'
              }
              {
                field: 'Microsoft.Compute/virtualMachines/sku.name'
                like: 'Standard_G*'
              }
            ]
          }
        ]
      }
      then: {
        effect: 'deny'
      }
    }
  }
}
請注意,原則定義只適用於符合下列條件的資源:
- 資源類型等於
Microsoft.Compute/virtualMachines。 sku.name屬性的開頭是Standard_F或Standard_G。
當您嘗試建立符合這些條件的資源時,Azure 將會拒絕建立資源。
警告
當您針對原則定義使用拒絕原則效果時請小心,特別是在像是訂用帳戶和管理群組等廣泛範圍的情況下。 如果未正確建立定義,可能造成非預期的影響,而導致中斷。 最好是從稽核原則效果開始,當您確定其在一段時間內能正常運作之後,才切換到拒絕效果。
您正在建立訂用帳戶範圍的原則定義。 這表示部署定義之後,就可以在訂用帳戶中的所有資源群組使用定義。
- 資源類型等於
指派原則
原則定義在套用之前沒有任何作用。 在此步驟中,您會部署將原則定義套用至訂用帳戶的第二個訂用帳戶範圍資源。
在
policyDefinitionName變數定義下方,新增下列變數定義:var policyAssignmentName = 'DenyFandGSeriesVMs'在檔案底部的原則定義資源下方,新增下列原則指派:
resource policyAssignment 'Microsoft.Authorization/policyAssignments@2020-03-01' = {
  name: policyAssignmentName
  properties: {
    policyDefinitionId: policyDefinition.id
  }
}
請注意,您不須明確設定要套用至整個訂用帳戶的原則指派。 Bicep 了解這是因為範本會部署在訂用帳戶範圍內。
儲存對檔案所做的變更。
驗證範本
您的範本看起來應該如下所示:
targetScope = 'subscription'

var policyDefinitionName = 'DenyFandGSeriesVMs'
var policyAssignmentName = 'DenyFandGSeriesVMs'

resource policyDefinition 'Microsoft.Authorization/policyDefinitions@2020-03-01' = {
  name: policyDefinitionName
  properties: {
    policyType: 'Custom'
    mode: 'All'
    parameters: {}
    policyRule: {
      if: {
        allOf: [
          {
            field: 'type'
            equals: 'Microsoft.Compute/virtualMachines'
          }
          {
            anyOf: [
              {
                field: 'Microsoft.Compute/virtualMachines/sku.name'
                like: 'Standard_F*'
              }
              {
                field: 'Microsoft.Compute/virtualMachines/sku.name'
                like: 'Standard_G*'
              }
            ]
          }
        ]
      }
      then: {
        effect: 'deny'
      }
    }
  }
}

resource policyAssignment 'Microsoft.Authorization/policyAssignments@2020-03-01' = {
  name: policyAssignmentName
  properties: {
    policyDefinitionId: policyDefinition.id
  }
}
否則,請複製範例或調整範本,以符合範例。
部署範本
若要將此範本部署至 Azure,您必須從 Visual Studio Code 終端機登入您的 Azure 帳戶。 請確定您已安裝 Azure CLI 工具。
在 [終端機] 功能表上,選取 [新增終端機]。 終端機視窗通常隨即在畫面的下半部開啟。
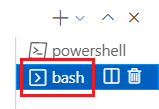
如果終端視窗右側顯示的殼層為 [bash],則正確的殼層隨即開啟,而您可以跳至下一節。

如果出現 bash 以外的殼層,請選取殼層下拉式清單箭號,然後選取 [Git Bash]。
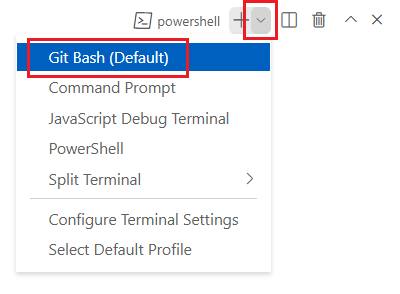
在終端機殼層清單中,選取 [bash]。
在終端機中,前往您儲存範本的目錄。 例如,若將範本儲存於 templates 資料夾,則可使用此命令:
cd templates
安裝 Bicep
執行以下命令,確保您有最新版本 Bicep:
az bicep install && az bicep upgrade
使用 Azure CLI 登入 Azure
在 Visual Studio Code 終端中,執行下列命令以登入 Azure:
az login在開啟的瀏覽器中,登入您的 Azure 帳戶。
Visual Studio Code 終端機會顯示與此帳戶相關聯的訂用帳戶清單。
在清單中,尋找您要在此練習中使用的訂用帳戶。
如果您在登入時錯過此清單,您可以使用下列程式碼片段以再次列出訂用帳戶。
az account list --output table針對您在此工作階段中執行的所有 Azure CLI 命令,設定預設訂用帳戶。
az account set --subscription "Your Subscription Name or ID"
若要將此範本部署至 Azure,請從 Visual Studio Code 終端登入 Azure 帳戶。 確定您已安裝 Azure PowerShell。
在 [終端機] 功能表上,選取 [新增終端機]。 終端機視窗通常隨即在畫面的下半部開啟。
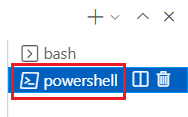
如果終端視窗右側顯示的殼層是 powershell 或 pwsh,則已開啟正確的殼層,而您可以跳至下一節。

如果出現 powershell 或 pwsh 以外的殼層,則請選取殼層下拉式清單箭號,然後選取 [PowerShell]。
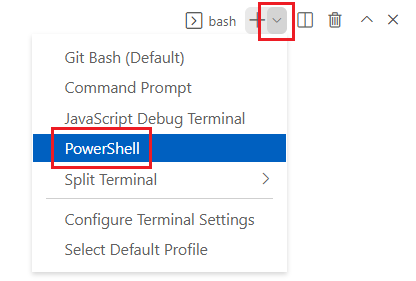
在終端機殼層清單中,選取 [powershell] 或 [pwsh]。
在終端機中,前往您儲存範本的目錄。 例如,若將範本儲存在 templates 資料夾,則可使用此命令:
Set-Location -Path templates
安裝 Bicep CLI
若要從 Azure PowerShell 使用 Bicep,請安裝 Bicep CLI。
使用 Azure PowerShell 登入 Azure
在 Visual Studio Code 終端中,執行下列命令以登入 Azure:
Connect-AzAccount在開啟的瀏覽器中,登入您的 Azure 帳戶。
執行下列命令,以取得您要在此練習中使用的訂用帳戶識別碼:
Get-AzSubscription訂用帳戶識別碼是第二個資料行。 複製第二個資料行。 看起來像 cf49fbbc-217c-4eb6-9eb5-a6a6c68295a0。
針對您在此工作階段中執行的所有 Azure PowerShell 命令,設定預設訂用帳戶。
Set-AzContext -SubscriptionId {Your subscription ID}
將範本部署至 Azure
在 Visual Studio Code 終端中,透過使用下列 Azure CLI 命令來部署範本:
templateFile="main.bicep"
today=$(date +"%d-%b-%Y")
deploymentName="sub-scope-"$today

az deployment sub create \
    --name $deploymentName \
    --location westus \
    --template-file $templateFile
請注意,您要使用 az deployment sub create 命令來建立訂用帳戶範圍的部署,而不是您可能習慣使用的 az deployment group create 命令。
在 Visual Studio Code 終端機中,透過使用下列 Azure PowerShell 命令部署範本:
$templateFile = 'main.bicep'
$today = Get-Date -Format 'MM-dd-yyyy'
$deploymentName = "sub-scope-$today"

New-AzSubscriptionDeployment `
  -Name $deploymentName `
  -Location westus `
  -TemplateFile $templateFile
請注意,您要使用 New-AzSubscriptionDeployment Cmdlet 來建立訂用帳戶範圍的部署,而不是您可能習慣使用的 New-AzResourceGroupDeployment Cmdlet。
也請注意,您要明確指定部署的名稱和位置。 Azure 會使用此資訊來儲存部署中繼資料。
提示
您的部署名稱包含今天的日期。 這可讓您較不容易誤用與另一個部署相同的名稱。
部署可能需要一到兩分鐘的時間才能完成,然後您會看到成功的部署。
注意
如果使用程式碼 AuthorizationFailed 時收到錯誤訊息,表示您可能沒有部署訂用帳戶範圍資源的許可權。 請要求 Azure 系統管理員授與您權限。 或者,如果您無法使用目前的 Azure 帳戶來滿足這些需求,可以取得免費的試用版,並建立新的 Azure 訂用帳戶和租用戶。
檢查部署
您可以在 Azure 入口網站中查看訂用帳戶範圍的部署。 這有助於確認部署已順利完成,並檢查結果。
前往 Azure 入口網站。
在左窗格中,選取 [訂用帳戶]。
選取您的訂用帳戶。
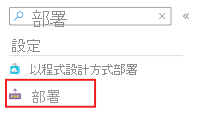
在 [搜尋] 方塊中,輸入 [部署],然後選取 [部署] 功能表項目。
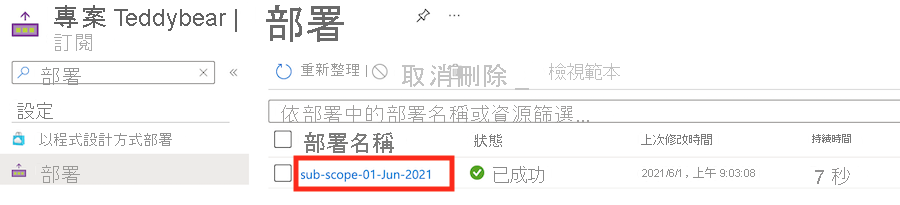
在 [部署名稱] 資料行中,選取以 sub-scope 開頭的部署,以查看已部署的資源。
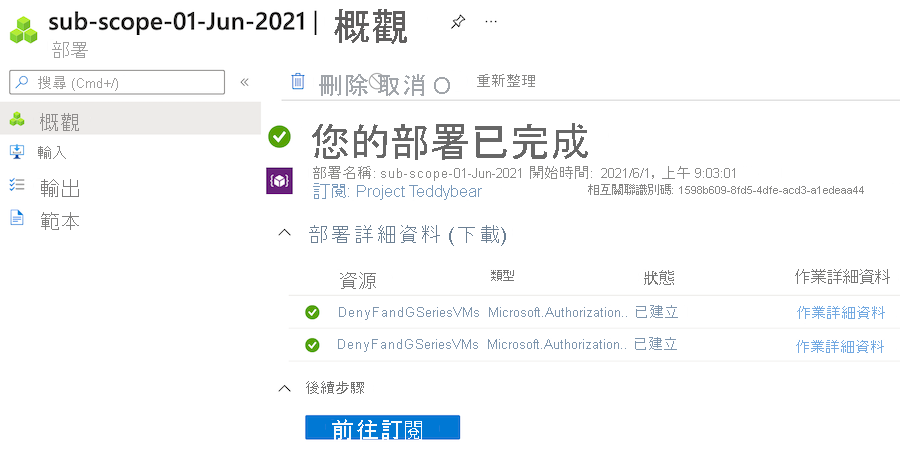
選取 [部署詳細資料] 以將其展開。 在此情況下,會列出兩個 Azure 原則資源。
清除資源
您已成功部署訂用帳戶範圍的資源。 可以藉由執行下列命令來移除您所建立的原則資源:
subscriptionId=$(az account show --query 'id' --output tsv)

az policy assignment delete --name 'DenyFandGSeriesVMs' --scope "/subscriptions/$subscriptionId"
az policy definition delete --name 'DenyFandGSeriesVMs' --subscription $subscriptionId
$subscriptionId = (Get-AzContext).Subscription.Id

Remove-AzPolicyAssignment -Name 'DenyFandGSeriesVMs' -Scope "/subscriptions/$subscriptionId"
Remove-AzPolicyDefinition -Name 'DenyFandGSeriesVMs' -SubscriptionId $subscriptionId
在下一個練習單元中,您將重新部署相同的原則資源。 將會重新建立這些資源,但之後您可以再次清除。