練習 - 發佈存放庫
在玩具公司,網站的開發人員表示願意協助您撰寫 Bicep 範本。 您告訴他們,您已將 Bicep 的程式碼保留在存放庫中,而他們要求您發佈存放庫。 在此練習中,您將發佈 Git 存放庫,讓您的同事可以檢視檔案並與您共同作業。
在此過程中,您將會:
- 建立新的遠端存放庫。
- 設定您的本機 Git 存放庫,以與遠端存放庫整合。
- 將您本機存放庫中的變更推送到遠端存放庫。
- 確認變更出現在遠端存放庫中。
在 GitHub.com 上建立存放庫
在瀏覽器中,前往 GitHub。 使用您的 GitHub 帳戶登入,或建立新的帳戶 (如果您沒有帳戶)。
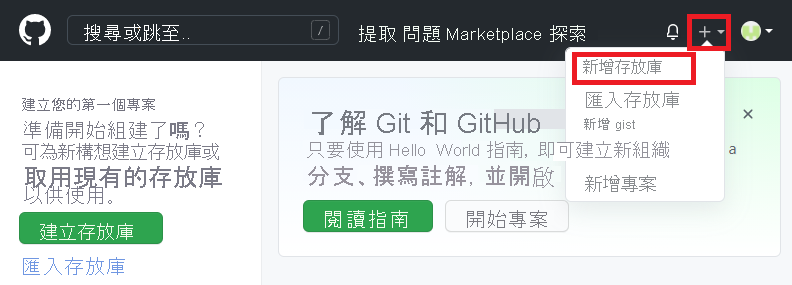
選取視窗右上方的加號 (+) 圖示,然後選取 [新增存放庫]。
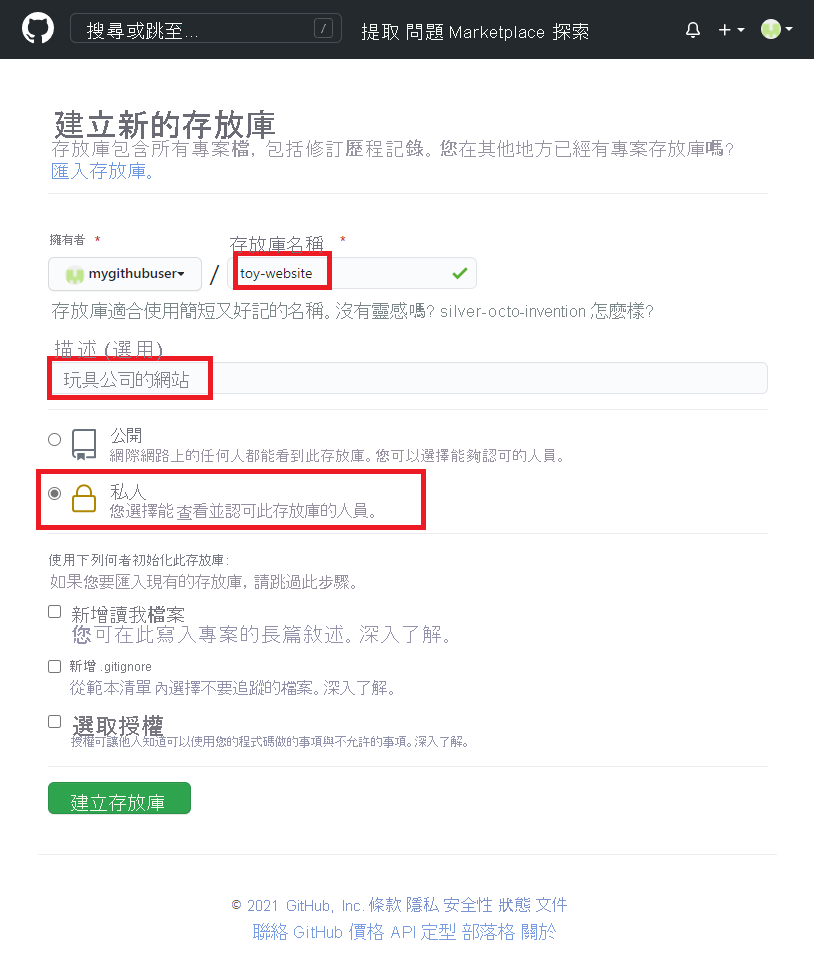
輸入新存放庫的詳細資料:
- 擁有者:從下拉式功能表中選取您的 GitHub 使用者名稱。 在螢幕擷取畫面中,
mygithubuser是存放庫擁有者的 GitHub 帳戶名稱。 您將會在本課程模組稍後使用您的帳戶名稱。 - 存放庫名稱:輸入有意義但簡短的名稱。 針對此課程模組,請使用
toy-website-workflow。 - 描述:包含可協助其他人了解存放庫用途的描述。
- 私人:您可以使用 GitHub 來建立公用和私人存放庫。 請建立私人存放庫,因為只有您組織內的人員才能存取玩具網站的檔案。 您稍後可以將存取權授與其他人。
完成之後,您的存放庫設定看起來應該如下列螢幕擷取畫面所示:
- 擁有者:從下拉式功能表中選取您的 GitHub 使用者名稱。 在螢幕擷取畫面中,
選取 [建立存放庫]。
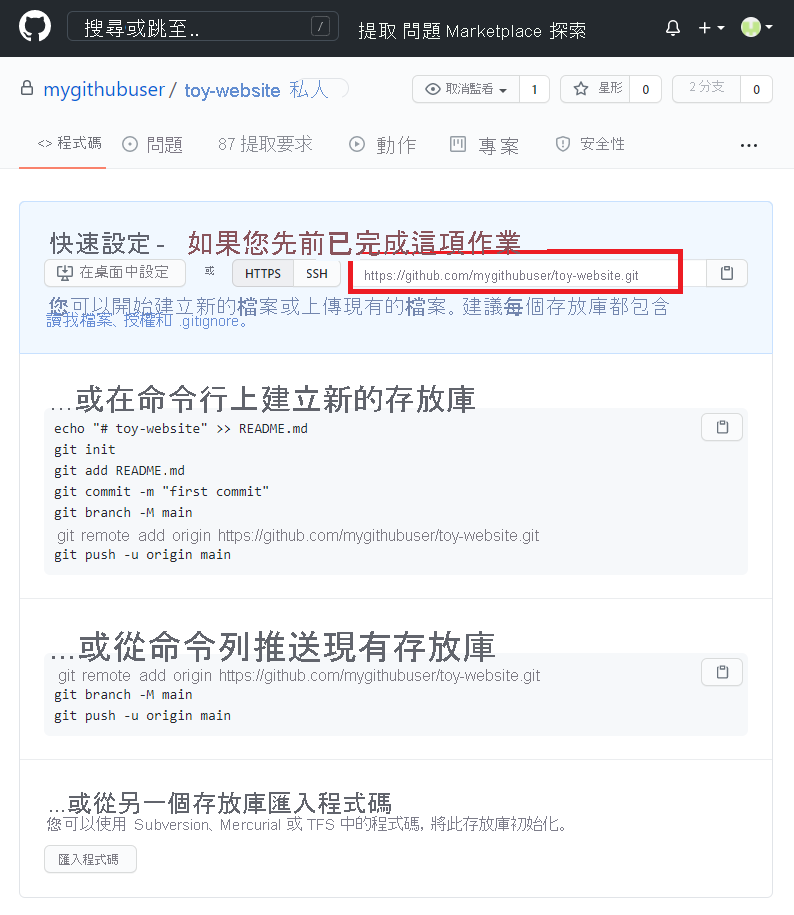
在出現的 [確認] 頁面上,記下存放庫的 URL。 您可以使用複製按鈕來複製 URL。 您很快就會用到此資訊。
在 Azure Repos 中建立存放庫
在瀏覽器中,前往 Azure DevOps。 登入或建立新的帳戶。
若要建立新的帳戶,請遵循提示來建立 Azure DevOps 組織。 Azure DevOps 接著會要求您建立新專案。 繼續至下個步驟。
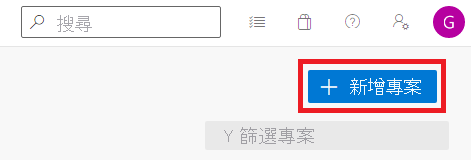
若您已登入現有的 Azure DevOps 組織,請選取 [新增專案] 按鈕以建立新的專案。
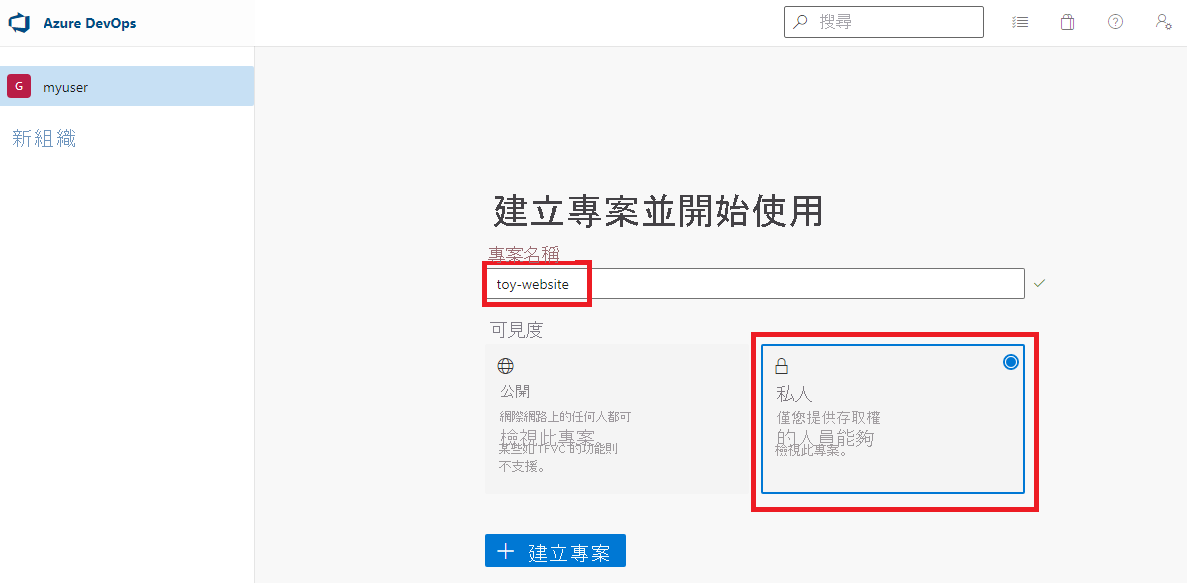
輸入新專案的詳細資料:
- 專案名稱:輸入有意義但簡短的名稱。 針對此課程模組,請使用
toy-website。 - 描述:包含可協助其他人了解存放庫用途的描述。
- 可見度:您可以使用 Azure DevOps 建立公用與私人存放庫。 請建立私人存放庫,因為只有您組織內的人員才能存取網站的檔案。 您稍後可以將存取權授與其他人。
完成之後,您的專案設定看起來應該如下列螢幕擷取畫面所示:
- 專案名稱:輸入有意義但簡短的名稱。 針對此課程模組,請使用
選取 建立。
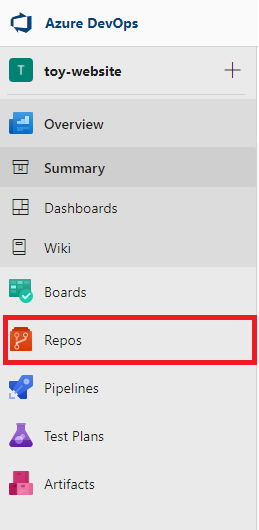
在出現的 [專案] 頁面上,選取 [Repos] 功能表項目。
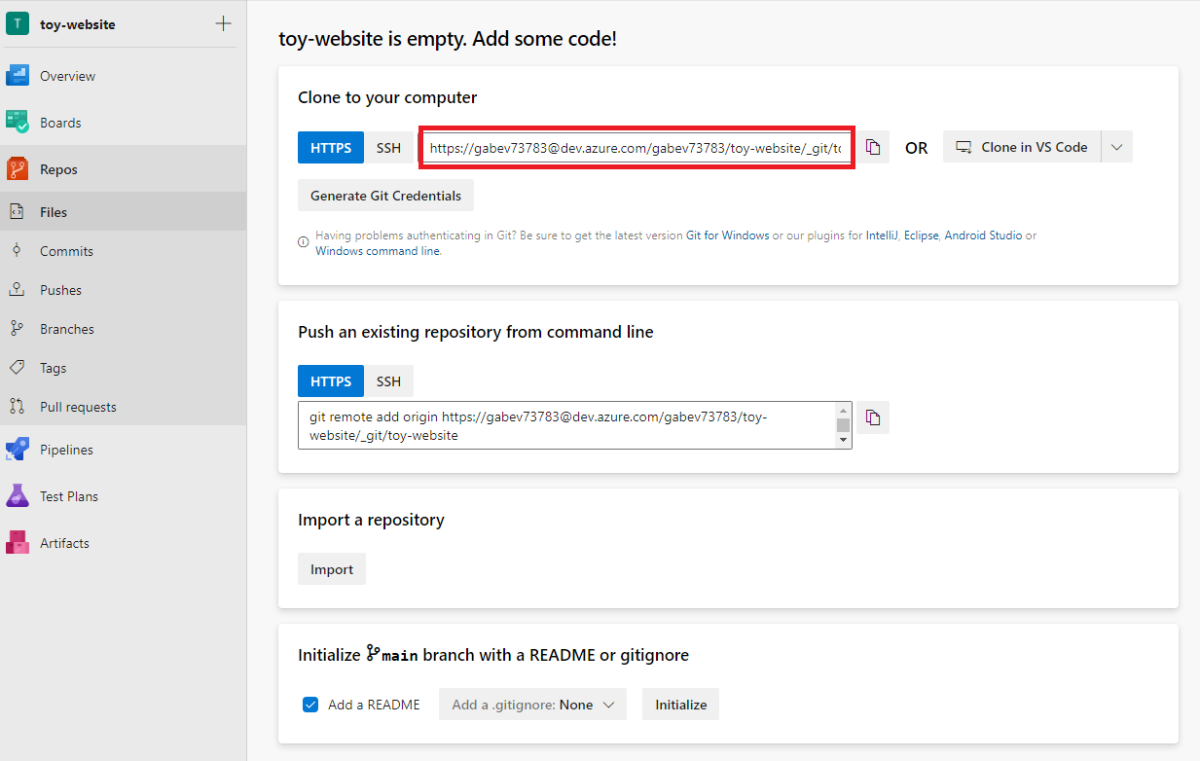
記下存放庫的 URL。 您可以使用複製按鈕來複製 URL。 您很快就會用到此資訊。
產生 Git 密碼
當您從 macOS 上的 Visual Studio Code 使用 Azure Repos 時,需要使用與您登入密碼不同的特殊密碼。
注意
如果您是使用 Windows,請跳至下一節,設定您的本機 Git 存放庫。
選取 [產生 Git 認證] 按鈕。
Azure Repos 會建立隨機密碼供您使用。
記下 [密碼] 值。 您很快就會用到此資訊。
讓瀏覽器保持開啟。 您稍後會在本練習中再次檢查存放庫。
設定您的本機 Git 存放庫
在 Visual Studio Code 終端機中輸入下列命令,以確定您是在 main 分支上:
git checkout main輸入下列命令,將本機存放庫與您建立的遠端存放庫整合。 將
YOUR_REPOSITORY_URL取代為您稍早儲存的 URL。git remote add origin YOUR_REPOSITORY_URL請注意,您要使用命令
git remote add來建立遠端存放庫的新參考。 您可以命名參考origin,這會是標準名稱。確認遠端已建立。
git remote -v輸出將會類似於下列範例。
origin  https://github.com/mygithubuser/toy-website.git (fetch)
origin  https://github.com/mygithubuser/toy-website.git (push)
origin https://myuser@dev.azure.com/myuser/toy-website/_git/toy-website (fetch) origin https://myuser@dev.azure.com/myuser/toy-website/_git/toy-website (push)
使用 Git CLI 推送您的變更
在 Visual Studio Code 終端機中,輸入下列命令:
git push -u origin main因為您目前的本機分支是 main 分支,所以此命令會告知 Git 本機 main 分支會「追蹤」遠端存放庫中的 main 分支。 這也會將本機存放庫中的認可「推送」至遠端存放庫。
這是您第一次使用此遠端存放庫,因此終端機會提示您選取如何進行驗證。 選擇使用瀏覽器的選項。
依照瀏覽器中的指示進行登入,並授權 Visual Studio Code 存取 GitHub 存放庫。
在終端機視窗中,Git 會顯示類似下列範例的輸出:
Enumerating objects: 16, done.
Counting objects: 100% (16/16), done.
Delta compression using up to 8 threads
Compressing objects: 100% (11/11), done.
Writing objects: 100% (16/16), 2.30 KiB | 785.00 KiB/s, done.
Total 16 (delta 2), reused 0 (delta 0), pack-reused 0
remote: Resolving deltas: 100% (2/2), done.
To https://github.com/mygithubuser/toy-website.git
 * [new branch]      main -> main
Branch 'main' set up to track remote branch 'main' from 'origin'.
此輸出表示 Git 已成功將您存放庫的內容推送至遠端存放庫。
在 Visual Studio Code 終端機中,輸入下列命令:
git push -u origin main因為您目前的本機分支是 main 分支,所以此命令會告知 Git 本機 main 分支會「追蹤」遠端存放庫中的 main 分支。 這也會將本機存放庫的認可推送至遠端。
這是您第一次使用此存放庫,因此系統會提示您登入。
若您正在使用 Windows,請輸入您稍早在本練習中用來登入 Azure DevOps 的相同認證。
若您正在使用 macOS,請貼上您稍早在本練習中產生的密碼。
在終端機視窗中,Git 會顯示類似下列範例的輸出:
Enumerating objects: 16, done.
Counting objects: 100% (16/16), done.
Delta compression using up to 8 threads
Compressing objects: 100% (11/11), done.
Writing objects: 100% (16/16), 2.30 KiB | 785.00 KiB/s, done.
Total 16 (delta 2), reused 0 (delta 0), pack-reused 0
remote: Analyzing objects... (16/16) (5 ms)
remote: Storing packfile... done (165 ms)
remote: Storing index... done (75 ms)
To https://dev.azure.com/myuser/toy-website/_git/toy-website
 * [new branch]      main -> main
Branch 'main' set up to track remote branch 'main' from 'origin'.
此輸出表示 Git 已成功將您存放庫的內容推送至遠端存放庫。
新增讀我檔案
現在您的同事將會使用您的存放庫,請務必建立 README.md 檔案,以協助他們了解您的存放庫用途,以及如何開始使用。
在 Visual Studio Code 中開啟 [Explorer]。
在目前資料夾結構的根目錄新增檔案,並將其命名為 README.md。
將下列文字複製到檔案中:
# Toy company's website

This repository contains the website for our toy company.

## How to use

The Azure infrastructure is defined using [Bicep](/azure/azure-resource-manager/bicep).

To deploy the website's Azure resources, use the _deploy/main.bicep_ file.
提示
這是預留位置的讀我檔案,因此沒有太多有用的內容。 當您使用自己的 Git 存放庫時,請建立讀我檔案,以協助他人了解如何開始使用您的程式碼。 就將其當作您專案的輕量型使用手冊。
儲存檔案。
將檔案暫存並認可至本機 Git 存放庫。 您可以選擇使用 Git CLI 或使用 Visual Studio Code 中的原始檔控制進行認可。
使用 Visual Studio Code 重新推送
現在您已認可新的檔案,必須再次推送變更,讓遠端具有最新的檔案。 這次,您會使用 Visual Studio Code 推送至遠端存放庫。
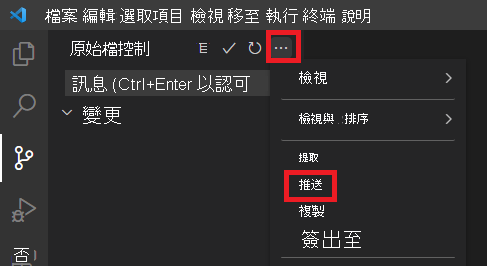
在 Visual Studio Code 中開啟 [原始檔控制]。
選取 [原始檔控制] 工具列右側有三個點的圖示,然後選取 [推送]。
請注意,系統不會提示您再次登入。 您的認證會在 Git CLI 和 Visual Studio Code 之間共用。
確認 GitHub 中的變更
現在您已將變更推送至遠端存放庫,可以在 GitHub 上檢查存放庫的內容。
在您的瀏覽器中,重新整理存放庫頁面。
請注意,現在會列出您建立的檔案,並顯示您的 README.md 檔案。
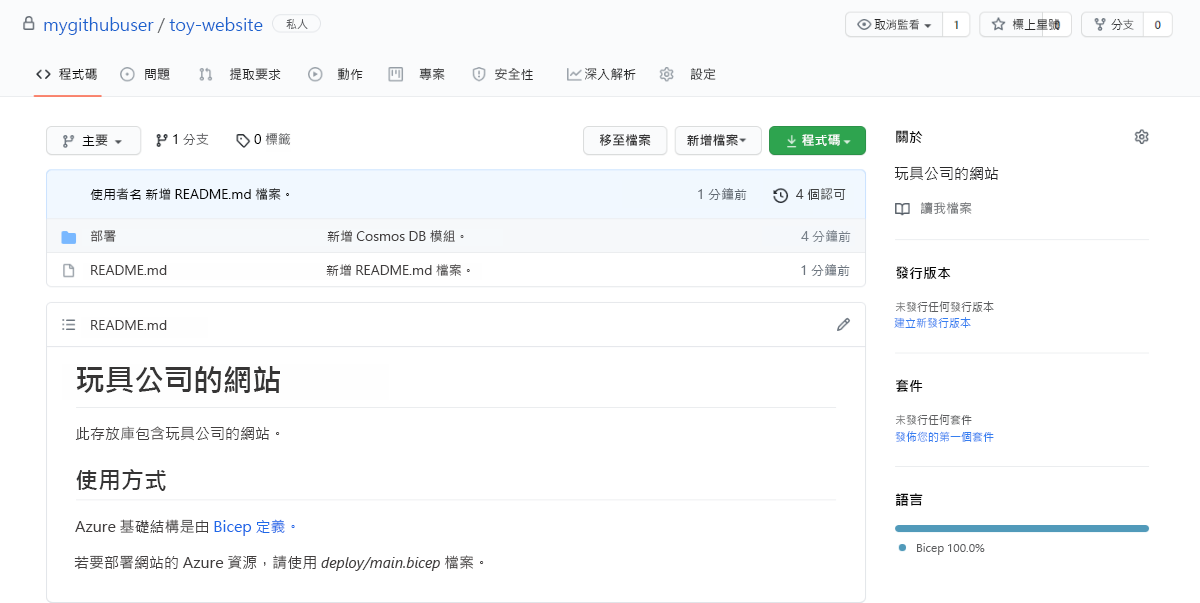
瀏覽 GitHub 介面以探索檔案,並注意您的變更已全部顯示。 由於 GitHub 有每個檔案的變更完整清單,因此您甚至可以像在 Visual Studio Code 中工作一樣,檢視檔案的歷程記錄。
確認 Azure Repos 中的變更
現在您已將變更推送至遠端存放庫,可以在 Azure Repos 上檢查存放庫的內容。
在您的瀏覽器中,重新整理 Repos 頁面。
請注意,現在會列出您建立的檔案,並顯示您的 README.md 檔案。
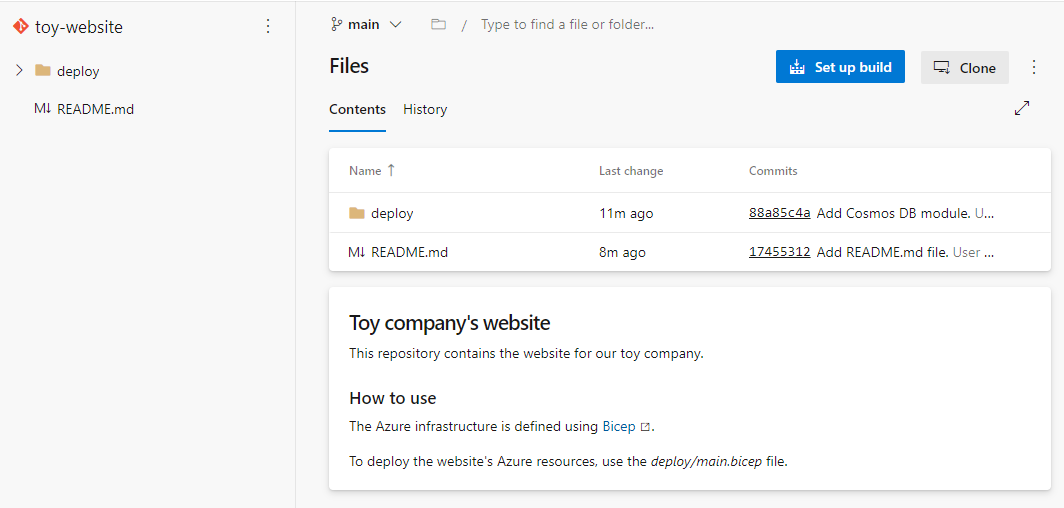
瀏覽 GitHub 介面以探索檔案,並注意您的變更已全部顯示。 由於 GitHub 有每個檔案的變更完整清單,因此您甚至可以像在 Visual Studio Code 中工作一樣,檢視檔案的歷程記錄。