練習 - 設定環境
重要
您必須有自己的 Azure 訂用帳戶才能執行本練習,且可能會產生費用。 如果您還沒有 Azure 訂用帳戶,請在開始前建立免費帳戶。
開始處理玩具公司的網站工作流程之前,您需要設定環境。 在此單元中,確定您已設定 Azure 和 GitHub 環境來完成此課程模組的其餘部分。
為了達成這些目標,您可以:
- 設定適用於此課程模組的 GitHub 存放庫。
- 將專案的存放庫複製到電腦。
- 在 Microsoft Entra ID 中建立兩個工作負載身分識別。
- 在 Azure 中建立兩個資源群組。
- 在 GitHub 中建立祕密和環境。
取得 GitHub 存放庫
在此,您需要確定已設定 GitHub 存放庫,以完成此課程模組的其餘作業。 您可以根據範本存放庫建立新的存放庫,以完成設定。 範本存放庫包含您開始進行此課程模組所需的檔案。
此學習路徑中的課程模組有難度分級。 基於學習目的,每個課程模組都有相關聯的 GitHub 範本存放庫。
提示
即使您已完成學習路徑中的上一個課程模組,仍請遵循這些指示建立新的存放庫,並確定您為其提供新的名稱。
從範本存放庫開始進行
執行可設定您的 GitHub 存放庫的範本。
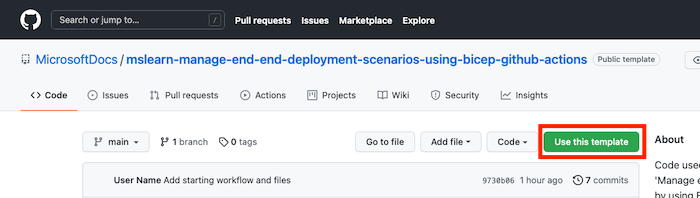
在 GitHub 網站上,按照下列步驟操作以從範本建立存放庫:
選取 [使用此範本]> [建立新的存放庫]。
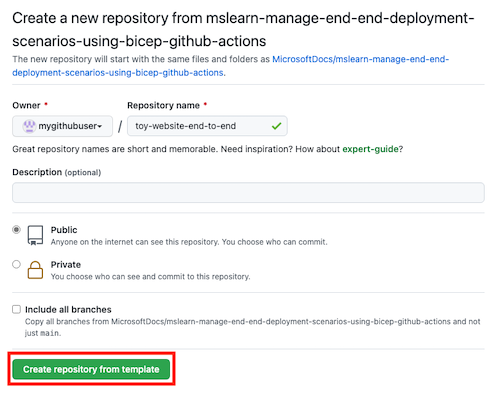
從 [擁有者] 下拉式清單中選取您的 GitHub 使用者名稱。
輸入新專案的存放庫名稱,例如 toy-website-end-to-end。
選取 [公開] 選項。
建立自己的存放庫時,建議您將其設為私人。 在此課程模組中,您將使用僅可與公用存放庫和 GitHub Enterprise 帳戶一同運作的一些 GitHub 功能。
選取 [從範本建立存放庫]。
重要
本課程模組的最後一個練習包含重要的清除步驟。 即使未完成本課程模組,也請務必執行清除步驟。
複製存放庫
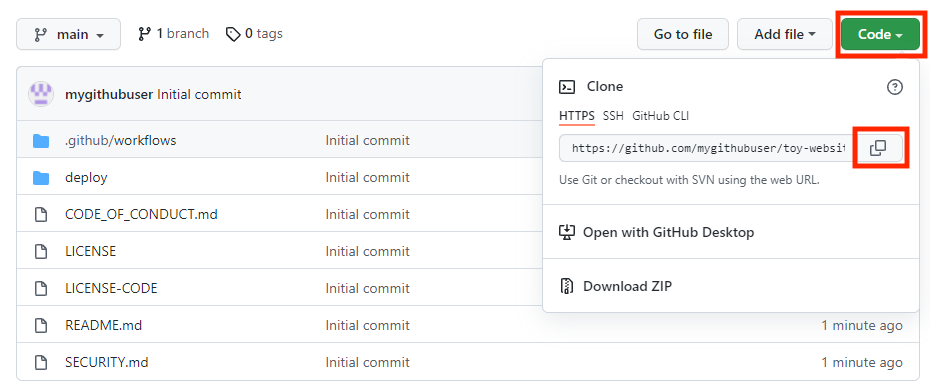
現在,您已在自己的帳戶中擁有範本存放庫的複本。 您現在將此存放庫複製至本機,以便開始作業。
選取 [程式碼],然後選取複製圖示。
打開 Visual Studio Code。
透過選取 [終端機]>[新增終端機],開啟一個 Visual Studio Code 終端機視窗。 該視窗通常會在畫面底部開啟。
在終端上瀏覽至您要在本機電腦上複製 GitHub 存放庫的目錄。 例如,若要將存放庫複製到 toy-website-environments 資料夾,請執行下列命令:
cd toy-website-end-to-end輸入
git clone並貼上您稍早複製的 URL,該 URL 看起來像這樣:git clone https://github.com/mygithubuser/toy-website-end-to-end.git在 Visual Studio Code 終端機中執行下列命令,以在存放庫資料夾中重新開啟 Visual Studio Code:
code -r toy-website-end-to-end
登入 Azure
若要在 Azure 中使用資源群組,請從 Visual Studio Code 終端機登入 Azure 帳戶。 請確定您已安裝 Azure CLI 工具。
在 [終端機] 功能表中,選取 [新增終端機]。 終端機視窗通常隨即在畫面的下半部開啟。
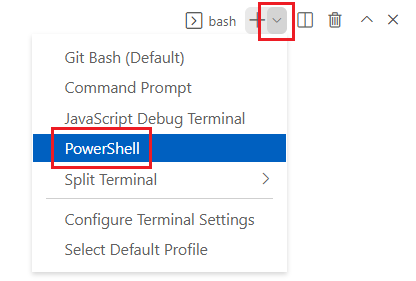
預設殼層通常是 pwsh,如終端視窗右側所示。

選取殼層下拉式清單,然後選取 [Azure Cloud Shell (bash)]。
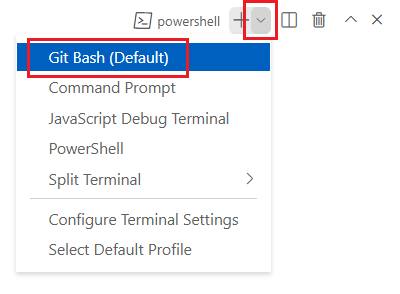
新的殼層隨即開啟。
使用 Azure CLI 登入 Azure
在 Visual Studio Code 終端機中,執行下列命令以登入 Azure:
az login在開啟的瀏覽器中,登入您的 Azure 帳戶。
若要在 Azure 中使用資源群組,請從 Visual Studio Code 終端機登入 Azure 帳戶。 確定您已安裝 Azure PowerShell。
在 [終端機] 功能表中,選取 [新增終端機]。 終端機視窗通常隨即在畫面的下半部開啟。
預設殼層通常是 pwsh,如終端視窗右側所示。
選取殼層下拉式清單,然後選取 [Azure Cloud Shell (PowerShell)]。
新的殼層隨即開啟。
使用 Azure PowerShell 登入 Azure
在 Visual Studio Code 終端機中,執行下列命令以登入 Azure:
Connect-AzAccount在開啟的瀏覽器中,登入您的 Azure 帳戶。
建立兩個工作負載身分識別
接下來,在 Microsoft Entra ID 中建立兩個工作負載身分識別:一個用於測試環境,另一個用於實際執行環境。
執行下列的程式碼,來定義 GitHub 使用者名稱和存放庫名稱的變數。 確定您以稍早在此練習中記下的 GitHub 使用者名稱來取代
mygithubuser。 也請確定您指定正確的 GitHub 存放庫名稱。githubOrganizationName='mygithubuser' githubRepositoryName='toy-website-end-to-end'建立工作負載身分識別,以部署至測試環境。 工作負載身分識別需要兩個同盟認證:一個在工作流程執行「驗證」作業時使用,因為此作業與 GitHub 環境無關。 第二個則是在工作流程執行「部署」作業時使用,此作業會針對「測試」GitHub 環境執行。
testApplicationRegistrationDetails=$(az ad app create --display-name 'toy-website-end-to-end-test')
testApplicationRegistrationObjectId=$(echo $testApplicationRegistrationDetails | jq -r '.id')
testApplicationRegistrationAppId=$(echo $testApplicationRegistrationDetails | jq -r '.appId')

az ad app federated-credential create \
   --id $testApplicationRegistrationObjectId \
   --parameters "{\"name\":\"toy-website-end-to-end-test\",\"issuer\":\"https://token.actions.githubusercontent.com\",\"subject\":\"repo:${githubOrganizationName}/${githubRepositoryName}:environment:Test\",\"audiences\":[\"api://AzureADTokenExchange\"]}"

az ad app federated-credential create \
   --id $testApplicationRegistrationObjectId \
   --parameters "{\"name\":\"toy-website-end-to-end-test-branch\",\"issuer\":\"https://token.actions.githubusercontent.com\",\"subject\":\"repo:${githubOrganizationName}/${githubRepositoryName}:ref:refs/heads/main\",\"audiences\":[\"api://AzureADTokenExchange\"]}"
執行下列程式碼,這會為實際執行環境建立類似的工作負載身分識別和同盟認證:
productionApplicationRegistrationDetails=$(az ad app create --display-name 'toy-website-end-to-end-production')
productionApplicationRegistrationObjectId=$(echo $productionApplicationRegistrationDetails | jq -r '.id')
productionApplicationRegistrationAppId=$(echo $productionApplicationRegistrationDetails | jq -r '.appId')

az ad app federated-credential create \
   --id $productionApplicationRegistrationObjectId \
   --parameters "{\"name\":\"toy-website-end-to-end-production\",\"issuer\":\"https://token.actions.githubusercontent.com\",\"subject\":\"repo:${githubOrganizationName}/${githubRepositoryName}:environment:Production\",\"audiences\":[\"api://AzureADTokenExchange\"]}"

az ad app federated-credential create \
   --id $productionApplicationRegistrationObjectId \
   --parameters "{\"name\":\"toy-website-end-to-end-production-branch\",\"issuer\":\"https://token.actions.githubusercontent.com\",\"subject\":\"repo:${githubOrganizationName}/${githubRepositoryName}:ref:refs/heads/main\",\"audiences\":[\"api://AzureADTokenExchange\"]}"
執行下列程式碼以定義 GitHub 使用者名稱及存放庫名稱的變數。 確定您以稍早在此練習中記下的 GitHub 使用者名稱來取代
mygithubuser。 也請確定您指定正確的 GitHub 存放庫名稱。$githubOrganizationName = 'mygithubuser' $githubRepositoryName = 'toy-website-end-to-end'執行下列程式碼,這會建立適用於測試環境的工作負載身分識別,並將它與您的 GitHub 存放庫產生關聯:
$testApplicationRegistration = New-AzADApplication -DisplayName 'toy-website-end-to-end-test'
New-AzADAppFederatedCredential `
   -Name 'toy-website-end-to-end-test' `
   -ApplicationObjectId $testApplicationRegistration.Id `
   -Issuer 'https://token.actions.githubusercontent.com' `
   -Audience 'api://AzureADTokenExchange' `
   -Subject "repo:$($githubOrganizationName)/$($githubRepositoryName):environment:Test"
New-AzADAppFederatedCredential `
   -Name 'toy-website-end-to-end-test-branch' `
   -ApplicationObjectId $testApplicationRegistration.Id `
   -Issuer 'https://token.actions.githubusercontent.com' `
   -Audience 'api://AzureADTokenExchange' `
   -Subject "repo:$($githubOrganizationName)/$($githubRepositoryName):ref:refs/heads/main"
執行下列程式碼,這會遵循適用於實際執行環境的類似流程:
$productionApplicationRegistration = New-AzADApplication -DisplayName 'toy-website-end-to-end-production'
New-AzADAppFederatedCredential `
   -Name 'toy-website-end-to-end-production' `
   -ApplicationObjectId $productionApplicationRegistration.Id `
   -Issuer 'https://token.actions.githubusercontent.com' `
   -Audience 'api://AzureADTokenExchange' `
   -Subject "repo:$($githubOrganizationName)/$($githubRepositoryName):environment:Production"
New-AzADAppFederatedCredential `
   -Name 'toy-website-end-to-end-production-branch' `
   -ApplicationObjectId $productionApplicationRegistration.Id `
   -Issuer 'https://token.actions.githubusercontent.com' `
   -Audience 'api://AzureADTokenExchange' `
   -Subject "repo:$($githubOrganizationName)/$($githubRepositoryName):ref:refs/heads/main"
在 Azure 中建立兩個資源群組,並授與工作負載身分識別存取權
接下來,為每個環境建立資源群組。 此流程也會在資源群組上為各自的工作負載身分識別授與參與者角色,讓您的工作流程能夠部署至該資源群組。
若要建立測試環境的資源群組,並為工作負載身分識別授與對該資源群組的存取權,請在 Visual Studio Code 終端機中執行下列 Azure CLI 命令:
testResourceGroupResourceId=$(az group create --name ToyWebsiteTest --location westus3 --query id --output tsv)

az ad sp create --id $testApplicationRegistrationObjectId
az role assignment create \
   --assignee $testApplicationRegistrationAppId \
   --role Contributor \
   --scope $testResourceGroupResourceId
執行類似流程,以建立實際執行環境的資源群組:
productionResourceGroupResourceId=$(az group create --name ToyWebsiteProduction --location westus3 --query id --output tsv)

az ad sp create --id $productionApplicationRegistrationObjectId
az role assignment create \
   --assignee $productionApplicationRegistrationAppId \
   --role Contributor \
   --scope $productionResourceGroupResourceId
若要建立測試環境的資源群組,並為工作負載身分識別授與對該資源群組的存取權,請在 Visual Studio Code 終端機中執行下列 Azure PowerShell 命令:
$testResourceGroup = New-AzResourceGroup -Name ToyWebsiteTest -Location westus3

New-AzADServicePrincipal -AppId $($testApplicationRegistration.AppId)
New-AzRoleAssignment `
   -ApplicationId $($testApplicationRegistration.AppId) `
   -RoleDefinitionName Contributor `
   -Scope $($testResourceGroup.ResourceId)
執行類似流程,以建立實際執行環境的資源群組:
$productionResourceGroup = New-AzResourceGroup -Name ToyWebsiteProduction -Location westus3

New-AzADServicePrincipal -AppId $($productionApplicationRegistration.AppId)
New-AzRoleAssignment `
   -ApplicationId $($productionApplicationRegistration.AppId) `
   -RoleDefinitionName Contributor `
   -Scope $($productionResourceGroup.ResourceId)
準備 GitHub 祕密
執行下列程式碼以輸出您用來建立 GitHub 祕密所需的值:
echo "AZURE_CLIENT_ID_TEST: $testApplicationRegistrationAppId"
echo "AZURE_CLIENT_ID_PRODUCTION: $productionApplicationRegistrationAppId"
echo "AZURE_TENANT_ID: $(az account show --query tenantId --output tsv)"
echo "AZURE_SUBSCRIPTION_ID: $(az account show --query id --output tsv)"
$azureContext = Get-AzContext
Write-Host "AZURE_CLIENT_ID_TEST: $($testApplicationRegistration.AppId)"
Write-Host "AZURE_CLIENT_ID_PRODUCTION: $($productionApplicationRegistration.AppId)"
Write-Host "AZURE_TENANT_ID: $($azureContext.Tenant.Id)"
Write-Host "AZURE_SUBSCRIPTION_ID: $($azureContext.Subscription.Id)"
建立 GitHub 祕密
您已建立兩個工作負載身分識別,以及其可部署的目標資源群組。 接下來,在 GitHub Actions 中建立祕密。
在瀏覽器中,瀏覽至您的 GitHub 存放庫。
選取 [設定]> [祕密]> [動作]。
選取 [新增存放庫祕密]。

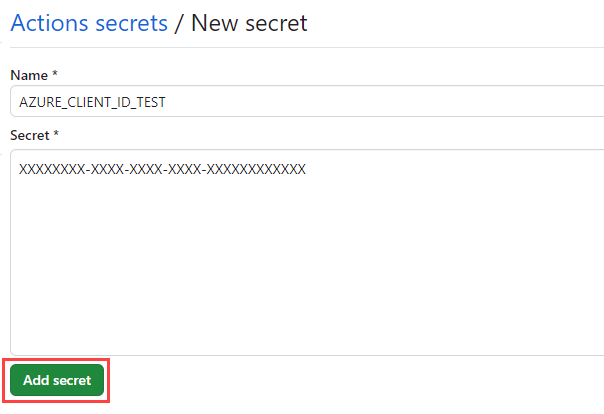
將祕密命名為 AZURE_CLIENT_ID_TEST。
在 [Value] \(值\) 欄位中,貼上來自終端輸出第一行的 GUID。 請勿在值中包含
AZURE_CLIENT_ID_TEST、冒號或任何空格。選取 [新增祕密]。
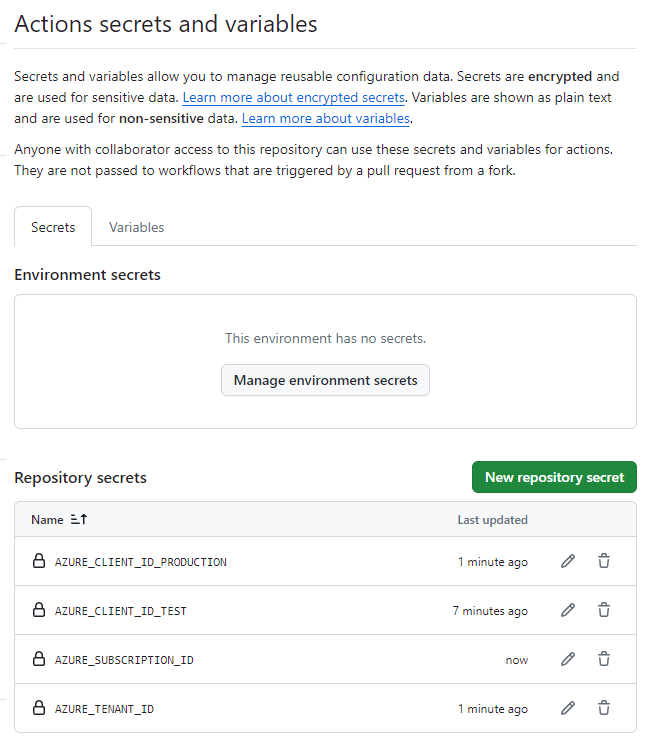
重複此流程,以針對 AZURE_CLIENT_ID_PRODUCTION、AZURE_TENANT_ID 和 AZURE_SUBSCRIPTION_ID 建立祕密,並從終端機輸出的對應欄位中複製值。
確認祕密清單現在會顯示這四個祕密。
在 GitHub 中建立環境
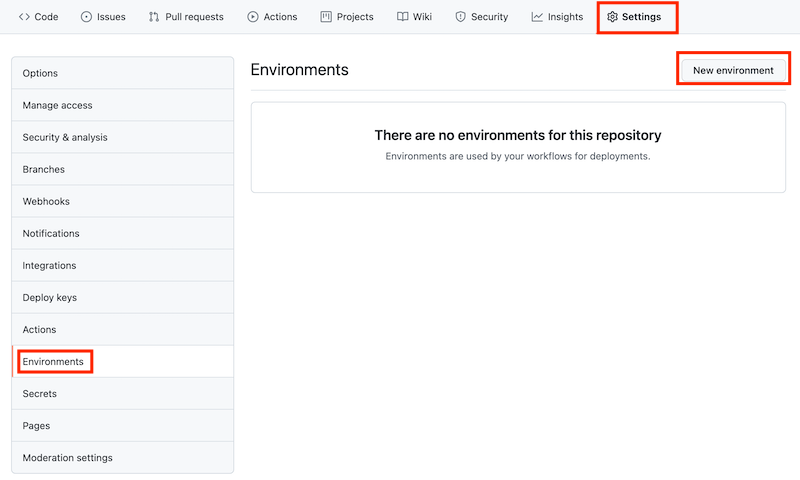
在瀏覽器中,前往 [設定]> [環境]。
選取 [新增環境]。
輸入 [測試] 作為環境名稱。
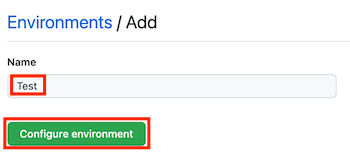
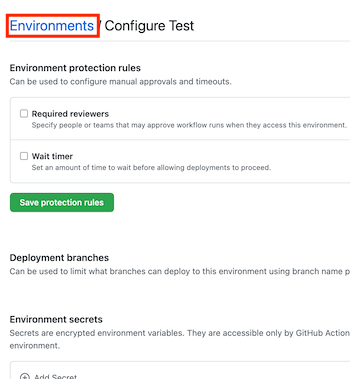
選取 [設定環境]。
選取 [環境] 以返回環境清單。
重複此流程,以建立另一個名為生產的環境。
注意
在此學習路徑的先前課程模組中,您已在實際執行環境中新增一個保護規則。 在此課程模組中,為了簡單起見,您會略過該保護規則。 不過,您可以視需要自行新增保護規則。