練習 - 使用 Azure Resource Manager 函式來建立運算式
注意
當您第一次啟動沙箱並接受條款時,您的 Microsoft 帳戶會與名為「Microsoft Learn 沙箱」的新 Azure 目錄建立關聯。 系統會將您新增至名為 Concierge Subscription 的特殊訂用帳戶。
在此練習中,您會使用 Azure Resource Manager (ARM) 範本建立運算式。 運算式會藉由將前置詞輸入與資源群組識別碼的雜湊結合,為每個資源群組建立唯一名稱。 產生像 dev2hu6sbtr5 和 staging5his8hgr67 一樣的 Azure 儲存體帳戶名稱。
在本練習中,您會使用適用於 Visual Studio Code 的 Azure Resource Manager 工具。 請務必在 Visual Studio Code 中安裝此延伸模組。
建立 ARM 範本檔案
在上一個課程模組中,您建立 ARM 範本來部署儲存體帳戶。 您已將參數和輸出新增至這個檔案。 在這裡,您會從該檔案開始,但輸出已移除,以降低額外負荷。
開啟 Visual Studio Code,並建立名為 azuredeploy.json 的檔案。 如果您有來自上一個課程模組的這個檔案,您可以使用該檔案。
以下列程式碼來取代 檔案的內容:
{
    "$schema": "https://schema.management.azure.com/schemas/2019-04-01/deploymentTemplate.json#",
    "contentVersion": "1.0.0.0",
    "parameters": {
       "storageName": {
           "type": "string",
           "minLength": 3,
           "maxLength": 24
       },
        "storageSKU": {
            "type": "string",
            "defaultValue": "Standard_LRS",
            "allowedValues": [
                "Standard_LRS",
                "Standard_GRS",
                "Standard_RAGRS",
                "Standard_ZRS",
                "Premium_LRS",
                "Premium_ZRS",
                "Standard_GZRS",
                "Standard_RAGZRS"
            ]
        }
   },
    "functions": [],
    "variables": {},
    "resources": [{
        "name": "[parameters('storageName')]",
        "type": "Microsoft.Storage/storageAccounts",
        "apiVersion": "2019-06-01",
        "tags": {
            "displayName": "[parameters('storageName')]"
        },
        "location": "[resourceGroup().location]",
        "kind": "StorageV2",
        "sku": {
         "name": "[parameters('storageSKU')]"
       }
    }],
     "outputs": {}
}
如果您未完成上一個課程模組,請花一點時間檢閱此檔案。 請注意
storageName參數。 此參數用來傳入儲存體帳戶的唯一名稱。
建立運算式來設定唯一的儲存體帳戶名稱
您可以變更參數以取得儲存體帳戶名稱的前置詞,而不需要傳入儲存體帳戶的名稱。 此參數會傳遞至運算式中的 concat 函式。
在
parameters區段中,將storageName變更為 storagePrefix。將
storagePrefix參數的maxLength:屬性值變更為 11。 儲存體帳戶名稱的長度上限為 24 個字元,請確定從您建立的函式新增的雜湊不會導致名稱超過 24。建立運算式來設定唯一的儲存體帳戶名稱。 在
resources區段中,將name:和displayName:屬性的值從"[parameters('storageName')]"變更為 "[toLower(concat(parameters('storagePrefix'),uniqueString(resourceGroup().id)))]"。 您已在上一個單元中了解此運算式。 檔案現在看起來應該像下列檔案:{ "$schema": "https://schema.management.azure.com/schemas/2019-04-01/deploymentTemplate.json#", "contentVersion": "1.0.0.0", "parameters": { "storagePrefix": { "type": "string", "minLength": 3, "maxLength": 11 }, "storageSKU": { "type": "string", "defaultValue": "Standard_LRS", "allowedValues": [ "Standard_LRS", "Standard_GRS", "Standard_RAGRS", "Standard_ZRS", "Premium_LRS", "Premium_ZRS", "Standard_GZRS", "Standard_RAGZRS" ] } }, "functions": [], "variables": {}, "resources": [{ "name": "[toLower(concat(parameters('storagePrefix'),uniqueString(resourceGroup().id)))]", "type": "Microsoft.Storage/storageAccounts", "apiVersion": "2019-06-01", "tags": { "displayName": "[toLower(concat(parameters('storagePrefix'),uniqueString(resourceGroup().id)))]" }, "location": "[resourceGroup().location]", "kind": "StorageV2", "sku": { "name": "[parameters('storageSKU')]" } }], "outputs": {} }
將 ARM 範本部署至 Azure
若要將此範本部署至 Azure,您必須從 Visual Studio Code 終端機登入您的 Azure 帳戶。 請確定您已安裝 Azure CLI 工具。 此外,請確定您登入已啟動沙箱的同一個帳戶。
使用 [終端機] 功能表開啟終端機視窗。
如果終端機視窗右側的下拉式功能表顯示 bash,表示您使用正確的殼層。 您可以跳到下一節。

如果您沒有正確的殼層,請在下拉式功能表中選取 [選取預設殼層]。
選取 bash:
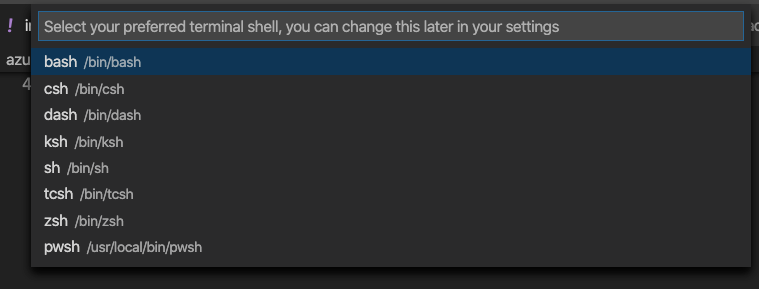
在終端機選取 +,建立以 bash 為殼層的新終端機。
登入 Azure
從 Visual Studio Code 中的終端機,執行下列命令以登入 Azure。 執行此命令會開啟瀏覽器,讓您能夠登入您的帳戶:
az login登入之後,您會在終端機看到與此帳戶相關聯的訂用帳戶清單。 如果您已啟動沙箱,則會看到名為 Concierge Subscription 的訂用帳戶。 在練習的其餘部分中使用此訂用帳戶。
針對您在此工作階段中執行的所有 Azure CLI 命令,設定預設訂用帳戶:
az account set --subscription "Concierge Subscription"注意
如果您最近使用過多個沙箱,可能會列出多個指引訂用帳戶。 在此情況下,請使用接下來兩個步驟設定預設訂用帳戶。 如果上述命令成功,請跳過接下來的兩個步驟。
取得指引訂用帳戶識別碼:
 az account list \
   --refresh \
   --query "[?contains(name, 'Concierge Subscription')].id" \
   --output table
使用訂用帳戶識別碼設定預設訂用帳戶。 將
{your subscription ID}換成最新的指引訂用帳戶識別碼。az account set --subscription {your subscription ID}
設定預設資源群組
將預設資源群組設定為沙箱環境中為您建立的資源群組。 這樣做可讓您在本練習的其餘 Azure CLI 命令中省略該參數。
az configure --defaults group=<rgn>[sandbox resource group name]</rgn>
將範本部署至 Azure
您已在上一個課程模組中學到部署命令。 在這裡,我們使用 Azure CLI az deployment group create 命令。
在 Visual Studio Code 終端中,使用 Azure CLI 命令部署範本。 請記得將
{your-prefix}換成不同的字串。 例如,您可以使用 storage。templateFile="azuredeploy.json" today=$(date +"%d-%b-%Y") DeploymentName="addfunction-"$today az deployment group create \ --name $DeploymentName \ --template-file $templateFile \ --parameters storagePrefix={your-prefix}在此程式碼的第一個區段中,您設定 Azure CLI 變數代表所要部署範本檔案的路徑,以及部署的名稱。 然後,您使用
az deployment group create命令將範本部署至 Azure。您應該會在終端中看到訊息
Running...。
若要將此範本部署至 Azure,您必須從 Visual Studio Code 終端機登入您的 Azure 帳戶。 請確定您已安裝 Azure PowerShell 工具,而且登入已啟動沙箱的同一個帳戶。
使用 [終端機] 功能表開啟終端機視窗。
如果終端機視窗右側的下拉式功能表顯示 pwsh,表示您使用正確的殼層。 您可以跳到下一節。

如果您沒有正確的殼層,請在下拉式功能表中選取 [選取預設殼層]。
選取 pwsh。
在終端中選取 +,建立以 pwsh 為殼層的新終端。
使用 Azure PowerShell 登入 Azure
從 Visual Studio Code 中的終端機,執行下列命令以登入 Azure。 執行此命令時,系統會提示您開啟瀏覽器來連線到 URL,讓您能夠登入您的帳戶。 使用提示中的程式碼。 請務必使用您用來啟動沙箱的同一個帳戶登入。
Connect-AzAccount登入之後,您會在終端機看到與此帳戶相關聯的訂用帳戶清單。 如果您已啟動沙箱,則會看到名為 Concierge Subscription 的訂用帳戶。 在練習的其餘部分中使用此訂用帳戶。
針對您在此工作階段中執行的所有 Azure CLI 命令,設定預設訂用帳戶。
取得訂用帳戶識別碼。 命令會列出您的訂用帳戶及其識別碼。 訂用帳戶識別碼是第二個資料行。 尋找
Concierge Subscription,並複製第二個資料行。 它看起來會像這樣:cf49fbbc-217c-4eb6-9eb5-a6a6c68295a0。Get-AzSubscription將作用中訂用帳戶變更為指引訂用帳戶。 請務必將
{Your subscription ID}取代為您複製的識別碼。$context = Get-AzSubscription -SubscriptionId {Your subscription ID} Set-AzContext $context將預設資源群組設定為沙箱環境中為您建立的資源群組。 這樣做可讓您在本練習的其餘 Azure PowerShell 命令中省略該參數。
Set-AzDefault -ResourceGroupName <rgn>[sandbox resource group name]</rgn>
將範本部署至 Azure
您已在上一個課程模組中學到部署命令。 在這裡,我們使用 Azure PowerShell New-AzResourceGroupDeployment 命令。
在 Visual Studio Code 終端機使用 Azure PowerShell 命令來部署範本。 請記得將
{your-prefix}換成不同的字串。 例如,您可以使用 storage。$templateFile = "azuredeploy.json" $today=Get-Date -Format "MM-dd-yyyy" $deploymentName="addfunction-"+"$today" New-AzResourceGroupDeployment ` -Name $deploymentName ` -TemplateFile $templateFile ` -storagePrefix {your-prefix}
在此程式碼的第一個區段中,您設定 Azure PowerShell 變數代表所要部署範本檔案的路徑,以及部署的名稱。 然後,您使用 New-AzResourceGroupDeployment 命令將範本部署至 Azure。
檢查您的部署
部署完成後,請前往 Azure 入口網站,並確定您在沙箱訂用帳戶中。 若要查看訂用帳戶,請在頁面右上角選取您的虛擬人偶。 選取 [切換目錄]。 在清單中,選取 [Microsoft Learn 沙箱] 目錄。
在左窗格中,選取 [資源群組]。
選取 [沙箱資源群組名稱]。
在 [概觀] 區段中,您看到一個部署成功:
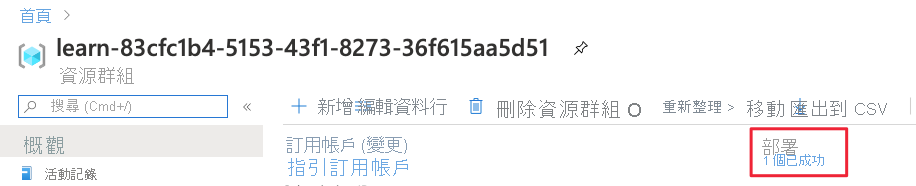
選取 [1 個成功] 以查看部署的詳細資料:

選取 [addfunction] 查看已部署的資源:
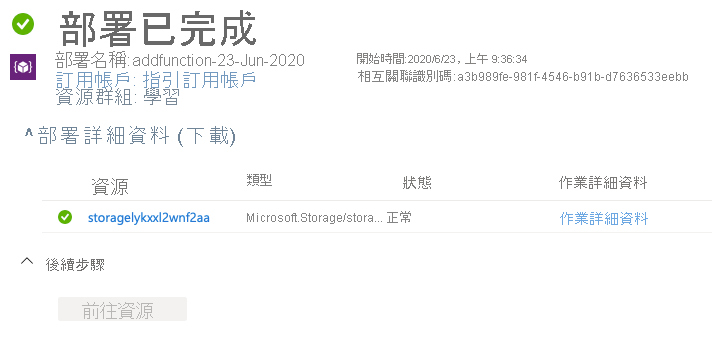
讓頁面在瀏覽器中保持開啟狀態,以便稍後在模組中再次檢查部署。