練習 - 設定環境
重要
您必須有自己的 Azure 訂用帳戶才能執行本練習,且可能會產生費用。 如果您還沒有 Azure 訂用帳戶,請在開始前建立免費帳戶。
開始處理玩具公司的網站管線之前,您必須先設定環境。 在此小節中,您會確定已設定 Azure 和 Azure DevOps 環境,以完成本課程模組的其餘作業。
為了達成這些目標,您可以:
- 設定本課程模組的 Azure DevOps 專案。
- 將專案的存放庫複製到電腦。
- 在 Azure 中建立資源群組。
- 在 Azure Pipelines 中建立服務連線。
取得 Azure DevOps 專案
請確定已設定 Azure DevOps 組織,以完成本課程模組的其餘部分。 您可以藉由執行在 Azure DevOps 中建立專案的範本來對其進行設定。
此學習路徑中的課程模組有難度分級。 為方便學習,每個課程模組皆有相關聯的 Azure DevOps 專案。
提示
即使您已在學習路徑中完成上一個模組,請遵循這些指示來建立新的專案,並確定您提供新名稱。
執行範本
執行範本來設定 Azure DevOps 專案。
在 Azure DevOps 示範產生器網站上,遵循下列步驟來執行範本:
選取 [登入] 並接受使用條款。
在 [建立新專案] 頁面上,選取 Azure DevOps 組織。 接著輸入專案名稱,例如 toy-website-test。

選取 [建立專案]。
執行範本需要花一些時間。 會自動建立管線和 Bicep 檔案,讓您在後續練習中使用。
選取 [瀏覽至專案],前往您在 Azure DevOps 中的專案。
重要
本課程模組的最後一個練習包含重要的清除步驟。 即使未完成本課程模組,也請務必執行清除步驟。
複製存放庫
選取 [存放庫] > [檔案]。
![Azure DevOps 的螢幕擷取畫面,其中顯示 [存放庫] 功能表並醒目提示 [檔案]。](media/4-repos-files.png)
選取 [複製]。
![Azure DevOps 螢幕擷取畫面,其中顯示存放庫並醒目提示 [複製] 按鈕。](media/4-clone.png)
如果您使用 macOS,則需要特殊的密碼才能複製 Git 存放庫。 選取 [產生 Git 認證],然後將顯示的使用者名稱和密碼複製到安全的場所。
選取 [在 VS Code 中複製]。 如果系統提示您允許開啟 Visual Studio Code,請選取 [開啟]。
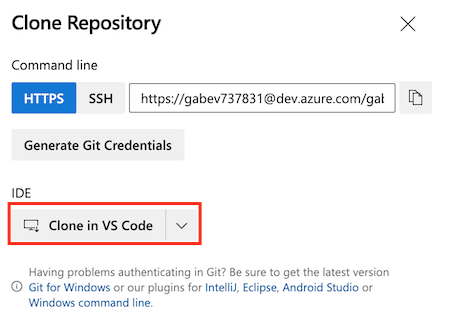
如果出現對話方塊,提示您允許延伸模組開啟存放庫 URI,請選取 [開啟]。
建立資料夾作為存放庫,然後選擇 [選取存放庫位置]。
因為您是第一次使用此存放庫,所以系統會提示您登入。
若您正在使用 Windows,請輸入您稍早在本練習中用來登入 Azure DevOps 的相同認證。
如果您使用 macOS,請輸入您稍早所產生的 Git 使用者名稱和密碼。
Visual Studio Code 會提示您開啟存放庫。 選取開啟。
![Visual Studio Code 的螢幕擷取畫面,其中顯示開啟已複製存放庫的提示並醒目提示 [開啟] 按鈕。](../includes/media/open-cloned-repo.png)
登入 Azure
若要在 Azure 中使用資源群組,請從 Visual Studio Code 終端機登入 Azure 帳戶。 請確定您已安裝 Azure CLI 工具。
在 [終端機] 功能表中,選取 [新增終端機]。 終端機視窗通常隨即在畫面的下半部開啟。
如果終端視窗右側顯示的殼層為 [bash],則正確的殼層隨即開啟,而您可以跳至下一節。

如果出現 bash 以外的殼層,請選取殼層下拉式清單,然後選取 [Git Bash (預設)]。
![Visual Studio Code 終端視窗的螢幕擷取畫面,其中顯示終端殼層下拉式清單並已選取 [Git Bash (預設)]。](../includes/media/select-shell-bash.png)
在終端殼層清單中,選取 bash,然後選取加號以開啟使用 bash 殼層的新終端。
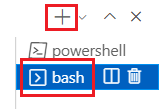
使用 Azure CLI 登入 Azure
在 Visual Studio Code 終端機中,執行下列命令以登入 Azure:
az login在開啟的瀏覽器中,登入您的 Azure 帳戶。
若要在 Azure 中使用資源群組,請從 Visual Studio Code 終端機登入 Azure 帳戶。 確定您已安裝 Azure PowerShell。
在 [終端機] 功能表中,選取 [新增終端機]。 終端機視窗通常隨即在畫面的下半部開啟。
如果終端視窗右側顯示的殼層是 [powershell] 或 [pwsh],則會開啟正確的殼層,您可以跳至下一節。
![Visual Studio Code 終端機視窗的螢幕擷取畫面,其中殼層下拉式清單中顯示 [pwsh] 選項。](../includes/media/pwsh.png)
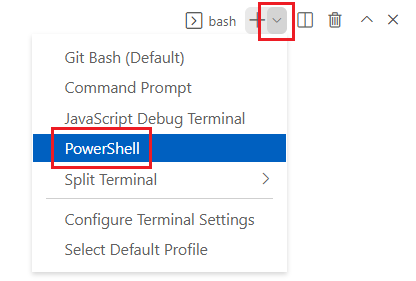
如果出現 [Powershell] 或 [pwsh] 以外的殼層,請選取殼層下拉式清單,然後選取 [PowerShell]。
在終端殼層清單中,選取 powershell 或 pwsh,然後選取加號以開啟使用 powershell 或 pwsh 殼層的新終端。
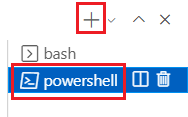
使用 Azure PowerShell 登入 Azure
在 Visual Studio Code 終端機中,執行下列命令以登入 Azure:
Connect-AzAccount在開啟的瀏覽器中,登入您的 Azure 帳戶。
在 Azure 中建立資源群組
若要建立新的資源群組,請在 Visual Studio Code 終端中執行此 Azure CLI 命令:
az group create --name ToyWebsiteTest --location westus3
若要建立資源群組,請在 Visual Studio Code 終端中執行此 Azure PowerShell 命令:
New-AzResourceGroup -Name ToyWebsiteTest -Location westus3
在 Azure Pipelines 中建立服務連線
接下來,請在 Azure Pipelines 中建立服務連線。 此連線會自動在 Azure 中建立服務主體。 還會將資源群組的參與者角色授與服務主體,以允許您的管線部署至資源群組。
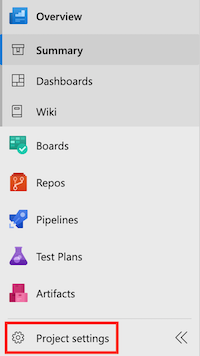
在您的瀏覽器中,選取 [專案設定]。
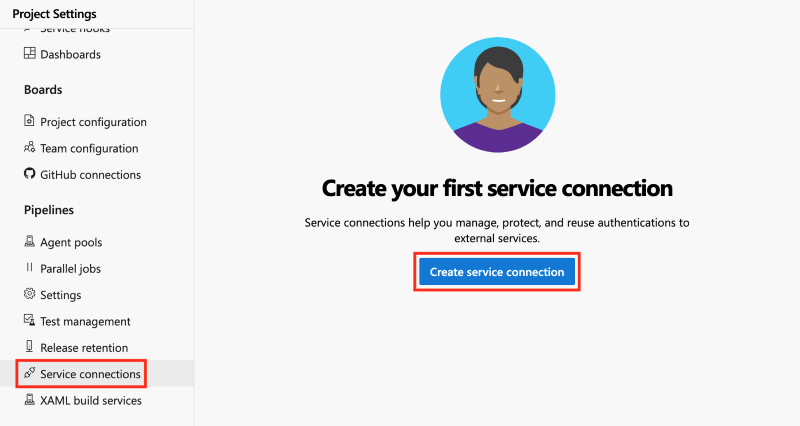
選取 [服務連線]>[建立服務連線]。
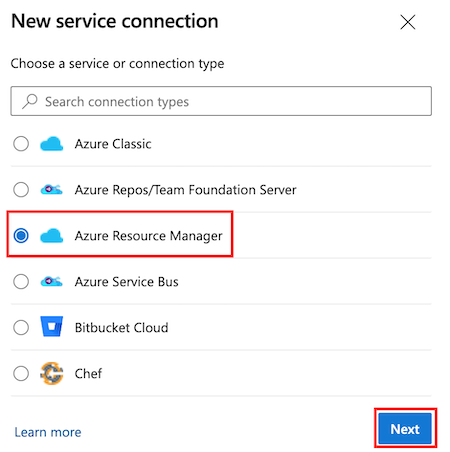
選取 [Azure Resource Manager] > [下一步]。
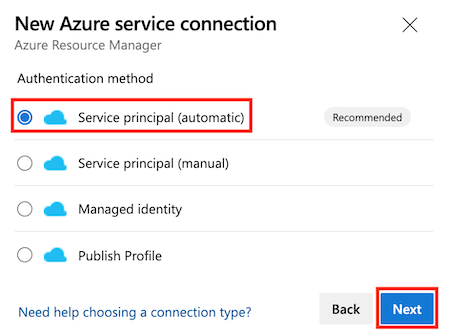
選取 [服務主體 (自動)] > [下一步]。
在 [訂用帳戶] 下拉式清單中,選取您的 Azure 訂用帳戶。
可能會出現一個快顯視窗,要求您登入 Azure。 若是如此,請輸入認證並登入。
在 [資源群組] 下拉式清單中,選取 [ToyWebsiteTest]。
在 [服務連線名稱] 中,輸入 ToyWebsiteTest。 確定已選取 [為所有管線授與存取權限] 核取方塊。
![Azure DevOps 的螢幕擷取畫面,其中顯示針對建立服務連線所完成的詳細資料,並醒目提示 [儲存] 按鈕。](media/4-create-service-connection-principal-details.png)
提示
為了簡單起見,您將允許每個管線存取服務連線。 如果所建立的實際服務連線會使用生產資源,建議您僅限需要這些連線的管線存取。
選取 [儲存]。