練習 - 將測試階段新增至管線
您的玩具公司安全性小組請您確認您的網站只能透過 HTTPS 存取。 在此練習中,您將設定管線來執行煙霧測試,以檢查安全性小組的需求。
在此過程中,您將會:
- 將測試指令碼新增至您的存放庫。
- 更新管線定義以新增測試階段。
- 執行管線並觀察測試失敗。
- 修正 Bicep 檔案,並觀察管線順利執行。
新增測試指令碼
您將在此新增測試指令碼,以確認使用 HTTPS 時可存取網站,使用不安全的 HTTP 通訊協定時則無法存取。
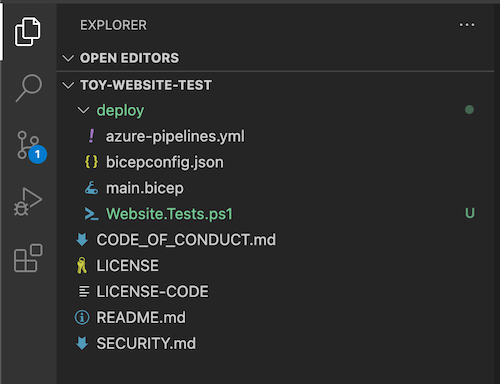
在 Visual Studio Code 中的 [deploy] 資料夾內建立名為 Website.Tests.ps1 的新檔案。
將下列測試程式碼貼到檔案中:
param(
  [Parameter(Mandatory)]
  [ValidateNotNullOrEmpty()]
  [string] $HostName
)

Describe 'Toy Website' {

    It 'Serves pages over HTTPS' {
      $request = [System.Net.WebRequest]::Create("https://$HostName/")
      $request.AllowAutoRedirect = $false
      $request.GetResponse().StatusCode |
        Should -Be 200 -Because "the website requires HTTPS"
    }

    It 'Does not serves pages over HTTP' {
      $request = [System.Net.WebRequest]::Create("http://$HostName/")
      $request.AllowAutoRedirect = $false
      $request.GetResponse().StatusCode |
        Should -BeGreaterOrEqual 300 -Because "HTTP is not secure"
    }

}
此程式碼是 Pester 測試檔案。 其需要名為
$HostName的參數。 其會針對主機名稱執行兩項測試:- 嘗試透過 HTTPS 連線至網站。 如果伺服器回應 200 到 299 之間的 HTTP 回應狀態碼,表示連線成功,測試會通過。
- 嘗試透過 HTTP 連線至網站。 如果伺服器回應 300 以上的 HTTP 回應狀態碼,測試會通過。
本練習的目的並非一定要您了解測試檔案的詳細資料及其運作方式。 我們將會在摘要中提供連結,如有興趣您可以自行深入瞭解。
將 Bicep 檔案的輸出發佈為階段輸出變數
您在上述步驟中建立的測試指令碼,需要主機名稱才能進行測試。 Bicep 檔案已經包含輸出,但您必須先將其發佈為階段輸出變數,才能在煙霧測試中使用。
在 Visual Studio Code 中,開啟 deploy 資料夾中的 azure-pipelines.yml 檔案。
在 [部署] 階段中,更新部署步驟以將輸出發佈至變數:
- task: AzureResourceManagerTemplateDeployment@3
  name: DeployBicepFile
  displayName: Deploy Bicep file
  inputs:
    connectedServiceName: $(ServiceConnectionName)
    deploymentName: $(Build.BuildNumber)
    location: $(deploymentDefaultLocation)
    resourceGroupName: $(ResourceGroupName)
    csmFile: deploy/main.bicep
    overrideParameters: >
      -environmentType $(EnvironmentType)
    deploymentOutputs: deploymentOutputs
現在,您的部署程序仍會使用與先前執行的相同工作,但部署的輸出會儲存在名為
deploymentOutputs的管線變數中。 輸出變數會格式化為 JSON。若要將 JSON 格式的輸出轉換成管線變數,請在部署步驟下方新增下列指令碼步驟:
- bash: |
    echo "##vso[task.setvariable variable=appServiceAppHostName;isOutput=true]$(echo $DEPLOYMENT_OUTPUTS | jq -r '.appServiceAppHostName.value')"
  name: SaveDeploymentOutputs
  displayName: Save deployment outputs into variables
  env:
    DEPLOYMENT_OUTPUTS: $(deploymentOutputs)
如果部署成功完成,指令碼會存取 Bicep 部署的每個輸出值。 此指令碼使用
jq工具來存取 JSON 輸出相關部分來執行這項作業。 然後,該值會發佈至與 Bicep 部署輸出具有相同名稱的階段輸出變數。注意
Pester 和 jq 都預先安裝在 Microsoft 裝載的 Azure Pipelines 代理程式上。 您不需要執行任何特殊動作,即可在指令碼步驟中使用兩者。
儲存檔案。
將煙霧測試階段新增至管線
現在,您可以新增執行測試的煙霧測試階段。
在檔案底端,為 SmokeTest 階段新增下列定義:
- stage: SmokeTest
  jobs:
  - job: SmokeTest
    displayName: Smoke test
    variables:
      appServiceAppHostName: $[ stageDependencies.Deploy.DeployWebsite.outputs['DeployWebsite.SaveDeploymentOutputs.appServiceAppHostName'] ]
此程式碼會定義階段和作業。 其也會在名為
appServiceAppHostName的作業中建立變數。 此變數會從您在上一節中建立的輸出變數取得其值。在檔案底部,將下列步驟定義新增至 SmokeTest 階段:
steps:
  - task: PowerShell@2
    name: RunSmokeTests
    displayName: Run smoke tests
    inputs:
      targetType: inline
      script: |
        $container = New-PesterContainer `
          -Path 'deploy/Website.Tests.ps1' `
          -Data @{ HostName = '$(appServiceAppHostName)' }
        Invoke-Pester `
          -Container $container `
          -CI
此步驟會執行 PowerShell 指令碼,以執行您稍早使用 Pester 測試工具撰寫的測試指令碼。
在檔案底部,將下列步驟定義新增至 SmokeTest 階段:
- task: PublishTestResults@2
  name: PublishTestResults
  displayName: Publish test results
  condition: always()
  inputs:
    testResultsFormat: NUnit
    testResultsFiles: 'testResults.xml'
此步驟會採用 Pester 建立的測試結果檔案,並將其發佈為管線測試結果。 您很快就會看到結果的顯示出。
請注意,步驟定義包含
condition: always()。 此條件表示 Azure Pipelines,即使上述步驟失敗,其也應該一律發佈測試結果。 此條件很重要,因為任何失敗的測試都會造成測試步驟失敗,而且管線通常會在失敗的步驟之後停止執行。儲存檔案。
驗證並認可管線定義
確認 azure-pipelines.yml 檔案看起來像下列程式碼:
trigger:
  batch: true
  branches:
    include:
    - main

pool:
  vmImage: ubuntu-latest

variables:
  - name: deploymentDefaultLocation
    value: westus3

stages:

- stage: Lint
  jobs:
  - job: LintCode
    displayName: Lint code
    steps:
      - script: |
          az bicep build --file deploy/main.bicep
        name: LintBicepCode
        displayName: Run Bicep linter

- stage: Validate
  jobs:
  - job: ValidateBicepCode
    displayName: Validate Bicep code
    steps:
      - task: AzureResourceManagerTemplateDeployment@3
        name: RunPreflightValidation
        displayName: Run preflight validation
        inputs:
          connectedServiceName: $(ServiceConnectionName)
          location: $(deploymentDefaultLocation)
          deploymentMode: Validation
          resourceGroupName: $(ResourceGroupName)
          csmFile: deploy/main.bicep
          overrideParameters: >
            -environmentType $(EnvironmentType)

- stage: Preview
  jobs:
  - job: PreviewAzureChanges
    displayName: Preview Azure changes
    steps:
      - task: AzureCLI@2
        name: RunWhatIf
        displayName: Run what-if
        inputs:
          azureSubscription: $(ServiceConnectionName)
          scriptType: 'bash'
          scriptLocation: 'inlineScript'
          inlineScript: |
            az deployment group what-if \
              --resource-group $(ResourceGroupName) \
              --template-file deploy/main.bicep \
              --parameters environmentType=$(EnvironmentType)

- stage: Deploy
  jobs:
  - deployment: DeployWebsite
    displayName: Deploy website
    environment: Website
    strategy:
      runOnce:
        deploy:
          steps:
            - checkout: self
            - task: AzureResourceManagerTemplateDeployment@3
              name: DeployBicepFile
              displayName: Deploy Bicep file
              inputs:
                connectedServiceName: $(ServiceConnectionName)
                deploymentName: $(Build.BuildNumber)
                location: $(deploymentDefaultLocation)
                resourceGroupName: $(ResourceGroupName)
                csmFile: deploy/main.bicep
                overrideParameters: >
                  -environmentType $(EnvironmentType)
                deploymentOutputs: deploymentOutputs

            - bash: |
                echo "##vso[task.setvariable variable=appServiceAppHostName;isOutput=true]$(echo $DEPLOYMENT_OUTPUTS | jq -r '.appServiceAppHostName.value')"
              name: SaveDeploymentOutputs
              displayName: Save deployment outputs into variables
              env:
                DEPLOYMENT_OUTPUTS: $(deploymentOutputs)

- stage: SmokeTest
  jobs:
  - job: SmokeTest
    displayName: Smoke test
    variables:
      appServiceAppHostName: $[ stageDependencies.Deploy.DeployWebsite.outputs['DeployWebsite.SaveDeploymentOutputs.appServiceAppHostName'] ]
    steps:
      - task: PowerShell@2
        name: RunSmokeTests
        displayName: Run smoke tests
        inputs:
          targetType: inline
          script: |
            $container = New-PesterContainer `
              -Path 'deploy/Website.Tests.ps1' `
              -Data @{ HostName = '$(appServiceAppHostName)' }
            Invoke-Pester `
              -Container $container `
              -CI

      - task: PublishTestResults@2
        name: PublishTestResults
        displayName: Publish test results
        condition: always()
        inputs:
          testResultsFormat: NUnit
          testResultsFiles: 'testResults.xml'
如果不相符,請更新以符合此範例,然後將其儲存。
在 Visual Studio Code 終端機中執行下列命令,以認可所做的變更,並將其推送至您的 Git 存放庫:
git add .
git commit -m "Add test stage"
git push
執行管線並檢閱測試結果
在瀏覽器中,前往您的管線。
選取管線的最近一次執行。
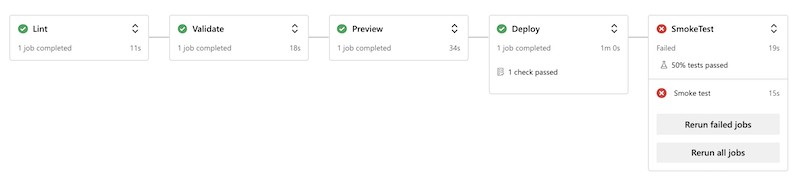
等候管線完成 Lint、驗證和預覽階段。 雖然 Azure Pipelines 自動將頁面更新為最新狀態,但最好偶爾重新整理頁面。
選取 [檢閱] 按鈕,然後選取 [核准]。
等候管線執行完成。
請注意,部署階段會順利完成。 煙霧測試階段完成時發生錯誤。
選取 [測試] 索引標籤。

請注意,測試摘要顯示已執行兩個測試。 一個通過,一個失敗。 失敗的測試會列為 Toy Website.Does not serve pages over HTTP。
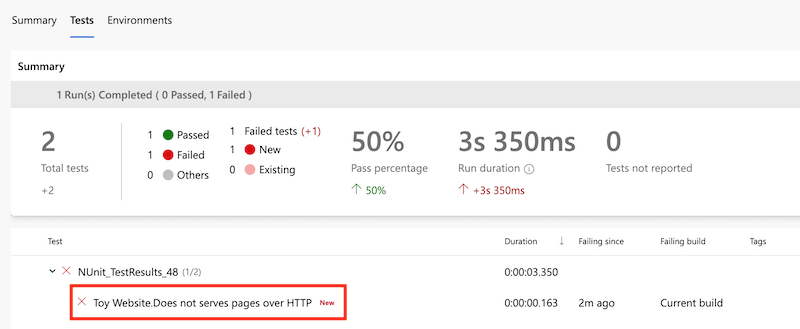
此文字表示網站尚未根據安全性小組的需求正確設定。
更新 Bicep 檔案
既然您已發現 Bicep 定義不符合安全性小組的需求,現在要予以修正。
在 Visual Studio Code 中,開啟 [deploy] 資料夾中的 main.bicep 檔案。
尋找 Azure App Service 應用程式的定義並予以更新,以在其
properties區域中加入httpsOnly屬性:resource appServiceApp 'Microsoft.Web/sites@2022-03-01' = { name: appServiceAppName location: location properties: { serverFarmId: appServicePlan.id httpsOnly: true siteConfig: { appSettings: [ { name: 'APPINSIGHTS_INSTRUMENTATIONKEY' value: applicationInsights.properties.InstrumentationKey } { name: 'APPLICATIONINSIGHTS_CONNECTION_STRING' value: applicationInsights.properties.ConnectionString } ] } } }儲存檔案。
在 Visual Studio Code 終端機中執行下列命令,以認可所做的變更,並將其推送至您的 Git 存放庫:
git add .
git commit -m "Configure HTTPS on website"
git push
再次執行管線
在瀏覽器中,前往您的管線。
選取最近的執行。
等候管線完成 Lint、驗證和預覽階段。 雖然 Azure Pipelines 自動將頁面更新為最新狀態,但最好偶爾重新整理頁面。
選取 [預覽] 階段,然後再次檢閱假設狀況結果。
請注意,假設狀況命令已偵測到
httpsOnly屬性值中的變更:Resource and property changes are indicated with these symbols: + Create ~ Modify = Nochange The deployment will update the following scope: Scope: /subscriptions/f0750bbe-ea75-4ae5-b24d-a92ca601da2c/resourceGroups/ToyWebsiteTest ~ Microsoft.Web/sites/toy-website-nbfnedv766snk [2021-01-15] + properties.siteConfig.localMySqlEnabled: false + properties.siteConfig.netFrameworkVersion: "v4.6" ~ properties.httpsOnly: false => true = Microsoft.Insights/components/toywebsite [2020-02-02] = Microsoft.Storage/storageAccounts/mystoragenbfnedv766snk [2021-04-01] = Microsoft.Web/serverfarms/toy-website [2021-01-15] Resource changes: 1 to modify, 3 no change.回到管線執行。
選取 [檢閱] 按鈕,然後選取 [核准]。
等候管線執行完成。
請注意,整個工作流程會順利完成,包括 SmokeTest 階段。 這表示兩個測試都通過了。

清除資源
既然您已完成練習,您可以移除資源,以免產生費用。
在 Visual Studio Code 終端中,執行下列命令:
az group delete --resource-group ToyWebsiteTest --yes --no-wait
資源群組會在背景中刪除。
Remove-AzResourceGroup -Name ToyWebsiteTest -Force