本文可協助您解決安裝 Microsoft Visual Studio 2015 Update 3 之後,針對不受信任的憑證所發生的警告。
原始產品版本: Visual Studio 2015
原始 KB 編號: 3180222
徵兆
您已使用 Visual Studio 2015、Update 1 或 Update 2 的版本,透過超文本傳輸通訊協定安全 (HTTPS) 開發 Web 應用程式。 不過,安裝 Visual Studio 2015 Update 3 之後,您就會開始收到未受信任憑證的相關警告。
原因
在 Visual Studio 的初始安裝期間,如果憑證不存在,網際網路資訊服務 (IIS) Express 會將自我簽署憑證安裝到 Certificates (Local Computer)\Personal\Certificates 資料夾中。 第一次偵錯使用安全套接字層 (SSL) 的 Web 應用程式時,系統會提示您將此憑證安裝到 Certificates - Current User\Trusted Root Certification Authorities\Certificates 資料夾中。
在升級至 Visual Studio 2015 Update 3 期間,IIS Express 會將新的 SHA256 自我簽署憑證安裝到 Certificates (Local Computer)\Personal\Certificates 資料夾中。 不過,由於資料夾中已安裝憑證 Certificates - Current User\Trusted Root Certification Authorities\Certificates ,Visual Studio 無法提示您將新的 SHA256 憑證安裝到 Certificates - Current User\Trusted Root Certification Authorities\Certificates 資料夾中。
方法 1:使用 PowerShell 腳本
注意
這是慣用的方法。
在 Windows PowerShell 整合式腳本環境中執行下列腳本 (ISE):
ipmo PKI
$name = [GUID]::NewGuid()
$cerFile = "$env:TEMP\$name.cer"
$certs = Get-ChildItem Cert:\LocalMachine\My -DnsName localhost -SSLServerAuthentication |
? {($_.FriendlyName -eq 'IIS Express Development Certificate') -and
($_.SignatureAlgorithm.FriendlyName -ieq 'sha256RSA') -and
($_.EnhancedKeyUsageList.Count -eq 1)}
if ($certs.Count -eq 0)
{
    Write-Error 'Cannot find any SHA256 certificate generated by IIS Express.
    Please make sure that the latest version of IIS Express is installed.'
}
else
{
    foreach ($cert in $certs)
    {
        Export-Certificate -Cert $cert.PSPath -FilePath $cerFile -Type CERT | Out-Null
        Import-Certificate -FilePath $cerFile -CertStoreLocation Cert:\CurrentUser\Root | Out-Null
        Remove-Item $cerFile -Force
    }
    Write-Host 'Successfully installed the certificate to
    Trusted Root Certification Authorities of the current user.'
}
當您收到下列警告時,請按兩下 [ 是 ]:
![[安全性警告] 視窗的螢幕快照,指出您即將安裝宣告代表的證書頒發機構單位。](media/warnings-untrusted-certificate/certification-authority-warning.png)
文稿執行完成之後,您應該會在PowerShell ISE 命令視窗中看到下列訊息:
已成功將憑證安裝到目前使用者的信任跟證書授權單位。
方法 2:將電腦設定為信任 IIS Express 憑證
按兩下 [開始],輸入 [執行],然後按Enter鍵,以開啟Microsoft管理控制台。 在 [ 執行 ] 對話框中,輸入 mmc,然後按兩下 [ 確定]。
![[執行] 視窗輸入 mmc 的螢幕快照。](media/warnings-untrusted-certificate/mmc.png)
新增嵌入式管理單元來管理本機計算機的憑證。 若要這樣做,請遵循下列步驟:
在 [檔案] 功能表上,按一下 [新增/移除嵌入式管理單元]。
![[檔案] 選單的螢幕快照。標題為 [新增或移除嵌入式管理單元] 的功能表項及其鍵盤快捷方式 Ctrl+M 會反白顯示。](media/warnings-untrusted-certificate/add-or-remove-snap-ins.png)
在 [ 新增或移除嵌入式管理單元 ] 對話框中,選取 [ 憑證],然後按兩下 [ 新增]。
![[新增或移除嵌入式管理單元] 對話框的螢幕快照,其中已選取 [憑證] 專案。](media/warnings-untrusted-certificate/select-certificates.png)
在 [ 憑證嵌入式 管理單元] 對話框中,選取 [ 計算機帳戶],然後按 [ 下一步]。
![已核取 [計算機帳戶] 選項的 [憑證] 嵌入式管理單元對話框螢幕快照。](media/warnings-untrusted-certificate/certificates-snap-in.png)
在 [ 選取計算機] 對話框中,選取 [ 本機計算機],然後按兩下 [ 完成]。
![已核取 [選取計算機] 對話框的螢幕快照,其中已核取 [本機計算機] 選項。](media/warnings-untrusted-certificate/select-computer.png)
在 [新增或移除嵌入式管理單元] 對話框中,再次選取 [憑證],這次在 [憑證] 嵌入式管理單元對話框中選取 [我的用戶帳戶]。
![已核取使用者帳戶的 [憑證] 嵌入式管理單元對話框螢幕快照。](media/warnings-untrusted-certificate/select-my-user-account.png)
從
Certificates (Local Computer)\Personal\Certificates導出 SHA256 IIS Express 憑證,如下所示:開啟 IIS 快速開發憑證,確認您已選取 SHA256 憑證。 然後按下 [ 複製到檔案]。
![選取 SHA256 憑證和 [複製到檔案] 按鈕的螢幕快照。](media/warnings-untrusted-certificate/copy-to-file.png)
在 [憑證導出精靈] 中,選取 [否],不要匯出私鑰,然後按 [ 下一步]。
![[憑證導出精靈] 對話框的螢幕快照,以選取 [否],不要匯出私鑰選項。](media/warnings-untrusted-certificate/certificate-export-wizard.png)
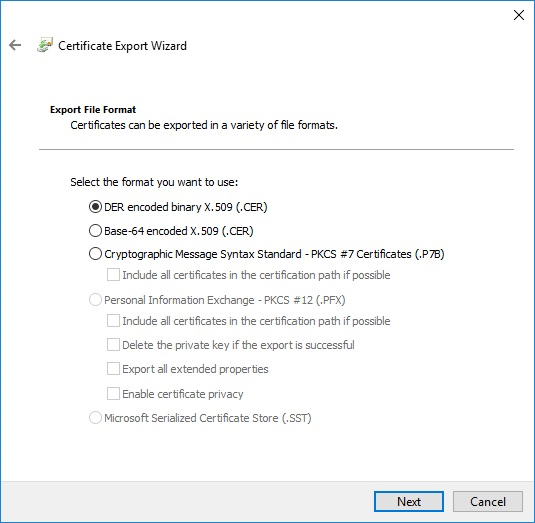
在精靈的下一個頁面上,選取 [DER 編碼二進位 X.509]。CER),然後按 [ 下一步]。
在精靈的下一個頁面上,選取磁碟上的位置,並遵循其餘步驟,直到您成功匯出憑證為止。
將匯出的憑證匯入下列位置:
Certificates - Current User\Trusted Root Certification Authorities\Certificates若要這樣做,請遵循下列步驟:
流覽至
Certificates - Current User\Trusted Root Certification Authorities\Certificates資料夾,然後按兩下 [動作],指向 [ 所有工作],然後按兩下 [ 匯入]。在 [憑證匯入精靈] 中,流覽至您導出的憑證(受信任的跟證書授權單位),然後選取 [將所有憑證放在下列存放區中]。
![頁面的螢幕快照,以核取 [將所有憑證放入下列存放區]。存放區是受信任的跟證書授權單位。](media/warnings-untrusted-certificate/place-all-certificates.png)
按兩下 [下一步],確認您已選取正確的憑證,然後按兩下 [ 完成]。
成功匯入自我簽署的 IIS 憑證之後,您就不會再收到有關開發期間未受信任憑證的警告。