Team Explorer 會將 Visual Studio 2019 和更早版本連線至 Team Foundation 版本控制 (TFVC) 存放庫,以及裝載於 azure DevOps Services 或內部部署 Azure DevOps Server (先前稱為 Team Foundation Server 或 TFS) 的專案。 您可以管理原始程式碼、工作項目和組建。
重要
在 Visual Studio 2019 16.8 版版本中,Git 版本控制體驗預設為開啟。 如果您想要深入瞭解它與 Team Explorer 的比較方式,請參閱 Git 和 Team Explorer頁面並存比較。
不過,如果您想要繼續在 Visual Studio 2019 中使用 Team Explorer,請移至 [工具]>[>環境]>[預覽功能],然後切換 [[新增 Git 使用者體驗] 複選框。 (此選項不適用於 Visual Studio 2022 和更新版本。
使用 Team Explorer 連線至專案的方式取決於您所使用的 Visual Studio 2019 版本。
在 Visual Studio 2019 16.8 版和更新版本中
開啟 Visual Studio 2019。
在 [開始] 視窗中,選取 [複製存放庫。
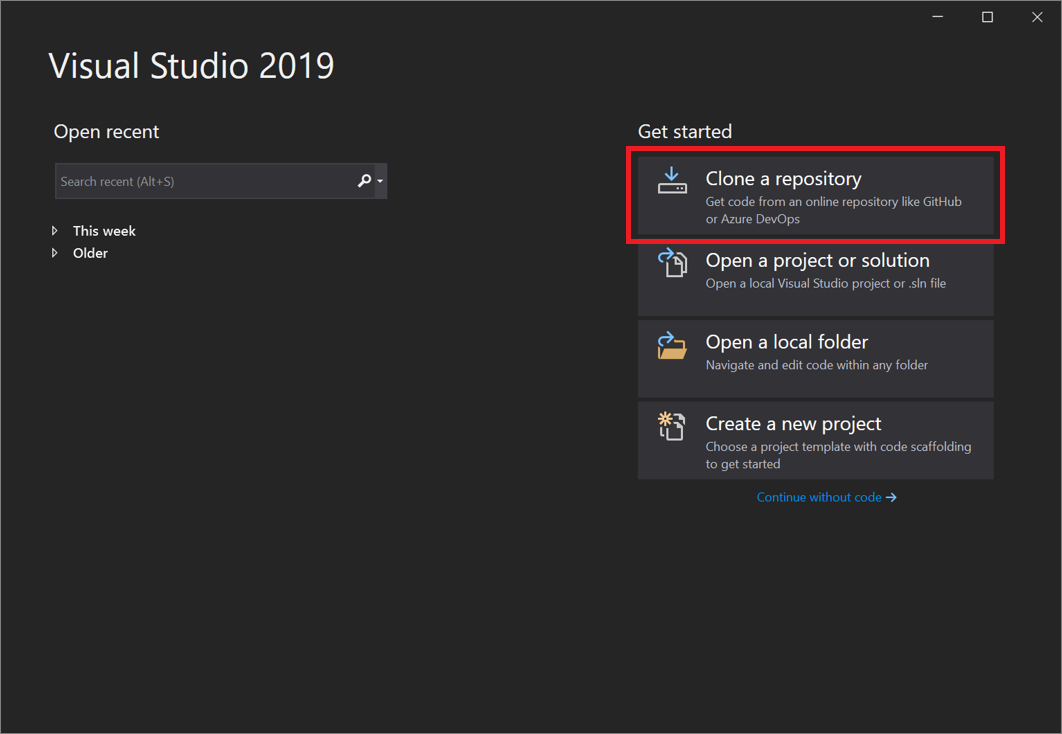
在 [流覽存放庫] 區段中,選取 [Azure DevOps]。
![Visual Studio 2019 16.8 版和更新版本中 [連線至專案] 對話方塊的 [流覽存放庫] 區段螢幕快照](media/vs-2019/browse-repository-azure-devops.png?view=vs-2019)
如果您看到登入視窗,請登入您的帳戶。
在 [連接到專案] 對話框中,選擇您要連線的存放庫,然後選取 [複製。
![Visual Studio 2019 16.8 版和更新版本所產生的 [連線至專案] 對話框螢幕快照](media/vs-2019/connect-project-azure-devops.png?view=vs-2019)
提示
如果您看不到已填入的要連線之存放庫清單,請選取 [新增 Azure DevOps Server] 以輸入伺服器 URL。 (或者,您可能會看到「找不到伺服器」提示,其中包含新增現有 Azure DevOps Server 或建立 Azure DevOps 帳戶的連結。
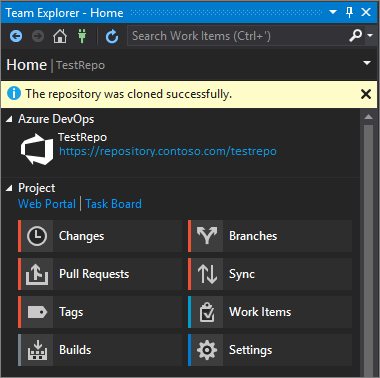
接下來,Visual Studio 會開啟 [方案總管] 顯示資料夾和檔案。
選取 [Team Explorer] 索引標籤,以檢視 Azure DevOps 動作。
![Visual Studio 2019 16.8 版和更新版本產生之 [Team Explorer] 對話框的螢幕快照](media/vs-2019/team-explorer-azure-devops.png?view=vs-2019)
在 Visual Studio 2019 16.7 版和更早版本中
開啟 Visual Studio 2019。
在【開始】視窗中,選取【克隆或簽出程式代碼】。
![Visual Studio 2019 16.7 版和更早版本中 [建立新專案] 視窗的螢幕快照](../get-started/media/vs-2019/clone-checkout-code-dark.png?view=vs-2019)
在 [流覽存放庫] 區段中,選取 [Azure DevOps]。
![Visual Studio 2019 16.7 版及更早版本中顯示 [複製或簽出原始碼] 視窗的螢幕截圖,其中的 [瀏覽存放庫] 區段列出 Azure DevOps](../get-started/media/vs-2019/clone-checkout-code-git-repo-dark.png?view=vs-2019)
如果您看到登入視窗,請登入您的帳戶。
在 [連接到專案] 對話框中,選擇您要連接的存放庫,然後選取 [克隆]。
![從 Visual Studio 2019 16.7 版和更早版本產生之 [連接到專案] 對話框的螢幕快照](../get-started/media/open-proj-azure-devops-connect-cloud-clone.png?view=vs-2019)
注意
您在清單框中看到的內容取決於您有權存取的 Azure DevOps 存放庫。
Visual Studio 會在 Team Explorer 開啟,並在複製完成時顯示通知。
若要檢視資料夾和檔案,請選取 [顯示資料夾檢視] 連結。
![Visual Studio 2019 16.7 版和更早版本中 [Team Explorer] 視窗 [方案] 區段的螢幕快照,複製完成之後](../get-started/media/vs-2019/show-folder-view-azure-devops.png?view=vs-2019)
Visual Studio 在 [方案總管] 中開啟。
選擇 [[解決方案與資料夾] 連結,以搜尋要開啟的解決方案檔案(特別是.sln檔案)。
![Visual Studio 2019 16.7 版和舊版中 Team Explorer 的[解決方案和資料夾] 通知螢幕快照](../get-started/media/open-proj-repo-solutions-folders.png?view=vs-2019)
如果您的存放庫中沒有方案檔,則會出現「找不到解決方案」訊息。 不過,您可以按兩下資料夾選單中的任何檔案,在 Visual Studio 程式代碼編輯器中開啟它。
相關內容
探索下列資源以繼續學習: