我們已在 Visual Studio 2019 版本16.8 中推出 Git 體驗的第一個版本。 此體驗有助於使用包含一般 Git 工作的簡單 [Git 變更] 視窗來減少內容切換。 它也包含全螢幕 [Git 存放庫] 視窗,用於更進階的 Git 作業,例如分支管理和存放庫瀏覽。
如果您使用 Team Explorer,以下是說明如何使用 Git 體驗的逐步指南。
注意
下一節包含的螢幕擷取畫面已調整為符合資料表資料行大小。 按一下每個螢幕擷取畫面以檢視較大的版本。 (如果您使用觸控式螢幕裝置,請點選每個螢幕擷取畫面以檢視較大型版本的螢幕擷取畫面。)
開始使用
|
Team Explorer |
Git 體驗 |
| 複製存放庫 |
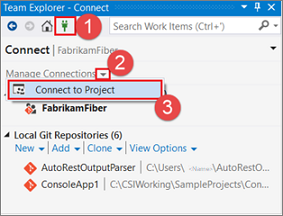 1.開啟 [連線] 頁面。
2.展開 [管理連線]。
3.選取 [連線至專案]。 |
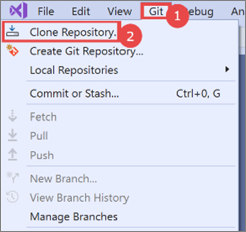 1.開啟 [Git] 功能表。
2.選取 [複製存放庫]。
|
| 在存放庫之間切換 |
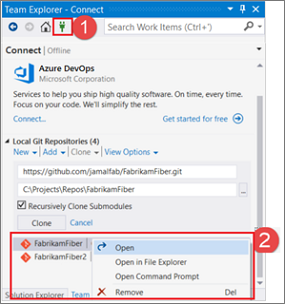 1.開啟 [連線] 頁面。
2.從 [本機存放庫] 清單中選取存放庫。 |
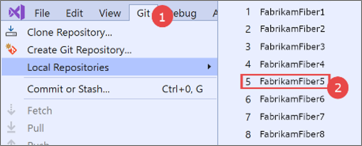 1.開啟 [Git] 功能表。
2.從 [本機存放庫] 清單中選取存放庫。 |
| 開啟方案 |
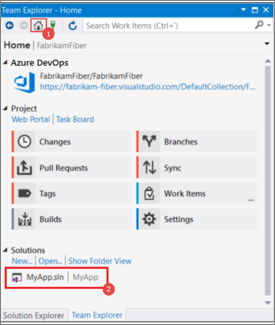 1.在 Team Explorer 中開啟首頁。
2.從方案清單中選取方案。 |
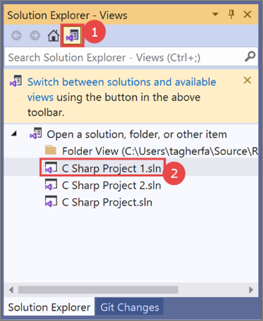 1.在 [方案總管] 中開啟 [切換檢視] 頁面。
2.從方案清單中選取方案。 |
| 將方案加入至原始檔控制並建立新存放庫 |
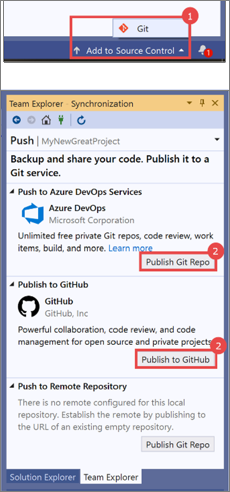 1.從 [加入至原始檔控制] 狀態列功能表中選取 [Git]。
2.選取 [發行]。 |
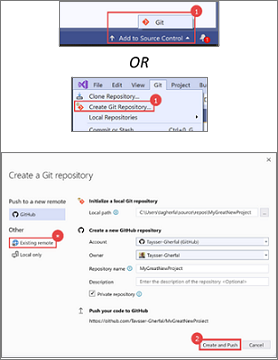 1.從 [加入至原始檔控制] 狀態列功能表選取 [Git],或從最上層 Visual Studio 功能表列選取 [Git] > [建立 Git存放庫]。
2.選取 [建立並推送]。 注意:如果您想要將程式碼加入至 Azure DevOps,請使用現有的遠端選項。 在此情況下,您必須先建立 Azure DevOps 存放庫。 |
提示
[Git 體驗] 應該根據您開啟的存放庫或方案,自動連線到正確的 Azure DevOps 存放庫。 不過,如果您需要手動連線到存放庫,您仍然可以使用 Team Explorer 來執行該動作。 從 Visual Studio 功能表列,選取 [檢視] > [Team Explorer] > [管理連線] > [連線]。
Git 變更
|
Team Explorer |
Git 體驗 |
| 認可和暫存 |
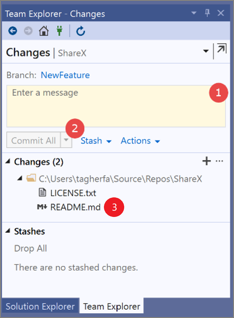 1.輸入認可訊息。
2.選取 [全部認可]。
3.若要暫存特定檔案,請以滑鼠右鍵按一下它們,然後選取 [暫存]。 |
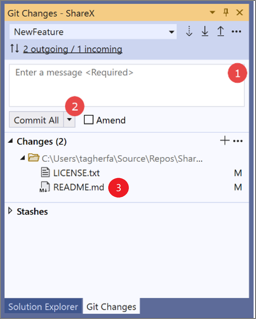 1.輸入認可訊息。
2.選取 [全部認可]。
3.若要暫存特定檔案,請將滑鼠停留在它們上方,然後按一下 “+” 圖示。 |
| 修改認可 |
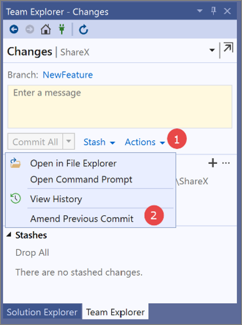 1.按一下 [動作] 下拉式清單。
2.選取 [修改先前認可]。 |
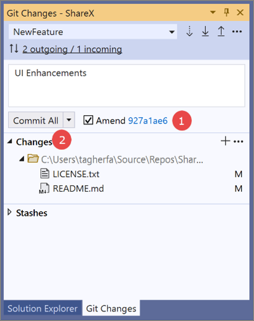 1.按一下 [修改] 核取方塊。
2.按一下 [全部認可] 以認可您的更新。 |
| 隱藏變更 |
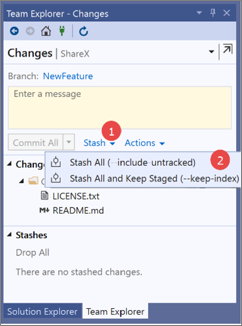 1.按一下 [隱藏] 下拉式清單。
2.選取相關的 [隱藏] 選項。 |
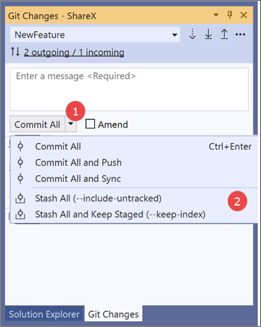 1.按一下 [全部認可] 下拉式清單。
2.選取相關的 [隱藏] 選項。 |
同步處理
|
Team Explorer |
Git 體驗 |
| 擷取、提取和推送變更 |
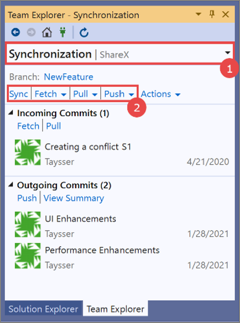 1.瀏覽至 [同步] 頁面。
2.按一下您選擇的網路作業。 |
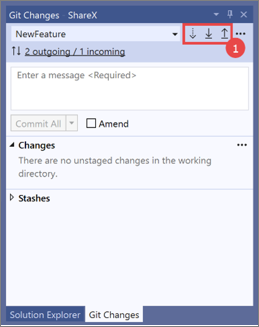 1.在 [Git 變更] 視窗中找出擷取、提取和推送按鈕。
2.按一下您選擇的網路作業。 |
| 檢視傳入和傳出認可 |
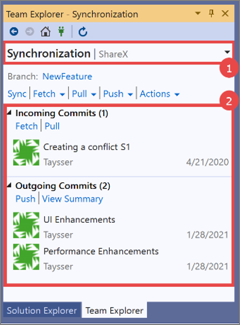 1.瀏覽至 [同步] 頁面。
2.檢視您的傳入和傳出清單。 |
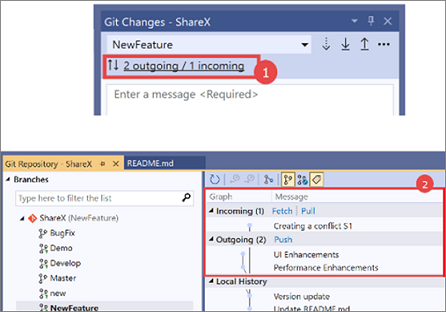 1.按一下 [Git 變更] 視窗中的 [傳出/傳入] 連結。
2.使用 [Git 存放庫] 視窗頂端圖表資料表中的圖示來檢視您的傳入和傳出認可。 |
分支
|
Team Explorer |
Git 體驗 |
| 建立分支 |
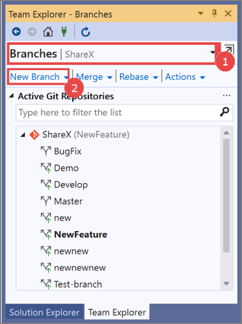 1.瀏覽至 [分支] 視窗。
2.按一下 [新增分支]。 |
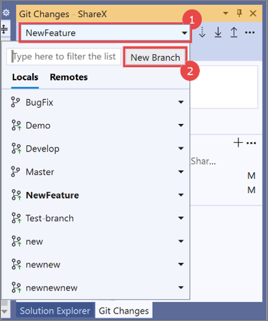 1.在 [Git 變更] 視窗中,按一下分支下拉式清單。
2.按一下 [新增分支]。 |
| 從遠端分支取得最新的變更 |
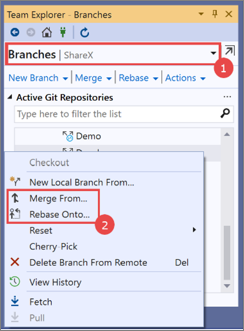 1.瀏覽至 [分支] 頁面。
2.以滑鼠右鍵按一下遠端分支,並選取 [合併自] 或 [重訂基底到]。 |
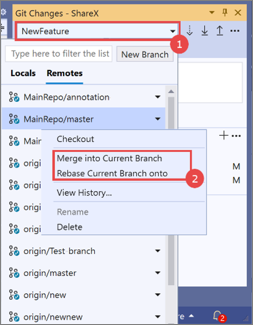 1.按一下分支下拉式清單。
2.在 [遠端] 索引標籤底下,按一下遠端分支,然後選取 [合併到最新分支] 或 [重訂基底到最新分支]。 |
| 管理分支 |
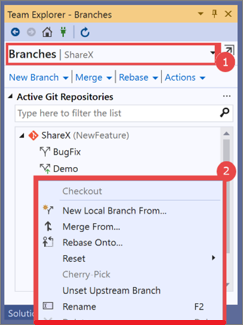 1.瀏覽至 [分支] 視窗。
2.以滑鼠右鍵按一下您想要管理的分支。
3.檢視要管理認可的分支的 [歷程記錄]。 |
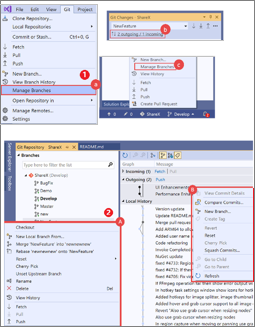 1.使用下列其中一個進入點瀏覽至 [Git 存放庫]視窗:
a. 從最上層 Visual Studio 功能表中,選取 [Git] > [管理分支]。
b. 選取 [Git 變更] > [傳入/傳出]。
c. 從右下角的狀態列功能表中,選取 [管理分支]。
2.從最上層的 [Git] > [管理分支] 功能表中,執行下列其中一項動作:
A. 以滑鼠右鍵按一下分支。
B. 多重選取您要管理的認可。 |
衝突解決功能
|
Team Explorer |
Git 體驗 |
| 有衝突檔案的存取清單 |
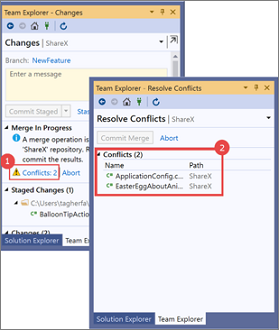 1.按一下 [衝突] 連結,瀏覽至 [解決衝突] 視窗。
2.使用 [衝突] 清單來解決您的合併衝突。 |
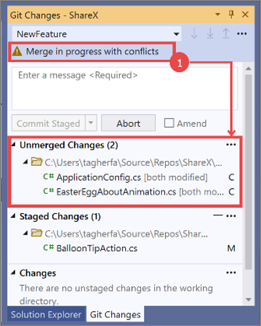 1.驗證 [正在合併,但發生衝突] 隨即顯示。
2.有合併衝突的檔案清單會出現在 [Git 變更] 視窗的 [未合併的變更] 區段中。
解決衝突。 |
相關內容
 1.按一下 [衝突] 連結,瀏覽至 [解決衝突] 視窗。
  1.驗證 [正在合併,但發生衝突] 隨即顯示。


