硬體支援應用程式 (HSA) :驅動程式開發人員的步驟
硬體支援應用程式 (HSA) 是與特定驅動程式或 RPC (遠端過程呼叫 ) 端點配對的裝置特定應用程式。
若要將市集應用程式與驅動程式產生關聯,請先保留稱為自訂功能的特殊值。 然後允許存取公告功能的應用程式,並將功能提供給應用程式開發人員。 此頁面說明驅動程式開發人員的這些步驟。
應用程式開發人員的步驟說明在 硬體支援應用程式 (HSA) :應用程式開發人員的步驟。
HSA 是 Windows 驅動程式的三個 (「DCH」) 設計原則之一。
保留自訂功能
首先,保留自訂功能:
Email Microsoft 硬體支援應用程式檢閱 () HSAReview@microsoft.com 下列資訊:
連絡人資訊
公司名稱
功能名稱 (必須是唯一的,且參考擁有者)
功能需要存取哪些資源?
任何安全性或隱私權考慮
哪些資料事件會處理給合作夥伴?
事件是否包含個人識別碼,例如精確的使用者位置、密碼、IP 位址、PUID、裝置識別碼、CID、使用者名稱和連絡人資料) ?
資料事件會保留在使用者裝置上,還是傳送給合作夥伴?
您的功能提供哪些資料存取權?
這項功能的終端使用者有哪些優點?
包含 Microsoft Store 應用程式發行者識別碼。 若要取得其中一個專案,請在 Microsoft Store 頁面上建立基本架構應用程式專案。 如需保留應用程式 PFN 的詳細資訊,請參閱 保留名稱來建立您的應用程式。
如果已核准要求,Microsoft 會以格式 CompanyName.capabilityName_PublisherID傳回唯一的自訂功能字串名稱。
現在,您可以使用自訂功能來允許存取 RPC 端點或驅動程式。
允許使用自訂功能存取 UWP 應用程式的 RPC 端點
若要允許存取具有自訂功能的 UWP 應用程式 RPC 端點,請遵循下列步驟:
呼叫 DeriveCapabilitySidsFromName ,將自訂功能名稱轉換成安全性識別碼, (SID) 。
將 SID 新增至您允許的 ACE 存取,以及 RPC 端點安全性描述元所需的任何其他 SID。
使用安全性描述元中的資訊建立 RPC 端點。
您可以在自訂功能範例的RPC 伺服器程式碼中看到上述 的實作。
允許使用自訂功能存取 UWP 應用程式的驅動程式
若要允許存取具有自訂功能的 UWP app,請將幾行新增至 INF 檔案或驅動程式來源。
在 INF 檔案中,指定您的自訂功能,如下所示:
[WDMPNPB003_Device.NT.Interfaces]
AddInterface= {zzzzzzzz-zzzz-zzzz-zzzz-zzzzzzzzzzzz},,AddInterfaceSection

[AddInterfaceSection]
AddProperty= AddInterfaceSection.AddProps

[AddInterfaceSection.AddProps]
; DEVPKEY_DeviceInterface_UnrestrictedAppCapabilities
{026e516e-b814-414b-83cd-856d6fef4822}, 8, 0x2012,, "CompanyName.myCustomCapabilityName_MyStorePubId"
或者,在驅動程式中執行下列動作:
WDF_DEVICE_INTERFACE_PROPERTY_DATA PropertyData = {};
WCHAR customCapabilities[] = L"CompanyName.myCustomCapabilityName_MyStorePubId\0";

WDF_DEVICE_INTERFACE_PROPERTY_DATA_INIT(
   &PropertyData,
   &m_VendorDefinedSubType,
   &DEVPKEY_DeviceInterface_UnrestrictedAppCapabilities);

Status = WdfDeviceAssignInterfaceProperty(
    m_FxDevice,
    &PropertyData,
    DEVPROP_TYPE_STRING_LIST,
    ARRAYSIZE(customCapabilities),
    reinterpret_cast<PVOID>(customCapabilities));
將 取代 zzzzzzzz-zzzz-zzzz-zzzz-zzzzzzzzzzzz 為要公開之介面的 GUID。 以您的公司名稱取代 CompanyName 、 myCustomCapabilityName 取代為公司內唯一的名稱,並使用您的發行者市集識別碼取代 MyStorePubId 。
如需上述驅動程式程式碼的範例,請參閱 適用于通用驅動程式的驅動程式套件安裝工具組。
若要在核心模式中設定 屬性,請使用如下所示的程式碼:
#if defined(NTDDI_WIN10_RS2) && (NTDDI_VERSION >= NTDDI_WIN10_RS2)

//
// Adding Custom Capability:
//
// Adds a custom capability to device interface instance that allows a Windows
// Store device app to access this interface using Windows.Devices.Custom namespace.
// This capability can be defined either in INF or here as shown below. In order
// to define it from the INF, uncomment the section "OsrUsb Interface installation"
// from the INF and remove the block of code below.
//

static const wchar_t customCapabilities[] = L"microsoft.hsaTestCustomCapability_q536wpkpf5cy2\0";

status = g_pIoSetDeviceInterfacePropertyData(&symbolicLinkName,
                                              &DEVPKEY_DeviceInterface_UnrestrictedAppCapabilities,
                                              0,
                                              0,
                                              DEVPROP_TYPE_STRING_LIST,
                                              sizeof(customCapabilities),
                                              (PVOID)&customCapabilities);

if (!NT_SUCCESS(status)) {
    TraceEvents(TRACE_LEVEL_ERROR, DBG_PNP,
                "IoSetDeviceInterfacePropertyData failed to set custom capability property  %!STATUS!\n", status);
    goto Error;
}

#endif
準備已簽署的自訂功能描述元 (SCCD) 檔案
已簽署的自訂功能描述元 (SCCD) 檔案是一個已簽署的 XML 檔案,可授權使用一或多個自訂功能。 驅動程式或 RPC 端點的擁有者會提供此檔案,將自訂功能授與應用程式開發人員。
若要準備 SCCD 檔案,請先更新自訂功能字串。 使用下列範例作為起點:
<?xml version="1.0" encoding="utf-8"?>
<CustomCapabilityDescriptor xmlns="http://schemas.microsoft.com/appx/2016/sccd" xmlns:s="http://schemas.microsoft.com/appx/2016/sccd">
<CustomCapabilities>
    <CustomCapability Name="microsoft.hsaTestCustomCapability_q536wpkpf5cy2"></CustomCapability>
</CustomCapabilities>
<AuthorizedEntities>
    <AuthorizedEntity AppPackageFamilyName="MicrosoftHSATest.Microsoft.SDKSamples.Hsa.CPP_q536wpkpf5cy2" CertificateSignatureHash="ca9fc964db7e0c2938778f4559946833e7a8cfde0f3eaa07650766d4764e86c4"></AuthorizedEntity>
</AuthorizedEntities>
<Catalog>0000</Catalog>
</CustomCapabilityDescriptor>
接下來,自訂功能擁有者會取得套件系列名稱 (PFN) ,以及應用程式開發人員的簽章雜湊,並在 SCCD 檔案中更新這些字串。
注意
應用程式不需要直接使用憑證簽署,但指定的憑證必須是簽署應用程式的憑證鏈結的一部分。
完成 SCCD 之後,功能擁有者會傳送電子郵件給 Microsoft 進行簽署。 Microsoft 會將已簽署的 SCCD 傳回給功能擁有者。
然後,功能擁有者會將 SCCD 傳送給應用程式開發人員。 應用程式開發人員會在應用程式資訊清單中包含已簽署的 SCCD。 若要瞭解應用程式開發人員需要做什麼,請參閱 硬體支援應用程式 (HSA) :應用程式開發人員的步驟。
限制 SCCD 的範圍
為了進行測試,自訂功能擁有者可以將硬體支援應用程式的安裝限制為開發人員模式中的電腦。
若要這樣做,請在取得 Microsoft 簽署的 SCCD 之前,新增 DeveloperModeOnly:
<?xml version="1.0" encoding="utf-8"?>
<CustomCapabilityDescriptor xmlns="http://schemas.microsoft.com/appx/2016/sccd" xmlns:s="http://schemas.microsoft.com/appx/2016/sccd">
<CustomCapabilities>
    <CustomCapability Name="microsoft.hsaTestCustomCapability_q536wpkpf5cy2"></CustomCapability>
</CustomCapabilities>
<AuthorizedEntities>
    <AuthorizedEntity AppPackageFamilyName="MicrosoftHSATest.Microsoft.SDKSamples.Hsa.CPP_q536wpkpf5cy2" CertificateSignatureHash="ca9fc964db7e0c2938778f4559946833e7a8cfde0f3eaa07650766d4764e86c4"></AuthorizedEntity>
</AuthorizedEntities>
<Catalog>0000</Catalog>
<DeveloperModeOnly Value="true" />
</CustomCapabilityDescriptor>
產生的已簽署 SCCD 僅適用于 開發人員模式中的裝置。
允許任何應用程式使用自訂功能
建議您 (可使用自訂功能的應用程式指定授權實體) 。 不過,在某些情況下,您可能想要允許任何應用程式包含 SCCD。 從 Windows 10 1809 版開始,您可以將AllowAny新增至 AuthorizedEntities 元素來執行此動作。 因為最佳做法是在 SCCD 檔案中宣告授權的實體,所以請在提交您的 SCCD 以供 Microsoft 簽署時,提供使用 AllowAny 的理由。
<?xml version="1.0" encoding="utf-8"?>
<CustomCapabilityDescriptor xmlns="http://schemas.microsoft.com/appx/2018/sccd" xmlns:s="http://schemas.microsoft.com/appx/2018/sccd">
<CustomCapabilities>
    <CustomCapability Name="microsoft.hsaTestCustomCapability_q536wpkpf5cy2"></CustomCapability>
</CustomCapabilities>
<AuthorizedEntities AllowAny="true"/>
<Catalog>0000</Catalog>
</CustomCapabilityDescriptor>
產生的已簽署 SCCD 將會在任何應用程式套件中驗證。
多個 SCCD
從 Windows 10 1803 版開始,應用程式可以從一或多個 SCCD 檔案宣告自訂功能。 將 SCCD 檔案放在應用程式套件的根目錄中。
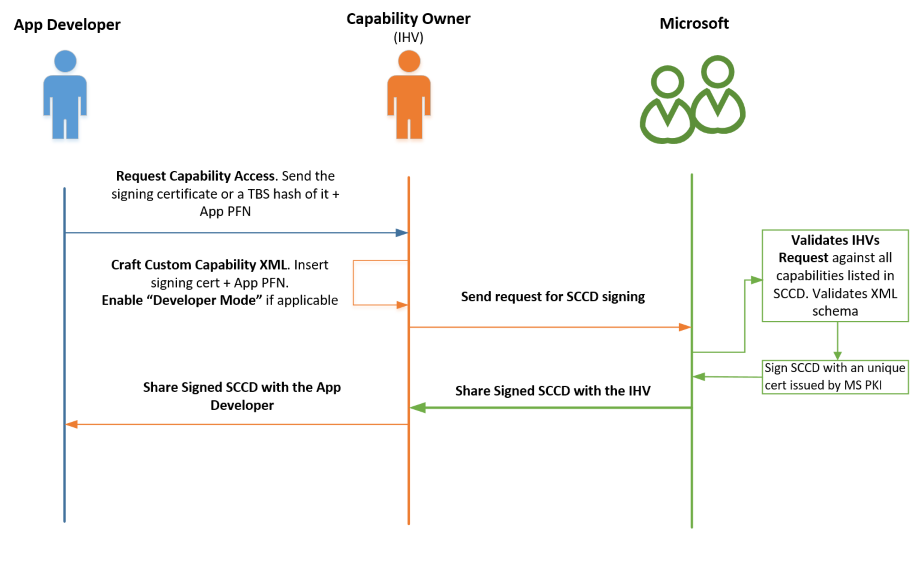
SCCD 簽署順序的摘要
下圖摘要說明上述的順序:

SCCD XML 架構
以下是 SCCD 檔案的正式 XML XSD 架構。 使用此架構在提交 SCCD 以供檢閱之前驗證您的 SCCD。 如需使用 IntelliSense 匯入架構和驗證的資訊,請參閱 架構 快取和 XML 檔驗證 。
<?xml version="1.0" encoding="UTF-8"?>
<xs:schema attributeFormDefault="unqualified" elementFormDefault="qualified"
  xmlns:xs="https://www.w3.org/2001/XMLSchema"
  targetNamespace="http://schemas.microsoft.com/appx/2016/sccd"
  xmlns:s="http://schemas.microsoft.com/appx/2016/sccd"
  xmlns="http://schemas.microsoft.com/appx/2016/sccd">

  <xs:element name="CustomCapabilityDescriptor" type="CT_CustomCapabilityDescriptor">
    <xs:unique name="Unique_CustomCapability_Name">
      <xs:selector xpath="s:CustomCapabilities/s:CustomCapability"/>
      <xs:field xpath="@Name"/>
    </xs:unique>
  </xs:element>

  <xs:complexType name="CT_CustomCapabilityDescriptor">
    <xs:sequence>
      <xs:element ref="CustomCapabilities" minOccurs="1" maxOccurs="1"/>
      <xs:element ref="AuthorizedEntities" minOccurs="1" maxOccurs="1"/>
      <xs:element ref="DeveloperModeOnly" minOccurs="0" maxOccurs="1"/>
      <xs:element ref="Catalog" minOccurs="1" maxOccurs="1"/>
      <xs:any minOccurs="0"/>
    </xs:sequence>
  </xs:complexType>

  <xs:element name="CustomCapabilities" type="CT_CustomCapabilities" />

  <xs:complexType name="CT_CustomCapabilities">
    <xs:sequence>
      <xs:element ref="CustomCapability" minOccurs="1" maxOccurs="unbounded"/>
    </xs:sequence>
  </xs:complexType>

  <xs:element name="CustomCapability">
    <xs:complexType>
      <xs:attribute name="Name" type="ST_CustomCapability" use="required"/>
    </xs:complexType>
  </xs:element>

  <xs:simpleType name="ST_NonEmptyString">
    <xs:restriction base="xs:string">
      <xs:minLength value="1"/>
      <xs:maxLength value="32767"/>
      <xs:pattern value="[^\s]|([^\s].*[^\s])"/>
    </xs:restriction>
  </xs:simpleType>

  <xs:simpleType name="ST_CustomCapability">
    <xs:annotation>
      <xs:documentation>Custom capabilities should be a string in the form of Company.capabilityName_PublisherId</xs:documentation>
    </xs:annotation>
    <xs:restriction base="ST_NonEmptyString">
      <xs:pattern value="[A-Za-z0-9][-_.A-Za-z0-9]*_[a-hjkmnp-z0-9]{13}"/>
      <xs:minLength value="15"/>
      <xs:maxLength value="255"/>
    </xs:restriction>
  </xs:simpleType>

  <xs:element name="AuthorizedEntities" type="CT_AuthorizedEntities" />

  <xs:complexType name="CT_AuthorizedEntities">
    <xs:sequence>
      <xs:element ref="AuthorizedEntity" minOccurs="1" maxOccurs="unbounded"/>
    </xs:sequence>
  </xs:complexType>

  <xs:element name="AuthorizedEntity" type="CT_AuthorizedEntity" />

  <xs:complexType name="CT_AuthorizedEntity">
    <xs:attribute name="CertificateSignatureHash" type="ST_CertificateSignatureHash" use="required"/>
    <xs:attribute name="AppPackageFamilyName" type="ST_NonEmptyString" use="required"/>
  </xs:complexType>

  <xs:simpleType name="ST_CertificateSignatureHash">
    <xs:restriction base="ST_NonEmptyString">
      <xs:pattern value="[A-Fa-f0-9]+"/>
      <xs:minLength value="64"/>
      <xs:maxLength value="64"/>
    </xs:restriction>
  </xs:simpleType>

  <xs:element name="DeveloperModeOnly">
    <xs:complexType>
      <xs:attribute name="Value" type="xs:boolean" use="required"/>
    </xs:complexType>
  </xs:element>

  <xs:element name="Catalog" type="ST_Catalog" />

  <xs:simpleType name="ST_Catalog">
    <xs:restriction base="xs:string">
      <xs:pattern value="[A-Za-z0-9\+\/\=]+"/>
      <xs:minLength value="4"/>
    </xs:restriction>
  </xs:simpleType>

</xs:schema>
在Windows 10 版本 1809時,下列架構也有效。 它可讓 SCCD 宣告任何應用程式套件成為授權實體。
<?xml version="1.0" encoding="UTF-8"?>
<xs:schema attributeFormDefault="unqualified" elementFormDefault="qualified"
  xmlns:xs="https://www.w3.org/2001/XMLSchema"
  targetNamespace="http://schemas.microsoft.com/appx/2018/sccd"
  xmlns:s="http://schemas.microsoft.com/appx/2018/sccd"
  xmlns="http://schemas.microsoft.com/appx/2018/sccd">

  <xs:element name="CustomCapabilityDescriptor" type="CT_CustomCapabilityDescriptor">
    <xs:unique name="Unique_CustomCapability_Name">
      <xs:selector xpath="s:CustomCapabilities/s:CustomCapability"/>
      <xs:field xpath="@Name"/>
    </xs:unique>
  </xs:element>

  <xs:complexType name="CT_CustomCapabilityDescriptor">
    <xs:sequence>
      <xs:element ref="CustomCapabilities" minOccurs="1" maxOccurs="1"/>
      <xs:element ref="AuthorizedEntities" minOccurs="1" maxOccurs="1"/>
      <xs:element ref="DeveloperModeOnly" minOccurs="0" maxOccurs="1"/>
      <xs:element ref="Catalog" minOccurs="1" maxOccurs="1"/>
      <xs:any minOccurs="0"/>
    </xs:sequence>
  </xs:complexType>

  <xs:element name="CustomCapabilities" type="CT_CustomCapabilities" />

  <xs:complexType name="CT_CustomCapabilities">
    <xs:sequence>
      <xs:element ref="CustomCapability" minOccurs="1" maxOccurs="unbounded"/>
    </xs:sequence>
  </xs:complexType>

  <xs:element name="CustomCapability">
    <xs:complexType>
      <xs:attribute name="Name" type="ST_CustomCapability" use="required"/>
    </xs:complexType>
  </xs:element>

  <xs:simpleType name="ST_NonEmptyString">
    <xs:restriction base="xs:string">
      <xs:minLength value="1"/>
      <xs:maxLength value="32767"/>
      <xs:pattern value="[^\s]|([^\s].*[^\s])"/>
    </xs:restriction>
  </xs:simpleType>

  <xs:simpleType name="ST_CustomCapability">
    <xs:annotation>
      <xs:documentation>Custom capabilities should be a string in the form of Company.capabilityName_PublisherId</xs:documentation>
    </xs:annotation>
    <xs:restriction base="ST_NonEmptyString">
      <xs:pattern value="[A-Za-z0-9][-_.A-Za-z0-9]*_[a-hjkmnp-z0-9]{13}"/>
      <xs:minLength value="15"/>
      <xs:maxLength value="255"/>
    </xs:restriction>
  </xs:simpleType>

  <xs:element name="AuthorizedEntities" type="CT_AuthorizedEntities" />

  <xs:complexType name="CT_AuthorizedEntities">
    <xs:sequence>
      <xs:element ref="AuthorizedEntity" minOccurs="0" maxOccurs="unbounded"/>
    </xs:sequence>
    <xs:attribute name="AllowAny" type="xs:boolean" use="optional"/>
  </xs:complexType>

  <xs:element name="AuthorizedEntity" type="CT_AuthorizedEntity" />

  <xs:complexType name="CT_AuthorizedEntity">
    <xs:attribute name="CertificateSignatureHash" type="ST_CertificateSignatureHash" use="required"/>
    <xs:attribute name="AppPackageFamilyName" type="ST_NonEmptyString" use="required"/>
  </xs:complexType>

  <xs:simpleType name="ST_CertificateSignatureHash">
    <xs:restriction base="ST_NonEmptyString">
      <xs:pattern value="[A-Fa-f0-9]+"/>
      <xs:minLength value="64"/>
      <xs:maxLength value="64"/>
    </xs:restriction>
  </xs:simpleType>

  <xs:element name="DeveloperModeOnly">
    <xs:complexType>
      <xs:attribute name="Value" type="xs:boolean" use="required"/>
    </xs:complexType>
  </xs:element>

  <xs:element name="Catalog" type="ST_Catalog" />

  <xs:simpleType name="ST_Catalog">
    <xs:restriction base="xs:string">
      <xs:pattern value="[A-Za-z0-9\+\/\=]+"/>
      <xs:minLength value="4"/>
    </xs:restriction>
  </xs:simpleType>

</xs:schema>
另請參閱
將驅動程式與通用 Windows 平臺 (UWP) 應用程式配對
意見反應
即將登場:在 2024 年,我們將逐步淘汰 GitHub 問題作為內容的意見反應機制,並將它取代為新的意見反應系統。 如需詳細資訊,請參閱:https://aka.ms/ContentUserFeedback。
提交並檢視相關的意見反應