了解如何建置可讓使用者登入的原生應用程式,這些使用者是由 AD FS 2019 驗證的,並使用 MSAL 程式庫 來取得權杖,進而呼叫網路 API。
閱讀本文之前,您應該先熟悉 AD FS 概念和授權碼授與流程
Overview

在此流程中,您會將驗證新增至原生應用程式 (公用用戶端),因此可以登入使用者並呼叫 Web API。 若要從登入使用者的原生應用程式呼叫 Web API,您可以使用 MSAL 的 AcquireTokenInteractive 權杖取得方法。 若要啟用此互動,MSAL 會利用網頁瀏覽器。
若要進一步了解如何在 AD FS 中設定原生應用程式,以互動方式取得存取權杖,讓我們使用此處提供的範例,並逐步進行應用程式註冊和程式碼設定步驟。
Pre-requisites
- GitHub 用戶端工具
- 已設定且正在執行的 AD FS 2019 或更新版本
- Visual Studio 2013 或更新版本
AD FS 中的應用程式註冊
本節說明如何在 AD FS 中,將原生應用程式註冊為公用用戶端和將 Web API 註冊為信賴憑證者 (RP)
在 AD FS 管理中,以滑鼠右鍵按一下 [應用程式群組],然後選取 [新增應用程式群組]。
在 [應用程式群組精靈] 上,針對 [名稱] 輸入 NativeAppToWebApi,然後在 [用戶端伺服器應用程式] 下選取 [存取 Web API 的原生應用程式] 範本。 按 [下一步]。

複製 [用戶端識別碼] 值。 稍後會在應用程式的 App.config 檔案中,將其當作 ClientId 的值使用。 在“重新導向 URI”欄位中輸入下列內容: 按下 新增。 按 [下一步]。
![[新增應用程式群組精靈] 的 [原生應用程式] 頁面螢幕快照,其中顯示重新導向 U R I。](media/adfs-msal-native-app-web-api/native3.png)
在 [設定 Web API] 畫面上,輸入 [識別碼:]https://localhost:44321/. 按下 新增。 按 [下一步]。 稍後會在應用程式的 App.config 和 Web.config 檔案中使用此值。
![[新增應用程式群組精靈] 之 [設定 Web API] 頁面的螢幕快照,其中顯示正確的標識符。](media/adfs-msal-native-app-web-api/native4.png)
在 [套用存取控制原則] 畫面上,選取 [允許所有人],然後按 [下一步]。
![[新增應用程式群組精靈] 的 [選擇 存取控制 原則] 頁面的螢幕快照,其中已醒目提示 [允許所有人] 選項。](media/adfs-msal-native-app-web-api/native5.png)
在 [設定應用程式權限] 畫面上,確定已選取 [openid],然後按 [下一步]。
![[新增應用程式群組精靈] 的 [設定應用程式許可權] 頁面的螢幕擷取畫面,其中顯示選取了開啟 ID。](media/adfs-msal-native-app-web-api/native6.png)
在 [摘要] 畫面上,按 [下一步]。
在 [完成] 畫面上,按一下 [關閉]。
在 AD FS 管理中,按一下 [應用程式群組],然後選取 [NativeAppToWebApi] 應用程式群組。 按一下滑鼠右鍵,然後選取 [屬性]。
![[A D F S 管理] 對話框的螢幕快照,其中顯示反白顯示的 NativeAppToWebApi 群組,以及下拉式清單中的 [屬性] 選項。](media/adfs-msal-native-app-web-api/native7.png)
在 [NativeAppToWebApi 屬性] 畫面上,選取 [Web API] 下的 [NativeAppToWebApi – Web API],然後按一下 [編輯...]
![[NativeAppToWebApi 屬性] 對話框的螢幕截圖,顯示已醒目顯示的 NativeAppToWebApi - Web A P I 應用程式。](media/adfs-msal-native-app-web-api/native8.png)
在 [NativeAppToWebApi – Web API 屬性] 畫面上,選取 [發行轉換規則] 索引標籤,然後按一下 [新增規則...]
![[NativeAppToWebApi - Web A P I 屬性] 對話框的螢幕快照,其中顯示 [發行轉換規則] 索引標籤。](media/adfs-msal-native-app-web-api/native9.png)
在 [新增轉換宣告規則] 精靈中,從「宣告規則範本:」下拉選單選擇轉換傳入宣告,然後按下一步。
![[新增轉換宣告規則精靈] 的 [選取規則範本] 頁面的螢幕擷取畫面,顯示已選取 [轉換傳入宣告] 選項。](media/adfs-msal-native-app-web-api/native10.png)
在 [宣告規則名稱:] 欄位中輸入 NameID。 在 [傳入宣告類型:] 選取 [名稱]、在 [傳出宣告類型:] 選取 [名稱識別碼],以及在 [傳出名稱識別碼格式:] 選取 [一般名稱]。 按兩下 [ 完成]。
![[新增轉換宣告規則精靈] 的 [設定規則] 頁面螢幕快照,其中顯示上述設定。](media/adfs-msal-native-app-web-api/native11.png)
在 [NativeAppToWebApi – Web API 屬性] 畫面上按一下 [確定],然後在 [NativeAppToWebApi 屬性] 畫面上按一下 [確定]。
程式碼設定
本節說明如何設定原生應用程式來登入使用者,並擷取權杖以呼叫 Web API
從這裡下載範例
使用 Visual Studio 來開啟範例
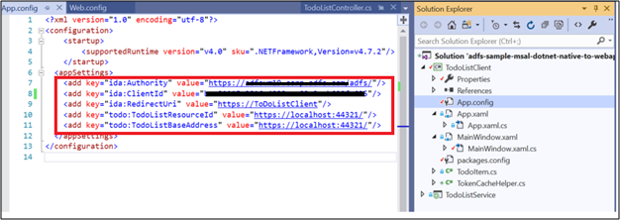
開啟 App.config 檔案。 修改下列內容:
ida:Authority - 輸入 h
ttps://[your AD FS hostname]/adfsida:ClientId - 在上述 AD FS 中應用程式註冊區段中輸入來自 #3 的用戶端識別碼值。
ida:RedirectUri - 在上述 AD FS 中應用程式註冊區段中輸入來自 #3 的重新導向 URI 值。
todo:TodoListResourceId – 在上述 AD FS 中應用程式註冊區段中輸入來自 #4 的識別碼值
ida: todo:TodoListBaseAddress - 在上述 AD FS 中應用程式註冊區段中輸入來自 #4 的識別碼值。
開啟 Web.config 檔案。 修改下列內容:
ida:Audience – 在上述 AD FS 中應用程式註冊區段中輸入來自 #4 的識別碼值
ida: AdfsMetadataEndpoint - 輸入
https://[your AD FS hostname]/federationmetadata/2007-06/federationmetadata.xml
測試範例
本節顯示如何測試上面所設定的範例。
變更程式碼之後,請重新建置解決方案
在 Visual Studio 上,以滑鼠右鍵按一下解決方案,然後選取 [設定啟動專案...]
![右鍵點擊解決方案後,螢幕上顯示選單,並顯示出已醒目提示的 [設定啟始專案] 選項的螢幕擷圖。](media/adfs-msal-native-app-web-api/native14.png)
在 [屬性] 頁面上,確定已針對每個專案將 [動作] 設定為 [開始]
![[方案屬性頁] 對話框的螢幕快照,其中顯示已選取 [多個啟動專案] 選項,並將所有項目的動作設定為 [開始]。](media/adfs-msal-native-app-web-api/native15.png)
在 Visual Studio 頂端,按一下綠色箭號。
![Visual Studio UI 的螢幕快照,其中標示了 [開始] 選項。](media/adfs-msal-native-app-web-api/native16.png)
在原生應用程式的 [主要] 畫面上,按一下 [登入]。
![[待辦事項 列表用戶端] 對話框的螢幕快照。](media/adfs-msal-native-app-web-api/native17.png)
如果您沒有看到原生應用程式畫面,請從系統上專案存放庫儲存所在的資料夾搜尋和移除 *msalcache.bin 檔案。
系統會將您重新導向至 AD FS 登入頁面。 請登入。
![[登入] 頁面的螢幕快照。](media/adfs-msal-native-app-web-api/native18.png)
登入之後,在 [建立待辦事項] 中輸入文字 [在 Web Api 中建置原生應用程式]。 按一下 [新增項目]。 這會呼叫待辦事項服務 (Web API),並在快取中新增項目。
![顯示[待辦事項列表用戶端]對話框的螢幕擷圖,其中新增的待辦事項已填入[待辦事項項目]區域。](media/adfs-msal-native-app-web-api/native19.png)