了解如何建置一個網頁應用程式,讓使用者透過 AD FS 2019 驗證登入,並用 MSAL 程式庫取得權杖以呼叫 Web API。
閱讀本文之前,您應該先熟悉 AD FS 概念和授權碼授與流程
Overview
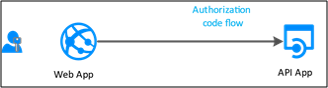
您在這個流程中將驗證功能加入您的 Web 應用程式(Web 應用伺服器),這樣就可以讓使用者登入並呼叫 Web API。 從 Web 應用程式中,若要呼叫 Web API,請使用 MSAL 的 AcquireTokenByAuthorizationCode token 取得方法。 您使用授權代碼流,將取得的權杖儲存在權杖快取中。 接著控制器必要時會悄悄從快取中取得權杖。 MSAL 會在需要時更新權杖。
呼叫 Web API 的 Web 應用程式:
- 為機密用戶端應用程式。
- 已在 AD FS 註冊了一個秘密(應用程式共用密碼、證書或 AD 帳戶)。 此秘密會在呼叫 AD FS 期間傳遞,以獲取權杖。
若要在 AD FS 註冊 Web 應用程式並配置為取得權杖呼叫 Web API,請使用這裡提供的例子,並實地演練應用程式註冊和代碼配置步驟。
Pre-requisites
- GitHub 用戶端工具
- 已設定且正在執行的 AD FS 2019 或更新版本
- Visual Studio 2013 或更新版本
AD FS 中的應用程式註冊
本節說明如何在 AD FS 中將 Web 應用程式註冊為機密用戶端,以及如何將 Web API 註冊為信賴憑證者 (RP)。
在 [AD FS 管理] 中,以滑鼠右鍵按一下 [應用程式群組],然後選取 [新增應用程式群組]。
在 [應用程式群組精靈] 上,針對 [名稱] 輸入 WebAppToWebApi,然後在 [用戶端伺服器應用程式] 下選取 [存取 Web API 的伺服器應用程式] 範本。 按 [下一步]。
![[新增應用程式群組精靈] 的 [歡迎] 頁面螢幕快照,顯示伺服器應用程式存取 Web API 範本的醒目提示。](media/adfs-msal-web-app-web-api/webapp2.png)
複製 [用戶端識別碼] 值。 此數值稍候會當成應用程式 Web.config 檔案裡 ida:ClientId 的數值。 針對 重新導向 URI: 輸入下列內容 - https://localhost:44326. 按兩下 [新增]。 按 [下一步]。
![[新增應用程式群組精靈] 的 [伺服器應用程式] 頁面螢幕快照,其中顯示正確的用戶端標識符和重新導向 U R I。](media/adfs-msal-web-app-web-api/webapp3.png)
在配置應用程式憑證的螢幕上,選取產生共享密鑰,然後複製此密鑰。 此秘密稍後將用作應用程式 Web.config 檔案中 ida:ClientSecret 的值。 按 [下一步]。
![[新增應用程式群組精靈] 的 [設定應用程式認證] 應用程式頁面的螢幕快照,其中顯示已選取 [產生共用密碼] 選項,並填入產生的共享密碼。](media/adfs-msal-web-app-web-api/webapp4.png)
在 [設定 Web API] 畫面上,輸入 [識別碼:]https://webapi. 按下 新增。 按 [下一步]。 此數值稍後會用於應用程式的ida:GraphResourceId於Web.config檔案中。
![[新增應用程式群組精靈] 之 [設定 Web API] 頁面的螢幕快照,其中顯示正確的標識符。](media/adfs-msal-web-app-web-api/webapp5.png)
在 [套用存取控制原則] 畫面上,選取 [允許所有人],然後按 [下一步]。
![[新增應用程式群組精靈] 的 [選擇 存取控制 原則] 頁面的螢幕快照,其中已醒目提示 [允許所有人] 選項。](media/adfs-msal-web-app-web-api/webapp6.png)
在 [設定應用程式權限] 畫面上,確定已選取 [openid] 和 [user_impersonation],然後按 [下一步]。
![[新增應用程式群組精靈] 之 [設定應用程式許可權] 頁面的螢幕快照,其中顯示已選取開啟的 I D 和使用者模擬選項。](media/adfs-msal-web-app-web-api/webapp7.png)
在 [摘要] 畫面上,按 [下一步]。
在 [完成] 畫面上,按一下 [關閉]。
程式碼設定
本節說明如何設定 ASP.NET Web 應用程式來登入使用者,以及如何擷取權杖以呼叫 Web API
從這裡下載範例
使用 Visual Studio 開啟範例
開啟 Web.config 檔案。 修改下列內容:
ida:ClientId- 在 AD FS 應用註冊區 #3 輸入客戶端識別碼數值。ida:ClientSecret- 在 AD FS 的應用程式註冊中,輸入第#4項的密鑰值。ida:RedirectUri- 在 AD FS 應用程式註冊的第 #3 步中輸入重導 URI數值。ida:Authority- 輸入 https://[您的 AD FS 主機名稱]/adfs。 例如,https://adfs.contoso.com/adfsida:Resource- 在 AD FS 區段的應用程式註冊中輸入 #5 的 識別碼 數值。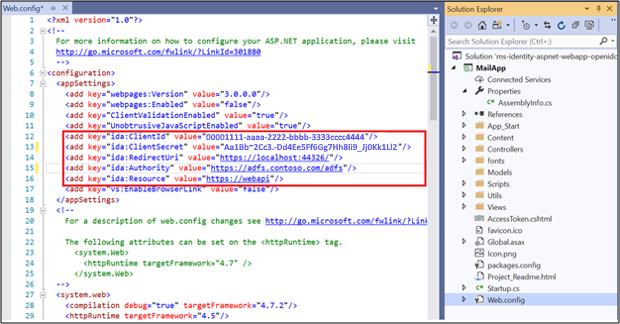
測試範例
本節展示如何測試配置的樣本。
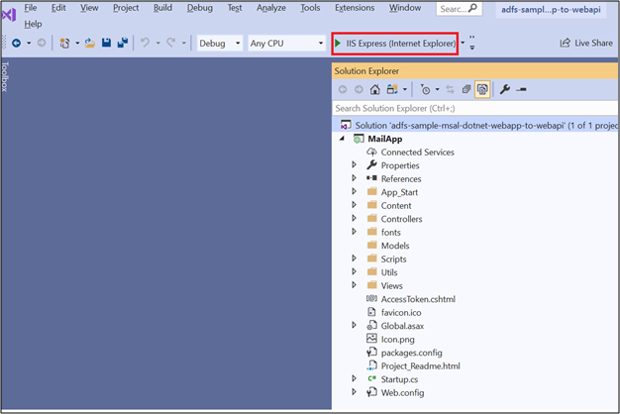
變更代碼後重新建置解決方案。
在 Visual Studio 頂端,確定已選取 Internet Explorer,然後按一下綠色箭號。
在首頁上,按一下 [登入]。
![[首頁] 的螢幕快照,其中標出 [登入] 選項。](media/adfs-msal-web-app-web-api/webapp10.png)
您將被重新轉向到 AD FS 登入頁。 請登入。
![[登入] 頁面的螢幕快照。](media/adfs-msal-web-app-web-api/webapp11.png)
一旦登入之後,按一下 [存取權杖]。
![[首頁] 的螢幕快照,特別標示出 [存取令牌] 選項。](media/adfs-msal-web-app-web-api/webapp12.png)
點選存取權杖即可藉由呼叫 Web API 取得存取權杖資訊。
![[存取令牌] 頁面的螢幕快照,其中顯示存取令牌資訊。](media/adfs-msal-web-app-web-api/webapp13.png)