Windows Admin Center 是以瀏覽器為基礎的管理工具,可簡化伺服器、叢集、Windows 計算機和 Azure 虛擬機的管理。
本文說明如何在 下載 並 在 Windows 計算機上安裝 它之後,開始使用 Windows Admin Center。 若要深入了解 Windows Admin Center,請參閱 Windows Admin Center 概觀。
在 Windows PC 上部署 Windows Admin Center
Important
您必須是本機系統管理員群組的成員,才能使用 Windows Admin Center。
請遵循下列步驟,在 Windows 電腦上開啟 Windows Admin Center:
在 [開始] 功能表上,選取 [Windows Admin Center][v2]。 或在搜尋列中輸入 Windows Admin Center (v2), 然後從搜尋結果中選取它。
您的預設瀏覽器隨即開啟,其中包含 Windows Admin Center 的登入畫面。
Windows 用戶端作業系統使用埠 6600 設定為本機存取。
Windows Server作業系統已設定為使用埠 443 的遠端訪問。
使用您的系統管理員認證登入 Windows Admin Center。
此時會出現選取憑證進行驗證的提示。
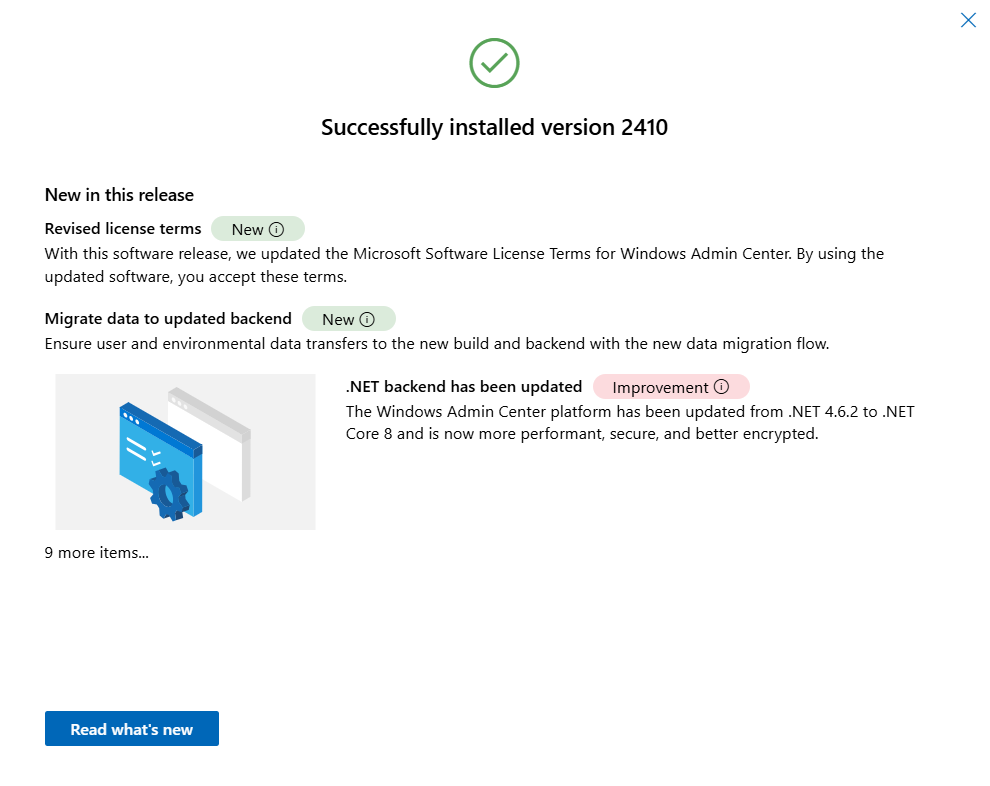
(僅限第一次:)彈出視窗會確認您的 Windows Admin Center 版本已成功安裝。 它也提供此版本新功能的相關資訊。 關閉視窗以繼續。
[ 所有連線 ] 頁面會在連線清單中顯示您的 Windows 計算機名稱。 您現在已準備好將連線新增至 Windows Admin Center。
將連線新增至 Windows Admin Center
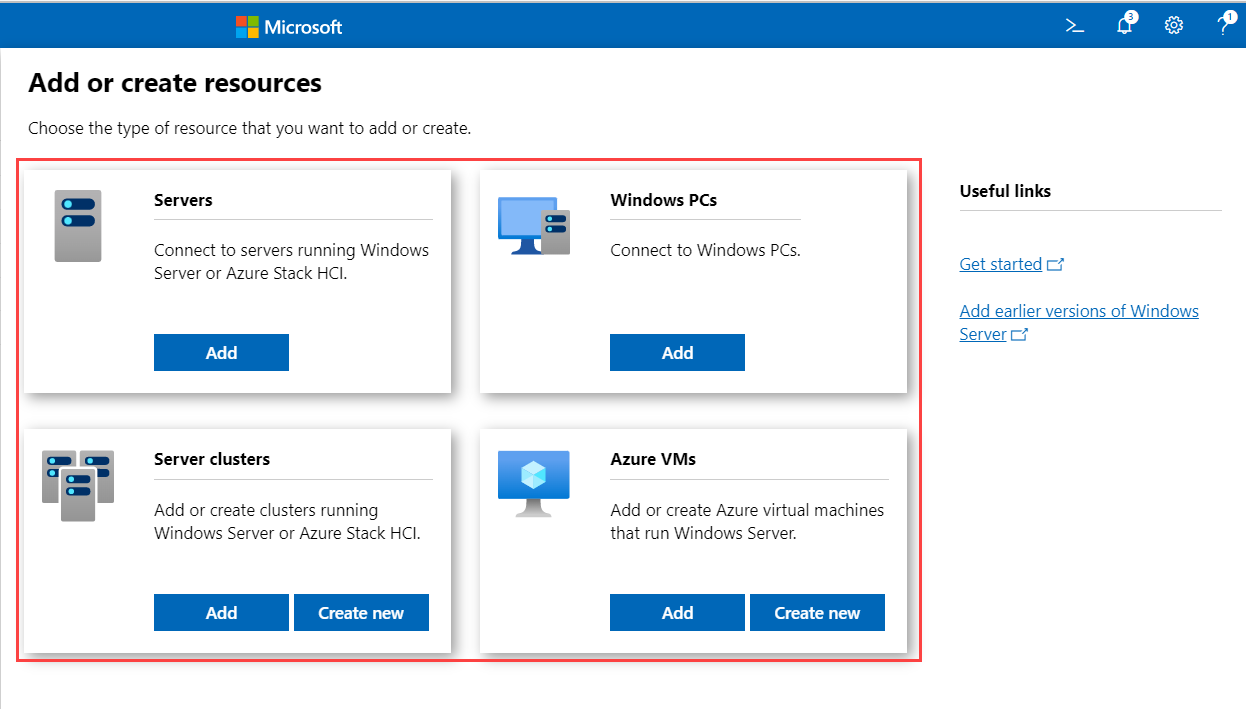
若要新增或建立 Azure VM,您必須先向 Azure 註冊 Windows Admin Center。 您可以從[所有連線]頁面,將連線以受控節點的形式新增至 Windows Admin Center。 開啟 Windows Admin Center 時,所有連線的 是預設顯示的頁面。 在此頁面上,您可以將現有的資源新增為連線,或建立新的資源。 您新增的資源會出現在連線清單中。
您可以從 [所有 連線] 頁面新增的資源類型為伺服器、Windows 計算機、叢集和 Azure VM。 您可以建立的資源是叢集和 Azure VM。
若要將連線新增至 Windows Admin Center
請在 [所有連線] 下,選取 [+ 新增]。

您可以新增的資源類型隨即顯示。 針對您要新增的資源類型,選取[新增]。
視資源類型而定,Windows Admin Center 支援各種方法來新增資源:
- 一次新增一個資源。
- 藉由大容量導入來新增多個資源。
- 藉由搜尋 Active Directory 來新增資源。
根據您要新增資源的方式選取索引標籤。 每個索引標籤的標籤可能會根據您要新增的資源類型而有所不同。
一次新增一個資源是預設方法。 當您新增叢集時,此索引標籤會顯示為 新增叢集。
選取 新增一個 或 新增叢集 索引標籤。
在 [伺服器名稱] 方塊中,輸入資源的名稱。
![選取 [新增一個資源] 索引標籤時,用於新增資源的頁面螢幕快照。](../media/launch/use-get-started-6.png)
當您開始輸入文字時,Windows Admin Center 會根據您的文字字串開始搜尋資源。 如果找到相符專案,您可以完全依照輸入的名稱來新增名稱,或使用預設資源名稱。 如果找不到相符資源,您仍然可以新增此資源,使其出現在連線清單中。
![選取 [新增一個資源] 索引標籤時,用於新增資源的頁面螢幕快照。](../media/launch/use-get-started-6.png#lightbox)
![選取 [匯入清單] 索引標籤時,用於新增資源的頁面螢幕快照。](../media/launch/use-get-started-7.png#lightbox)
![選取 [搜尋 Active Directory] 索引標籤時,用於新增資源的頁面螢幕快照。](../media/launch/use-get-started-8.png#lightbox)
(選擇性:)選取 新增標籤 以新增連接標籤。 您可以使用標籤來識別和篩選連線清單中的相關資源。 如需詳細資訊,請參閱本文稍後 使用標籤來管理連結。
當您完成新增資源時,請選取 [新增]。
選取的資源會出現在 [所有連線] 頁面上的連線清單中。
使用受控節點進行驗證
將連線新增為受控節點之後,您必須使用它們進行驗證才能連線。
Windows Admin Center 支援幾種向受控節點進行驗證的機制。 單一登入是預設值。
Note
為了執行遠端系統管理,Windows Admin Center 會模擬提供使用者的安全性內容,並使用該安全性內容來存取電腦。 所提供的使用者會列在 [所有連線 ] 頁面上的 [管理身分] 欄中。
透過單一登入進行驗證
您可以使用目前的 Windows 認證向受控節點進行驗證。 此驗證是預設值,而 Windows Admin Center 會在您新增資源時嘗試單一登錄。
在 Windows Admin Center 部署為 Windows Server 上的服務時,透過單一登錄進行驗證
如果您在 Windows Server 上安裝 Windows Admin Center,則單一登錄需要額外的設定。 如需詳細資訊,請參閱 設定單一登入。
藉由指定認證進行驗證
在 [所有連線]中,從清單中選取資源。
選取 以...身份管理 以指定您的認證來驗證至受管節點。

如果 Windows Admin Center 在 Windows Server 上以服務模式執行,但未設定 Kerberos 委派,您必須重新輸入 Windows 認證。
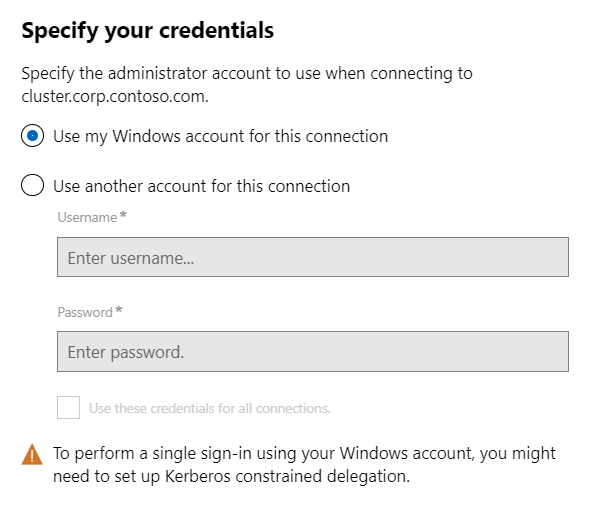
您可以將憑證應用於所有連線,以便在該特定瀏覽器會話中快取它們。 如果您重載瀏覽器,您必須將 管理重新輸入為 認證。
透過區域系統管理員密碼解決方案進行驗證
如果您的環境使用 本機系統管理員密碼解決方案 (LAPS),而且您已在 Windows 電腦上安裝 Windows Admin Center,您可以使用 LAPS 認證向受控節點進行驗證。 如果您使用此案例,您可以 提供意見反應。
使用標籤來整理您的連線
您可以使用標籤來識別和篩選連線清單中的相關資源。 當您有許多連線時,檢視連線清單中的資源子集的能力特別有用。
編輯標籤
您可以在新增連接時,將標籤新增至連線。 或者,您可以稍後新增或編輯它們。 針對所有連線頁面上的一或多個連線。
若要新增或編輯標籤:
在連線清單中,選取一或多個連線。
選取[編輯標籤]。
![[編輯標記] 命令的螢幕快照。](../media/launch/use-get-started-11.png)
在 [可用的標籤] 窗格中,您可以執行以下任一動作:
若要將新的標籤新增至選取的連接,請選取 [[新增標籤],然後輸入所需的標籤名稱。
若要標記具有現有標籤名稱的選取連接,請選取您要套用的標籤名稱旁的複選框。
若要從所有選取的連接中移除標籤,請清除您要移除之標籤旁的複選框。
如果標記套用至所選連線的子集,複選框就會以中繼狀態顯示。 您可以選取複選框,並將標籤套用至所有選取的連接,或清除複選框以從所有選取的連接中移除標籤。

選取儲存以儲存變更。
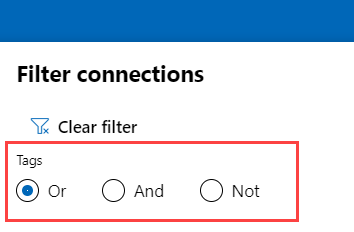
依標籤篩選連線
將標籤新增至一或多個連線之後,您可以檢視連接清單中的標籤,並依標籤篩選連接清單。
若要依標籤進行篩選,請選取搜尋方塊旁的篩選圖示。

您可以選取 或、和,或 而不是 來修改所選標籤的篩選行為。
使用 PowerShell 匯入或匯出您的連線 (包含標籤)
# Load the module
Import-Module "$env:ProgramFiles\windows admin center\PowerShell\Modules\ConnectionTools"
# Available cmdlets: Export-Connection, Import-Connection

# Export connections (including tags) to a .csv file
Export-Connection "https://wac.contoso.com" -fileName "WAC-connections.csv"
# Import connections (including tags) from a .csv file
Import-Connection "https://wac.contoso.com" -fileName "WAC-connections.csv"
# Import connections (including tags) from .csv files, and remove any connections that are not explicitly in the imported file by using the -prune switch parameter
Import-Connection "https://wac.contoso.com" -fileName "WAC-connections.csv" -prune
用於匯入連線的 CSV 檔案格式
CSV 檔案的格式會以下列四個標題開頭,後面接著新行上的每個連線。
name:連線的 FQDN。type:連線類型。 針對 Windows Admin Center 隨附的預設連線,請使用下列其中一個字串:連接類型 連線字串 Windows 伺服器 msft.sme.connection-type.server容錯移轉叢集 msft.sme.connection-type.clustertags:管道分隔標籤。groupId:共享連線的欄位。 使用此數據行中的值global來建立共享連線。
Note
修改共享連線僅限於閘道管理員。 任何使用者都可以使用PowerShell修改其個人連線清單。
用於匯入連線的 CSV 檔案範例
"name","type","tags","groupId"
"myServer.contoso.com","msft.sme.connection-type.server","hyperv"
"myDesktop.contoso.com","msft.sme.connection-type.windows-server","hyperv"
"teamcluster.contoso.com","msft.sme.connection-type.cluster","legacyCluster|WS2016","global"
"myHCIcluster.contoso.com,"msft.sme.connection-type.cluster","myHCIcluster|hyperv|JIT|WS2019"
"teamclusterNode.contoso.com","msft.sme.connection-type.server","legacyCluster|WS2016","global"
"myHCIclusterNode.contoso.com","msft.sme.connection-type.server","myHCIcluster|hyperv|JIT|WS2019"
Note
CSV 檔案會區分大小寫。
匯入 RDCMan 連線
使用下列腳本,將 RDCMan 中儲存的連線匯出至檔案。 然後,您可以將檔案匯入 Windows Admin Center,並使用標記來維護 RDCMan 群組階層。
將下列程式代碼複製並貼到 PowerShell 工作階段中:
#Helper function for RdgToWacCsv
function AddServers {
 param (
 [Parameter(Mandatory = $true)]
 [Xml.XmlLinkedNode]
 $node,
 [Parameter()]
 [String[]]
 $tags,
 [Parameter(Mandatory = $true)]
 [String]
 $csvPath
 )
 if ($node.LocalName -eq 'server') {
     $serverName = $node.properties.name
     $tagString = $tags -join "|"
     Add-Content -Path $csvPath -Value ('"'+ $serverName + '","msft.sme.connection-type.server","'+ $tagString +'"')
 }
 elseif ($node.LocalName -eq 'group' -or $node.LocalName -eq 'file') {
     $groupName = $node.properties.name
     $tags+=$groupName
     $currNode = $node.properties.NextSibling
     while ($currNode) {
         AddServers -node $currNode -tags $tags -csvPath $csvPath
         $currNode = $currNode.NextSibling
     }
 }
 else {
     # Node type isn't relevant to tagging or adding connections in Windows Admin Center
 }
 return
}

<#
.SYNOPSIS
Convert an .rdg file from Remote Desktop Connection Manager into a .csv that can be imported into Windows Admin Center, maintaining groups via server tags. This will not modify the existing .rdg file and will create a new .csv file

 .DESCRIPTION
 This converts an .rdg file into a .csv that can be imported into Windows Admin Center.

 .PARAMETER RDGfilepath
 The path of the .rdg file to be converted. This file will not be modified, only read.

 .PARAMETER CSVdirectory
 Optional. The directory you want to export the new .csv file. If it's not provided, the new file is created in the same directory as the .rdg file.

 .EXAMPLE
 C:\PS> RdgToWacCsv -RDGfilepath "rdcmangroup.rdg"
 #>
function RdgToWacCsv {
 param(
     [Parameter(Mandatory = $true)]
     [String]
     $RDGfilepath,
     [Parameter(Mandatory = $false)]
     [String]
     $CSVdirectory
 )
 [xml]$RDGfile = Get-Content -Path $RDGfilepath
 $node = $RDGfile.RDCMan.file
 if (!$CSVdirectory){
     $csvPath = [System.IO.Path]::GetDirectoryName($RDGfilepath) + [System.IO.Path]::GetFileNameWithoutExtension($RDGfilepath) + "_WAC.csv"
 } else {
     $csvPath = $CSVdirectory + [System.IO.Path]::GetFileNameWithoutExtension($RDGfilepath) + "_WAC.csv"
 }
 New-item -Path $csvPath
 Add-Content -Path $csvPath -Value '"name","type","tags"'
 AddServers -node $node -csvPath $csvPath
 Write-Host "Converted $RDGfilepath `nOutput: $csvPath"
}
若要建立 CSV 檔案,請執行下列命令:
RdgToWacCsv -RDGfilepath "path\to\myRDCManfile.rdg"將產生的 CSV 檔案匯入 Windows Admin Center。 連線清單中的標籤代表您的遠端桌面連線管理器 (RDCMan) 群組階層。
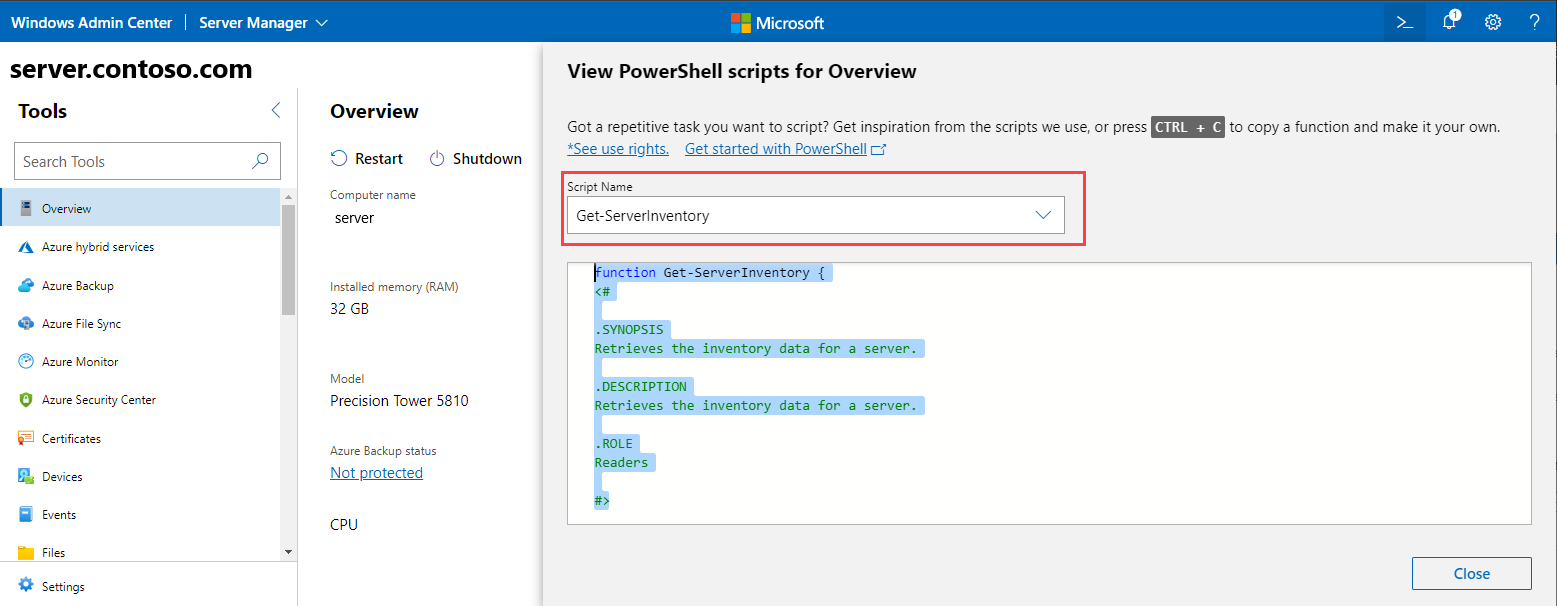
檢視 Windows Admin Center 中使用的 PowerShell 腳本
連接到伺服器、叢集或電腦之後,您可以查看在 Windows Admin Center 中支援 UI 動作的 PowerShell 腳本:
從工具內,選取應用程式行上的PowerShell圖示。
在下拉式清單中,選取感興趣的命令以移至對應的PowerShell腳本。