使用現代化 UWP 元件擴充您的傳統型應用程式
有些 Windows 體驗 (例如:啟用觸控功能的 UI 頁面) 必須在 AppContainer 中執行。 如果您想要新增此類體驗,請使用 UWP 專案和 Windows 執行階段元件擴充您的傳統型應用程式。
在許多情況下,您可以直接從傳統型應用程式呼叫 Windows 執行階段 API,因此在檢視本指南之前,請先參閱增強 Windows。
注意
本主題所述的功能需要封裝您的應用程式 (在執行階段具備套件識別資料)。 這包括已封裝的應用程式 (請參閱為已封裝的 WinUI 3 傳統型應用程式建立新專案),以及具有外部位置的封裝應用程式 (請參閱使用外部位置封裝來授與套件識別資料)。 另請參閱需要套件身分識別的功能。
先設定解決方案
新增一或多個 UWP 專案和執行階段元件至您的解決方案。
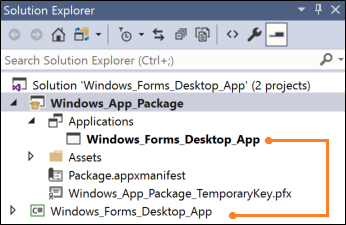
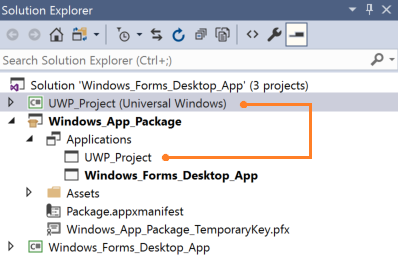
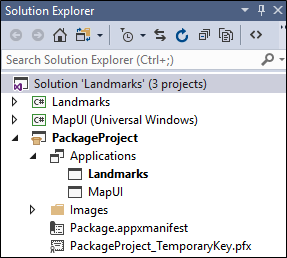
從包含 Windows 應用程式封裝專案的解決方案開始,內有傳統型應用程式的參考。
下圖為範例解決方案。
如果您的解決方案不包含封裝專案,請參閱使用 Visual Studio 封裝傳統型應用程式。
設定傳統型應用程式
確定您的傳統型應用程式是否具有呼叫 Windows 執行階段 API 所需檔案的參考。
若要執行此動作,請在傳統型應用程式中呼叫 Windows 執行階段 API。
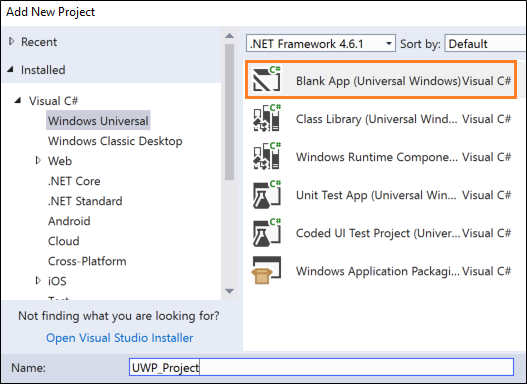
新增 UWP 專案
將 [空白應用程式 (通用 Windows)] 新增至您的解決方案。
您會在此建置現代化 XAML UI 或使用只在 UWP 處理程序中執行的應用程式。
在您的封裝專案中,以滑鼠右鍵按一下 [應用程式] 節點,然後按一下 [新增參考]。
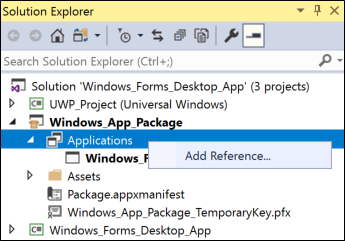
然後,新增 UWP 專案的參考。
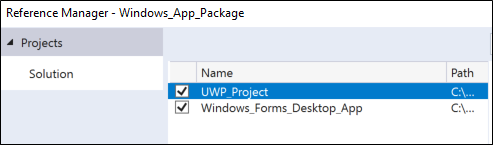
您的解決方案會如下所示:
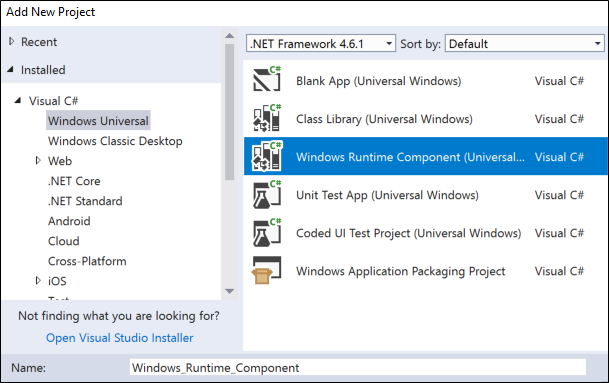
(選用) 新增 Windows 執行階段元件
若要完成一些案例,您必須將程式碼新增到 Windows 執行階段元件。
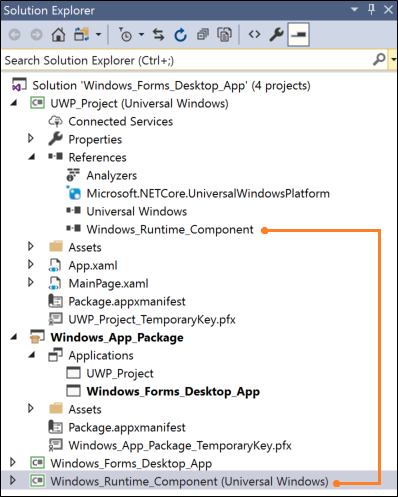
然後從 UWP 專案,新增執行階段元件的參考。 您的解決方案會如下所示:
建置您的解決方案
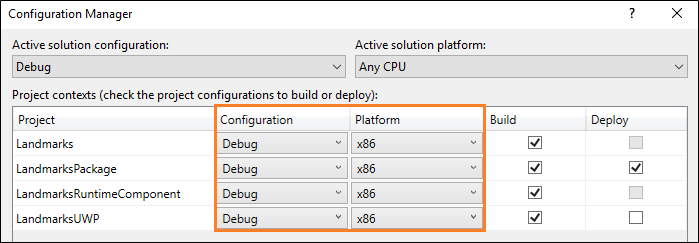
建置您的解決方案以確保不會出現任何錯誤。 如果您收到錯誤,請開啟 Configuration Manager,並確保專案將相同的平台設為目標。
接下來看看可使用 UWP 專案和執行階段元件執行的工作。
顯示現代化的 XAML UI
做為應用程式流程的一部分,您可以將現代化 XAML 型使用者介面納入您的傳統型應用程式。 這類使用者介面本身會配合不同的螢幕大小和解析度調整,且能支援現代化互動模型,例如觸控和筆跡。
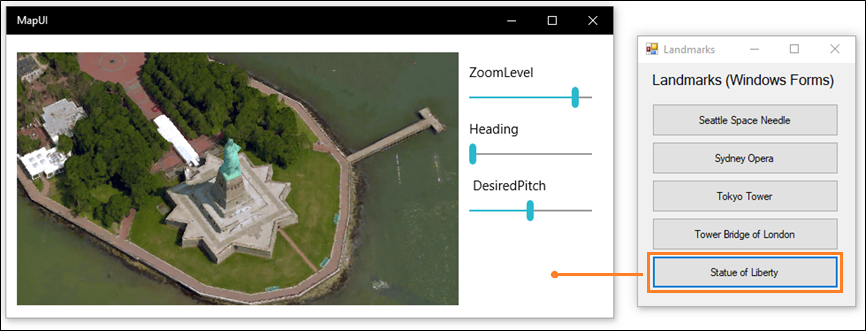
例如,只需少量的 XAML 標記,就可以為使用者提供強大的地圖視覺功能。
下圖為 Windows Forms 應用程式,開啟了包含地圖控制項的 XAML 型現代化 UI。
注意
本範例會示範將 UWP 專案新增至解決方案,以此方式顯示 XAML UI。 這是在傳統型應用程式中顯示 XAML UI 的穩定支援做法。 此方法有個替代方法,可使用 XAML Island 將 UWP XAML 控制項直接新增至傳統型應用程式。此方法的替代方法是使用 XAML Island,將 UWP XAML 控制項直接新增至傳統型應用程式。 XAML Islands 目前供開發人員預覽使用。 雖然我們鼓勵您現在在自己的原型程式碼中試用它們,但我們不建議您此時在實際程式碼中使用它們。 在未來的 Windows 版本中,這些 API 和控制項將會更加成熟和穩定。 若要深入了解 XAML Islands,請參閱傳統型應用程式中的 UWP 控制項
設計模式
如何顯示 XAML 型 UI:
1️⃣ 設定您的解決方案
2️⃣ 建立 XAML UI
設定您的解決方案
如需設定解決方案的一般指導方針,請參閱本指南開頭的先設定解決方案一節。
您的解決方案會如下所示:
在此範例中,Windows Forms 專案名稱為 Landmarks,而包含 XAML UI 的 UWP 專案名稱為 MapUI。
建立 XAML UI
將 XAML UI 新增至您的 UWP 專案。 以下是基本地圖的 XAML。
<Grid Background="{ThemeResource ApplicationPageBackgroundThemeBrush}" Margin="12,20,12,14">
    <Grid.ColumnDefinitions>
        <ColumnDefinition Width="Auto"/>
        <ColumnDefinition Width="*"/>
    </Grid.ColumnDefinitions>
    <maps:MapControl x:Name="myMap" Grid.Column="0" Width="500" Height="500"
                     ZoomLevel="{Binding ElementName=zoomSlider,Path=Value, Mode=TwoWay}"
                     Heading="{Binding ElementName=headingSlider,Path=Value, Mode=TwoWay}"
                     DesiredPitch="{Binding ElementName=desiredPitchSlider,Path=Value, Mode=TwoWay}"
                     HorizontalAlignment="Left"
                     MapServiceToken="<Your Key Goes Here" />
    <Grid Grid.Column="1" Margin="12">
        <StackPanel>
            <Slider Minimum="1" Maximum="20" Header="ZoomLevel" Name="zoomSlider" Value="17.5"/>
            <Slider Minimum="0" Maximum="360" Header="Heading" Name="headingSlider" Value="0"/>
            <Slider Minimum="0" Maximum="64" Header=" DesiredPitch" Name="desiredPitchSlider" Value="32"/>
        </StackPanel>
    </Grid>
</Grid>
新增通訊協定延伸模組
在 [方案總管] 中,開啟解決方案中封裝專案的 package.appxmanifest 檔案,並新增此延伸模組。
<Extensions>
  <uap:Extension Category="windows.protocol" Executable="MapUI.exe" EntryPoint="MapUI.App">
    <uap:Protocol Name="xamluidemo" />
  </uap:Extension>
</Extensions>
為通訊協定命名,提供由 UWP 專案產生的可執行檔名稱,以及進入點類別的名稱。
您也可以在設計工具中開啟 package.appxmanifest,選擇 [宣告] 索引標籤,然後在該索引標籤中新增延伸模組。

注意
地圖控制項會從網際網路下載資料,所以如果您使用地圖控制項,則也必須將「網際網路用戶端」功能新增至您的資訊清單。
啟動 UWP 應用程式
首先,從您的傳統型應用程式建立 Uri,包括通訊協定名稱,以及您想要傳遞到 UWP 應用程式的任何參數。 然後,呼叫 LaunchUriAsync 方法。
private void Statue_Of_Liberty_Click(object sender, EventArgs e)
{
    ShowMap(40.689247, -74.044502);
}

private async void ShowMap(double lat, double lon)
{
    string str = "xamluidemo://";

    Uri uri = new Uri(str + "location?lat=" +
        lat.ToString() + "&?lon=" + lon.ToString());

    var success = await Windows.System.Launcher.LaunchUriAsync(uri);

}
剖析參數並顯示頁面
在 UWP 專案的 App 類別中,覆寫 OnActivated 事件處理常式。 如果應用程式是由您的通訊協定啟動,請剖析參數,然後開啟您想要的頁面。
protected override void OnActivated(Windows.ApplicationModel.Activation.IActivatedEventArgs e)
{
    if (e.Kind == ActivationKind.Protocol)
    {
        ProtocolActivatedEventArgs protocolArgs = (ProtocolActivatedEventArgs)e;
        Uri uri = protocolArgs.Uri;
        if (uri.Scheme == "xamluidemo")
        {
            Frame rootFrame = new Frame();
            Window.Current.Content = rootFrame;
            rootFrame.Navigate(typeof(MainPage), uri.Query);
            Window.Current.Activate();
        }
    }
}
在 XAML 頁面後置的程式碼中,覆寫 OnNavigatedTo 方法以使用傳遞至頁面的參數。 在這種情形下,我們會使用傳遞到此頁面的緯度和經度,在地圖中顯示位置。
protected override void OnNavigatedTo(NavigationEventArgs e)
 {
     if (e.Parameter != null)
     {
         WwwFormUrlDecoder decoder = new WwwFormUrlDecoder(e.Parameter.ToString());

         double lat = Convert.ToDouble(decoder[0].Value);
         double lon = Convert.ToDouble(decoder[1].Value);

         BasicGeoposition pos = new BasicGeoposition();

         pos.Latitude = lat;
         pos.Longitude = lon;

         myMap.Center = new Geopoint(pos);

         myMap.Style = MapStyle.Aerial3D;

     }

     base.OnNavigatedTo(e);
 }
讓您的傳統型應用程式成為共用目標
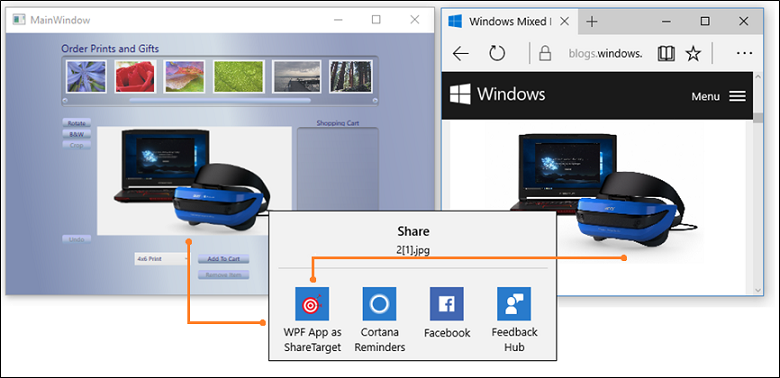
您可以讓您的傳統型應用程式成為共用目標,讓使用者可以輕鬆地共用資料,例如支援共用功能的其他應用程式所提供的圖片。
例如,使用者可以選擇您的應用程式,以從 Microsoft Edge 的 [相片] 應用程式分享圖片。 以下是具有該功能的 WPF 範例應用程式。
 .
.
您可以在這裡參閱完整範例
設計模式
如何讓您的應用程式成為共用目標:
1️⃣ 新增共用目標延伸模組
2️⃣ 覆寫 OnShareTargetActivated 事件處理常式
4️⃣ 新增完全信任處理序延伸模組
5️⃣ 修改傳統型應用程式以取得共用檔案
以下步驟
新增共用目標延伸模組
在 [方案總管] 中,開啟解決方案中封裝專案的 package.appxmanifest 檔案,並新增共用目標延伸模組。
<Extensions>
      <uap:Extension
          Category="windows.shareTarget"
          Executable="ShareTarget.exe"
          EntryPoint="App">
        <uap:ShareTarget>
          <uap:SupportedFileTypes>
            <uap:SupportsAnyFileType />
          </uap:SupportedFileTypes>
          <uap:DataFormat>Bitmap</uap:DataFormat>
        </uap:ShareTarget>
      </uap:Extension>
</Extensions>
提供由 UWP 專案產生的可執行檔名稱,以及進入點類別的名稱。 此標記會假定您的 UWP 應用程式可執行檔案名稱為 ShareTarget.exe。
您也需要指定您的應用程式可以分享哪些檔案類型。 在此範例中,我們會將 WPF PhotoStoreDemo 傳統型應用程式設為點陣圖影像的共用目標,以指定支援檔案類型的 Bitmap。
覆寫 OnShareTargetActivated 事件處理常式
在 UWP 專案的 App 類別中,覆寫 OnShareTargetActivated 事件處理常式。
當使用者選擇您的應用程式來共用檔案時,會呼叫此事件處理常式。
protected override void OnShareTargetActivated(ShareTargetActivatedEventArgs args)
{
    shareWithDesktopApplication(args.ShareOperation);
}

private async void shareWithDesktopApplication(ShareOperation shareOperation)
{
    if (shareOperation.Data.Contains(StandardDataFormats.StorageItems))
    {
        var items = await shareOperation.Data.GetStorageItemsAsync();
        StorageFile file = items[0] as StorageFile;
        IRandomAccessStreamWithContentType stream = await file.OpenReadAsync();

        await file.CopyAsync(ApplicationData.Current.LocalFolder);
            shareOperation.ReportCompleted();

        await FullTrustProcessLauncher.LaunchFullTrustProcessForCurrentAppAsync();
    }
}
在此程式碼中,我們會將使用者共用的影像儲存到應用程式本機存放區資料夾。 稍後會修改傳統型應用程式,以從相同的資料夾中提取影像。 傳統型應用程式可以執行此操作,因為與 UWP 應用程式位在相同套件中。
將桌面延伸模組新增至 UWP 專案
將 UWP 的 Windows 桌面延伸模組此延伸模組新增至 UWP 應用程式專案中。 您會看到一個以上的延伸模組版本 (例如 10.0.18362.0 和 10.0.19041.0)。 如需如何選擇版本的資訊,請參閱延伸模組 SDK,以及如何加以參考。

新增完全信任處理序延伸模組
在 [方案總管] 中,開啟解決方案中封裝專案的 package.appxmanifest 檔案,然後在您之前新增此檔案的共用目標延伸模組旁邊,新增完全信任的處理序延伸模組。
<Extensions>
  ...
      <desktop:Extension Category="windows.fullTrustProcess" Executable="PhotoStoreDemo\PhotoStoreDemo.exe" />
  ...
</Extensions>
透過此延伸模組,UWP 應用程式即可啟用您要共用檔案的傳統型應用程式。 在範例中,我們會參考 WPF PhotoStoreDemo 傳統型應用程式的可執行檔。
修改傳統型應用程式以取得共用檔案
修改您的傳統型應用程式以尋找並處理共用檔案。 在此範例中,UWP 應用程式會將共用檔案存放在本機應用程式資料夾中。 因此,我們會修改 WPF PhotoStoreDemo 傳統型應用程式,以從該資料夾提取相片。
Photos.Path = Windows.Storage.ApplicationData.Current.LocalFolder.Path;
在使用者已開啟傳統型應用程式執行個體的情況下,還要操作 FileSystemWatcher 事件,並將路徑傳遞到檔案位置。 因此,傳統型應用程式任何開啟的執行個體都會顯示共用相片。
...

   FileSystemWatcher watcher = new FileSystemWatcher(Photos.Path);

...

private void Watcher_Created(object sender, FileSystemEventArgs e)
{
    // new file got created, adding it to the list
    Dispatcher.BeginInvoke(System.Windows.Threading.DispatcherPriority.Normal, new Action(() =>
    {
        if (File.Exists(e.FullPath))
        {
            ImageFile item = new ImageFile(e.FullPath);
            Photos.Insert(0, item);
            PhotoListBox.SelectedIndex = 0;
            CurrentPhoto.Source = (BitmapSource)item.Image;
        }
    }));
}
建立背景工作
可新增背景工作,在應用程式暫停時也繼續執行程式碼。 背景工作很適合不需要使用者互動的小型工作。 例如,您的工作可以下載電子郵件、顯示收到聊天訊息的快顯通知,或回應系統條件的變更。
以下是註冊背景工作的 WPF 範例應用程式。
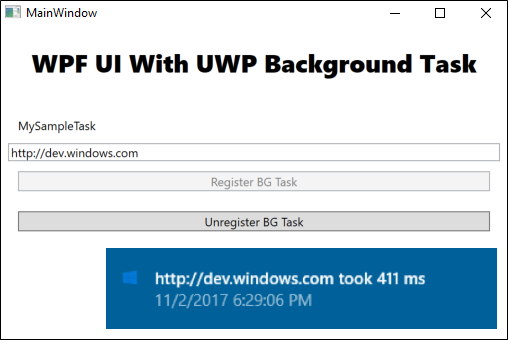
工作提供 http 要求,並測量傳回要求回應所需的時間。 您的工作可能會更有趣,但此範例非常適合學習背景工作的入門技巧。
您可以在這裡參閱完整範例。
設計模式
如何建立背景服務:
1️⃣ 實作背景工作
2️⃣ 設定背景工作
3️⃣ 登錄背景工作
實作背景工作
將程式碼新增至 Windows 執行階段元件專案,以實作背景工作。
public sealed class SiteVerifier : IBackgroundTask
{
    public async void Run(IBackgroundTaskInstance taskInstance)
    {

        taskInstance.Canceled += TaskInstance_Canceled;
        BackgroundTaskDeferral deferral = taskInstance.GetDeferral();
        var msg = await MeasureRequestTime();
        ShowToast(msg);
        deferral.Complete();
    }

    private async Task<string> MeasureRequestTime()
    {
        string msg;
        try
        {
            var url = ApplicationData.Current.LocalSettings.Values["UrlToVerify"] as string;
            var http = new HttpClient();
            Stopwatch clock = Stopwatch.StartNew();
            var response = await http.GetAsync(new Uri(url));
            response.EnsureSuccessStatusCode();
            var elapsed = clock.ElapsedMilliseconds;
            clock.Stop();
            msg = $"{url} took {elapsed.ToString()} ms";
        }
        catch (Exception ex)
        {
            msg = ex.Message;
        }
        return msg;
    }
設定背景工作
在資訊清單設計工具中,開啟解決方案中封裝專案的 package.appxmanifest 檔案。
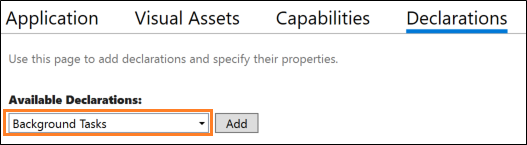
在 [宣告] 索引標籤中,新增 [背景工作] 宣告。
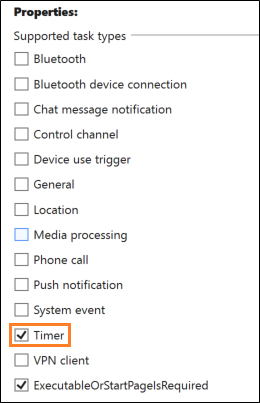
然後,選擇您需要的屬性。 此範例使用 Timer 屬性。
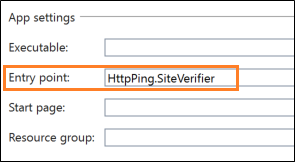
在實作背景工作的 Windows 執行階段元件中提供類別的完整名稱。
登錄背景工作
將程式碼新增至登錄背景工作的傳統型應用程式專案中。
public void RegisterBackgroundTask(String triggerName)
{
    var current = BackgroundTaskRegistration.AllTasks
        .Where(b => b.Value.Name == triggerName).FirstOrDefault().Value;

    if (current is null)
    {
        BackgroundTaskBuilder builder = new BackgroundTaskBuilder();
        builder.Name = triggerName;
        builder.SetTrigger(new MaintenanceTrigger(15, false));
        builder.TaskEntryPoint = "HttpPing.SiteVerifier";
        builder.Register();
        System.Diagnostics.Debug.WriteLine("BGTask registered:" + triggerName);
    }
    else
    {
        System.Diagnostics.Debug.WriteLine("Task already:" + triggerName);
    }
}
