本文將深入探討如何使用 InteractionTracker 的 SourceModifier 功能,並透過建立自訂的拉取刷新控制來示範其使用方法。
先決條件
在這裡,我們假設你已經熟悉這些文章中討論的概念:
什麼是 SourceModifier?它們為什麼有用?
像 慣性修正器一樣,SourceModifier 讓你能更細緻地控制互動追蹤器的動作。 但與 InertiaModifier 不同,InertiaModifier 在 InteractionTracker 進入慣性後定義動作,SourceModifier 是在 InteractionTracker 仍處於互動狀態時定義動作。 在這些情況下,你想要的體驗會和傳統的「黏在手指上」不同。
一個經典例子是拉取刷新體驗——當使用者拉出清單刷新內容時,列表以與手指相同的速度平移,並在一定距離後停止,動作會顯得突兀且機械化。 更自然的體驗是,在使用者積極與清單互動時,加入一種抗拒感。 這種細微差異讓整體用戶與清單互動的體驗更具動態性與吸引力。 在範例部分,我們更詳細說明如何建構這個系統。
來源修正有兩種類型:
- DeltaPosition – 指在觸控平移互動期間,手指當前影格位置與前一影格位置之間的差異。 這個源修飾符允許你在送出進一步處理前修改交互作用的 delta 位置。 這是一個 Vector3 類型的參數,開發者可以在傳給 InteractionTracker 之前,選擇修改該位置的 X、Y 或 Z 屬性。
- DeltaScale - 是當前影格縮放與前一個在觸控縮放互動中所應用的影格縮放之間的差異。 這個來源修改器允許你調整互動的縮放等級。 這是一個浮點型屬性,開發者可以在交給 InteractionTracker 前修改它。
當 InteractionTracker 處於互動狀態時,會評估分配給它的每個來源修飾符,並判斷是否有其適用。 這表示你可以為 InteractionTracker 建立並指派多個來源修飾符。 但在定義每一個時,你需要做以下幾點:
- 定義條件(Define the Condition)——一個表達式,定義該條件陳述何時應套用該特定來源修飾符。
- 定義 DeltaPosition/DeltaScale – 當上述定義條件達成時,會改變 DeltaPosition 或 DeltaScale 的來源修飾符表達式。
範例
現在讓我們看看如何透過 Source Modifiers 來實現自訂的下拉更新體驗,應用於現有的 WinUI XAML ListView 控制項。 我們將使用 Canvas 作為「刷新面板」,並疊加在 XAML ListView 之上,以打造這種體驗。
為了終端使用者體驗,我們希望創造「阻力」的效果,因為使用者會主動用觸控平移列表,位置超過某個點後停止平移。
這個體驗的工作程式碼可以在 GitHub 上的 Windows UI Dev Labs 倉庫找到。 以下是逐步打造這種體驗的步驟。 在你的 XAML 標記程式碼中,你會有以下內容:
<StackPanel Height="500" MaxHeight="500" x:Name="ContentPanel" HorizontalAlignment="Left" VerticalAlignment="Top" >
 <Canvas Width="400" Height="100" x:Name="RefreshPanel" >
<Image x:Name="FirstGear" Source="ms-appx:///Assets/Loading.png" Width="20" Height="20" Canvas.Left="200" Canvas.Top="70"/>
 </Canvas>
 <ListView x:Name="ThumbnailList"
 MaxWidth="400"
 Height="500"
ScrollViewer.VerticalScrollMode="Enabled" ScrollViewer.IsScrollInertiaEnabled="False" ScrollViewer.IsVerticalScrollChainingEnabled="True" >
 <ListView.ItemTemplate>
 ……
 </ListView.ItemTemplate>
 </ListView>
</StackPanel>
因為 ListView(ThumbnailList) 是已經在捲動的 XAML 控制項,當它到達最頂端且無法再捲動時,你需要將捲動連結到它的父項目(ContentPanel)。 (ContentPanel 是你套用來源修飾符的地方。)要做到這點,你需要在 ListView 標記中將 ScrollViewer.IsVerticalScrollChainingEnabled 設 為 true 。 你還需要將 VisualInteractionSource 的鏈結模式設為 「永遠」。
你需要將 PointerPressedEvent handler 的 handledEventsToo 參數設 為 true。 若無此選項,PointerPressedEvent 不會被串接到 ContentPanel,因為 ListView 控制項會將這些事件標記為已處理並阻止其向上傳遞。
//The PointerPressed handler needs to be added using AddHandler method with the //handledEventsToo boolean set to "true"
//instead of the XAML element's "PointerPressed=Window_PointerPressed",
//because the list view needs to chain PointerPressed handled events as well.
ContentPanel.AddHandler(PointerPressedEvent, new PointerEventHandler( Window_PointerPressed), true);
現在,你準備好把它和 InteractionTracker 綁定了。 首先設定 InteractionTracker、VisualInteractionSource 以及能利用 InteractionTracker 位置的表達式。
// InteractionTracker and VisualInteractionSource setup.
_root = ElementCompositionPreview.GetElementVisual(Root);
_compositor = _root.Compositor;
_tracker = InteractionTracker.Create(_compositor);
_interactionSource = VisualInteractionSource.Create(_root);
_interactionSource.PositionYSourceMode = InteractionSourceMode.EnabledWithInertia;
_interactionSource.PositionYChainingMode = InteractionChainingMode.Always;
_tracker.InteractionSources.Add(_interactionSource);
float refreshPanelHeight = (float)RefreshPanel.ActualHeight;
_tracker.MaxPosition = new Vector3((float)Root.ActualWidth, 0, 0);
_tracker.MinPosition = new Vector3(-(float)Root.ActualWidth, -refreshPanelHeight, 0);

// Use the Tacker's Position (negated) to apply to the Offset of the Image.
// The -{refreshPanelHeight} is to hide the refresh panel
m_positionExpression = _compositor.CreateExpressionAnimation($"-tracker.Position.Y - {refreshPanelHeight} ");
m_positionExpression.SetReferenceParameter("tracker", _tracker);
_contentPanelVisual.StartAnimation("Offset.Y", m_positionExpression);
透過這種設定,刷新面板會從視窗中移出起始位置,使用者看到的只有 listView。當移動到 ContentPanel,會觸發 PointerPressed 事件,你要求系統使用 InteractionTracker 來驅動操作體驗。
private void Window_PointerPressed(object sender, PointerRoutedEventArgs e)
{
if (e.Pointer.PointerDeviceType == Windows.Devices.Input.PointerDeviceType.Touch) {
 // Tell the system to use the gestures from this pointer point (if it can).
 _interactionSource.TryRedirectForManipulation(e.GetCurrentPoint(null));
 }
}
備註
如果不需要串接處理事件,可以透過屬性()PointerPressed="Window_PointerPressed"直接透過 XAML 標記來新增 PointerPressedEvent 處理器。
下一步是設定來源修飾符。 你會用兩個來源修飾符來達成這種行為; 抵抗 與 停止。
- 阻力 – 將 deltaPosition.Y 以減半速度移動,直到達到 RefreshPanel 的高度。
CompositionConditionalValue resistanceModifier = CompositionConditionalValue.Create (_compositor);
ExpressionAnimation resistanceCondition = _compositor.CreateExpressionAnimation(
 $"-tracker.Position.Y < {pullToRefreshDistance}");
resistanceCondition.SetReferenceParameter("tracker", _tracker);
ExpressionAnimation resistanceAlternateValue = _compositor.CreateExpressionAnimation(
 "source.DeltaPosition.Y / 3");
resistanceAlternateValue.SetReferenceParameter("source", _interactionSource);
resistanceModifier.Condition = resistanceCondition;
resistanceModifier.Value = resistanceAlternateValue;
- 停止——當整個刷新面板顯示在螢幕上後停止移動。
CompositionConditionalValue stoppingModifier = CompositionConditionalValue.Create (_compositor);
ExpressionAnimation stoppingCondition = _compositor.CreateExpressionAnimation(
 $"-tracker.Position.Y >= {pullToRefreshDistance}");
stoppingCondition.SetReferenceParameter("tracker", _tracker);
ExpressionAnimation stoppingAlternateValue = _compositor.CreateExpressionAnimation("0");
stoppingModifier.Condition = stoppingCondition;
stoppingModifier.Value = stoppingAlternateValue;
Now add the 2 source modifiers to the InteractionTracker.
List<CompositionConditionalValue> modifierList = new List<CompositionConditionalValue>()
{ resistanceModifier, stoppingModifier };
_interactionSource.ConfigureDeltaPositionYModifiers(modifierList);
這張圖提供了 SourceModifiers 設定的視覺化。
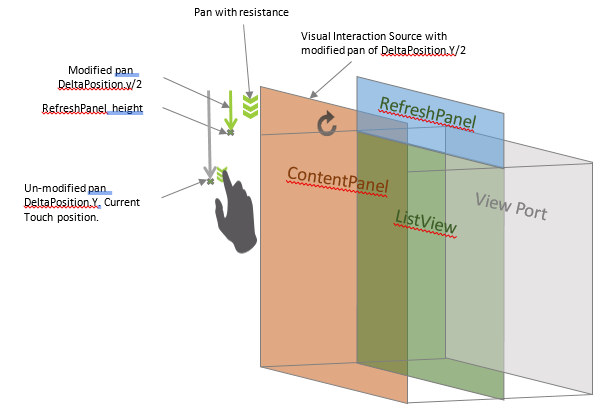
現在用 SourceModifier,你會注意到當 ListView 向下平移並移動到最頂端的項目時,刷新面板會以平移速度的一半往下拉,直到達到 RefreshPanel 高度後才停止移動。
在完整範例中,關鍵影格動畫用於在 RefreshPanel 畫布互動時旋轉圖示。 任何內容都可以用來替代,或者利用 InteractionTracker 的位置獨立地驅動動畫。
