在這個快速入門中,你將建立一個桌面Windows應用程式,使用 Windows 應用程式 SDK 來發送和接收推播通知。
Prerequisites
- 開始開發Windows應用程式
- 要嘛是 建立一個新專案,使用 Windows 應用程式 SDK,要嘛是 在現有專案中使用Windows 應用程式 SDK
- 使用 Windows 應用程式 SDK 推播通知需要 Azure 帳號。
- 閱讀 推播通知概觀
包裝要求
Windows 應用程式 SDK 中的推播通知支援已打包與真正未打包的桌面應用程式。 然而,套件識別是對背景傳送與COM啟動必要的 ——這是最常見的應用情境。 下表總結了根據您的包裝模型所需的事項:
| 包裝模型 | 需要 COM 啟動器 | 需要 PFN 映射 | 未封裝支援 |
|---|---|---|---|
| MSIX 封裝(WinUI 3,封裝 WPF/WinForms) | 是的——在 Package.appxmanifest |
是的——透過PFN映射電子郵件 | No |
| 打包於外部位置 | 是的——在 Package.appxmanifest |
是的——透過PFN映射電子郵件 | No |
| 真正無包裝 (沒有包裝身份) | 沒有(跳過步驟3) | No | 是的——功能有限 |
Important
如果你的應用程式是打包(MSIX 或與外部位置打包),你必須將應用程式的
範例應用程式
這份快速入門指南將教你如何在 Windows 應用程式 SDK 1.7 上為你的應用程式新增推播通知支援。 在 GitHub 上的範例應用程式中,可以參考類似的快速入門程式碼。 務必查看包含你偏好的 Windows 應用程式 SDK 版本的 分支,以尋找最適合你專案的範例。
你也可以透過選擇範例庫中的版本分支,找到每個Windows 應用程式 SDK版本的範例。
API 參考資料
關於推播通知的 API 參考文件,請參見 Microsoft.Windows。PushNotifications 命名空間。
在 Microsoft Entra ID 中設定你的應用程式身份
Windows 應用程式 SDK 中的推播通知使用來自 Microsoft Entra ID(前稱 Azure Active Directory)的識別。 請求 WNS 通道 URI 以及請求存取權杖以發送推送通知時,必須使用 Azure 憑證。 注意:我們不支援將 Windows 應用程式 SDK 的推播通知與 Microsoft Partner Center 一起使用。
步驟 1:建立應用程式註冊
登入你的 Azure 帳號並建立一個新的應用程式註冊資源。 選取新增註冊。
步驟 2:提供名稱並選取多租用戶選項
提供應用程式名稱。
推播通知需要多租用戶選項,因此請選取該選項。
- 如需瞭解關於租戶的更多資訊,請參閱 誰可以登入您的應用程式?。
選取 註冊
請注意您的Application(用戶端)ID,因為這是您在啟動註冊及存取權杖申請時會使用的Azure AppId。
請注意您的 Directory(租戶)ID,因為這是您在申請存取權杖時會使用的 Azure TenantId。
Important
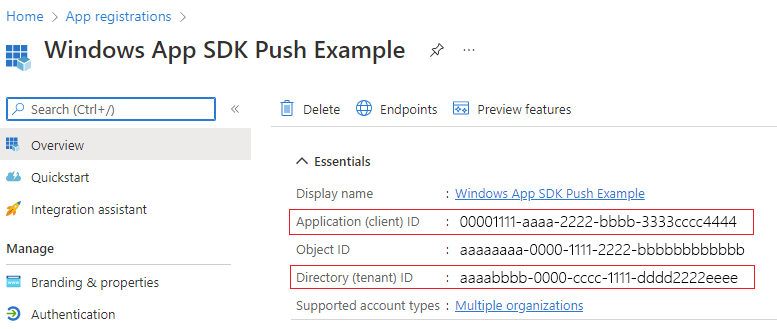 請注意您的 應用程式(客戶)ID 與 目錄(租戶)ID。
請注意你的
Object ID ,因為這是你在提出通道請求時會使用的Azure ObjectId 。 請注意,這不是在 [基本資訊 ] 頁面上列出的物件標識符。 相反地,若要尋找正確的 對象標識符,請在 [Essentials] 頁面的 [Managed 應用程式] 的 [本機目錄] 欄位中,點擊應用程式名稱:![顯示在 [基本資訊] 頁面上的 [本機目錄中的管理應用程式] 選項的螢幕截圖](images/push-notification-essentials-ui.png)
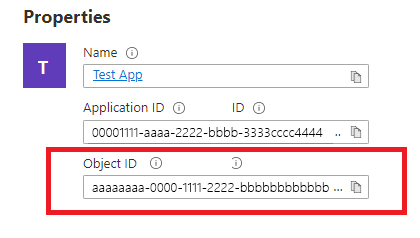
Note
要取得物件 ID,需要一個service principal。如果您的應用程式沒有相關的 service principal,請依照以下文章中的步驟,在 Azure 入口網站或使用命令列建立一個。
步驟 3:為您的應用程式註冊建立秘密
當您請求存取權杖以發送推播通知時,您的機密將與 Azure AppId/ClientId 一同使用。

流覽至 [憑證和秘密] ,然後選取 [ 新增客戶端密碼]。
Important
確保你在建立秘密後複製並存到安全的地方,例如 Azure Key Vault。 建立之後,它只能檢視一次。
步驟 4:將你的應用程式的套件族名對應到 Azure AppID
如果你的應用程式已經打包(包括有外部位置打包),你可以利用這個流程來映射應用程式的套件族名(PFN)和 Azure AppId。
如果你的應用程式是封裝的 Win32 應用程式,請透過電子郵件寄信至 Win_App_SDK_Push@microsoft.com,以「Windows 應用程式 SDK 推播通知映射請求」為主旨,信件內容需包括「PFN:[your PFN]」、AppId:[your APPId]、ObjectId:[your ObjectId],以建立套件族名(PFN)映射請求。 每周會完成映射請求。 當您的對應要求完成後,您將收到通知。
當你擁有 Azure AppId、ObjectID 和秘密後,就可以將這些憑證加入下面的範例程式碼中。
設定您的應用程式以接收推播通知
步驟 1:新增 Windows 應用程式 SDK 及必要的 NuGet 套件
接著,在方案總管中右鍵點擊解決方案,選擇 Manage NuGet Packages。
在 封裝管理員 中,新增以下套件:
- Microsoft。WindowsAppSDK(最低版本 1.1.0)
- Microsoft。Windows。SDK。BuildTools(最低版本 10.0.22000.194)
- Microsoft。Windows。CppWinRT,(最低版本 2.0.210930.14)
- Microsoft。Windows。ImplementationLibrary,(最低版本 1.0.210930.1)
如果你是第一次在專案中使用 Windows 應用程式 SDK,且它是以外部位置封裝或未封裝,請透過在專案檔案中加入以下屬性來初始化 Windows 應用程式 SDK:
<!-- your .vcxproj or .proj file -->
<PropertyGroup Label="Globals">
    <!-- Other properties -->
    <WindowsPackageType>None</WindowsPackageType>
</PropertyGroup>
或使用引導程序 API。 詳情請參見 使用 Windows 應用程式 SDK 執行階段來處理外部位置封裝或未封裝的應用程式 相關說明。
Note
如果 SDK 未初始化,應用程式將會擲回 System.Runtime.InteropServices.COMException (0x80040154): Class not registered (0x80040154 (REGDB_E_CLASSNOTREG)) 且不會執行。
步驟 2:新增命名空間
接著,新增Windows 應用程式 SDK推播通知的命名空間Microsoft.Windows.PushNotifications。
#include <winrt/Microsoft.Windows.PushNotifications.h>

using namespace winrt::Microsoft::Windows::PushNotifications;
如果你收到「找不到 Microsoft.Windows.PushNotifications」的錯誤,這很可能表示標頭檔案尚未產生。 若要解決此問題,請確定您已安裝上述套件、註解掉導致錯誤的 include 和 using 陳述式,然後重建應用程式以產生標頭檔。 建置成功之後,請將 include 和 using 陳述式取消註解,然後重新建置專案。 這應該可以解決錯誤。
步驟 3:將 COM 啟用器新增至應用程式的資訊清單
Important
如果您的應用程式未封裝 (也就是在執行階段缺少套件身分識別),請跳至 步驟 4:在應用程式啟動時註冊並回應推播通知。
如果您的應用程式已封裝(包括使用外部位置進行封裝):請開啟您的 Package.appxmanifest。 在 <Application> 元素內新增下列內容。 將 Id、Executable和 DisplayName 的值替換為適合您的應用程式的特定值。
<!--Packaged apps only-->
<!--package.appxmanifest-->

<Package
  ...
  xmlns:com="http://schemas.microsoft.com/appx/manifest/com/windows10"
  ...
  <Applications>
    <Application>
      ...
      <Extensions>

        <!--Register COM activator-->
        <com:Extension Category="windows.comServer">
          <com:ComServer>
              <com:ExeServer Executable="SampleApp\SampleApp.exe" DisplayName="SampleApp" Arguments="----WindowsAppRuntimePushServer:">
                <com:Class Id="[Your app's Azure AppId]" DisplayName="Windows App SDK Push" />
            </com:ExeServer>
          </com:ComServer>
        </com:Extension>

      </Extensions>
    </Application>
  </Applications>
 </Package>
Note
<com:Class> 中的 Id 屬性必須設為您的 Azure AppId(也就是您在 Microsoft Entra ID 應用程式註冊中的應用程式(用戶端)ID)。 這就是 Windows 應用程式 SDK 將你應用程式的 COM 啟用與其 Azure 身份連結的方式——當 WNS 啟動你的應用程式以發送背景推播通知時,它會利用這個 GUID 定位並啟動正確的 COM 伺服器。 使用你在第一步提到的 Azure AppID 值。
Note
您可以在 步驟 5 之後找到此範例已完成的 C++ 類別範例。 步驟 4 和 5 提供了在最終範例中新增每個部分的逐步指導。
步驟 4:註冊並回應應用程式啟動時的推播通知
更新您的應用程式的 main() 方法,以添加以下內容:
- 呼叫 PushNotificationManager::Default().Register()註冊您的應用程式以接收推送通知。
- 呼叫 AppInstance::GetCurrent()來檢查啟用要求的來源。GetActivatedEventArgs(). 如果推播通知觸發了啟用,請根據通知的有效載荷進行回應。
Important
您必須在呼叫 AppInstance.GetCurrent.GetActivatedEventArgs之前,先呼叫 PushNotificationManager::Default().Register。
新增前景事件處理常式
若要在前景中處理事件,請註冊 PushNotificationManager.PushReceived 的處理常式。
Important
您也必須先註冊任何 PushNotificationManager.PushReceived 事件處理常式,才能呼叫 PushNotificationManager.Register()。 否則,將會拋出下列執行階段例外狀況:
System.Runtime.InteropServices.COMException: Element not found. Must register event handlers before calling Register().
新增 PushNotificationManager::IsSupported() 檢查
接下來,使用 PushNotificationManager.IsSupported() 檢查是否支援 PushNotification API。 如果沒有,建議您使用輪詢或您自己的自訂通訊端實作。
現在已確認推播通知支援,請根據 PushNotificationReceivedEventArgs 新增行為。
步驟 5:要求 WNS 通道 URI 並向 WNS 伺服器註冊
WNS 通道 URI 是用來傳送推播通知的 HTTP 端點。 每個客戶端都必須要求通道 URI,並向 WNS 伺服器註冊以接收推播通知。
Note
WNS 通道 URI 會在 30 天后到期。 每次應用程式啟動時申請新的頻道 URI ,而不是快取之前的頻道。 當新的 URI 與你的後端儲存不同時,將更新後的 URI 傳送到你的雲端服務,讓它保持紀錄的更新。 不要假設 URI 會在會話間保持穩定——將其視為會話範疇內的可變值,以避免因通道的 URI 過期或失效而導致的靜默遞送失敗。
auto channelOperation{ PushNotificationManager::Default().CreateChannelAsync(winrt::guid("[Your app's Azure ObjectID]")) };
如果你有按照教學程式碼操作,請在這裡加入你的 Azure 物件 ID:
// To obtain an Entra ID RemoteIdentifier for your app,
// follow the instructions on https://learn.microsoft.com/entra/identity-platform/quickstart-register-app
winrt::guid remoteId{ "00000000-0000-0000-0000-000000000000" }; // Replace this with your own Azure ObjectId
PushNotificationManager 會嘗試建立通道 URI,且重試時間不超過 15 分鐘。 建立事件處理程式以等候呼叫完成。 呼叫完成後,如果成功,請向WNS 伺服器註冊 URI。
範例程式碼
#include <iostream>
#include <winrt/Microsoft.Windows.PushNotifications.h>
#include <winrt/Windows.Foundation.h>
#include <winrt/Microsoft.Windows.AppLifecycle.h>
#include <winrt/Windows.ApplicationModel.Background.h>
#include <wil/cppwinrt.h>
#include <wil/result.h>

using namespace winrt::Microsoft::Windows::PushNotifications;
using namespace winrt::Windows::Foundation;
using namespace winrt::Microsoft::Windows::AppLifecycle;

// To obtain an Entra ID RemoteIdentifier for your app,
// follow the instructions on https://learn.microsoft.com/entra/identity-platform/quickstart-register-app
winrt::guid remoteId{ "00000000-0000-0000-0000-000000000000" }; // Replace this with your own Azure ObjectId

winrt::Windows::Foundation::IAsyncOperation<PushNotificationChannel> RequestChannelAsync()
{
    auto channelOperation = PushNotificationManager::Default().CreateChannelAsync(remoteId);

    // Set up the in-progress event handler
    channelOperation.Progress(
        [](auto&& sender, auto&& args)
        {
            if (args.status == PushNotificationChannelStatus::InProgress)
            {
                // This is basically a noop since it isn't really an error state
                std::cout << "Channel request is in progress." << std::endl << std::endl;
            }
            else if (args.status == PushNotificationChannelStatus::InProgressRetry)
            {
                LOG_HR_MSG(
                    args.extendedError,
                    "The channel request is in back-off retry mode because of a retryable error! Expect delays in acquiring it. RetryCount = %d",
                    args.retryCount);
            }
        });

    auto result = co_await channelOperation;

    if (result.Status() == PushNotificationChannelStatus::CompletedSuccess)
    {
        auto channelUri = result.Channel().Uri();

        std::cout << "channelUri: " << winrt::to_string(channelUri.ToString()) << std::endl << std::endl;

        auto channelExpiry = result.Channel().ExpirationTime();

        // Caller's responsibility to keep the channel alive
        co_return result.Channel();
    }
    else if (result.Status() == PushNotificationChannelStatus::CompletedFailure)
    {
        LOG_HR_MSG(result.ExtendedError(), "We hit a critical non-retryable error with channel request!");
        co_return nullptr;
    }
    else
    {
        LOG_HR_MSG(result.ExtendedError(), "Some other failure occurred.");
        co_return nullptr;
    }

};

PushNotificationChannel RequestChannel()
{
    auto task = RequestChannelAsync();
    if (task.wait_for(std::chrono::seconds(300)) != AsyncStatus::Completed)
    {
        task.Cancel();
        return nullptr;
    }

    auto result = task.GetResults();
    return result;
}

void SubscribeForegroundEventHandler()
{
    winrt::event_token token{ PushNotificationManager::Default().PushReceived([](auto const&, PushNotificationReceivedEventArgs const& args)
    {
        auto payload{ args.Payload() };

        std::string payloadString(payload.begin(), payload.end());
        std::cout << "\nPush notification content received in the FOREGROUND: " << payloadString << std::endl;
    }) };

    std::cout << "Push notification foreground event handler registered." << std::endl;
}

int main()
{
    // Set up an event handler, so we can receive notifications in the foreground while the app is running.
    // You must register notification event handlers before calling Register(). Otherwise, the following runtime
    // exception will be thrown: System.Runtime.InteropServices.COMException: 'Element not found. Must register
    // event handlers before calling Register().'
    SubscribeForegroundEventHandler();

    // Register the app for push notifications.
    PushNotificationManager::Default().Register();

    auto args{ AppInstance::GetCurrent().GetActivatedEventArgs() };
    switch (args.Kind())
    {
        case ExtendedActivationKind::Launch:
        {
            std::cout << "App launched by user or from the debugger." << std::endl;
            if (PushNotificationManager::IsSupported())
            {
                std::cout << "Push notifications are supported on this device." << std::endl;

                // Request a WNS Channel URI which can be passed off to an external app to send notifications to.
                // The WNS Channel URI uniquely identifies this app for this user and device.
                PushNotificationChannel channel{ RequestChannel() };
                if (!channel)
                {
                    std::cout << "\nThere was an error obtaining the WNS Channel URI" << std::endl;

                    if (remoteId == winrt::guid{ "00000000-0000-0000-0000-000000000000" })
                    {
                        std::cout << "\nThe ObjectID has not been set. Refer to the readme file accompanying this sample\nfor the instructions on how to obtain and setup an ObjectID" << std::endl;
                    }
                }

                std::cout << "\nPress 'Enter' at any time to exit App." << std::endl;
                std::cin.ignore();
            }
            else
            {
                std::cout << "Push notifications are NOT supported on this device." << std::endl;
                std::cout << "App implements its own custom socket here to receive messages from the cloud since Push APIs are unsupported." << std::endl;
                std::cin.ignore();
            }
        }
        break;

        case ExtendedActivationKind::Push:
        {
            std::cout << "App activated via push notification." << std::endl;
            PushNotificationReceivedEventArgs pushArgs{ args.Data().as<PushNotificationReceivedEventArgs>() };

            // Call GetDeferral to ensure that code runs in low power
            auto deferral{ pushArgs.GetDeferral() };

            auto payload{ pushArgs.Payload() };

            // Do stuff to process the raw notification payload
            std::string payloadString(payload.begin(), payload.end());
            std::cout << "\nPush notification content received in the BACKGROUND: " << payloadString.c_str() << std::endl;
            std::cout << "\nPress 'Enter' to exit the App." << std::endl;

            // Call Complete on the deferral when finished processing the payload.
            // This removes the override that kept the app running even when the system was in a low power mode.

            deferral.Complete();
            std::cin.ignore();
        }
        break;

        default:
            std::cout << "\nUnexpected activation type" << std::endl;
            std::cout << "\nPress 'Enter' to exit the App." << std::endl;
            std::cin.ignore();
            break;
    }
}
步驟 6:建置和安裝應用程式
使用 Visual Studio 來建置並安裝你的應用程式。 在方案總管中右鍵點擊解決方案檔案,選擇 Deploy。 Visual Studio 會幫你建置應用程式並安裝到你的電腦上。 你可以透過開始功能表啟動應用程式,或使用 Visual Studio 除錯器啟動。
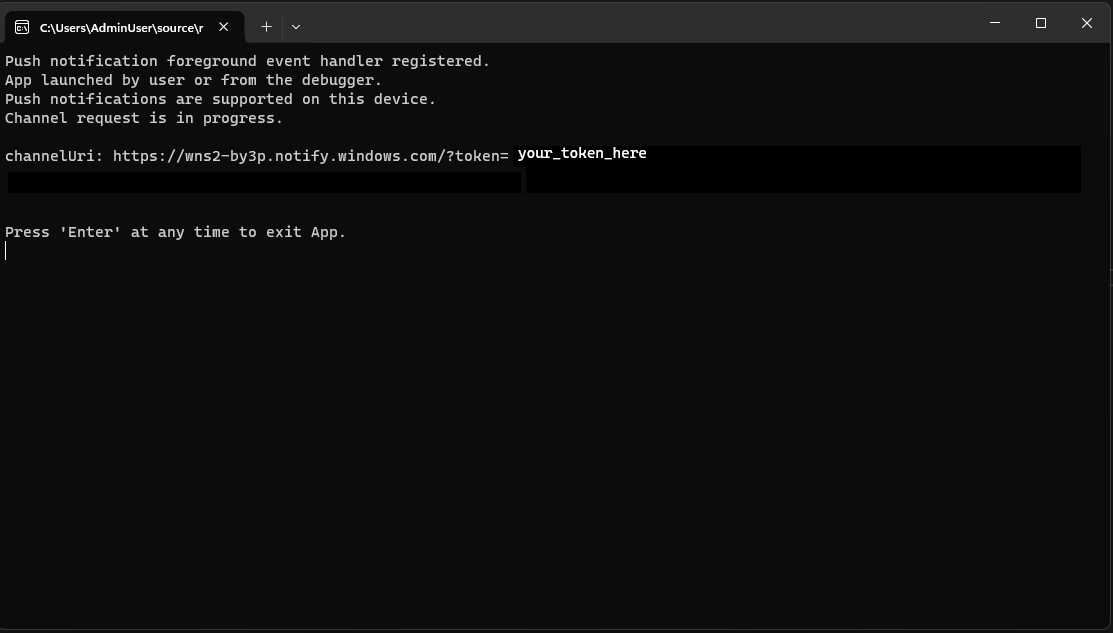
教學課程程式碼的主控台將如下所示:
您需要權杖才能 將推播通知傳送至您的應用程式。
將推播通知傳送至您的應用程式
此時,所有設定都已完成,且 WNS 伺服器可以將推播通知傳送至用戶端應用程式。 在下列步驟中,您可以參考 推播通知伺服器要求和響應標頭 以取得更多詳細資訊。
步驟 1:要求存取令牌
若要傳送推播通知,WNS 伺服器必須先要求存取令牌。 發送一個包含 Azure TenantId、Azure AppID 和 secret 的 HTTP POST 請求。 若要了解如何取得 Azure 租戶 ID 和應用程式 ID 的資訊,請參閱取得登入所需的租戶和應用程式 ID 值。
HTTP 範例要求:
POST /{tenantID}/oauth2/v2.0/token Http/1.1
Host: login.microsoftonline.com
Content-Type: application/x-www-form-urlencoded
Content-Length: 160

grant_type=client_credentials&client_id=<Azure_App_Registration_AppId_Here>&client_secret=<Azure_App_Registration_Secret_Here>&scope=https://wns.windows.com/.default/
C# 範例要求:
//Sample C# Access token request
var client = new RestClient("https://login.microsoftonline.com/{tenantID}/oauth2/v2.0");
var request = new RestRequest("/token", Method.Post);
request.AddHeader("Content-Type", "application/x-www-form-urlencoded");
request.AddParameter("grant_type", "client_credentials");
request.AddParameter("client_id", "[Your app's Azure AppId]");
request.AddParameter("client_secret", "[Your app's secret]");
request.AddParameter("scope", "https://wns.windows.com/.default");
RestResponse response = await client.ExecutePostAsync(request);
Console.WriteLine(response.Content);
如果您的要求成功,您會收到一個回應,其中的令牌會位於 [access_token] 欄位中。
{
    "token_type":"Bearer",
    "expires_in":"86399",
    "ext_expires_in":"86399",
    "expires_on":"1653771789",
    "not_before":"1653685089",
    "access_token":"[your access token]"
}
步驟 2. 傳送原始通知
建立 HTTP POST 要求,其中包含您在上一個步驟中取得的存取令牌,以及您想要傳送的推播通知內容。 推播通知的內容將會傳遞至應用程式。
POST /?token=[The token query string parameter from your channel URL. E.g. AwYAAABa5cJ3...] HTTP/1.1
Host: dm3p.notify.windows.com
Content-Type: application/octet-stream
X-WNS-Type: wns/raw
Authorization: Bearer [your access token]
Content-Length: 46

{ Sync: "Hello from the Contoso App Service" }
var client = new RestClient("[Your channel URL. E.g. https://wns2-by3p.notify.windows.com/?token=AwYAAABa5cJ3...]");
var request = new RestRequest();
request.Method = Method.Post;
request.AddHeader("Content-Type", "application/octet-stream");
request.AddHeader("X-WNS-Type", "wns/raw");
request.AddHeader("Authorization", "Bearer [your access token]");
request.AddBody("Notification body");
RestResponse response = await client.ExecutePostAsync(request);");
步驟 3:傳送雲端來源應用程式通知
如果您只想要傳送原始通知,請忽略此步驟。 要發送來自雲端的應用程式通知,也稱為推播通知,請先依照 快速入門: 應用程式通知在 Windows 應用程式 SDK 操作。 應用程式通知可以是推播(從雲端傳送)或從本機傳送。 傳送雲端來源應用程式通知與在步驟 2 中傳送原始通知類似,不過 X-WNS-Type 標頭為 toast,內容類型 為 text/xml,並且內容包含應用程式通知的 XML 承載。 如需如何建構 XML 承載的詳細資訊,請參閱 通知 XML 架構 。
建立 HTTP POST 要求,其中包含您的存取令牌,以及您想要傳送之雲端來源應用程式通知的內容。 推播通知的內容將會傳遞至應用程式。
POST /?token=AwYAAAB%2fQAhYEiAESPobjHzQcwGCTjHu%2f%2fP3CCNDcyfyvgbK5xD3kztniW%2bjba1b3aSSun58SA326GMxuzZooJYwtpgzL9AusPDES2alyQ8CHvW94cO5VuxxLDVzrSzdO1ZVgm%2bNSB9BAzOASvHqkMHQhsDy HTTP/1.1
Host: dm3p.notify.windows.com
Content-Type: text/xml
X-WNS-Type: wns/toast
Authorization: Bearer [your access token]
Content-Length: 180

<toast><visual><binding template="ToastGeneric"><text>Example cloud toast notification</text><text>This is an example cloud notification using XML</text></binding></visual></toast>
var client = new RestClient("https://dm3p.notify.windows.com/?token=AwYAAAB%2fQAhYEiAESPobjHzQcwGCTjHu%2f%2fP3CCNDcyfyvgbK5xD3kztniW%2bjba1b3aSSun58SA326GMxuzZooJYwtpgzL9AusPDES2alyQ8CHvW94cO5VuxxLDVzrSzdO1ZVgm%2bNSB9BAzOASvHqkMHQhsDy");
client.Timeout = -1;

var request = new RestRequest(Method.POST);
request.AddHeader("Content-Type", "text/xml");
request.AddHeader("X-WNS-Type", "wns/toast");
request.AddHeader("Authorization", "Bearer <AccessToken>");
request.AddParameter("text/xml", "<toast><visual><binding template=\"ToastGeneric\"><text>Example cloud toast notification</text><text>This is an example cloud notification using XML</text></binding></visual></toast>",  ParameterType.RequestBody);
Console.WriteLine(response.Content);
