安裝了「連結到 Windows」套件的 Android 行動裝置可以透過程式設計方式共享 Android 應用程式中最近的任務,以便在 Windows PC 上繼續執行(例如網站 URL、文件連結、音樂曲目等)。
跨裝置工作連續性正在進化中,利用 Continuity SDK 提供與 Windows 工作列更深入的原生整合,以自然且直覺的方式更好地為客戶提供服務。 雖然 Phone Link 工作持續性應用程式的原始實作仍然受到支援,但針對新的實作,我們建議您在 Continuity SDK 中使用跨裝置繼續(XDR),以便整合至 Windows 工作列。 深入瞭解:使用 Continuity SDK 的跨裝置繼續 (XDR) (Android 和 Windows 應用程式)。
Continuity SDK 透過顯示工作接續圖示的跨裝置繼續 (XDR) 提供更順暢的跨裝置體驗,以協助您直接從 Windows 工作列繼續最近的 Android 裝置工作 (不需要依賴 Phone Link 應用程式介面)。
如何將 Android 應用程式與 Phone Link 工作連續性整合
瞭解如何以程式設計方式將 Android 應用程式最近的工作 (例如網站 URL、文件連結、音樂曲目等) 共用到已 設定 Phone Link 的 Windows 電腦。 此功能僅適用於 Phone Link 體驗的支援裝置。
案例需求
您的 Android 應用程式必須符合下列條件,才能存取「連結至 Windows」工作連續性:
- 請同步有效的網頁 URL,使 Windows PC 可以訪問
- DO 同步雲文檔鏈接以供 Windows PC 訪問
- 務必將本機文件連結同步至 Windows PC,以便可以通過您的應用程式從行動裝置存取。
- 每分鐘請勿同步處理超過 60 次
- 如果使用者未與您的應用程式體驗互動,請勿同步處理內容
電話連結和跨裝置繼續功能
電話連結會在「最近使用」和「最近瀏覽的網站」下的「應用程式」節點中,以及彈出通知中顯示您同步的內容。
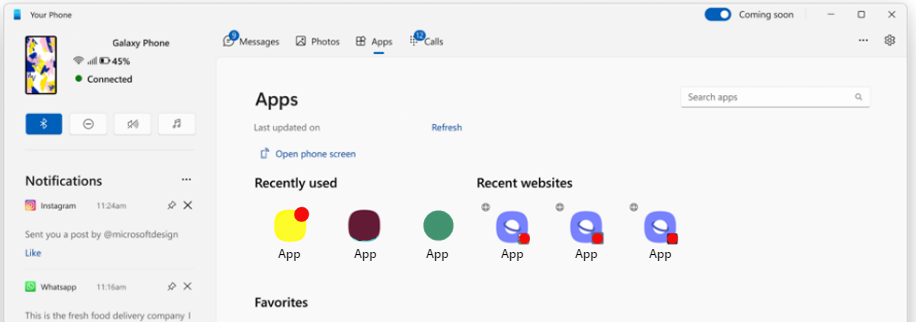
使用 Continuity SDK(Android 和 Windows 應用程式)的跨裝置續播(XDR)會在 Windows 工作列上顯示已同步的內容。

限制存取功能 (LAF) 核准
Phone Link任務連續性是一項受限訪問功能(LAF)。 要獲得訪問權限,您需要獲得 Microsoft 的批准才能與 Android 移動設備上預裝的“鏈接到 Windows”包進行互操作。
若要要求存取權,請傳送電子郵件 wincrossdeviceapi@microsoft.com 並附上下列資訊。
- 使用者體驗的描述
- 使用者原生存取 Web 或文件之應用程式的螢幕擷取畫面
- 應用程式的 PackageId
- 您應用程式的 Google Play 商店連結
如果已核准要求,您將會收到如何解除鎖定功能的指示。 核准將基於您的溝通,前提是您的案例需求滿足上述案例要求。
資料處理
藉由使用 Phone Link 工作連續性,Microsoft 將根據 Microsoft 服務合約 和 Microsoft 隱私權聲明來處理和傳輸您的資料。 傳送至使用者連結裝置的資料,可透過 Microsoft 的雲端服務進行處理,以確保裝置之間的可靠資料傳輸。 最終使用者控制的 Microsoft 雲端服務,不會保留此 API 處理的資料。
您將整合在應用程式套件中的持續性 SDK 可確保提供給 API 的資料只會由受信任的 Microsoft 套件處理。
Phone Link 整合程式碼範例
以下是整合的一般準則和程式碼範例。 如需詳細的整合指引,請參閱 SDK 的 Kotlin 文件。
Android 應用程式資訊清單宣告
應用程式資訊清單是一個 XML 檔案,可作為 Android 應用程式的藍圖。 宣告檔案會向作業系統提供應用程式結構、元件、權限等相關資訊。需要下列宣告才能使用「連結至 Windows」進行工作連續性。
功能中繼資料
合作夥伴應用程式必須先在應用程式資訊清單中註冊中繼資料。
若要參與應用程式內容合約,必須針對支援的應用程式內容類型宣告中繼資料。 例如,若要新增應用程式內容提供者中繼資料,以取得 應用程式遞交 功能:
<application...>
<meta-data
android:name="com.microsoft.crossdevice.applicationContextProvider"
android:value="true" />
</application>
如果您的應用程式支援多種類型的應用程式內容,則必須新增每種類型的中繼資料。 目前支援的中繼資料類型包括:
<meta-data
android:name="com.microsoft.crossdevice.browserContextProvider"
android:value="true" />

<meta-data
android:name="com.microsoft.crossdevice.applicationContextProvider"
android:value="true" />

<meta-data
android:name="com.microsoft.crossdevice.resumeActivityProvider
android:value="true" />
若要新增類型,中繼資料名稱格式應該是 “com.microsoft.crossdevice.xxxProvider”。
應用程式也必須在資訊清單中宣告觸發類型的中繼資料。 這些聲明可協助系統決定應用程式應如何以及何時通知 Load-Time Weaving (LTW) 某些功能處於活動狀態。
對於自我通知觸發程序,其中應用程式本身負責通知系統,並在所有裝置上啟用,無論原始設備製造商 (OEM) 為何,觸發程序類型都應宣告為:
<application ...
<meta-data
android:name="com.microsoft.crossdevice.trigger.PartnerApp"
android:value="the sum value of all features' binary codes" />

</application>
對於系統 API 觸發程序,其中應用程式依賴系統 API 來觸發「連結至 Windows」功能,僅在特定 OEM 裝置上啟用,觸發程序類型應該宣告為:
<application ...
<meta-data
android:name="com.microsoft.crossdevice.trigger.SystemApi"
android:value="the sum value of all features' binary codes" />

</application>
這些功能的二進位代碼現在是:
APPLICATION_CONTEXT: 1
BROWSER_HISTORY:     2
RESUME_ACTIVITY:     4
應用程式資訊清單註冊可能如下所示:
<?xml version="1.0" encoding="utf-8"?>
<manifest xmlns:android="http://schemas.android.com/apk/res/android"

    <application …

       <!--
           This is the meta-data represents this app supports XDR, LTW will check
           the package before we request app context.
       -->
       <meta-data
                android:name="com.microsoft.crossdevice.resumeActivityProvider"
                android:value="true" />

             <!--
           This is the meta-data represents this app supports trigger from app, the
           Value is the code of XDR feature, LTW will check if the app support partner
           app trigger when receiving trigger broadcast.
           -->
       <meta-data
                android:name="com.microsoft.crossdevice.trigger.PartnerApp"
                android:value="4" />

    </application>
</manifest>
傳送應用程式內容的程式碼範例
新增應用程式資訊清單宣告之後,「連結至 Windows」的合作夥伴應用程式將需要:
判斷適當的時間來呼叫 Continuity SDK 的 Initialize 和 DeInitialize 函式 。 呼叫 Initialize 函式之後,應該會觸發
IAppContextEventHandler所整合的回呼。初始化 Continuity SDK 之後,若呼叫
onContextRequestReceived(),則表示連接已建立。 然後,該應用程序可以 發送AppContext(包括創建和更新)到 LTW 或從 LTW 中 刪除AppContext。
請務必避免在 中 AppContext傳送任何敏感資料,例如存取權杖。 此外,如果生命週期設定得太短,則 AppContext 可能會在傳送至 PC 之前過期。 建議將最小生命週期設定為至少 5 分鐘。
class MainActivity : AppCompatActivity() {

    private val appContextResponse = object : IAppContextResponse {
        override fun onContextResponseSuccess(response: AppContext) {
            Log.d("MainActivity", "onContextResponseSuccess")
            runOnUiThread {
                Toast.makeText(
                    this@MainActivity,
                    "Context response success: ${response.contextId}",
                    Toast.LENGTH_SHORT
                ).show()
            }
        }

        override fun onContextResponseError(response: AppContext, throwable: Throwable) {
            Log.d("MainActivity", "onContextResponseError: ${throwable.message}")
            runOnUiThread {
                Toast.makeText(
                    this@MainActivity,
                    "Context response error: ${throwable.message}",
                    Toast.LENGTH_SHORT
                ).show()
            }
        }
    }

    private lateinit var appContextEventHandler: IAppContextEventHandler

    private val _currentAppContext = MutableLiveData<AppContext?>()
    private val currentAppContext: LiveData<AppContext?> get() = _currentAppContext


    override fun onCreate(savedInstanceState: Bundle?) {
        super.onCreate(savedInstanceState)
        enableEdgeToEdge()
        setContentView(R.layout.activity_main)
        ViewCompat.setOnApplyWindowInsetsListener(findViewById(R.id.main)) { v, insets ->
            val systemBars = insets.getInsets(WindowInsetsCompat.Type.systemBars())
            v.setPadding(systemBars.left, systemBars.top, systemBars.right, systemBars.bottom)
            insets
        }
        LogUtils.setDebugMode(true)
        var ready = false
        val buttonSend: Button = findViewById(R.id.buttonSend)
        val buttonDelete: Button = findViewById(R.id.buttonDelete)
        val buttonUpdate: Button = findViewById(R.id.buttonUpdate)
        setButtonDisabled(buttonSend)
        setButtonDisabled(buttonDelete)
        setButtonDisabled(buttonUpdate)
        buttonSend.setOnClickListener {
            if (ready) {
                sendAppContext()
            }
        }
        buttonDelete.setOnClickListener {
            if (ready) {
                deleteAppContext()
            }
        }
        buttonUpdate.setOnClickListener {
            if (ready) {
                updateAppContext()
            }
        }
        appContextEventHandler = object : IAppContextEventHandler {
            override fun onContextRequestReceived(contextRequestInfo: ContextRequestInfo) {
                LogUtils.d("MainActivity", "onContextRequestReceived")
                ready = true
                setButtonEnabled(buttonSend)
                setButtonEnabled(buttonDelete)
                setButtonEnabled(buttonUpdate)
            }

            override fun onInvalidContextRequestReceived(throwable: Throwable) {
                Log.d("MainActivity", "onInvalidContextRequestReceived")
            }

            override fun onSyncServiceDisconnected() {
                Log.d("MainActivity", "onSyncServiceDisconnected")
                ready = false
                setButtonDisabled(buttonSend)
                setButtonDisabled(buttonDelete)
            }
        }
        // Initialize the AppContextManager
        AppContextManager.initialize(this.applicationContext, appContextEventHandler)


        // Update currentAppContext text view.
        val textView = findViewById<TextView>(R.id.appContext)
        currentAppContext.observe(this, Observer { appContext ->
            appContext?.let {
                textView.text =
                    "Current app context: ${it.contextId}\n App ID: ${it.appId}\n Created: ${it.createTime}\n Updated: ${it.lastUpdatedTime}\n Type: ${it.type}"
                Log.d("MainActivity", "Current app context: ${it.contextId}")
            } ?: run {
                textView.text = "No current app context available"
                Log.d("MainActivity", "No current app context available")
            }
        })

    }

    // Send app context to LTW
    private fun sendAppContext() {
        val appContext = AppContext().apply {
            this.contextId = generateContextId()
            this.appId = applicationContext.packageName
            this.createTime = System.currentTimeMillis()
            this.lastUpdatedTime = System.currentTimeMillis()
            // Set the type of app context, for example, resume activity.
            this.type = ProtocolConstants.TYPE_RESUME_ACTIVITY
            // Set the rest fields in appContext
            //……
        }
        _currentAppContext.value = appContext
        AppContextManager.sendAppContext(this.applicationContext, appContext, appContextResponse)
    }

    // Delete app context from LTW
    private fun deleteAppContext() {
        currentAppContext.value?.let {
            AppContextManager.deleteAppContext(
                this.applicationContext,
                it.contextId,
                appContextResponse
            )
            _currentAppContext.value = null
        } ?: run {
            Toast.makeText(this, "No resume activity to delete", Toast.LENGTH_SHORT).show()
            Log.d("MainActivity", "No resume activity to delete")
        }
    }

    // Update app context from LTW
    private fun updateAppContext() {
        currentAppContext.value?.let {
            it.lastUpdatedTime = System.currentTimeMillis()
            AppContextManager.sendAppContext(this.applicationContext, it, appContextResponse)
            _currentAppContext.postValue(it)
        } ?: run {
            Toast.makeText(this, "No resume activity to update", Toast.LENGTH_SHORT).show()
            Log.d("MainActivity", "No resume activity to update")
        }
    }

    private fun setButtonDisabled(button: Button) {
        button.isEnabled = false
        button.alpha = 0.5f
    }

    private fun setButtonEnabled(button: Button) {
        button.isEnabled = true
        button.alpha = 1.0f
    }

    override fun onDestroy() {
        super.onDestroy()
        // Deinitialize the AppContextManager
        AppContextManager.deInitialize(this.applicationContext)
    }

    private fun generateContextId(): String {
        return "${packageName}.${UUID.randomUUID()}"
    }
}
如需所有 必填 和 選擇性 欄位,請參閱 AppContext 說明。
AppContext 描述
傳送應用程式內容時,合作夥伴應用程式應該提供下列值:
| 機碼 | 值 | 額外資訊 |
|---|---|---|
| contextId [必要] | 用來將其與其他應用程式內容區分開來。 | 每個應用程式上下文都是唯一的。格式:「${packageName}.${UUID.randomUUID()}」 |
| 類型 [必填] | 二元旗標,指出哪些應用程式內容類型會傳送至 LTW。 | 值應與上述requestedContextType一致 |
| createTime[必填] [FR1] | 時間戳記,表示應用程式內容的建立時間。 | |
| lastUpdatedTime[必要] | 代表應用程式內容上次更新時間的時間戳記。 | 每當應用程式內容的任何欄位更新時,都必須記錄更新的時間。 |
| teamId [選用] | 用來識別應用程式所屬的組織或群組。 | |
| intentUri [選擇性] | 用於指示哪個應用程式可以繼續從原始裝置移交的應用程式內容。 | 長度上限為 2083 個字元。 |
| appId [選用] | 內容所適用之應用程式的套件。 | |
| title[選用] | 此應用程式內容的標題,例如文件名稱或網頁標題。 | |
| weblink[選用] | 要在瀏覽器中載入以繼續應用程式內容之網頁的 URL。 | 長度上限為 2083 個字元。 |
| 預覽[選用] | 可代表應用程式內容的預覽影像位元組 | |
| 額外內容[可選] | 鍵值組物件,包含在繼續裝置上繼續應用內容所需的應用特定狀態資訊。 | 當應用程式內容具有唯一資料時,必須提供 。 |
| LifeTime[選用] | 應用程式內容的存留期,以毫秒為單位。 | 僅用於進行中的案例,如果未設定,預設值為 30 天)。 |
瀏覽器持續性程式碼範例
此範例重點介紹瀏覽器 持續性 類型的使用,它與其他 AppContext 類型不同。
class MainActivity : AppCompatActivity() {

    private val appContextResponse = object : IAppContextResponse {
        override fun onContextResponseSuccess(response: AppContext) {
            Log.d("MainActivity", "onContextResponseSuccess")
        }

        override fun onContextResponseError(response: AppContext, throwable: Throwable) {
            Log.d("MainActivity", "onContextResponseError: ${throwable.message}")
        }
    }

    private lateinit var appContextEventHandler: IAppContextEventHandler

    private val browserHistoryContext: BrowserHistoryContext = BrowserHistoryContext()


    override fun onCreate(savedInstanceState: Bundle?) {
        super.onCreate(savedInstanceState)
        //……
        LogUtils.setDebugMode(true)
        var ready = false
        val buttonSend: Button = findViewById(R.id.buttonSend)
        val buttonDelete: Button = findViewById(R.id.buttonDelete)
        setButtonDisabled(buttonSend)
        setButtonDisabled(buttonDelete)
        buttonSend.setOnClickListener {
            if (ready) {
                sendBrowserHistory ()
            }
        }
        buttonDelete.setOnClickListener {
            if (ready) {
                clearBrowserHistory ()
            }
        }
        appContextEventHandler = object : IAppContextEventHandler {
            override fun onContextRequestReceived(contextRequestInfo: ContextRequestInfo) {
                LogUtils.d("MainActivity", "onContextRequestReceived")
                ready = true
                setButtonEnabled(buttonSend)
                setButtonEnabled(buttonDelete)
            }

            override fun onInvalidContextRequestReceived(throwable: Throwable) {
                Log.d("MainActivity", "onInvalidContextRequestReceived")
            }

            override fun onSyncServiceDisconnected() {
                Log.d("MainActivity", "onSyncServiceDisconnected")
                ready = false
                setButtonDisabled(buttonSend)
                setButtonDisabled(buttonDelete)
            }
        }
        // Initialize the AppContextManager
        AppContextManager.initialize(this.applicationContext, appContextEventHandler)
    }

    // Send browser history to LTW
    private fun sendBrowserHistory () {
        browserHistoryContext.setAppId(this.packageName)
        browserHistoryContext.addBrowserContext(System.currentTimeMillis(),
             Uri.parse("https://www.bing.com/"), "Bing Search", null
        )
        AppContextManager.sendAppContext(this.applicationContext, browserHistoryContext, appContextResponse)

    }

    // Clear browser history from LTW
         private fun clearBrowserHistory() {
        browserHistoryContext.setAppId(this.packageName)
        browserHistoryContext.setBrowserContextEmptyFlag(true)
        AppContextManager.sendAppContext(this.applicationContext, browserHistoryContext, appContextResponse)
    }

    private fun setButtonDisabled(button: Button) {
        button.isEnabled = false
        button.alpha = 0.5f
    }

    private fun setButtonEnabled(button: Button) {
        button.isEnabled = true
        button.alpha = 1.0f
    }

    override fun onDestroy() {
        super.onDestroy()
        // Deinitialize the AppContextManager
        AppContextManager.deInitialize(this.applicationContext)
    }

    //……
}
如需所有 必要 和 選用 欄位,請參閱 BrowserContext 說明。
BrowserContext 說明
合作夥伴應用程式可以呼叫方法 addBrowserContext 來新增瀏覽器歷程記錄。 新增瀏覽器記錄時,應該提供下列值:
| 機碼 | 值 |
|---|---|
| browserWebUri [必要] | 將在 PC 上的瀏覽器中開啟的 Web URI (http: 或 https:)。 |
| 標題 [必填] | 網頁的標題。 |
| 時間戳記 [必填] | 網頁第一次開啟或上次重新整理的時間戳記。 |
| favIcon [選用] | 網頁的 favicon,以位元組為單位,一般應該很小。 |
整合驗證步驟
確保已安裝私有 LTW 來準備。 確認 LTW 已連線到 PC: 如何在 PC 上管理您的行動裝置。 確認 LTW 已連線至 Phone Link: Phone Link 需求和設定。 如果掃描二維碼後無法跳入LTW,請先打開LTW並在應用程序內掃描二維碼。 最後,確認合作夥伴應用程式已整合 Continuity SDK。
啟動應用程式並初始化 Continuity SDK 來驗證。 確認
onContextRequestReceived()已呼叫。 一旦呼叫onContextRequestReceived(),應用程式便可以將其內容傳送至 LTW。 如果在傳送應用程式內容後呼叫onContextResponseSuccess(),則表示SDK整合成功。
GitHub 上的 Windows 跨裝置存放庫
在 GitHub 上的 Windows 跨裝置存放庫中尋找有關將 Windows 跨裝置 SDK 整合到專案中的資訊。
手機連結常見問題
如需常見問題的清單,請參閱手機連結常見問題。
