使用參數啟動 Windows 應用程式
調查
[開始] 功能表中的一些 Windows 應用程式啟動器需要在啟動 Windows 應用程式時,使用參數傳遞至可執行檔。 為了達成此目的,我們必須先識別需要 參數的啟動器,再將Windows 應用程式與套件支援架構整合。
識別 Windows 應用程式啟動器參數需求
在測試電腦上安裝您的 Windows 應用程式。
開啟 [ Windows 開始] 功能表。
從 [開始] 選單中找出並選取您的 Windows 應用程式啟動器。
如果應用程式啟動,則您沒有任何問題(在 [開始] 功能表中測試所有相關聯的 Windows 應用程式啟動器)。
從測試電腦卸載 Windows 應用程式。
使用 Win32 安裝媒體,將應用程式安裝到您的測試電腦。
開啟 [ Windows 開始] 功能表。
從 [開始] 功能表內,找出並用滑鼠右鍵按下您的 Windows 應用程式。
從下拉功能表中選取 [更多>>開啟檔案位置]。
以滑鼠右鍵按兩下第一個相關聯的應用程式快捷方式(針對所有相關聯的應用程式快捷方式重複後續三個步驟)。
從下拉功能表中選取 [屬性 ]。
在 [目標] 右側的文字框中檢閱值。 在應用程式檔案路徑之後,如果有列出參數,則此應用程式
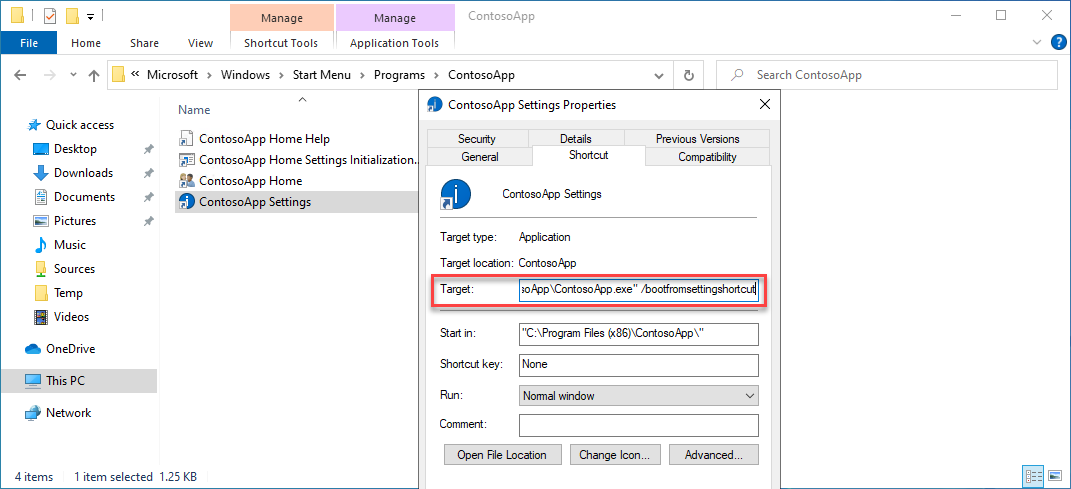
記錄參數值以供日後使用。
解決方法
Windows 應用程式會將與應用程式相關的特定目錄重新導向至 C:\Program Files\WindowsApps 資料夾。 如果應用程式嘗試寫入 Windows 應用程式容器,就會觸發錯誤,寫入將會失敗。
若要解決與 Windows 應用程式無法寫入 Windows 應用程式容器相關的問題,我們必須遵循下列四個步驟:
- 將 Windows 應用程式暫存到本機目錄
- 建立 Config.json 並插入必要的 PSF 檔案
- 更新 Windows 應用程式 AppxManifest 檔案
- 重新封裝並簽署 Windows 應用程式
上述步驟提供將 Windows 應用程式內容解壓縮到本機暫存目錄、將 PSF 修正檔案插入暫存 Windows 應用程式目錄、將應用程式啟動器設定為指向 PSF 啟動器,然後設定 PSF config.json 檔案,將 PSF 啟動器重新導向至指定工作目錄的應用程式。
下載並安裝必要的工具
此程式將引導您擷取及使用下列工具:
- NuGet 用戶端工具
- 套件支援架構
- Windows 10 SDK (最新版本)
- SysInternals 行程監視器
下列會提供下載和安裝必要工具的逐步指引。
下載 NuGet 用戶端工具的最新 (非預覽) 版本,並將 nuget.exe 儲存在
C:\PSF\nuget資料夾中。從 管理員 istrative PowerShell 視窗執行下列命令,以下載使用 Nuget 的套件支援架構:
Set-Location "C:\PSF"
.\nuget\nuget.exe install Microsoft.PackageSupportFramework
下載並安裝 Windows 10 軟體開發工具群組 (Win 10 SDK) 。
- 下載 Win 10 SDK。
- 執行在 上一個步驟中下載的 winsdksetup.exe 。
- 選取下一步按鈕。
- 只選取下列三項安裝功能:
- 適用於傳統型應用程式的 Windows SDK 簽署工具
- 適用於UWP C++ 應用程式的 Windows SDK
- Windwos SDK for UWP Apps 當地語系化
- 選取 [安裝] 按鈕。
- 選取 [確定] 按鈕。
暫存 Windows 應用程式
藉由暫存 Windows 應用程式,我們會將 Windows 應用程式的內容解壓縮/解壓縮到本機目錄。 將 Windows 應用程式解壓縮到預備位置之後,就可以插入 PSF 修正檔案,以更正任何不必要的體驗。
開啟 管理員 istrative PowerShell 視窗。
設定以特定應用程式檔案和 Windows 10 SDK 版本為目標的下列變數:
$AppPath          = "C:\PSF\SourceApp\PSFSampleApp.msix"         ## Path to the MSIX App Installer
$StagingFolder    = "C:\PSF\Staging\PSFSampleApp"                ## Path to where the MSIX App will be staged
$OSArchitecture   = "x$((gcim Win32_Processor).AddressWidth)"    ## Operating System Architecture
$Win10SDKVersion  = "10.0.19041.0"                               ## Latest version of the Win10 SDK
執行下列 PowerShell Cmdlet,將 Windows 應用程式解壓縮至預備資料夾:
## Sets the directory to the Windows 10 SDK
Set-Location "${env:ProgramFiles(x86)}\Windows Kits\10\Bin\$Win10SDKVersion\$OSArchitecture"

## Unpackages the Windows app to the staging folder
.\makeappx.exe unpack /p "$AppPath" /d "$StagingFolder"
建立並插入必要的 PSF 檔案
若要將更正動作套用至 Windows 應用程式 ,必須建立 config.json 檔案,並提供失敗的 Windows 應用程式啟動器相關信息。 如果有多個 Windows 應用程式啟動器發生問題, config.json 檔案可以使用多個項目來更新。
更新 config.json 檔案之後, 必須將 config.json 檔案和支援 PSF 修正檔案移至 Windows 應用程式套件的根目錄。
開啟 Visual Studio Code (VS Code),或任何其他文本編輯器。
選取 VS Code 頂端的 [檔案 ] 功能表,從下拉功能表中選取 [新增檔案],以建立新的檔案 。
將檔案儲存為 config.json,方法是選取 VS Code 視窗頂端的 [檔案 ] 選單,然後從下拉功能表中選取 [ 儲存 ]。 在 [另存新檔] 視窗中,流覽至 Windows 應用程式預備目錄 (C:\PSF\Staging\PSFSampleApp),並將 [檔名] 設定為
config.json。 選取儲存按鈕。將下列程式代碼複製到新建立 的 config.json 檔案。
{
    "applications": [
        {
            "id": "",
            "executable": "",
            "arguments": ""
        }
    ]
}
使用 VS Code 或其他文本編輯器,開啟位於 Windows 應用程式預備資料夾中的暫存 Windows 應用程式 AppxManifest 檔案(C:\PSF\Staging\PSFSampleApp\AppxManifest.xml)。
<Applications>
    <Application Id="PSFSAMPLE" Executable="VFS\ProgramFilesX64\PS Sample App\PSFSample.exe" EntryPoint="Windows.FullTrustApplication">
    <uap:VisualElements BackgroundColor="transparent" DisplayName="PSFSample" Square150x150Logo="Assets\StoreLogo.png" Square44x44Logo="Assets\StoreLogo.png" Description="PSFSample">
        <uap:DefaultTile Wide310x150Logo="Assets\StoreLogo.png" Square310x310Logo="Assets\StoreLogo.png" Square71x71Logo="Assets\StoreLogo.png" />
    </uap:VisualElements>
    </Application>
</Applications>
將
applications.idconfig.json 中的值設定為與 AppxManifest.xml 檔案 Applications.Application.ID 字段中找到的值相同。
applications.executable將 config.json 中的值設定為以位於 AppxManifest.xml 檔案之 Applications.Application.Executable 字段中之應用程式的相對路徑為目標。
applications.arguments設定 config.json 中的值,以符合用來啟動應用程式的自變數。 請參閱調查 - 識別 Windows 應用程式啟動器參數需求指引的最後一個步驟中的記錄值。將
applications.workingdirectoryconfig.json 中的值設定為以 AppxManifest.xml 檔案之 Applications.Application.Executable 欄位中找到的相對資料夾路徑為目標。
儲存更新 後的 config.json 檔案。
{
    "applications": [
        {
        "id": "PSFSample",
        "executable": "VFS/ProgramFilesX64/PS Sample App/PSFSample.exe",
        "arguments": "/bootfromsettingshortcut"
        }
    ]
}
根據應用程式可執行文件架構,將下列四個檔案從套件支援架構複製到分段 Windows 應用程式的根目錄。 下列檔案位於 .\Microsoft.PackageSupportFramework 內。<Version>\bin。
應用程式 (x64) 應用程式 (x86) PSFLauncher64.exe PSFLauncher32.exe PSFRuntime64.dll PSFRuntime32.dll PSFRunDll64.exe PSFRunDll32.exe
更新 AppxManifest
建立及更新 config.json 檔案之後,必須針對 config.json 中包含的每個 Windows 應用程式啟動器更新 Windows 應用程式的 AppxManifest.xml。 AppxManifest 的應用程式現在必須以與應用程式架構相關聯的 PSFLauncher.exe 為目標。
開啟 檔案總管,然後流覽至 [暫存 MSIX 應用程式] 資料夾 (C:\PSF\Staging\PSFSampleApp)。
以滑鼠右鍵按兩下 AppxManifest.xml,然後從下拉功能表中選取 [以程式代碼 開啟] (選擇性地,您可以使用另一個文字編輯器開啟)。
使用下列資訊更新 AppxManifest.xml 檔案:
<Package ...>
...
<Applications>
    <Application Id="PSFSample"
                Executable="PSFLauncher32.exe"
                EntryPoint="Windows.FullTrustApplication">
    ...
    </Application>
</Applications>
</Package>
重新封裝應用程式
所有更正都已套用,現在 Windows 應用程式可以重新封裝到 MSIX,並使用程式代碼簽署憑證進行簽署。
開啟 管理員 istrative PowerShell 視窗。
設定下列變數:
$AppPath          = "C:\PSF\SourceApp\PSFSampleApp_Updated.msix" ## Path to the MSIX App Installer
$CodeSigningCert  = "C:\PSF\Cert\CodeSigningCertificate.pfx"     ## Path to your code signing certificate
$CodeSigningPass  = "<Password>"                                 ## Password used by the code signing certificate
$StagingFolder    = "C:\PSF\Staging\PSFSampleApp"                ## Path to where the MSIX App will be staged
$OSArchitecture   = "x$((gcim Win32_Processor).AddressWidth)"    ## Operating System Architecture
$Win10SDKVersion  = "10.0.19041.0"                               ## Latest version of the Win10 SDK
執行下列 PowerShell Cmdlet,從預備資料夾重新封裝 Windows 應用程式:
Set-Location "${env:ProgramFiles(x86)}\Windows Kits\10\Bin\$Win10SDKVersion\$OSArchitecture"
.\makeappx.exe pack /p "$AppPath" /d "$StagingFolder"
執行下列 PowerShell Cmdlet 來簽署 Windows 應用程式:
Set-Location "${env:ProgramFiles(x86)}\Windows Kits\10\Bin\$Win10SDKVersion\$OSArchitecture"
.\signtool.exe sign /v /fd sha256 /f $CodeSigningCert /p $CodeSigningPass $AppPath
意見反應
即將登場:在 2024 年,我們將逐步淘汰 GitHub 問題作為內容的意見反應機制,並將它取代為新的意見反應系統。 如需詳細資訊,請參閱:https://aka.ms/ContentUserFeedback。
提交並檢視相關的意見反應