備註
Windows 應用程式 SDK 的 WinUI 文字控制項不支援手寫檢視。 本文僅適用於 UWP 應用程式。
自訂內建於 UWP 文字輸入控制項(如 TextBox、 RichEditBox 和 AutoSuggestBox)中的手寫視圖(用於墨水轉文字)。
概觀
UWP 文字輸入控制支援使用 Windows Ink 筆輸入,當使用者用筆點擊文字輸入框時,筆會轉換成手寫表面。
使用者在手寫表面任意處書寫時,文字會被辨識,而候選視窗則顯示辨識結果。 使用者可以點擊結果選擇,或繼續寫入以接受建議候選人。 字面(逐字母)識別結果包含在候選視窗中,因此辨識不僅限於字典中的單字。 隨著使用者書寫,接受的文字輸入會被轉換成保留自然書寫感覺的腳本字體。
備註
手寫檢視預設是啟用的,但你可以依控制器逐一關閉,改回文字輸入面板。
使用者可以使用標準手勢和動作編輯文字:
- 刪除線或劃掉——劃線以刪除單字或單字的部分
- Join - 在單字間畫弧線,刪除字詞間的空格
- 插入 - 繪製符號(^)以插入空格
- 覆寫 - 在現有文字上寫入以取代
停用手寫檢視
內建的手寫檢視預設是啟用的。
如果您的應用程式已經提供等效的墨水轉文字功能,或者您在文字輸入時需要依賴某種格式或特殊字元(例如制表符),而這些在手寫方式無法提供,建議關閉手寫視圖。
在此範例中,我們透過將 TextBox 控制項中的 IsHandwritingViewEnabled 屬性設為 false,來停用手寫視圖。 所有支援手寫檢視的文字控制項都支援類似的屬性。
<TextBox Name="SampleTextBox"
Height="50" Width="500"
FontSize="36" FontFamily="Segoe UI"
PlaceholderText="Try taping with your pen"
IsHandwritingViewEnabled="False">
</TextBox>
指定手寫視圖的對齊方式
手寫檢視位於底層文字控制項之上,大小依使用者的筆跡偏好調整(參見 設定 -> 藍牙與裝置 -> 筆與 Windows 墨水 -> 手寫 -> 字體大小)。 視圖也會自動與文字控制項及其在應用程式中的位置對齊。
應用程式介面不會重新排版以容納較大的控制鍵,這可能會遮擋重要的介面。
以下片段展示了如何使用 TextBoxHandwritingView 的 PlacementAlignment 屬性,指定底層文字控制項上的哪個錨點來對齊手寫視圖。
<TextBox Name="SampleTextBox"
Height="50" Width="500"
FontSize="36" FontFamily="Segoe UI"
PlaceholderText="Try taping with your pen">
<TextBox.HandwritingView>
<HandwritingView PlacementAlignment="TopLeft"/>
</TextBox.HandwritingView>
</TextBox>
停用自動完成選項
文字建議彈窗預設是啟用的。 它提供一份頂尖墨水辨識候選名單,使用者可從中選擇,以防主要候選者錯誤。
如果您的應用程式已經提供強大的自訂辨識功能,您可以使用 AreCandidatesEnabled 屬性來停用內建的建議,如下範例所示。
<TextBox Name="SampleTextBox"
Height="50" Width="500"
FontSize="36" FontFamily="Segoe UI"
PlaceholderText="Try taping with your pen">
<TextBox.HandwritingView>
<HandwritingView AreCandidatesEnabled="False"/>
</TextBox.HandwritingView>
</TextBox>
使用偏好的手寫字體
使用者可從預設的手寫字型集合中選擇,用於根據墨水辨識呈現文字(參見 設定 -> 藍牙與裝置 -> 筆與 Windows 墨水 -> 手寫 -> 字體)。
你的應用程式可以進入這個設定,並在文字控制項中使用所選的字體來識別文字。
在此範例中,我們會監聽 TextBox 的 TextChanged 事件,若文字變更源自 HandwritingView,則套用使用者所選字型(若非則為預設字型)。
private void SampleTextBox_TextChanged(object sender, TextChangedEventArgs e)
{
((TextBox)sender).FontFamily =
((TextBox)sender).HandwritingView.IsOpen ?
new FontFamily(PenAndInkSettings.GetDefault().FontFamilyName) :
new FontFamily("Segoe UI");
}
在複合控制中存取手寫檢視
使用 TextBox 或 RichEditBox 控制項(如 AutoSuggestBox)的複合控制項也支援 HandwritingView。
若要在複合控制項中存取 HandwritingView ,請使用 VisualTreeHelper API。
以下 XAML 片段顯示 AutoSuggestBox 控制項。
<AutoSuggestBox Name="SampleAutoSuggestBox"
Height="50" Width="500"
PlaceholderText="Auto Suggest Example"
FontSize="16" FontFamily="Segoe UI"
Loaded="SampleAutoSuggestBox_Loaded">
</AutoSuggestBox>
在對應的程式碼中,我們展示了如何停用 HandwritingView 在 AutoSuggestBox 上。
首先,我們處理元素的 Loaded 事件,並呼叫
FindInnerTextBox函式開始視覺樹遍歷。private void SampleAutoSuggestBox_Loaded(object sender, RoutedEventArgs e) { if (FindInnerTextBox((AutoSuggestBox)sender)) autoSuggestInnerTextBox.IsHandwritingViewEnabled = false; }在
FindInnerTextBox函式中,我們會從 AutoSuggestBox 開始,透過呼叫FindVisualChildByName函式來遍歷視覺樹。private bool FindInnerTextBox(AutoSuggestBox autoSuggestBox) { if (autoSuggestInnerTextBox == null) { // Cache textbox to avoid multiple tree traversals. autoSuggestInnerTextBox = (TextBox)FindVisualChildByName<TextBox>(autoSuggestBox); } return (autoSuggestInnerTextBox != null); } ```最後,
FindVisualChildByName函式會遍歷視覺樹,直到取得 TextBox。private FrameworkElement FindVisualChildByName<T>(DependencyObject obj) { FrameworkElement element = null; int childrenCount = VisualTreeHelper.GetChildrenCount(obj); for (int i = 0; (i < childrenCount) && (element == null); i++) { FrameworkElement child = (FrameworkElement)VisualTreeHelper.GetChild(obj, i); if ((child.GetType()).Equals(typeof(T)) || (child.GetType().GetTypeInfo().IsSubclassOf(typeof(T)))) { element = child; } else { element = FindVisualChildByName<T>(child); } } return (element); } ```
重新定位手寫輸入視圖
在某些情況下,你可能需要確保 HandwritingView 涵蓋了它可能忽略的 UI 元素。
在這裡,我們建立一個支援語音輸入的文字框(透過在 StackPanel 中放置文字框和語音輸入按鈕實現)。

由於 StackPanel 現在比 TextBox 大, HandwritingView 可能無法遮蔽所有複合控制項。

為了解決這個問題,請將 HandwritingView 的 PlacementTarget 屬性設定為它應該對齊的 UI 元素。
<StackPanel Name="DictationBox"
Orientation="Horizontal"
VerticalAlignment="Top"
HorizontalAlignment="Left"
BorderThickness="1" BorderBrush="DarkGray"
Height="55" Width="500" Margin="50">
<TextBox Name="DictationTextBox"
Width="450" BorderThickness="0"
FontSize="24" VerticalAlignment="Center">
<TextBox.HandwritingView>
<HandwritingView PlacementTarget="{Binding ElementName=DictationBox}"/>
</TextBox.HandwritingView>
</TextBox>
<Button Name="DictationButton"
Height="48" Width="48"
FontSize="24"
FontFamily="Segoe MDL2 Assets"
Content=""
Background="White" Foreground="DarkGray" Tapped="DictationButton_Tapped" />
</StackPanel>
調整手寫視圖
你也可以設定 HandwritingView 的大小,這在需要確保視圖不會遮擋重要介面時很有用。
如同前述範例,我們建立一個支援語音輸入的文字框(透過將文字框和語音輸入按鈕放入 StackPanel 實現)。
在這種情況下,我們會調整 HandwritingView 的大小,以確保聽寫按鈕是可見的。

為此,我們將 HandwritingView 的 MaxWidth 屬性綁定為它應該遮蔽的 UI 元素寬度。
<StackPanel Name="DictationBox"
Orientation="Horizontal"
VerticalAlignment="Top"
HorizontalAlignment="Left"
BorderThickness="1"
BorderBrush="DarkGray"
Height="55" Width="500"
Margin="50">
<TextBox Name="DictationTextBox"
Width="450"
BorderThickness="0"
FontSize="24"
VerticalAlignment="Center">
<TextBox.HandwritingView>
<HandwritingView
PlacementTarget="{Binding ElementName=DictationBox}"
MaxWidth="{Binding ElementName=DictationTextBox, Path=Width"/>
</TextBox.HandwritingView>
</TextBox>
<Button Name="DictationButton"
Height="48" Width="48"
FontSize="24"
FontFamily="Segoe MDL2 Assets"
Content=""
Background="White" Foreground="DarkGray"
Tapped="DictationButton_Tapped" />
</StackPanel>
重新定位自訂介面
如果你有自訂的 UI 會回應文字輸入,例如資訊彈出視窗,可能需要重新定位該 UI,避免它遮擋手寫視圖。
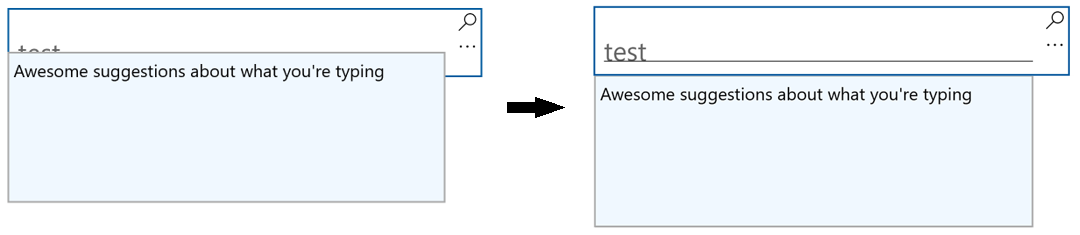
以下範例展示了如何監聽 HandwritingView 中開啟、關閉及大小變更事件,以設定彈出視窗的位置。
private void Search_HandwritingViewOpened(
HandwritingView sender, HandwritingPanelOpenedEventArgs args)
{
UpdatePopupPositionForHandwritingView();
}
private void Search_HandwritingViewClosed(
HandwritingView sender, HandwritingPanelClosedEventArgs args)
{
UpdatePopupPositionForHandwritingView();
}
private void Search_HandwritingViewSizeChanged(
object sender, SizeChangedEventArgs e)
{
UpdatePopupPositionForHandwritingView();
}
private void UpdatePopupPositionForHandwritingView()
{
if (CustomSuggestionUI.IsOpen)
CustomSuggestionUI.VerticalOffset = GetPopupVerticalOffset();
}
private double GetPopupVerticalOffset()
{
if (SearchTextBox.HandwritingView.IsOpen)
return (SearchTextBox.Margin.Top + SearchTextBox.HandwritingView.ActualHeight);
else
return (SearchTextBox.Margin.Top + SearchTextBox.ActualHeight);
}
重新範本化 HandwritingView 控制項
與所有 XAML 框架控制項一樣,您可以根據自身需求自訂 HandwritingView 的視覺結構與視覺行為。
想完整示範如何建立自訂範本,請參考「 建立自訂傳輸控制」操作指南或「 自訂編輯控制」範例。
