重要
UWP MapControl 和 Windows Maps 平臺 API (Windows.Services.Maps.*) 已被取代,未來版本的 Windows 可能無法使用。 如需詳細資訊,請參閱 已淘汰功能的資源。
重要
針對企業用 Bing 地圖服務淘汰
來自 Windows.Services.Maps 命名空間的 UWP MapControl 和地圖服務依賴 Bing 地圖服務。 針對企業用 Bing 地圖服務已遭到取代且即將淘汰,屆時 MapControl 及服務將不再接收資料。
如需詳細資訊,請參閱 Bing 地圖服務開發人員中心和 Bing 地圖服務文件。
注意
MapControl 和地圖服務要求地圖驗證金鑰,稱為 MapServiceToken。 如需取得和設定地圖驗證金鑰的詳細資訊,請參閱要求地圖驗證金鑰。
使用圖釘、影像、圖形及 XAML UI 元素,在地圖上新增興趣點 (POI)。 POI 是地圖上代表感興趣項目的特定點。 例如,企業、城市或朋友的位置。
將 MapIcon、MapBillboard、MapPolygon 和 MapPolyline 物件新增至 MapElements 物件的 MapElements 集合,在地圖上顯示圖釘、影像和圖形。 然後,將該圖層物件新增至地圖控制項的 Layers 集合。
注意
在舊版中,本指南示範如何將地圖元素新增至 MapElements 集合。 雖然您仍然可以使用此方法,但您會錯過新地圖圖層模型的某些優點。 若要深入瞭解,請參閱本指南的「使用圖層」一節。
您也可以將 XAML 使用者介面元素新增至 MapItemsControl 或 MapControl 的子系,以在地圖上顯示 XAML 使用者介面元素,例如 Button、HyperlinkButton 或 TextBlock。
如果您有大量的元素要放在地圖上,請考慮 在地圖上重疊圖格影像。 若要在地圖上顯示道路,請參閱顯示路線和路線指引
新增圖釘
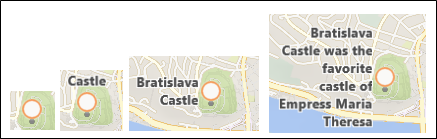
使用 MapIcon 類別在地圖上顯示圖釘等影像,並可選擇性地顯示文字。 您可以使用 Image 屬性來接受預設影像或提供自訂影像。 下圖顯示 MapIcon 的預設影像,其中未針對 Title 屬性指定任何值、具有簡短標題、具有長標題,以及具有很長的標題。
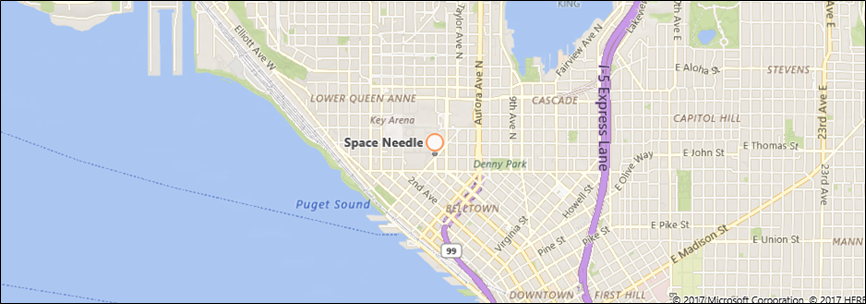
下列範例顯示西雅圖市的地圖,並新增具有預設影像和選擇性標題的 MapIcon,以指出 Space Needle 的位置。 它還會將地圖於圖示位置置中並進行放大。 如需使用地圖控制項的一般資訊,請參閱使用 2D、3D 和 Streetside 檢視來顯示地圖。
public void AddSpaceNeedleIcon()
{
    var MyLandmarks = new List<MapElement>();

    BasicGeoposition snPosition = new BasicGeoposition { Latitude = 47.620, Longitude = -122.349 };
    Geopoint snPoint = new Geopoint(snPosition);

    var spaceNeedleIcon = new MapIcon
    {
        Location = snPoint,
        NormalizedAnchorPoint = new Point(0.5, 1.0),
        ZIndex = 0,
        Title = "Space Needle"
    };

    MyLandmarks.Add(spaceNeedleIcon);

    var LandmarksLayer = new MapElementsLayer
    {
        ZIndex = 1,
        MapElements = MyLandmarks
    };

    myMap.Layers.Add(LandmarksLayer);

    myMap.Center = snPoint;
    myMap.ZoomLevel = 14;

}
本範例在地圖上顯示下列 POI (中央的預設影像)。
下列程式碼行會顯示 MapIcon ,其中包含儲存在專案 Assets 資料夾中的自訂影像。 MapIcon 的 Image 屬性需要 RandomAccessStreamReference 類型的值。 這種類型需要在程式碼中使用 using 陳述式來引用 Windows.Storage.Streams 命名空間。
注意
若您將相同的影像用於多個地圖圖示,請在頁面或應用程式層級宣告 RandomAccessStreamReference 以獲得最佳效能。
    MapIcon1.Image =
        RandomAccessStreamReference.CreateFromUri(new Uri("ms-appx:///Assets/customicon.png"));
使用 MapIcon 類別時,請記住這些考量:
- Image 屬性支援 2048×2048 像素的最大影像大小。
- 根據預設,地圖圖示的影像並不保證會顯示。 當它遮蔽地圖上的其他元素或標籤時,可能會被隱藏。 若要保持可見,請將地圖圖示的 CollisionBehaviorDesired 屬性設定為 MapElementCollisionBehavior.RemainVisible。
- MapIcon 的選擇性標題並不保證會顯示。 如果您沒有看到文字,請減少 MapControl 的 ZoomLevel 屬性值來縮小。
- 當您顯示指向地圖上特定位置的 MapIcon 影像時,例如圖釘或箭號,請考慮將 NormalizedAnchorPoint 屬性的值設定為影像上指標的近似位置。 如果將 NormalizedAnchorPoint 的值保留為預設值 (0, 0),這表示圖像的左上角,則變更地圖的 ZoomLevel 可能會使圖像指向其他位置。
- 如果您未明確設定 Altitude 和 AltitudeReferenceSystem,MapIcon 會放在表面。
新增 3D 圖釘
您可以將三維物件新增到地圖。 使用 MapModel3D 類別,從 3D 製造格式 (3MF) 檔案匯入 3D 物件。
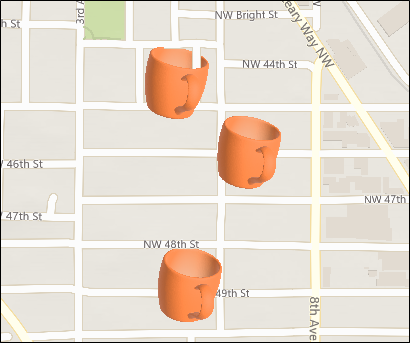
此影像會使用 3D 咖啡杯來標記附近咖啡店的位置。
下列程式碼會使用匯入 3MF 檔案,將咖啡杯新增至地圖。 為了保持簡單,此程式碼會將影像新增至地圖的中心,但您的程式碼可能會將影像新增至特定位置。
public async void Add3DMapModel()
{
    var mugStreamReference = RandomAccessStreamReference.CreateFromUri
        (new Uri("ms-appx:///Assets/mug.3mf"));

    var myModel = await MapModel3D.CreateFrom3MFAsync(mugStreamReference,
        MapModel3DShadingOption.Smooth);

    myMap.Layers.Add(new MapElementsLayer
    {
       ZIndex = 1,
       MapElements = new List<MapElement>
       {
          new MapElement3D
          {
              Location = myMap.Center,
              Model = myModel,
          },
       },
    });
}
新增影像
顯示與地圖位置相關的大型影像,例如餐廳或地標的圖片。 當使用者縮小時,影像會按比例縮小,讓使用者能夠檢視更多地圖。 這與 MapIcon 稍有不同,它會標示特定位置、通常很小,而且當使用者放大和縮小地圖時,會維持一樣的大小。
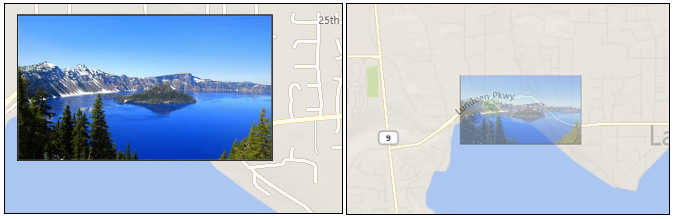
下列程式碼顯示上圖中顯示的 MapBillboard。
public void AddLandmarkPhoto()
{
    // Create MapBillboard.

    RandomAccessStreamReference mapBillboardStreamReference =
        RandomAccessStreamReference.CreateFromUri(new Uri("ms-appx:///Assets/billboard.jpg"));

    var mapBillboard = new MapBillboard(myMap.ActualCamera)
    {
        Location = myMap.Center,
        NormalizedAnchorPoint = new Point(0.5, 1.0),
        Image = mapBillboardStreamReference
    };

    // Add MapBillboard to a layer on the map control.

    var MyLandmarkPhotos = new List<MapElement>();

    MyLandmarkPhotos.Add(mapBillboard);

    var LandmarksPhotoLayer = new MapElementsLayer
    {
        ZIndex = 1,
        MapElements = MyLandmarkPhotos
    };

    myMap.Layers.Add(LandmarksPhotoLayer);
}
此程式碼中有三個部分值得仔細查看:影像、參照攝影機和 NormalizedAnchorPoint 屬性。
映像
此範例顯示儲存在專案的 Assets 資料夾中的自訂影像。 MapBillboard 的 Image 屬性期望 RandomAccessStreamReference 類型的值。 這種類型需要在程式碼中使用 using 陳述式來引用 Windows.Storage.Streams 命名空間。
注意
若您將相同的影像用於多個地圖圖示,請在頁面或應用程式層級宣告 RandomAccessStreamReference 以獲得最佳效能。
參考攝影機
由於 MapBillboard 影像會隨著地圖的 ZoomLevel 變更而相應縮小,因此請務必定義 ZoomLevel 影像出現在正常 1 倍比例的位置。 該位置定義於 MapBillboard 的參照攝影機中,而且若要加以設定,您必須將 MapCamera 物件傳遞至 MapBillboard 的建構函式。
您可以定義要在 Geopoint 中的位置,然後使用該 Geopoint 來建立 MapCamera 物件。 不過,在此範例中,我們只是使用地圖控制項的 ActualCamera 屬性所傳回的 MapCamera 物件。 這是地圖的內部攝影機。 該攝影機的目前位置會成為參照攝影機位置;MapBillboard 影像以 1 倍比例顯示的位置。
如果您的應用程式讓使用者能夠在地圖上縮小,影像會變小,因為地圖的內部攝影機正在升高,而在 1 倍比例尺下的影像保持固定在參考攝影機位置。
正規化錨點
NormalizedAnchorPoint 是錨定至 MapBillboard 之 Location 屬性的影像點。 點 0.5,1 是影像的底部中央。 因為我們已將 MapBillboard 的 Location 屬性設定為地圖控制項的中央,因此影像的底部中央會錨定在地圖控制項的中央。 如果您想要將影像直接置中於某個點上方,請將 NormalizedAnchorPoint 設定為 0.5,0.5。
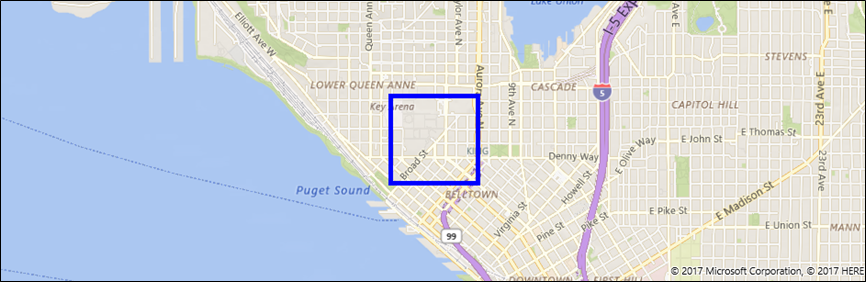
新增圖形
使用 MapPolygon 類別在地圖上顯示多點圖形。 下列範例會從 UWP地圖範例顯示地圖上具有藍色框線的紅色方塊。
public void HighlightArea()
{
    // Create MapPolygon.

    double centerLatitude = myMap.Center.Position.Latitude;
    double centerLongitude = myMap.Center.Position.Longitude;

    var mapPolygon = new MapPolygon
    {
        Path = new Geopath(new List<BasicGeoposition> {
                    new BasicGeoposition() {Latitude=centerLatitude+0.0005, Longitude=centerLongitude-0.001 },
                    new BasicGeoposition() {Latitude=centerLatitude-0.0005, Longitude=centerLongitude-0.001 },
                    new BasicGeoposition() {Latitude=centerLatitude-0.0005, Longitude=centerLongitude+0.001 },
                    new BasicGeoposition() {Latitude=centerLatitude+0.0005, Longitude=centerLongitude+0.001 },
                }),
        ZIndex = 1,
        FillColor = Colors.Red,
        StrokeColor = Colors.Blue,
        StrokeThickness = 3,
        StrokeDashed = false,
    };

    // Add MapPolygon to a layer on the map control.
    var MyHighlights = new List<MapElement>();

    MyHighlights.Add(mapPolygon);

    var HighlightsLayer = new MapElementsLayer
    {
        ZIndex = 1,
        MapElements = MyHighlights
    };

    myMap.Layers.Add(HighlightsLayer);
}
加入線條
使用 MapPolyline 類別在地圖上顯示線條。 下列範例會從 UWP地圖範例顯示地圖上的虛線。
public void DrawLineOnMap()
{
    // Create Polyline.

    double centerLatitude = myMap.Center.Position.Latitude;
    double centerLongitude = myMap.Center.Position.Longitude;
    var mapPolyline = new MapPolyline
    {
        Path = new Geopath(new List<BasicGeoposition> {
                    new BasicGeoposition() {Latitude=centerLatitude-0.0005, Longitude=centerLongitude-0.001 },
                    new BasicGeoposition() {Latitude=centerLatitude+0.0005, Longitude=centerLongitude+0.001 },
                }),
        StrokeColor = Colors.Black,
        StrokeThickness = 3,
        StrokeDashed = true,
    };

   // Add Polyline to a layer on the map control.

   var MyLines = new List<MapElement>();

   MyLines.Add(mapPolyline);

   var LinesLayer = new MapElementsLayer
   {
       ZIndex = 1,
       MapElements = MyLines
   };

   myMap.Layers.Add(LinesLayer);

}
新增 XAML
使用 XAML 在地圖上顯示自訂 UI 元素。 藉由指定 XAML 的位置和標準化錨點,在地圖上放置 XAML。
- 藉由呼叫 SetLocation,設定地圖上 XAML 的位置。
- 將 XAML 中對應指定位置的相對位置設定為呼叫 SetNormalizedAnchorPoint。
下列範例顯示西雅圖市的地圖,並新增 XAML 框線控制項來指出 Space Needle 的位置。 它還會將地圖於該區域位置置中並進行放大。 如需使用地圖控制項的一般資訊,請參閱使用 2D、3D 和 Streetside 檢視來顯示地圖。
private void displayXAMLButton_Click(object sender, RoutedEventArgs e)
{
   // Specify a known location.
   BasicGeoposition snPosition = new BasicGeoposition { Latitude = 47.620, Longitude = -122.349 };
   Geopoint snPoint = new Geopoint(snPosition);

   // Create a XAML border.
   Border border = new Border
   {
      Height = 100,
      Width = 100,
      BorderBrush = new SolidColorBrush(Windows.UI.Colors.Blue),
      BorderThickness = new Thickness(5),
   };

   // Center the map over the POI.
   MapControl1.Center = snPoint;
   MapControl1.ZoomLevel = 14;

   // Add XAML to the map.
   MapControl1.Children.Add(border);
   MapControl.SetLocation(border, snPoint);
   MapControl.SetNormalizedAnchorPoint(border, new Point(0.5, 0.5));
}
本範例在地圖上顯示藍色框線。
下一個範例示範如何使用資料繫結,直接在頁面的 XAML 標記中新增 XAML UI 元素。 如同其他顯示內容的 XAML 元素,Children 是 MapControl 的預設內容屬性,而且不需要在 XAML 標記中明確指定。
此範例示範如何將兩個 XAML 控制項顯示為 MapControl 的隱含子系。 這些控制項會出現在地圖上的資料繫結位置。
<maps:MapControl>
    <TextBox Text="Seattle" maps:MapControl.Location="{x:Bind SeattleLocation}"/>
    <TextBox Text="Bellevue" maps:MapControl.Location="{x:Bind BellevueLocation}"/>
</maps:MapControl>
在程式碼後置檔案中使用屬性來設定這些位置。
public Geopoint SeattleLocation { get; set; }
public Geopoint BellevueLocation { get; set; }
此範例示範如何顯示 MapItemsControl 內含的兩個 XAML 控制項。這些控制項會出現在地圖上的資料繫結位置。
<maps:MapControl>
  <maps:MapItemsControl>
    <TextBox Text="Seattle" maps:MapControl.Location="{x:Bind SeattleLocation}"/>
    <TextBox Text="Bellevue" maps:MapControl.Location="{x:Bind BellevueLocation}"/>
  </maps:MapItemsControl>
</maps:MapControl>
此範例會顯示繫結至 MapItemsControl 的 XAML 元素集合。
<maps:MapControl x:Name="MapControl" MapTapped="MapTapped" MapDoubleTapped="MapTapped" MapHolding="MapTapped">
  <maps:MapItemsControl ItemsSource="{x:Bind LandmarkOverlays}">
      <maps:MapItemsControl.ItemTemplate>
          <DataTemplate>
              <StackPanel Background="Black" Tapped ="Overlay_Tapped">
                  <TextBlock maps:MapControl.Location="{Binding Location}" Text="{Binding Title}"
                    maps:MapControl.NormalizedAnchorPoint="0.5,0.5" FontSize="20" Margin="5"/>
              </StackPanel>
          </DataTemplate>
      </maps:MapItemsControl.ItemTemplate>
  </maps:MapItemsControl>
</maps:MapControl>
上述範例中的 ItemsSource 屬性會繫結至程式碼後置檔案中 IList 類型的屬性。
public sealed partial class Scenario1 : Page
{
    public IList LandmarkOverlays { get; set; }

    public MyClassConstructor()
    {
         SetLandMarkLocations();
         this.InitializeComponent();
    }

    private void SetLandMarkLocations()
    {
        LandmarkOverlays = new List<MapElement>();

        var pikePlaceIcon = new MapIcon
        {
            Location = new Geopoint(new BasicGeoposition
            { Latitude = 47.610, Longitude = -122.342 }),
            Title = "Pike Place Market"
        };

        LandmarkOverlays.Add(pikePlaceIcon);

        var SeattleSpaceNeedleIcon = new MapIcon
        {
            Location = new Geopoint(new BasicGeoposition
            { Latitude = 47.6205, Longitude = -122.3493 }),
            Title = "Seattle Space Needle"
        };

        LandmarkOverlays.Add(SeattleSpaceNeedleIcon);
    }
}
使用圖層
本指南中的範例會將元素新增至 MapElementsLayer 集合。 然後會示範如何將該集合新增至地圖控制項的 Layers 屬性。 在舊版中,本指南示範如何將地圖元素新增至 MapElements 集合,如下所示:
var pikePlaceIcon = new MapIcon
{
    Location = new Geopoint(new BasicGeoposition
    { Latitude = 47.610, Longitude = -122.342 }),
    NormalizedAnchorPoint = new Point(0.5, 1.0),
    ZIndex = 0,
    Title = "Pike Place Market"
};

myMap.MapElements.Add(pikePlaceIcon);
雖然您仍然可以使用此方法,但您會錯過新地圖圖層模型的某些優點。 藉由將元素分組到圖層中,您可以彼此獨立操作每個圖層。 例如,每一層都有自己的事件組,讓您可以回應特定層的特定事件,以及執行該事件專屬的動作。
此外,您也可以將 XAML 直接繫結至 MapLayer。 這是您無法使用 MapElements 集合執行的動作。
其中一種方法是使用檢視模型類別、XAML 頁面後置程式碼和 XAML 頁面。
檢視模型類別
public class LandmarksViewModel
{
    public ObservableCollection<MapLayer> LandmarkLayer
        { get; } = new ObservableCollection<MapLayer>();

    public LandmarksViewModel()
    {
        var MyElements = new List<MapElement>();

        var pikePlaceIcon = new MapIcon
        {
            Location = new Geopoint(new BasicGeoposition
            { Latitude = 47.610, Longitude = -122.342 }),
            Title = "Pike Place Market"
        };

        MyElements.Add(pikePlaceIcon);

        var LandmarksLayer = new MapElementsLayer
        {
            ZIndex = 1,
            MapElements = MyElements
        };

        LandmarkLayer.Add(LandmarksLayer);
    }
XAML 頁面的後置程式碼
將檢視模型類別連接至程式碼後置頁面。
public LandmarksViewModel ViewModel { get; set; }

public myMapPage()
{
    this.InitializeComponent();
    this.ViewModel = new LandmarksViewModel();
}
XAML 頁面
在 XAML 頁面中,繫結至檢視模型類別中傳回圖層的屬性。
<maps:MapControl
    x:Name="myMap" TransitFeaturesVisible="False" Loaded="MyMap_Loaded" Grid.Row="2"
    MapServiceToken="Your token" Layers="{x:Bind ViewModel.LandmarkLayer}"/>