設定套用到筆刷上的轉換。
多載清單
| 方法 | Description |
|---|---|
| SetTransform(D2D1_MATRIX_3X2_F&) | 設定套用到筆刷上的轉換。 |
| SetTransform(D2D1_MATRIX_3X2_F*) | 設定套用到筆刷上的轉換。 |
備註
當你用畫筆上色時,它會畫在渲染目標的座標空間裡。 畫筆不會自動定位以對齊被繪製的物體;預設情況下,它們會從渲染目標的原點(0, 0)開始繪製。
你可以透過設定起始點和終點,將 ID2D1LinearGradientBrush 定義的梯度「移動」到目標區域。 同樣地,你也可以透過改變 ID2D1RadialGradientBrush 的中心和半徑來移動由 ID2D1RadialGradientBrush 定義的梯度。
要將 ID2D1BitmapBrush 的內容對齊到被繪製的區域,你可以使用 SetTransform 方法將點陣圖轉換到所需的位置。 此轉換僅影響筆刷;它不會影響渲染目標繪製的其他內容。
以下圖示展示了使用 ID2D1BitmapBrush 填補位於 (100, 100) 的矩形的效果。 左圖所示,填滿矩形而不變換筆刷的結果:點陣圖是在渲染目標的原點繪製。 因此,矩形中只會出現部分點陣圖。
右側插圖展示了將 ID2D1BitmapBrush 轉換後,使其內容向右移動 50 像素、向下移動 50 像素的結果。 位圖現在填滿了矩形。
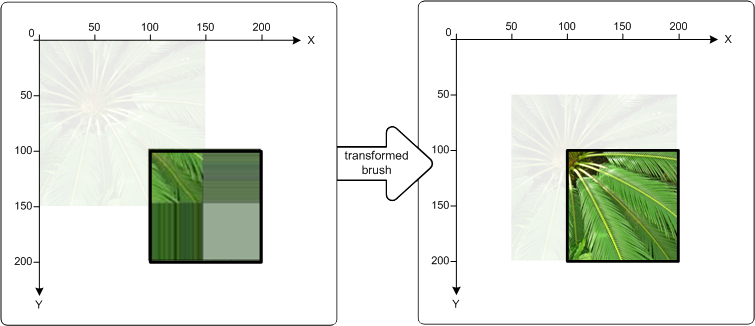
Examples
以下程式碼範例展示了如何建立前述圖示右側圖示中所示的轉換。 首先對 ID2D1BitmapBrush 進行平移,筆刷沿 x 軸向右移動 50 像素,沿 y 軸向下移動 50 像素。 接著用 ID2D1BitmapBrush 填滿左上角為 (100, 100)、右下角為 (200, 200) 的矩形。
// Create the bitmap to be used by the bitmap brush.
if (SUCCEEDED(hr))
{
    hr = LoadResourceBitmap(
        m_pRenderTarget,
        m_pWICFactory,
        L"FERN",
        L"Image",
        &m_pBitmap
        );

}
if (SUCCEEDED(hr))
{
    hr = m_pRenderTarget->CreateBitmapBrush(
        m_pBitmap,
        &m_pBitmapBrush
        );
}
D2D1_RECT_F rcTransformedBrushRect = D2D1::RectF(100, 100, 200, 200);


 // Demonstrate the effect of transforming a bitmap brush.
 m_pBitmapBrush->SetTransform(
     D2D1::Matrix3x2F::Translation(D2D1::SizeF(50,50))
     );

 // To see the content of the rcTransformedBrushRect, comment
 // out this statement.
 m_pRenderTarget->FillRectangle(
     &rcTransformedBrushRect,
     m_pBitmapBrush
     );

 m_pRenderTarget->DrawRectangle(rcTransformedBrushRect, m_pBlackBrush, 1, NULL);
要求
| Requirement | 值 |
|---|---|
| 標頭 |
|
| 圖書館 |
|
| DLL |
|