Windows Server 2008 R2 支援伺服器端手寫辨識。 伺服器端辨識可讓伺服器從網頁的手寫筆輸入辨識內容。 當網路上的使用者將指定使用自定義字典解譯的字詞時,這特別有用。 例如,如果您有一個醫療應用程式查詢伺服器資料庫以取得患者名稱,則這些名稱可以新增至另一個資料庫,以在從手寫 Silverlight 窗體執行搜尋時,進行交叉參考。
設定您的伺服器以進行 Server-Side 辨識
應遵循下列步驟來設定伺服器端辨識。
- 安裝墨水和手寫服務
- 安裝 Web 伺服器 (IIS) 和應用程式伺服器的支援
- 啟用桌面體驗角色
- 啟動平板電腦輸入服務
安裝筆跡和手寫服務
若要安裝 Ink 和 Handwriting 服務,請按兩下 [快速啟動] 匣中的伺服器管理員圖示,以開啟伺服器管理員。 從 [功能] 選單中,點擊 [新增功能]。 請確定您選取 [筆跡和手寫服務] 複選框。 下圖顯示 [功能選擇] 對話框,並選取了 [筆跡和手寫服務]。
![選取 [選取具有筆跡和手寫服務的功能] 對話框複選框](images/setup-server-1-ink-and-handwriting.png)
功能選擇對話框(勾選筆跡和手寫服務複選框)
Web 伺服器 (IIS) 和應用程式伺服器的安裝支援
開啟伺服器管理員,就像您在第一個步驟中所做的一樣。 接下來,您必須新增 Web 伺服器 (IIS) 和應用程式伺服器角色。 從 [角色] 功能表中,按一下 [新增角色]。 [新增角色精靈] 隨即出現。 請按一下 [下一步]。 確定已選取 Application Server 和 Web Server (IIS)。 下圖顯示 [選取伺服器角色 ] 對話框,並已選取 [網頁伺服器 [IIS],並選取 [應用程式伺服器] 角色。
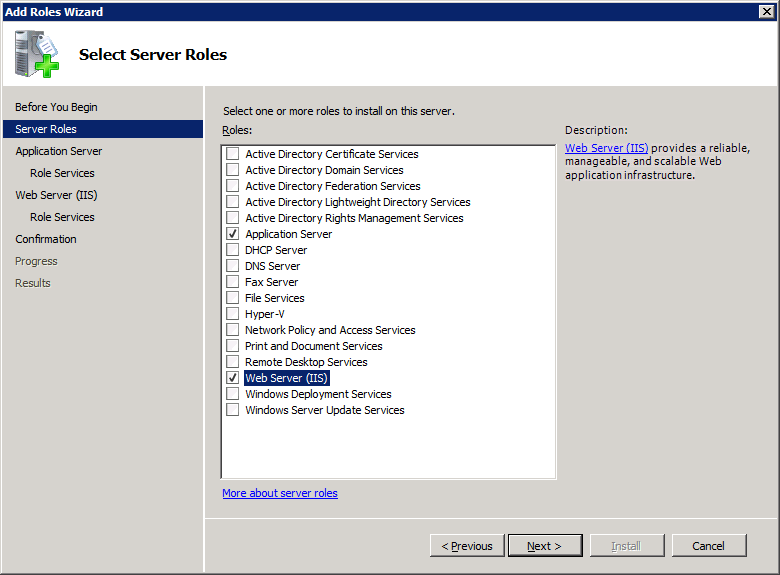
選取伺服器角色對話框,並選取網頁伺服器 (iis) 和應用程式伺服器角色
當您選取 [應用程式伺服器時,系統會要求您安裝 ASP.NET 架構。 按一下 新增必要功能 按鈕。 按兩下 [下一步]之後,您會看到 [概觀] 對話框;點選 [下一步] 。 [選取角色服務] 對話框現在應該可供使用。 確定已選取 網頁伺服器 (IIS)。 下圖顯示 [選取角色服務] 對話框 ,其中已啟用網頁伺服器(IIS)。
![啟用網頁伺服器 (iis) 的 [選取角色服務] 對話框](images/setup-server-3-select-role-services.png)
[啟用 Web 伺服器 (IIS) 的角色服務選取對話框]
點選 [下一步]。 [概觀] 對話框隨即出現,再次按一下 [下一步]。 您現在會看到一個頁面,提供供您選擇的網頁伺服器 (IIS) 角色選項。 點選 [下一步] 。 在下一個頁面上,安裝 按鈕將會變為可用。 按一下 [安裝],即可安裝對於網頁伺服器(IIS)和應用程式伺服器的支援。
啟用桌面體驗功能
若要啟用桌面體驗,請按兩下 [開始 ],按兩下 [系統管理工具],然後按兩下 [伺服器管理員]。 選取 [[新增服務],然後選取 [桌面體驗] 服務。 下圖顯示 [選取功能] 對話框,其中已安裝桌面體驗項目。
![[選取功能] 對話框已選取桌面體驗服務](images/setup-server-4-desktop-experience.png)
選取功能的對話框,其中已選取桌面體驗服務
按一下 [下一步] 來安裝桌面體驗。
啟動平板電腦服務
安裝桌面體驗服務之後,平板計算機輸入服務會出現在 [Services] 功能表中。 若要存取 [服務] 功能表,請按一下 [開始 ],按一下 [系統管理工具 ],然後按一下 [服務]。 若要啟動服務,請以滑鼠右鍵按下 平板電腦輸入服務,然後點擊 開始。 下圖顯示已啟動平板電腦輸入服務的 Services 選單。
已啟動的平板電腦輸入服務的服務功能表 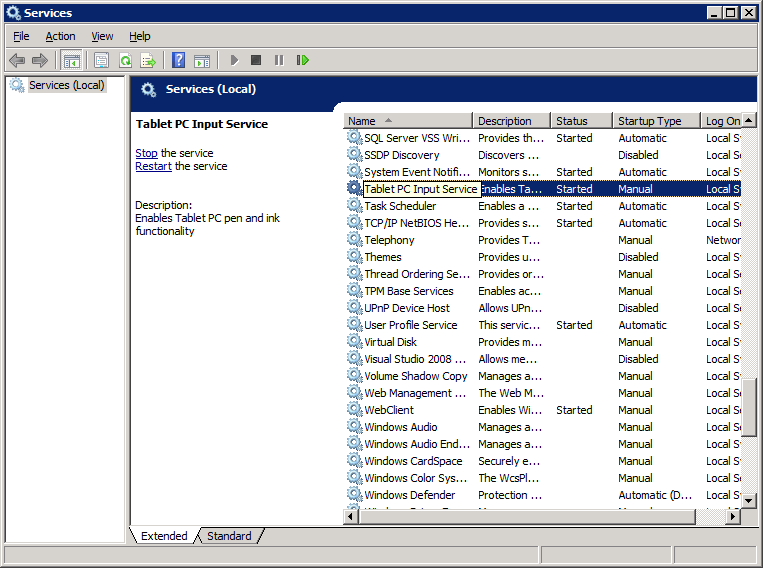
平板電腦輸入服務已啟動的服務功能表,
使用 Silverlight 執行 Server-Side 辨識
本節說明如何建立使用 Silverlight 來擷取手寫輸入的 Web 應用程式。 使用下列步驟在Visual Studio 2008中設計辨識器。
- 安裝及更新 Visual Studio 2008,以新增 Silverlight 的支援。
- 在 Visual Studio 2008 中建立新的 Silverlight 專案。
- 將必要的服務參考新增至您的專案。
- 建立 Silverlight WCF 服務以進行筆跡辨識。
- 將服務引用新增至客戶端專案。
- 將 InkCollector 類別新增至 InkRecognition 專案。
- 從客戶端設定中移除安全傳輸指示詞
安裝及更新 Visual Studio 2008 以新增 Silverlight 的支援
開始之前,您必須在 Windows Server 2008 R2 伺服器上執行下列步驟。
- 安裝 Visual Studio 2008。
- 安裝 Microsoft Visual Studio 2008 Service Pack 1。
- 安裝 Microsoft Silverlight 5 SDK。
安裝這些應用程式和更新之後,您就可以建立伺服器端辨識 Web 應用程式。
在 Visual Studio 2008 中建立新的 Silverlight Web 專案
從 [檔案] 選單中,點擊 [新增專案]。 從 Visual C# 專案清單中選取 Silverlight 應用程式範本。 將專案命名為 InkRecognition,然後單擊 [確定] 。 下圖顯示已選取並命名為 InkRecognition 的 C# Silverlight 專案。
已選取 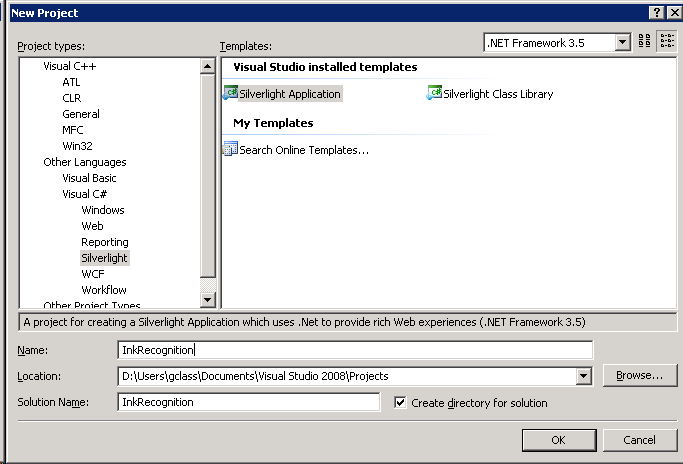
選取 C# silverlight 專案,其名稱為 inkrecognition
按兩下 [確定] 之後,對話框會提示您將 Silverlight 應用程式新增至專案。 選取 新增一個新的 ASP.NET Web 專案到解決方案以承載 Silverlight,然後按一下 確定。 下圖顯示如何在您按下 [確定] 之前設定範例專案。
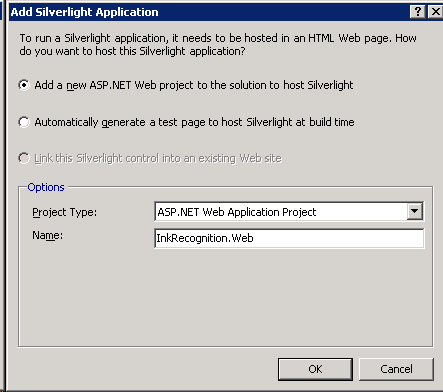
對話框,提示將 silverlight 應用程式新增至專案
將必要的服務參考新增至您的專案
現在,您的解決方案中已設置了一個一般的 Silverlight 用戶端專案 (InkRecognition) 和一個 Web 專案 (InkRecognition.Web)。 專案會同時開啟Page.xaml和Default.aspx。 關閉這些視窗,然後以滑鼠右鍵按兩下 InkRecognition 專案中的 references 資料夾,然後選取 [新增參考],以將 System.Runtime.Serialization 和 System.ServiceModel 參考新增至 InkRecognition 專案。 下圖顯示已選取必要參考的對話框。
![[新增參考] 對話框,已選取 system.runtime.serialization 和 system.servicemodel](images/project-3a-add-references-to-inkreco.png)
已選取 system.runtime.serialization 和 system.servicemodel 的 [新增參考] 對話框
接下來,您必須將 System.ServiceModel 和 Microsoft.Ink 參考新增至 InkRecognition.Web 專案。 根據預設,Microsoft.Ink 參考不會出現在 .NET 參考中,因此請在 Windows 資料夾中搜尋 Microsoft.Ink.dll。 找到 DLL 之後,將元件新增至專案參考:選取 [流覽 ] 索引標籤,變更為包含 Microsoft.Ink.dll的文件夾,選取 [Microsoft.Ink.dll],然後按兩下 [確定] 。 下圖顯示 Windows 檔案總管中項目的解決方案,並已新增所有參考元件。
在 Windows 檔案總管中 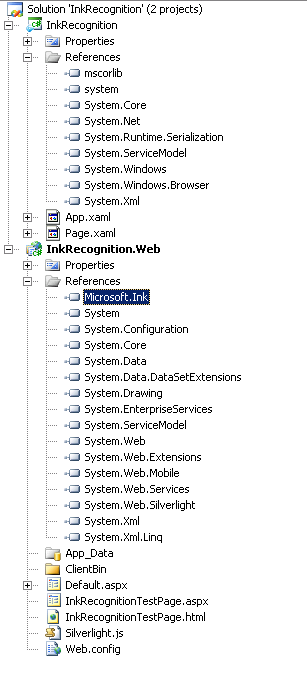
在 Windows 檔案總管中進行 inkrecognition 專案,並已新增所有參考組件
建立 Silverlight WCF 服務以進行筆跡辨識
接下來,您會將用於筆跡辨識的 WCF 服務新增至專案。 以滑鼠右鍵按下您的 InkRecognition.Web 專案,按一下 [新增],然後按一下 [新增項目]。 選取 WCF Silverlight 服務範本,將名稱變更為 InkRecogitionService,然後按一下 [[新增]]。 下圖顯示 [新增項目] 對話方塊,其中已選取並命名 Silverlight WCF 服務。
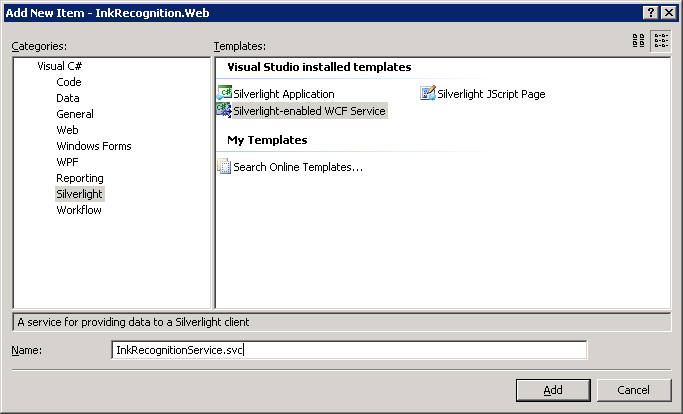
新增項目對話框中選取並命名 Silverlight WCF 服務為
在您新增 WCF Silverlight 服務之後,服務的後端代碼檔案 InkRecognitionService.cs 將會自動開啟。 以下列程式代碼取代服務程序代碼。
using System;
using System.Linq;
using System.Runtime.Serialization;
using System.ServiceModel;
using System.ServiceModel.Activation;
using System.Collections.Generic;
using System.Text;
using Microsoft.Ink;

namespace InkRecognition.Web
{
    [ServiceContract(Namespace = "")]
    [AspNetCompatibilityRequirements(RequirementsMode = AspNetCompatibilityRequirementsMode.Allowed)]
    public class InkRecognitionService
    {
        [OperationContract]
        public string[] Recognize(int[][] packets)
        {
            // Deserialize ink.
            Ink ink = new Ink();
            Tablet tablet = new Tablets().DefaultTablet;
            TabletPropertyDescriptionCollection desc = new TabletPropertyDescriptionCollection();
            desc.Add(new TabletPropertyDescription(PacketProperty.X, tablet.GetPropertyMetrics(PacketProperty.X)));
            desc.Add(new TabletPropertyDescription(PacketProperty.Y, tablet.GetPropertyMetrics(PacketProperty.Y)));
            int numOfStrokes = packets.GetUpperBound(0) + 1;
            for (int i = 0; i < numOfStrokes; i++)
            {
                ink.CreateStroke(packets[i], desc);
            }

            // Recognize ink.
            RecognitionStatus recoStatus;
            RecognizerContext recoContext = new RecognizerContext();
            recoContext.RecognitionFlags = RecognitionModes.LineMode | RecognitionModes.TopInkBreaksOnly;
            recoContext.Strokes = ink.Strokes;
            RecognitionResult recoResult = recoContext.Recognize(out recoStatus);
            RecognitionAlternates alternates = recoResult.GetAlternatesFromSelection();
            string[] results = new string[alternates.Count];
            for (int i = 0; i < alternates.Count; i++)
            {
                results[i] = alternates[i].ToString();
            }

            // Send results to client.
            return results;
        }
    }
}
將服務參考新增至您的客戶端專案
現在您已擁有適用於 InkRecognition 的 Silverlight WCF 服務,接下來會從用戶端應用程式取用服務。 以滑鼠右鍵按下 InkRecognition 專案,然後選取 新增服務參考。 在出現的 [新增服務參考] 對話框中,選取 [識別],以識別來自目前方案中的服務。 InkRecognitionService 會出現在 [服務] 窗格中。 從 [服務] 窗格中按兩下 InkRecognitionService,將命名空間變更為 InkRecognitionServiceReference,然後按兩下 [確定] [確定]。 下圖顯示已選取 InkRecognitionService 且命名空間已變更的 [[新增服務參考] 對話框。
![在 [新增服務參考] 對話框中,已選取 inkrecognitionservice 並變更命名空間](images/project-5-discover-service-reference.png)
[新增服務參考] 對話框,其中已選取 inkrecognitionservice 並已更改命名空間
將 InkCollector 類別新增至 InkRecognition 專案
以滑鼠右鍵按一下 InkRecognition 專案,然後按一下 新增,再按一下 新增項目。 從 [Visual C#] 選單中,選取 C# 類別。 將類別命名為 InkCollector。 下圖顯示已選取 C# 類別並命名的對話框。
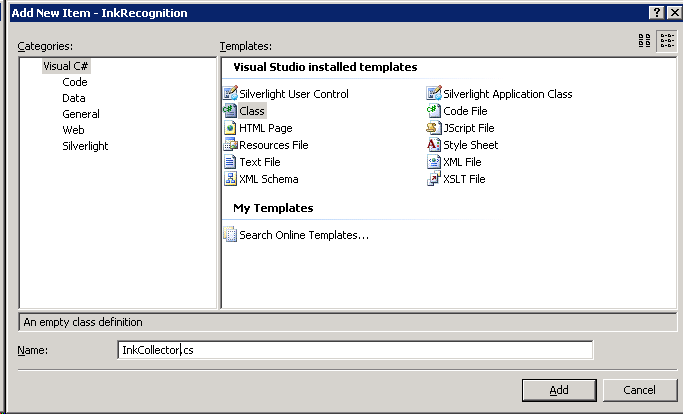
[新增項目] 對話框,並選取 c# 類別並命名
新增 InkCollector 類別之後,類別定義將會開啟。 以下列程序代碼取代 Ink Collector 中的程式代碼。
using System;
using System.Net;
using System.Windows;
using System.Windows.Controls;
using System.Windows.Documents;
using System.Windows.Ink;
using System.Windows.Input;
using System.Windows.Media;
using System.Windows.Media.Animation;
using System.Windows.Shapes;

namespace InkRecognition
{
    public class InkCollector : IDisposable
    {
        public InkCollector(InkPresenter presenter)
        {
            _presenter = presenter;
            _presenter.Cursor = Cursors.Stylus;
            _presenter.MouseLeftButtonDown += new MouseButtonEventHandler(_presenter_MouseLeftButtonDown);
            _presenter.MouseMove += new MouseEventHandler(_presenter_MouseMove);
            _presenter.MouseLeftButtonUp += new MouseButtonEventHandler(_presenter_MouseLeftButtonUp);
        }

        void _presenter_MouseLeftButtonDown(object sender, MouseButtonEventArgs e)
        {
            _presenter.CaptureMouse();
            if (!e.StylusDevice.Inverted)
            {
                _presenter.Cursor = Cursors.Stylus;
                _stroke = new Stroke(e.StylusDevice.GetStylusPoints(_presenter));
                _stroke.DrawingAttributes = _drawingAttributes;
                _presenter.Strokes.Add(_stroke);
            }
            else
            {
                _presenter.Cursor = Cursors.Eraser;
                _erasePoints = e.StylusDevice.GetStylusPoints(_presenter);
            }
        }

        void _presenter_MouseMove(object sender, MouseEventArgs e)
        {
            if (!e.StylusDevice.Inverted)
            {
                _presenter.Cursor = Cursors.Stylus;
            }
            else
            {
                _presenter.Cursor = Cursors.Eraser;
            }
            if (_stroke != null)
            {
                _stroke.StylusPoints.Add(e.StylusDevice.GetStylusPoints(_presenter));
            }
            else if (_erasePoints != null)
            {
                _erasePoints.Add(e.StylusDevice.GetStylusPoints(_presenter));
                StrokeCollection hitStrokes = _presenter.Strokes.HitTest(_erasePoints);
                if (hitStrokes.Count > 0)
                {
                    foreach (Stroke hitStroke in hitStrokes)
                    {
                        _presenter.Strokes.Remove(hitStroke);
                    }
                }
            }
        }

        void _presenter_MouseLeftButtonUp(object sender, MouseButtonEventArgs e)
        {
            _presenter.ReleaseMouseCapture();
            if (_stroke != null)
            {
                _stroke.StylusPoints.Add(e.StylusDevice.GetStylusPoints(_presenter));
            }
            _stroke = null;
            _erasePoints = null;
        }

        public DrawingAttributes DefaultDrawingAttributes
        {
            get { return _drawingAttributes; }
            set { _drawingAttributes = value; }
        }

        public void Dispose()
        {
            _presenter.MouseLeftButtonDown -= new MouseButtonEventHandler(_presenter_MouseLeftButtonDown);
            _presenter.MouseMove -= new MouseEventHandler(_presenter_MouseMove);
            _presenter.MouseLeftButtonUp -= new MouseButtonEventHandler(_presenter_MouseLeftButtonUp);
            _presenter = null;
        }

        private InkPresenter _presenter = null;
        private Stroke _stroke = null;
        private StylusPointCollection _erasePoints = null;
        private DrawingAttributes _drawingAttributes = new DrawingAttributes();
    }
}
更新預設頁面的 XAML,並新增手寫辨識的程式代碼後置
既然您已經有一個類別來收集墨水,您必須使用下列 XAML 內容更新 page.xaml 中的 XAML。 下列程式代碼會將黃色漸層新增至輸入區域、InkCanvas 控件,以及將觸發辨識的按鈕。
<UserControl x:Class="InkRecognition.Page"
    xmlns="http://schemas.microsoft.com/winfx/2006/xaml/presentation"
    xmlns:x="http://schemas.microsoft.com/winfx/2006/xaml">
    <Grid x:Name="LayoutRoot" Background="White">
        <Grid.RowDefinitions>
            <RowDefinition Height="Auto"/>
            <RowDefinition Height="Auto"/>
        </Grid.RowDefinitions>
        <Border Margin="5" Grid.Row="0" BorderThickness="4" BorderBrush="Black" CornerRadius="5" Height="200">
            <Grid>
                <InkPresenter x:Name="inkCanvas">
                    <InkPresenter.Background>
                        <LinearGradientBrush StartPoint="0.5,0" EndPoint="0.5,1">
                            <GradientStop Offset="0" Color="Yellow"/>
                            <GradientStop Offset="1" Color="LightYellow"/>
                        </LinearGradientBrush>
                    </InkPresenter.Background>
                </InkPresenter>
                <Button Grid.Row="0" HorizontalAlignment="Right" VerticalAlignment="Bottom" Margin="10" Content="Recognize" Click="RecoButton_Click"/>
            </Grid>
        </Border>
        <Grid Grid.Row="1">
            <Grid.ColumnDefinitions>
                <ColumnDefinition Width="Auto"/>
                <ColumnDefinition Width="*"/>
            </Grid.ColumnDefinitions>
            <TextBlock Grid.Column="0" FontSize="28" Text="Result: "/>
            <ComboBox x:Name="results" Grid.Column="1" FontSize="28"/>
        </Grid>
    </Grid>
</UserControl>
請將 Page.xaml.cs 的程式碼替換為以下程式碼,該程式碼將為 Recognize 按鈕新增事件處理器。
using System;
using System.Collections.Generic;
using System.Collections.ObjectModel;
using System.Linq;
using System.Net;
using System.Windows;
using System.Windows.Controls;
using System.Windows.Ink;
using System.Windows.Input;
using System.Windows.Media;
using System.Windows.Media.Animation;
using System.Windows.Shapes;
using InkRecognition.InkRecognitionServiceReference;

namespace InkRecognition
{
    public partial class Page : UserControl
    {
        public Page()
        {
            InitializeComponent();
            inkCol = new InkCollector(inkCanvas);
            recoClient = new InkRecognitionServiceClient();
            recoClient.RecognizeCompleted += new EventHandler<RecognizeCompletedEventArgs>(recoClient_RecognizeCompleted);
        }

        private void RecoButton_Click(object sender, RoutedEventArgs e)
        {
            // Serialize the ink into an array on ints.
            ObservableCollection<ObservableCollection<int>> packets = new ObservableCollection<ObservableCollection<int>>();
            double pixelToHimetricMultiplier = 2540d / 96d;

            foreach (Stroke stroke in inkCanvas.Strokes)
            {
                packets.Add(new ObservableCollection<int>());
                int index = inkCanvas.Strokes.IndexOf(stroke);
                for (int i = 0; i < stroke.StylusPoints.Count; i += 2)
                {
                    packets[index].Add(Convert.ToInt32(stroke.StylusPoints[i].X * pixelToHimetricMultiplier));
                    packets[index].Add(Convert.ToInt32(stroke.StylusPoints[i].Y * pixelToHimetricMultiplier));
                }
            }

            // Call the Web service.
            recoClient.RecognizeAsync(packets);
        }

        void recoClient_RecognizeCompleted(object sender, RecognizeCompletedEventArgs e)
        {
            // We have received results from the server, now display them.
            results.ItemsSource = e.Result;
            UpdateLayout();
            results.SelectedIndex = 0;
            inkCanvas.Strokes.Clear();
        }

        private InkRecognitionServiceClient recoClient = null;
        private InkCollector inkCol = null;
    }
}
從客戶端設定中移除安全傳輸指示詞
您必須先從服務組態中移除所有安全傳輸選項,因為 Silverlight 2.0 WCF 服務目前不支援安全傳輸,才能取用 WCF 服務。 從 InkRecognition 專案中,更新 ServiceReferences.ClientConfig 中的安全性設定。 更改安全性 XML
          <security mode="None">
            <transport>
              <extendedProtectionPolicy policyEnforcement="WhenSupported" />
            </transport>
          </security>
到
<security mode="None"/>
現在,您的應用程式應該會執行。 下圖顯示應用程式在網頁中的外觀,以及辨識方塊中輸入的一些手寫。
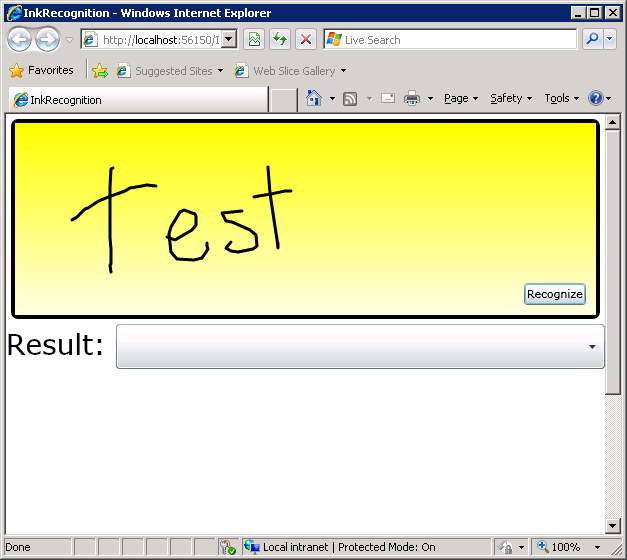
應用程式在網頁中輸入了一些手寫到辨識方塊中
下圖顯示 [結果 ] 下拉式清單中 辨識的文字。
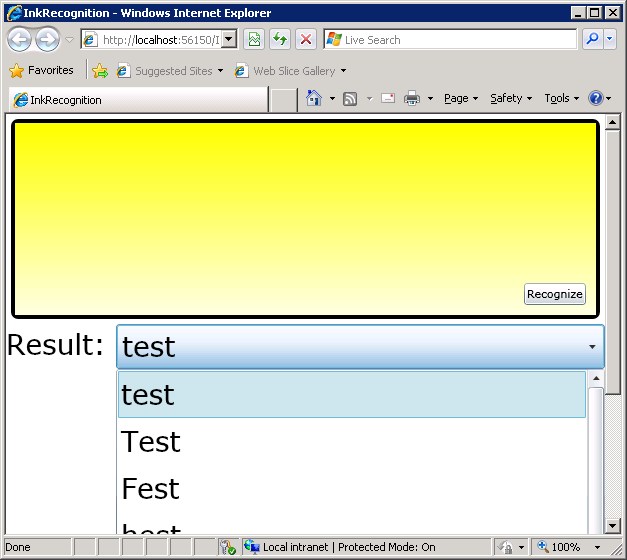
在網頁中具有已識別文字的應用程式於結果下拉式清單中