Android 上的本機通知
本節說明如何在 Xamarin.Android 中實作本機通知。 它會說明 Android 通知的各種 UI 元素,並討論與建立和顯示通知相關的 API。
本機通知概觀
Android 提供兩個系統控制區域,向用戶顯示通知圖示和通知資訊。 第一次發佈通知時,其圖示會顯示在 通知區域中,如下列螢幕快照所示:

若要取得通知的詳細數據,用戶可以開啟通知選單(這會展開每個通知圖示以顯示通知內容),並執行與通知相關聯的任何動作。 下列螢幕快照顯示對應 至上方顯示之通知區域的通知選單 :

Android 通知使用兩種類型的版面設定:
基本版面配置 – 精簡、固定的簡報格式。
展開的版面配置 – 可擴充為較大大小的簡報格式,以顯示更多資訊。
下列各節將說明這些配置類型(以及如何建立它們)。
注意
本指南著重於 Android 支持連結庫中的 NotificationCompat API。 這些 API 可確保 Android 4.0 的最大回溯相容性(API 層級 14)。
基本版面配置
所有 Android 通知都是以基底版面設定格式為基礎所建置,至少包含下列元素:
通知 圖示,代表原始應用程式,如果應用程式支援不同類型的通知,則為通知類型。
通知標題,如果通知是個人訊息,則為寄件人的名稱。
通知訊息。
時間戳。
這些元素會顯示如下圖所示:

基底版面配置的高度限制為 64 個密度無關圖元 (dp)。 Android 預設會建立此基本通知樣式。
或者,通知可以顯示代表應用程式或寄件者相片的大型圖示。 在 Android 5.0 和更新版本中的通知中使用大型圖示時,小型通知圖示會顯示為大型圖示上的徽章:

從 Android 5.0 開始,通知也可以出現在鎖定畫面上:

使用者可以按兩下鎖定畫面通知來解除鎖定裝置,並跳至源自該通知的應用程式,或撥動以關閉通知。 應用程式可以設定通知的可見度層級,以控制鎖定畫面上顯示的內容,用戶可以選擇是否允許在鎖定畫面通知中顯示敏感性內容。
Android 5.0 引進了稱為 「抬頭」的高優先順序通知簡報格式。 抬頭通知會從螢幕頂端向下滑動幾秒鐘,然後撤退到通知區域:

頭部通知可讓系統UI將重要資訊放在使用者面前,而不會中斷目前執行中活動的狀態。
Android 包含通知元數據的支援,以便以智慧方式排序和顯示通知。 通知元數據也會控制通知在鎖定畫面和抬頭格式上的呈現方式。 應用程式可以設定下列類型的通知元數據:
優先順序 – 優先順序層級會決定通知的呈現方式和時機。 例如,在 Android 5.0 中,高優先順序的通知會顯示為頭條通知。
可見度 – 指定當通知出現在鎖定畫面時,要顯示多少通知內容。
類別 – 通知系統如何在各種情況下處理通知,例如當裝置處於 「不要打擾 」模式時。
注意
可見度 和 類別 是在 Android 5.0 中引進的,無法在舊版 Android 中使用。 從 Android 8.0 開始, 通知通道 可用來控制通知向用戶呈現的方式。
展開的版面配置
從 Android 4.1 開始,通知可以使用展開的版面配置樣式來設定,讓用戶能夠擴充通知的高度,以檢視更多內容。 例如,下列範例說明在合約模式中展開的版面配置通知:

展開此通知時,會顯示整個訊息:
Android 針對單一事件通知支援三種展開的版面配置樣式:
大文字 – 在合約模式中,會顯示訊息第一行的摘錄,後面接著兩個句點。 在展開模式中,顯示整個訊息(如上述範例所示)。
收件匣 – 在合約模式中,顯示新訊息的數目。 在展開模式中,顯示收件匣中第一個電子郵件訊息或郵件清單。
影像 – 在合約模式中,只會顯示消息正文。 在展開模式中,顯示文字和影像。
除了基本通知 之外(本文稍後)會說明如何建立 大文字、 收件匣和 影像 通知。
通知通道
從 Android 8.0 (Oreo) 開始,您可以使用 通知通道 功能,為您想要顯示的每種通知類型建立使用者可自定義的通道。 通知通道可讓您將通知分組,讓所有張貼至通道的通知都表現出相同的行為。 例如,您可能有通知通道,其適用於需要立即注意的通知,以及用於參考訊息的個別「更安靜」通道。
隨 Android Oreo 一起安裝的 YouTube 應用程式會列出兩個通知類別:下載通知和一般通知:

這些類別中的每個類別都會對應至通知通道。 YouTube 應用程式會實作下載 通知 頻道和一 般通知 頻道。 使用者可以點選 [ 下載通知],其會顯示應用程式下載通知通道的設定畫面:

在此畫面中,使用者可以執行下列動作來修改下載通知通道的行為:
將 [重要性層級] 設定為 [緊急]、 [高]、 [中] 或 [低],以設定音效和視覺中斷的層級。
開啟或關閉通知點。
開啟或關閉閃爍的燈。
在鎖定畫面上顯示或隱藏通知。
覆寫 [不要打擾] 設定。
一 般通知 通道有類似的設定:

請注意,您對於通知通道與用戶互動的方式沒有絕對控制權, 使用者可以修改裝置上任何通知通道的設定,如上述螢幕快照所示。 不過,您可以設定預設值(如下所述)。 如這些範例所示,新的通知通道功能可讓您對不同類型的通知提供更細緻的控制。
通知建立
若要在 Android 中建立通知,您可以使用 Xamarin.Android.Support.v4 NuGet 套件中的 NotificationCompat.Builder 類別。 這個類別可讓您在舊版 Android 上建立和發佈通知。
NotificationCompat.Builder 也會討論。
NotificationCompat.Builder 提供在通知中設定各種選項的方法,例如:
內容,包括標題、消息正文和通知圖示。
通知的樣式,例如 [大文字]、 [收件匣] 或 [ 影像 ] 樣式。
通知的優先順序:最小值、低、預設值、高或最大值。 在 Android 8.0 和更新版本上,優先順序是透過 通知通道設定。
鎖定畫面上通知的可見度:公用、私人或秘密。
可協助Android分類和篩選通知的類別元數據。
選擇性意圖,表示點選通知時要啟動的活動。
通知通道的標識碼,通知將發佈在 (Android 8.0 和更新版本)。
在產生器中設定這些選項之後,您會產生包含設定的通知物件。 若要發佈通知,請將此通知對象傳遞至 通知管理員。 Android 提供 NotificationManager 類別,負責發佈通知並向用戶顯示通知。 這個類別的參考可以從任何內容取得,例如活動或服務。
建立通知通道
在 Android 8.0 上執行的應用程式必須為其通知建立通知通道。 通知通道需要下列三項資訊:
- 識別通道之封裝唯一的標識符字串。
- 要向用戶顯示的通道名稱。 名稱必須介於一到 40 個字元之間。
- 通道的重要性。
應用程式必須檢查其執行中的Android版本。 執行 Android 8.0 舊版的裝置不應該建立通知通道。 下列方法是如何在活動中建立通知通道的其中一個範例:
void CreateNotificationChannel()
{
    if (Build.VERSION.SdkInt < BuildVersionCodes.O)
    {
        // Notification channels are new in API 26 (and not a part of the
        // support library). There is no need to create a notification
        // channel on older versions of Android.
        return;
    }

    var channelName = Resources.GetString(Resource.String.channel_name);
    var channelDescription = GetString(Resource.String.channel_description);
    var channel = new NotificationChannel(CHANNEL_ID, channelName, NotificationImportance.Default)
                  {
                      Description = channelDescription
                  };

    var notificationManager = (NotificationManager) GetSystemService(NotificationService);
    notificationManager.CreateNotificationChannel(channel);
}
每次建立活動時,都應該建立通知通道。 CreateNotificationChannel針對方法,應該在 活動的 方法中OnCreate呼叫它。
建立和發佈通知
若要在Android中產生通知,請遵循下列步驟:
具現化
NotificationCompat.Builder物件。在物件上
NotificationCompat.Builder呼叫各種方法,以設定通知選項。呼叫 物件的 Build 方法
NotificationCompat.Builder,以具現化通知物件。呼叫通知管理員的 Notify 方法以發佈通知。
您必須為每個通知至少提供下列資訊:
小型圖示 (大小為 24x24 dp)
簡短標題
通知的文字
下列程式代碼範例說明如何使用 NotificationCompat.Builder 來產生基本通知。 請注意, NotificationCompat.Builder 方法支援 方法鏈結;也就是說,每個方法都會傳回產生器物件,讓您可以使用最後一個方法呼叫的結果來叫用下一個方法呼叫:
// Instantiate the builder and set notification elements:
NotificationCompat.Builder builder = new NotificationCompat.Builder(this, CHANNEL_ID)
    .SetContentTitle ("Sample Notification")
    .SetContentText ("Hello World! This is my first notification!")
    .SetSmallIcon (Resource.Drawable.ic_notification);

// Build the notification:
Notification notification = builder.Build();

// Get the notification manager:
NotificationManager notificationManager =
    GetSystemService (Context.NotificationService) as NotificationManager;

// Publish the notification:
const int notificationId = 0;
notificationManager.Notify (notificationId, notification);
在此範例中,會具現化名為 builder 的新NotificationCompat.Builder物件,以及要使用的通知通道標識符。 會設定通知的標題和文字,並從 Resources/drawable/ic_notification.png載入通知圖示。 呼叫通知產生器 Build 的方法會使用這些設定來建立通知物件。 下一個步驟是呼叫 Notify 通知管理員的 方法。 若要找出通知管理員,請呼叫 GetSystemService,如上所示。
方法 Notify 接受兩個參數:通知標識碼和通知物件。 通知標識碼是可識別應用程式通知的唯一整數。 在此範例中,通知標識碼設定為零 (0):不過,在生產應用程式中,您會想要為每個通知提供唯一標識符。 重複使用呼叫 Notify 中的前一個標識碼值,會導致覆寫最後一個通知。
當此程式代碼在Android 5.0裝置上執行時,會產生類似下列範例的通知:

通知圖示會顯示在通知的左側 –這個圓形 “i” 影像具有 Alpha 色板,讓 Android 可以在其後面繪製灰色圓形背景。 您也可以提供沒有 Alpha 色板的圖示。 若要將攝影影像顯示為圖示,請參閱 本主題稍後的大型圖示格式 。
時間戳會自動設定,但您可以呼叫 通知產生器的 SetWhen 方法來覆寫此設定。 例如,下列程式代碼範例會將時間戳設定為目前時間:
builder.SetWhen (Java.Lang.JavaSystem.CurrentTimeMillis());
啟用音效和震動
如果您想要讓通知也播放音效,您可以呼叫通知產生器的 SetDefaults 方法並傳入 NotificationDefaults.Sound 旗標:
// Instantiate the notification builder and enable sound:
NotificationCompat.Builder builder = new NotificationCompat.Builder(this, CHANNEL_ID)
    .SetContentTitle ("Sample Notification")
    .SetContentText ("Hello World! This is my first notification!")
    .SetDefaults (NotificationDefaults.Sound)
    .SetSmallIcon (Resource.Drawable.ic_notification);
此呼叫 SetDefaults 會導致裝置在發佈通知時播放音效。 如果您想要讓裝置振動而不是播放音效,您可以傳遞 NotificationDefaults.Vibrate 至 SetDefaults. 如果裝置播放音效並振動裝置,您可以將這兩個旗標傳遞至 SetDefaults:
builder.SetDefaults (NotificationDefaults.Sound | NotificationDefaults.Vibrate);
如果您啟用音效而不指定播放音效,Android 會使用預設的系統通知音效。 不過,您可以藉由呼叫通知產生器的 SetSound 方法來變更將播放的聲音。 例如,若要使用您的通知播放警示音效(而不是預設通知音效),您可以從 RingtoneManager 取得警示音效的 URI,並將其傳遞至 SetSound:
builder.SetSound (RingtoneManager.GetDefaultUri(RingtoneType.Alarm));
或者,您可以針對通知使用系統預設的鈴聲音效:
builder.SetSound (RingtoneManager.GetDefaultUri(RingtoneType.Ringtone));
建立通知對象之後,就可以在通知對象上設定通知屬性(而不是透過方法事先 NotificationCompat.Builder 設定它們)。 例如,您可以直接修改通知的 Defaults 屬性的位旗標,而不是呼叫 SetDefaults 方法來啟用通知上的震動:
// Build the notification:
Notification notification = builder.Build();

// Turn on vibrate:
notification.Defaults |= NotificationDefaults.Vibrate;
本範例會在發佈通知時讓裝置振動。
更新通知
如果您想要在通知發佈之後更新通知的內容,您可以重複使用現有的 NotificationCompat.Builder 物件來建立新的通知物件,並使用最後一個通知的標識碼發佈此通知。 例如:
// Update the existing notification builder content:
builder.SetContentTitle ("Updated Notification");
builder.SetContentText ("Changed to this message.");

// Build a notification object with updated content:
notification = builder.Build();

// Publish the new notification with the existing ID:
notificationManager.Notify (notificationId, notification);
在此範例中,現有的 NotificationCompat.Builder 對像是用來建立具有不同標題和訊息的新通知物件。
新的通知物件是使用先前通知的標識碼發佈,這會更新先前發佈的通知內容:

會重複使用上一個通知的本文 – 只有在通知隱藏式選單中顯示通知時,通知的標題和文字才會變更。 標題文字會從 「範例通知」變更為「已更新通知」,而消息正文會從 「Hello World! 這是我的第一個通知!
在發生下列三件事之一之前,仍會顯示通知:
使用者關閉通知(或點選 [全部清除]。
應用程式會呼叫
NotificationManager.Cancel,傳入發佈通知時指派的唯一通知標識符。應用程式會呼叫
NotificationManager.CancelAll。
如需更新 Android 通知的詳細資訊,請參閱 修改通知。
從通知啟動活動
在 Android 中,通知通常會與 動作 相關聯, 這是使用者點選通知時所啟動的活動。 此活動可以位於另一個應用程式,甚至是另一個工作中。 若要將動作新增至通知,您可以建立 PendingIntent 物件,並將與通知產生關聯 PendingIntent 。 PendingIntent是一種特殊的意圖類型,可讓收件者應用程式以傳送應用程式的許可權執行預先定義的程式代碼片段。 當使用者點選通知時,Android 會啟動 所 PendingIntent指定的活動。
下列代碼段說明如何使用 建立通知PendingIntent,以啟動原始應用程式的活動: MainActivity
// Set up an intent so that tapping the notifications returns to this app:
Intent intent = new Intent (this, typeof(MainActivity));

// Create a PendingIntent; we're only using one PendingIntent (ID = 0):
const int pendingIntentId = 0;
PendingIntent pendingIntent =
    PendingIntent.GetActivity (this, pendingIntentId, intent, PendingIntentFlags.OneShot);

// Instantiate the builder and set notification elements, including pending intent:
NotificationCompat.Builder builder = new NotificationCompat.Builder(this, CHANNEL_ID)
    .SetContentIntent (pendingIntent)
    .SetContentTitle ("Sample Notification")
    .SetContentText ("Hello World! This is my first action notification!")
    .SetSmallIcon (Resource.Drawable.ic_notification);

// Build the notification:
Notification notification = builder.Build();

// Get the notification manager:
NotificationManager notificationManager =
    GetSystemService (Context.NotificationService) as NotificationManager;

// Publish the notification:
const int notificationId = 0;
notificationManager.Notify (notificationId, notification);
此程式代碼與上一 PendingIntent 節中的通知程序代碼非常類似,不同之處在於 已將 新增至通知物件。 在此範例中,會 PendingIntent 先與原始應用程式的活動相關聯,再傳遞至通知產生器的 SetContentIntent 方法。 旗 PendingIntentFlags.OneShot 標會傳遞至 PendingIntent.GetActivity 方法, PendingIntent 以便只使用一次 。 執行此程式代碼時,會顯示下列通知:

點選此通知可讓使用者回到原始活動。
在生產應用程式中,當使用者按下通知活動內的 [上一頁] 按鈕時,您的應用程式必須處理返回堆疊(如果您不熟悉 Android 工作和返回堆疊,請參閱工作和上一頁堆棧)。
在大部分情況下,向後流覽通知活動應該會將使用者從應用程式傳回回到首頁畫面。 若要管理後台堆疊,您的應用程式會使用 TaskStackBuilder 類別來建立 PendingIntent 與後台堆疊。
另一個實際考慮是,原始活動可能需要將數據傳送至通知活動。 例如,通知可能表示文字訊息已送達,而通知活動(訊息檢視畫面)需要訊息的標識碼,才能向用戶顯示訊息。 建立 PendingIntent 的活動可以使用 Intent.PutExtra 方法,將數據(例如字串)新增至意圖,讓此數據傳遞至通知活動。
下列程式代碼範例說明如何使用 TaskStackBuilder 來管理後台堆疊,並包含如何將單一訊息字串傳送至名為 SecondActivity的通知活動範例:
// Setup an intent for SecondActivity:
Intent secondIntent = new Intent (this, typeof(SecondActivity));

// Pass some information to SecondActivity:
secondIntent.PutExtra ("message", "Greetings from MainActivity!");

// Create a task stack builder to manage the back stack:
TaskStackBuilder stackBuilder = TaskStackBuilder.Create(this);

// Add all parents of SecondActivity to the stack:
stackBuilder.AddParentStack (Java.Lang.Class.FromType (typeof (SecondActivity)));

// Push the intent that starts SecondActivity onto the stack:
stackBuilder.AddNextIntent (secondIntent);

// Obtain the PendingIntent for launching the task constructed by
// stackbuilder. The pending intent can be used only once (one shot):
const int pendingIntentId = 0;
PendingIntent pendingIntent =
    stackBuilder.GetPendingIntent (pendingIntentId, PendingIntentFlags.OneShot);

// Instantiate the builder and set notification elements, including
// the pending intent:
NotificationCompat.Builder builder = new NotificationCompat.Builder(this, CHANNEL_ID)
    .SetContentIntent (pendingIntent)
    .SetContentTitle ("Sample Notification")
    .SetContentText ("Hello World! This is my second action notification!")
    .SetSmallIcon (Resource.Drawable.ic_notification);

// Build the notification:
Notification notification = builder.Build();

// Get the notification manager:
NotificationManager notificationManager =
    GetSystemService (Context.NotificationService) as NotificationManager;

// Publish the notification:
const int notificationId = 0;
notificationManager.Notify (notificationId, notification);
在此程式代碼範例中,應用程式包含兩個活動: MainActivity (其中包含上述通知程式代碼),以及 SecondActivity用戶點選通知之後看到的畫面。 執行此程式代碼時,會顯示簡單的通知(類似於先前的範例)。 點選通知會讓使用者進入 SecondActivity 畫面:
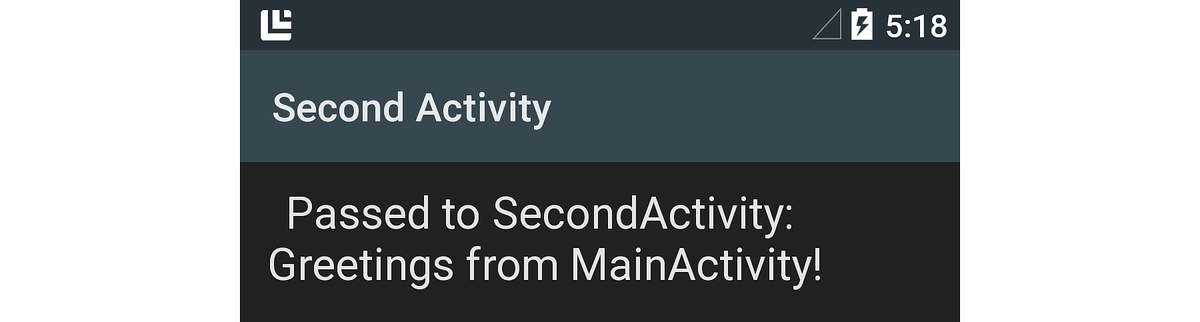
字串訊息(傳遞至意圖的 PutExtra 方法)會透過這一行程式代碼擷取:SecondActivity
// Get the message from the intent:
string message = Intent.Extras.GetString ("message", "");
此擷取的訊息「來自 MainActivity!的問候語!」會顯示在畫面中 SecondActivity ,如上述螢幕快照所示。 當使用者在 中SecondActivity按下 [上一頁] 按鈕時,流覽會從應用程式往外,然後回到啟動應用程式前的畫面。
如需建立暫止意圖的詳細資訊,請參閱 PendingIntent。
除了基本通知之外
通知預設為 Android 中的簡單基底版面配置格式,但您可以藉由進行其他 NotificationCompat.Builder 方法呼叫來增強此基本格式。 在本節中,您將瞭解如何將大型相片圖示新增至您的通知,並查看如何建立展開版面配置通知的範例。
大型圖示格式
Android 通知通常會顯示原始應用程式的圖示(在通知的左側)。 不過,通知可以顯示影像或相片( 大型圖示),而不是標準小型圖示。 例如,傳訊應用程式可能會顯示寄件者相片,而不是應用程式圖示。
以下是基本 Android 5.0 通知的範例 – 它只會顯示小型應用程式圖示:

以下是修改通知以顯示大型圖示之後的螢幕快照, 它會使用從 Xamarin 程式代碼猴子影像建立的圖示:
![]()
請注意,當通知以大型圖示格式顯示時,小型應用程式圖示會顯示為大型圖示右下角的徽章。
若要在通知中使用影像作為大型圖示,您可以呼叫通知產生器的 SetLargeIcon 方法,並傳入影像的位圖。 不同於 SetSmallIcon, SetLargeIcon 只接受位圖。 若要將圖像檔案轉換成位圖,您可以使用 BitmapFactory 類別。 例如:
builder.SetLargeIcon (BitmapFactory.DecodeResource (Resources, Resource.Drawable.monkey_icon));
此範例程式代碼會在 Resources/drawable/monkey_icon.png 開啟影像檔案,將它轉換成位圖,並將產生的點陣圖傳遞至 NotificationCompat.Builder。 一般而言,來源影像解析度大於小型圖示,但不會太大。 太大的影像可能會導致不必要的重設大小作業,而可能會延遲通知的張貼。
大文字樣式
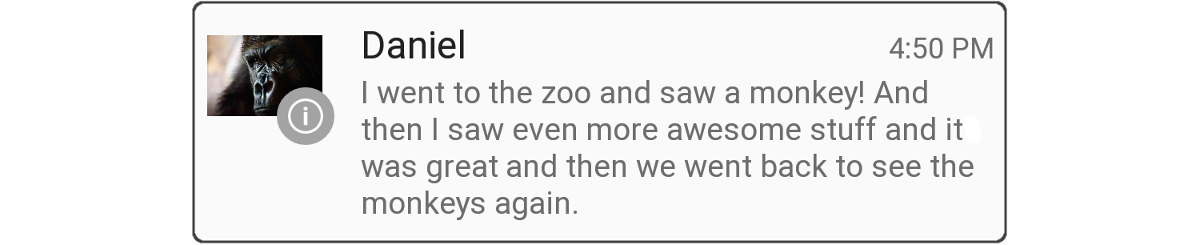
[ 大文字 ] 樣式是展開的版面配置範本,可用來在通知中顯示長訊息。 和所有展開的版面配置通知一樣,大文字通知一開始會以精簡的簡報格式顯示:

在此格式中,只會顯示訊息的摘錄,並終止兩個句點。 當使用者向下拖曳通知時,它會展開以顯示整個通知訊息:
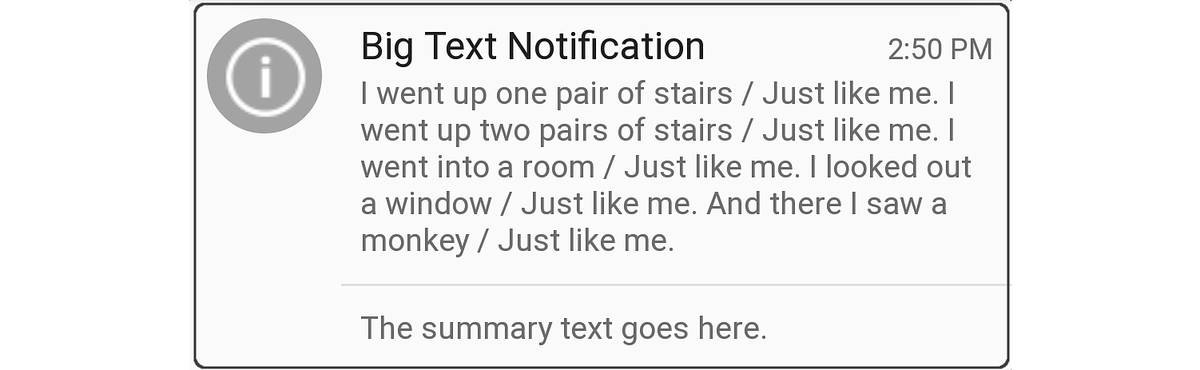
這個展開的版面配置格式也包含通知底部的摘要文字。 大文字通知的最大高度為 256 dp。
若要建立 Big Text 通知,您可以像先前一NotificationCompat.Builder樣具現化對象,然後將 BigTextStyle 物件具現化並新增至 NotificationCompat.Builder 物件。 以下是範例:
// Instantiate the Big Text style:
Notification.BigTextStyle textStyle = new Notification.BigTextStyle();

// Fill it with text:
string longTextMessage = "I went up one pair of stairs.";
longTextMessage += " / Just like me. ";
//...
textStyle.BigText (longTextMessage);

// Set the summary text:
textStyle.SetSummaryText ("The summary text goes here.");

// Plug this style into the builder:
builder.SetStyle (textStyle);

// Create the notification and publish it ...
在這裡範例中,訊息文字和摘要文字會在傳遞至 物件之前儲存在物件中 BigTextStyle (textStyle) NotificationCompat.Builder.
影像樣式
影像樣式(也稱為「大圖片」樣式)是展開的通知格式,可用來在通知本文中顯示影像。 例如,螢幕快照應用程式或相片應用程式可以使用 影像 通知樣式,為使用者提供上次擷取影像的通知。 請注意,影像通知的最大高度為 256 dp – Android 會在可用記憶體的限制內調整影像大小以符合此最大高度限制。
與所有展開的版面配置通知一樣, 影像 通知會先以精簡格式顯示,以顯示隨附訊息文字的摘錄:

當使用者拖曳到 [影像] 通知上時,它會展開以顯示影像。 例如,以下是先前通知的擴充版本:
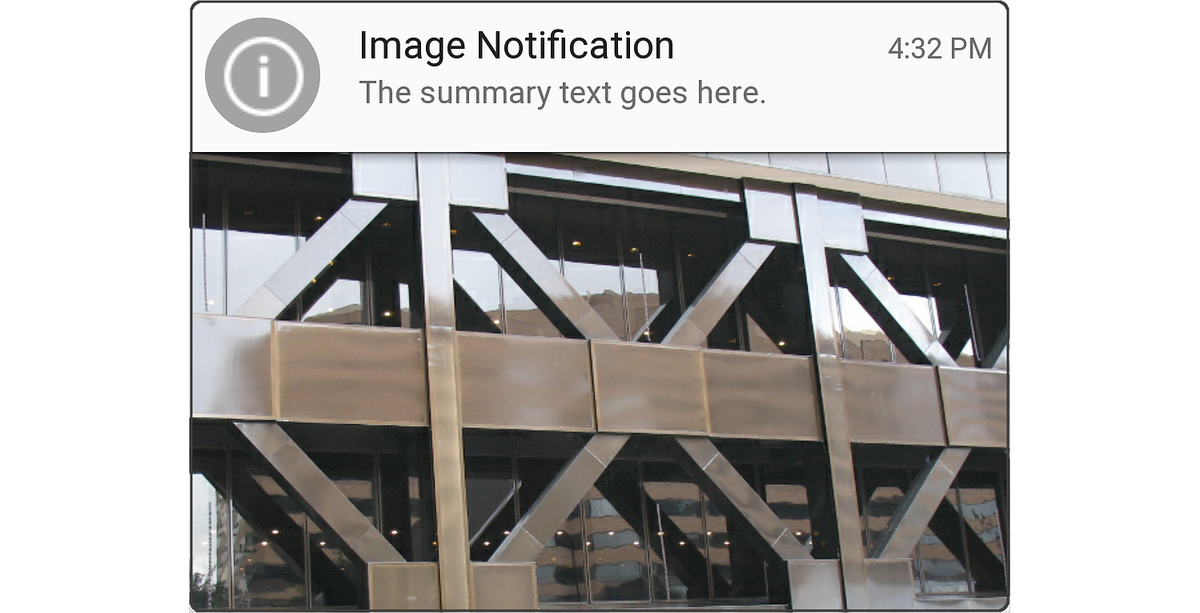
請注意,當通知以精簡格式顯示時,會顯示通知文字(傳遞至通知產生器方法的 SetContentText 文字,如先前所示)。 不過,當通知展開以顯示影像時,它會在影像上方顯示摘要文字。
若要建立 Image 通知,您可以像之前一NotificationCompat.Builder樣具現化對象,然後將 BigPictureStyle 物件NotificationCompat.Builder建立並插入物件中。 例如:
// Instantiate the Image (Big Picture) style:
Notification.BigPictureStyle picStyle = new Notification.BigPictureStyle();

// Convert the image to a bitmap before passing it into the style:
picStyle.BigPicture (BitmapFactory.DecodeResource (Resources, Resource.Drawable.x_bldg));

// Set the summary text that will appear with the image:
picStyle.SetSummaryText ("The summary text goes here.");

// Plug this style into the builder:
builder.SetStyle (picStyle);

// Create the notification and publish it ...
SetLargeIcon如同的 NotificationCompat.Builder方法,的 BigPicture 方法BigPictureStyle需要您想要在通知本文中顯示的影像位圖。 在此範例中 ,DecodeResource 方法 BitmapFactory 會讀取位於 Resources/drawable/x_bldg.png 的影像檔,並將其轉換成位圖。
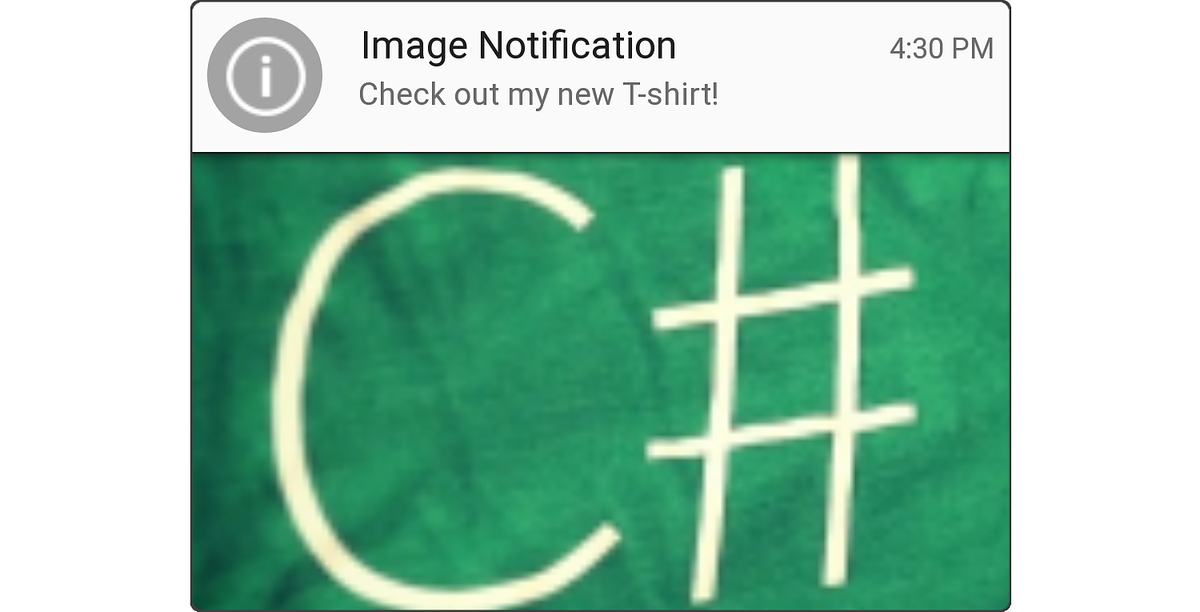
您也可以顯示未封裝為資源的影像。 例如,下列範例程式代碼會從本機 SD 記憶卡載入影像,並將其顯示在影像通知中:
// Using the Image (Big Picture) style:
Notification.BigPictureStyle picStyle = new Notification.BigPictureStyle();

// Read an image from the SD card, subsample to half size:
BitmapFactory.Options options = new BitmapFactory.Options();
options.InSampleSize = 2;
string imagePath = "/sdcard/Pictures/my-tshirt.jpg";
picStyle.BigPicture (BitmapFactory.DecodeFile (imagePath, options));

// Set the summary text that will appear with the image:
picStyle.SetSummaryText ("Check out my new T-Shirt!");

// Plug this style into the builder:
builder.SetStyle (picStyle);

// Create notification and publish it ...
在此範例中,會載入位於 /sdcard/Pictures/my-tshirt.jpg 的影像檔案、重設大小為原始大小的一半,然後轉換成位圖,以用於通知:
如果您事先不知道圖像檔的大小,最好在例外狀況處理程式中包裝對 BitmapFactory.DecodeFile 的呼叫, OutOfMemoryError 如果影像太大而無法重設大小,可能會擲回例外狀況。
如需載入和譯碼大型位圖影像的詳細資訊,請參閱 有效率地載入大型位圖。
收件匣樣式
收 件匣 格式是展開的版面配置範本,用於在通知本文中顯示個別的文字行(例如電子郵件收件匣摘要)。 收 件匣 格式通知會先以精簡格式顯示:

當使用者向下拖曳通知時,它會展開以顯示電子郵件摘要,如下列螢幕快照所示:
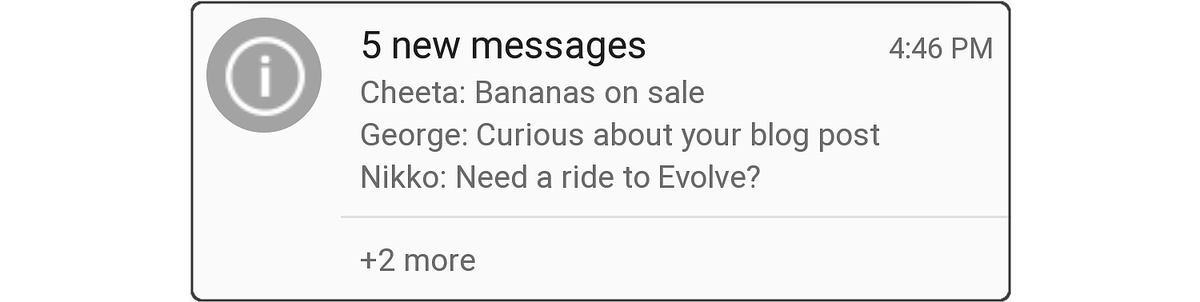
若要建立收件匣通知,您可以像之前一NotificationCompat.Builder樣具現化物件,並將 InboxStyle 物件新增至 NotificationCompat.Builder。 以下是範例:
// Instantiate the Inbox style:
Notification.InboxStyle inboxStyle = new Notification.InboxStyle();

// Set the title and text of the notification:
builder.SetContentTitle ("5 new messages");
builder.SetContentText ("chimchim@xamarin.com");

// Generate a message summary for the body of the notification:
inboxStyle.AddLine ("Cheeta: Bananas on sale");
inboxStyle.AddLine ("George: Curious about your blog post");
inboxStyle.AddLine ("Nikko: Need a ride to Evolve?");
inboxStyle.SetSummaryText ("+2 more");

// Plug this style into the builder:
builder.SetStyle (inboxStyle);
若要將新的文字行新增至通知本文,請呼叫 物件的 Addline 方法InboxStyle(收件匣通知的最大高度為 256 dp)。 請注意,與 Big Text 樣式不同,收件匣樣式支援通知本文中的個別文字行。
您也可以針對需要以展開格式顯示個別文字行的任何通知使用 [收件匣 ] 樣式。 例如,[收件匣] 通知樣式可用來將多個擱置通知結合成摘要通知 – 您可以使用新的通知內容行來更新單一收件匣樣式通知(請參閱更新上述通知),而不是產生新的、大部分類似通知的連續數據流。
設定元數據
NotificationCompat.Builder 包含方法,您可以呼叫 以設定通知的相關元數據,例如優先順序、可見度和類別。 Android 會使用這項資訊,以及用戶喜好設定,來判斷顯示通知的方式和時機。
優先順序設定
在 Android 7.1 和更低版本上執行的應用程式必須直接在通知本身上設定優先順序。 通知的優先順序設定會在發布通知時決定兩個結果:
通知出現在其他通知的位置。 例如,高優先順序通知會顯示在通知選單中高於優先順序較低的通知,而不論每個通知何時發佈。
通知是否以頭抬頭通知格式顯示(Android 5.0 和更新版本)。 只有 高 優先順序和 最高 優先順序的通知會顯示為頭抬頭通知。
Xamarin.Android 會定義下列列舉來設定通知優先順序:
NotificationPriority.Max– 將使用者警示至緊急或重大狀況(例如來電、轉身指示或緊急警示)。 在 Android 5.0 和更新版本的裝置上,最大優先順序通知會以抬頭格式顯示。NotificationPriority.High– 通知使用者重要事件(例如重要電子郵件或即時聊天訊息的抵達)。 在Android 5.0和更新版本的裝置上,高優先順序通知會以抬頭格式顯示。NotificationPriority.Default– 通知使用者具有中等重要性層級的條件。NotificationPriority.Low– 針對使用者需要通知的非緊急資訊(例如軟體更新提醒或社交網路更新)。NotificationPriority.Min– 針對使用者只有在檢視通知時才會注意到的背景資訊(例如位置或天氣資訊)。
若要設定通知的優先順序,請呼叫 物件的 SetPriority 方法 NotificationCompat.Builder ,並傳入優先順序層級。 例如:
builder.SetPriority (NotificationPriority.High);
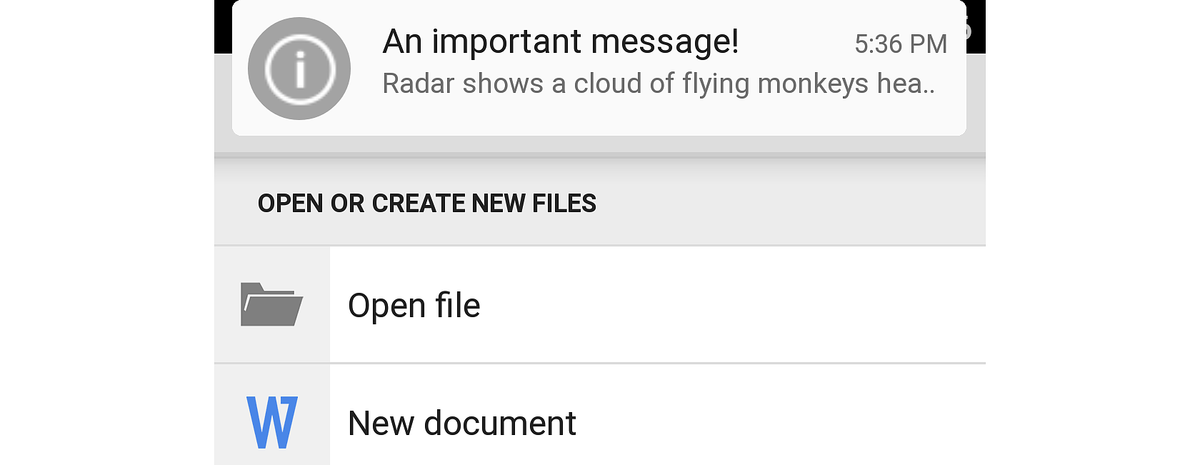
在下列範例中,高優先順序通知“重要訊息!” 會出現在通知選單頂端:
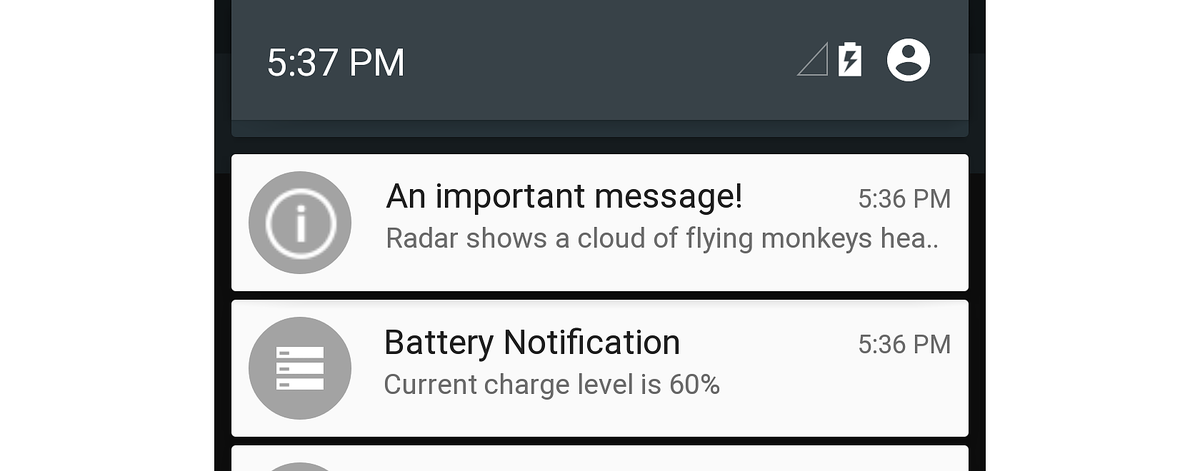
因為這是高優先順序的通知,因此也會在Android 5.0中的使用者目前活動畫面上方顯示為頭抬頭通知:
在下一個範例中,低優先順序的「考慮一天」通知會顯示在較高優先順序的電池電量通知下:
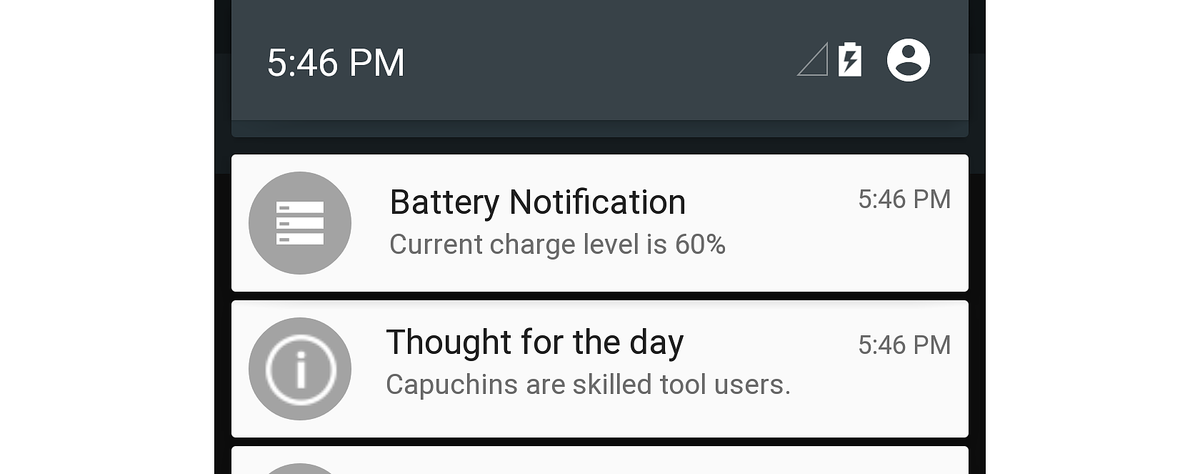
因為「考慮一天」通知是低優先順序通知,所以 Android 不會以向上格式顯示。
注意
在 Android 8.0 和更新版本上,通知通道和使用者設定的優先順序將決定通知的優先順序。
可見度設定
從 Android 5.0 開始, 可見度 設定可用來控制安全鎖定畫面上顯示多少通知內容。 Xamarin.Android 會定義下列列舉來設定通知可見性:
NotificationVisibility.Public– 通知的完整內容會顯示在安全鎖定畫面上。NotificationVisibility.Private– 只有基本資訊會顯示在安全鎖定畫面上(例如通知圖示和張貼它的應用程式名稱),但通知的其餘詳細數據會隱藏。 所有通知預設為NotificationVisibility.Private。NotificationVisibility.Secret– 安全鎖定畫面上不會顯示任何內容,甚至不會顯示通知圖示。 只有在使用者解除鎖定裝置之後,才能使用通知內容。
若要設定通知的可見性,應用程式會呼叫 SetVisibility 物件的方法 NotificationCompat.Builder ,並傳入可見度設定。 例如,這個呼叫會 SetVisibility 發出通知 Private:
builder.SetVisibility (NotificationVisibility.Private);
Private張貼通知時,只會在安全鎖定畫面上顯示應用程式的名稱和圖示。 使用者看到「解除鎖定您的裝置以查看此通知」,而不是通知訊息:

在此範例中, NotificationsLab 是原始應用程式的名稱。 只有在鎖定畫面安全時,才會顯示此已修訂的通知版本(亦即透過 PIN、模式或密碼保護)–如果鎖定畫面不安全,鎖定畫面上就會提供通知的完整內容。
類別設定
從 Android 5.0 開始,預先定義的類別可用於排名和篩選通知。 Xamarin.Android 提供下列類別的列舉:
Notification.CategoryCall– 來電。Notification.CategoryMessage– 內送簡訊。Notification.CategoryAlarm– 警示條件或定時器到期。Notification.CategoryEmail– 內送電子郵件訊息。Notification.CategoryEvent– 行事曆事件。Notification.CategoryPromo– 促銷訊息或廣告。Notification.CategoryProgress– 背景作業的進度。Notification.CategorySocial– 社交網路更新。Notification.CategoryError– 背景作業或驗證程序失敗。Notification.CategoryTransport– 媒體播放更新。Notification.CategorySystem– 保留供系統使用(系統或裝置狀態)。Notification.CategoryService– 表示背景服務正在執行。Notification.CategoryRecommendation– 與目前執行中應用程式相關的建議訊息。Notification.CategoryStatus– 裝置的相關信息。
排序通知時,通知的優先順序高於其類別設定。 例如,即使高優先順序通知屬於類別, Promo 仍會顯示為 「頭抬頭」。 若要設定通知的類別,您可以呼叫 SetCategory 物件的 方法 NotificationCompat.Builder ,並傳入類別設定。 例如:
builder.SetCategory (Notification.CategoryCall);
「不要打擾」功能(Android 5.0 的新功能)會根據類別篩選通知。 例如,設定 中的 [不要打擾] 畫面可讓使用者豁免電話和訊息的通知:
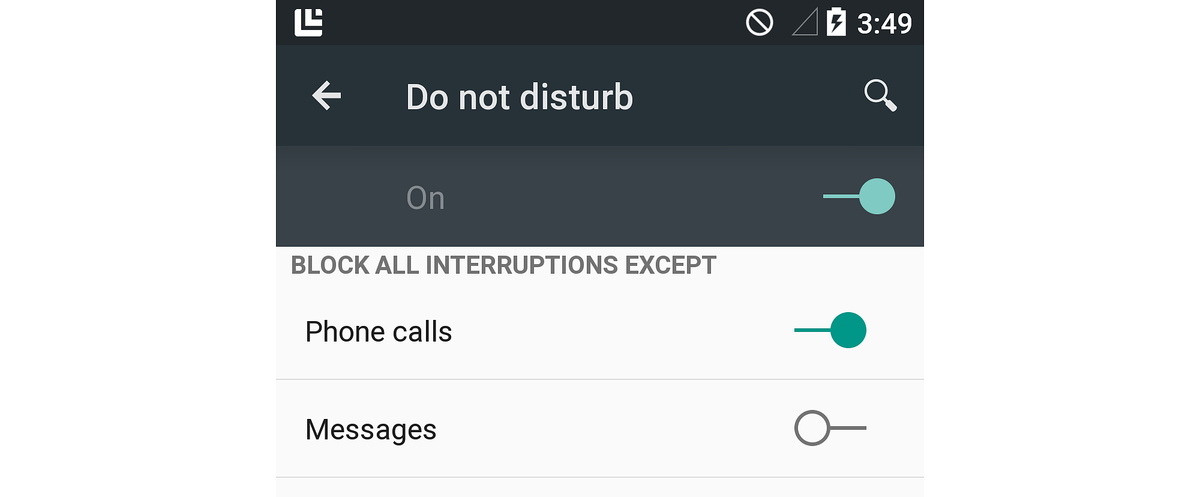
當使用者將 [不要打擾] 設定為封鎖電話以外的所有中斷時(如上述螢幕快照所示),Android 允許在裝置處於 [不要打擾] 模式時顯示類別設定Notification.CategoryCall為 的通知。 請注意,Notification.CategoryAlarm請勿打擾模式中永遠不會封鎖通知。
LocalNotifications 範例示範如何使用 NotificationCompat.Builder 從通知啟動第二個活動。 此範例程式代碼會說明在 Xamarin.Android 中使用本機通知逐步解說。
通知樣式
若要使用 NotificationCompat.Builder建立大文字、影像或收件匣樣式通知,您的應用程式必須使用這些樣式的相容性版本。 例如,若要使用 Big Text 樣式,請具現化 NotificationCompat.BigTextstyle:
NotificationCompat.BigTextStyle textStyle = new NotificationCompat.BigTextStyle();

// Plug this style into the builder:
builder.SetStyle (textStyle);
同樣地,您的應用程式可以分別使用 NotificationCompat.InboxStyle [NotificationCompat.BigPictureStyle收件匣] 和 [影像] 樣式。
通知優先順序和類別
NotificationCompat.BuilderSetPriority支援方法(從 Android 4.1 開始提供)。 不過,不支援NotificationCompat.Builder 方法,SetCategory因為類別是 Android 5.0 中引進的新通知元數據系統的一部分。
若要支援舊版 Android,其中 SetCategory 無法使用,您的程式代碼可以在運行時間檢查 API 層級,以在 API 層級等於或大於 Android 5.0 時有條件地呼叫 SetCategory API 層級(API 層級 21):
if (Android.OS.Build.VERSION.SdkInt >= Android.OS.BuildVersionCodes.Lollipop) {
    builder.SetCategory (Notification.CategoryEmail);
}
在此範例中,應用程式的目標 Framework 會設定為 Android 5.0,而最低 Android 版本會設定為 Android 4.1(API 層級 16)。 因為 SetCategory API 層級 21 和更新版本中有提供,所以此範例程式代碼只會在可用時呼叫 SetCategory ,而不會在 API 層級小於 21 時呼叫 SetCategory 。
鎖定畫面可見性
因為Android不支援在Android 5.0之前鎖定畫面通知(API 層級 21), NotificationCompat.Builder 因此不支援 SetVisibility 方法。 如上述 SetCategory所述,您的程式代碼可以在運行時間檢查 API 層級,並只在可用時呼叫 SetVisiblity :
if (Android.OS.Build.VERSION.SdkInt >= Android.OS.BuildVersionCodes.Lollipop) {
    builder.SetVisibility (Notification.Public);
}
摘要
本文說明如何在Android中建立本機通知。 它描述通知的結構、說明如何使用 NotificationCompat.Builder 來建立通知、如何以大型圖示、大文字、影像和收件匣格式設定通知、如何設定通知元數據設定,例如優先順序、可見度和類別,以及如何從通知啟動活動。 本文也說明這些通知設定如何與 Android 5.0 中引進的新頭、鎖定畫面和 「不要打擾 」功能搭配運作。 最後,您已瞭解如何使用 NotificationCompat.Builder 來維護與舊版 Android 的通知相容性。
如需設計 Android 通知的指導方針,請參閱 通知。