Xamarin.iOS 中的 ARKit 2
ARKit 自去年在 iOS 11 中引進以來已大幅成熟。 首先,您現在可以偵測垂直平面和水準平面,這大大提高了室內擴增實境體驗的實用性。 此外,還有新功能:
- 將參考影像和物件辨識為真實世界與數位影像之間的交界點
- 模擬真實世界光源的新光源模式
- 共用及保存AR環境的能力
- 儲存 AR 內容時慣用的新檔案格式
辨識參考物件
ARKit 2 中的一個展示功能是能夠辨識參考影像和物件。 參考影像可以從一般圖像檔載入(稍後討論),但必須使用開發人員焦點 ARObjectScanningConfiguration來掃描參考物件。
範例應用程式:掃描和偵測 3D 物件
- 使用物件進行
NSNotification應用程式狀態管理 - 自定義視覺效果
- 複雜的手勢
- 物件掃描
- 儲存
ARReferenceObject
掃描參考對像是電池和處理器密集且較舊的裝置,通常無法達到穩定的追蹤。
使用 NSNotification 物件的狀態管理
此應用程式會使用狀態機器,在下列狀態之間轉換:
AppState.StartARSessionAppState.NotReadyAppState.ScanningAppState.Testing
此外,在 中 AppState.Scanning時會使用內嵌狀態和轉換集:
Scan.ScanState.ReadyScan.ScanState.DefineBoundingBoxScan.ScanState.ScanningScan.ScanState.AdjustingOrigin
應用程式會使用回應式架構,將狀態轉換通知張貼至 NSNotificationCenter 並訂閱這些通知。 安裝程式看起來像來自 的這個代碼段 ViewController.cs:
// Configure notifications for application state changes
var notificationCenter = NSNotificationCenter.DefaultCenter;

notificationCenter.AddObserver(Scan.ScanningStateChangedNotificationName, State.ScanningStateChanged);
notificationCenter.AddObserver(ScannedObject.GhostBoundingBoxCreatedNotificationName, State.GhostBoundingBoxWasCreated);
notificationCenter.AddObserver(ScannedObject.GhostBoundingBoxRemovedNotificationName, State.GhostBoundingBoxWasRemoved);
notificationCenter.AddObserver(ScannedObject.BoundingBoxCreatedNotificationName, State.BoundingBoxWasCreated);
notificationCenter.AddObserver(BoundingBox.ScanPercentageChangedNotificationName, ScanPercentageChanged);
notificationCenter.AddObserver(BoundingBox.ExtentChangedNotificationName, BoundingBoxExtentChanged);
notificationCenter.AddObserver(BoundingBox.PositionChangedNotificationName, BoundingBoxPositionChanged);
notificationCenter.AddObserver(ObjectOrigin.PositionChangedNotificationName, ObjectOriginPositionChanged);
notificationCenter.AddObserver(NSProcessInfo.PowerStateDidChangeNotification, DisplayWarningIfInLowPowerMode);
一般通知處理程式會更新UI,並可能修改應用程式狀態,例如掃描物件時更新的這個處理程式:
private void ScanPercentageChanged(NSNotification notification)
{
    var pctNum = TryGet<NSNumber>(notification.UserInfo, BoundingBox.ScanPercentageUserKey);
    if (pctNum == null)
    {
        return;
    }
    double percentage = pctNum.DoubleValue;
    // Switch to the next state if scan is complete
    if (percentage >= 100.0)
    {
        State.SwitchToNextState();
    }
    else
    {
        DispatchQueue.MainQueue.DispatchAsync(() => navigationBarController.SetNavigationBarTitle($"Scan ({percentage})"));
    }
}
最後, Enter{State} 方法會視需要修改模型和UX,以符合新的狀態:
internal void EnterStateTesting()
{
    navigationBarController.SetNavigationBarTitle("Testing");
    navigationBarController.ShowBackButton(false);
    loadModelButton.Hidden = true;
    flashlightButton.Hidden = false;
    nextButton.Enabled = true;
    nextButton.SetTitle("Share", UIControlState.Normal);

    testRun = new TestRun(sessionInfo, sceneView);
    TestObjectDetection();
    CancelMaxScanTimeTimer();
}
自定義視覺效果
應用程式會顯示投影到所偵測水準平面周框方塊內的物件低階「點雲」。
這個點雲端可供 屬性中的 ARFrame.RawFeaturePoints 開發人員使用。 有效率地可視化點雲端可能是棘手的問題。 逐一查看點,然後建立並放置每個點的新 SceneKit 節點會終止幀速率。 或者,如果以異步方式完成,則會有延遲。 此範例會使用三部分策略來維護效能:
- 使用不安全的程式代碼來就地釘選數據,並將數據解譯為位元組的原始緩衝區。
- 將該原始緩衝區轉換成
SCNGeometrySource,並建立「範本」SCNGeometryElement物件。 - 使用 快速「結合」原始數據和範本
SCNGeometry.Create(SCNGeometrySource[], SCNGeometryElement[])
internal static SCNGeometry CreateVisualization(NVector3[] points, UIColor color, float size)
{
  if (points.Length == 0)
  {
    return null;
  }

  unsafe
  {
    var stride = sizeof(float) * 3;

    // Pin the data down so that it doesn't move
    fixed (NVector3* pPoints = &points[0])
    {
      // Important: Don't unpin until after `SCNGeometry.Create`, because geometry creation is lazy

      // Grab a pointer to the data and treat it as a byte buffer of the appropriate length
      var intPtr = new IntPtr(pPoints);
      var pointData = NSData.FromBytes(intPtr, (System.nuint) (stride * points.Length));

      // Create a geometry source (factory) configured properly for the data (3 vertices)
      var source = SCNGeometrySource.FromData(
        pointData,
        SCNGeometrySourceSemantics.Vertex,
        points.Length,
        true,
        3,
        sizeof(float),
        0,
        stride
      );

      // Create geometry element
      // The null and bytesPerElement = 0 look odd, but this is just a template object
      var template = SCNGeometryElement.FromData(null, SCNGeometryPrimitiveType.Point, points.Length, 0);
      template.PointSize = 0.001F;
      template.MinimumPointScreenSpaceRadius = size;
      template.MaximumPointScreenSpaceRadius = size;

      // Stitch the data (source) together with the template to create the new object
      var pointsGeometry = SCNGeometry.Create(new[] { source }, new[] { template });
      pointsGeometry.Materials = new[] { Utilities.Material(color) };
      return pointsGeometry;
    }
  }
}
結果如下所示:
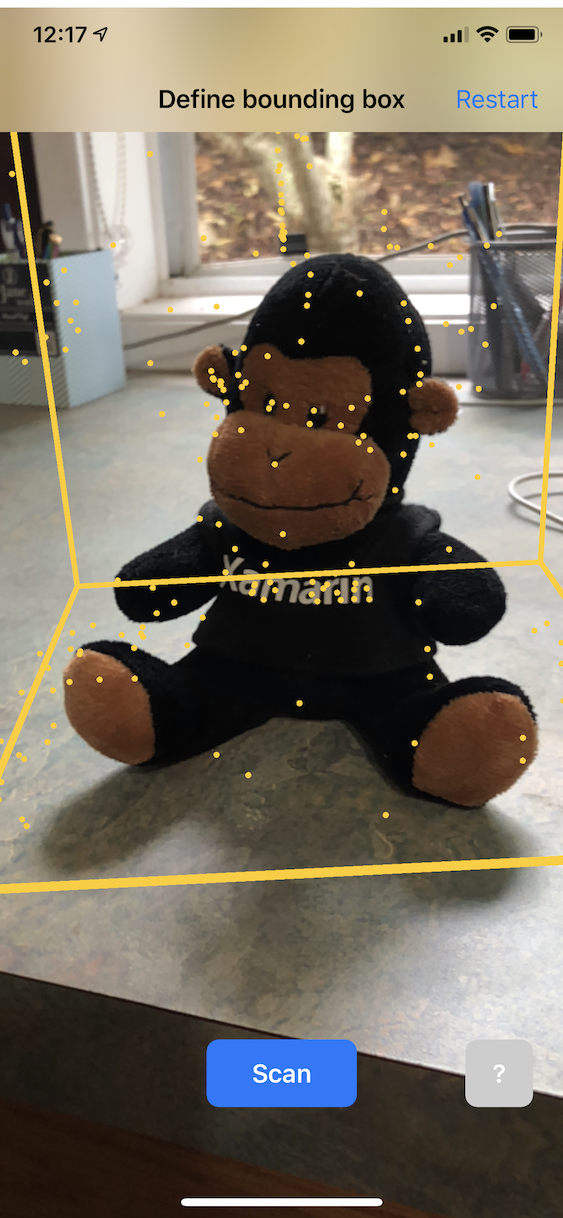
複雜的手勢
用戶可以縮放、旋轉和拖曳圍繞目標物件的周框方塊。 相關聯的手勢辨識器中有兩個有趣的專案。
首先,所有手勢辨識器只有在超過閾值之後才會啟動;例如,手指拖曳這麼多圖元或旋轉超過某個角度。 這項技術是累積移動,直到超過臨界值為止,然後以累加方式套用:
// A custom rotation gesture recognizer that fires only when a threshold is passed
internal partial class ThresholdRotationGestureRecognizer : UIRotationGestureRecognizer
{
    // The threshold after which this gesture is detected.
    const double threshold = Math.PI / 15; // (12°)

    // Indicates whether the currently active gesture has exceeded the threshold
    private bool thresholdExceeded = false;

    private double previousRotation = 0;
    internal double RotationDelta { get; private set; }

    internal ThresholdRotationGestureRecognizer(IntPtr handle) : base(handle)
    {
    }

    // Observe when the gesture's state changes to reset the threshold
    public override UIGestureRecognizerState State
    {
        get => base.State;
        set
        {
            base.State = value;

            switch(value)
            {
                case UIGestureRecognizerState.Began :
                case UIGestureRecognizerState.Changed :
                    break;
                default :
                    // Reset threshold check
                    thresholdExceeded = false;
                    previousRotation = 0;
                    RotationDelta = 0;
                    break;
            }
        }
    }

    public override void TouchesMoved(NSSet touches, UIEvent evt)
    {
        base.TouchesMoved(touches, evt);

        if (thresholdExceeded)
        {
            RotationDelta = Rotation - previousRotation;
            previousRotation = Rotation;
        }

        if (! thresholdExceeded && Math.Abs(Rotation) > threshold)
        {
            thresholdExceeded = true;
            previousRotation = Rotation;
        }
    }
}
與手勢相關的第二個有趣的事情是周框方塊相對於偵測到的實際平面移動的方式。 此 Xamarin 部落格文章會討論此層面。
ARKit 2 中的其他新功能
更多追蹤組態
現在,您可以使用下列任一專案作為混合實境體驗的基礎:
- 只有裝置加速計 (
AROrientationTrackingConfigurationiOS 11) - 臉部 (
ARFaceTrackingConfigurationiOS 11) - 參考影像 (
ARImageTrackingConfigurationiOS 12) - 掃描 3D 物件(
ARObjectScanningConfigurationiOS 12) - 視覺慣性 odometry (
ARWorldTrackingConfiguration在 iOS 12 中改善)
AROrientationTrackingConfiguration,在此部落格文章和 F# 範例中討論,最有限,並提供不佳的混合實境體驗,因為它只會將數位物件置於裝置的動作上,而不需要嘗試將裝置和螢幕系結至真實世界。
ARImageTrackingConfiguration可讓您辨識真實世界的 2D 影像(繪畫、標誌等),並使用這些影像來錨定數位影像:
var imagesAndWidths = new[] {
    ("cover1.jpg", 0.185F),
    ("cover2.jpg", 0.185F),
     //...etc...
    ("cover100.jpg", 0.185F),
};

var referenceImages = new NSSet<ARReferenceImage>(
    imagesAndWidths.Select( imageAndWidth =>
    {
      // Tuples cannot be destructured in lambda arguments
        var (image, width) = imageAndWidth;
        // Read the image
        var img = UIImage.FromFile(image).CGImage;
        return new ARReferenceImage(img, ImageIO.CGImagePropertyOrientation.Up, width);
    }).ToArray());

configuration.TrackingImages = referenceImages;
此設定有兩個有趣的層面:
- 它是有效率的,可以搭配大量的參考影像使用
- 數字圖像錨定在影像上,即使該圖像在真實世界中移動(例如,如果辨識了書籍的封面,它會追蹤該書從貨架上拉下來、放下等)。
先前已討論 ,ARObjectScanningConfiguration且是以開發人員為中心的組態來掃描 3D 物件。 它高度處理器和電池密集,不應用於用戶應用程式中。 範例 掃描和偵測 3D 物件 會示範此組態的使用。
最後的追蹤組態 ARWorldTrackingConfiguration 是大部分混合實境體驗的工作馬。 此設定會使用「視覺慣性 odometry」,將真實世界的「特徵點」與數位影像產生關聯。 數字幾何或Sprite會錨定相對於真實世界水準平面和垂直平面,或相對於偵測到 ARReferenceObject 的實例。 在此組態中,世界原點是相機在空間中的原始位置,Z 軸與重力對齊,而數字物件則相對於真實世界中的物件「就地」。
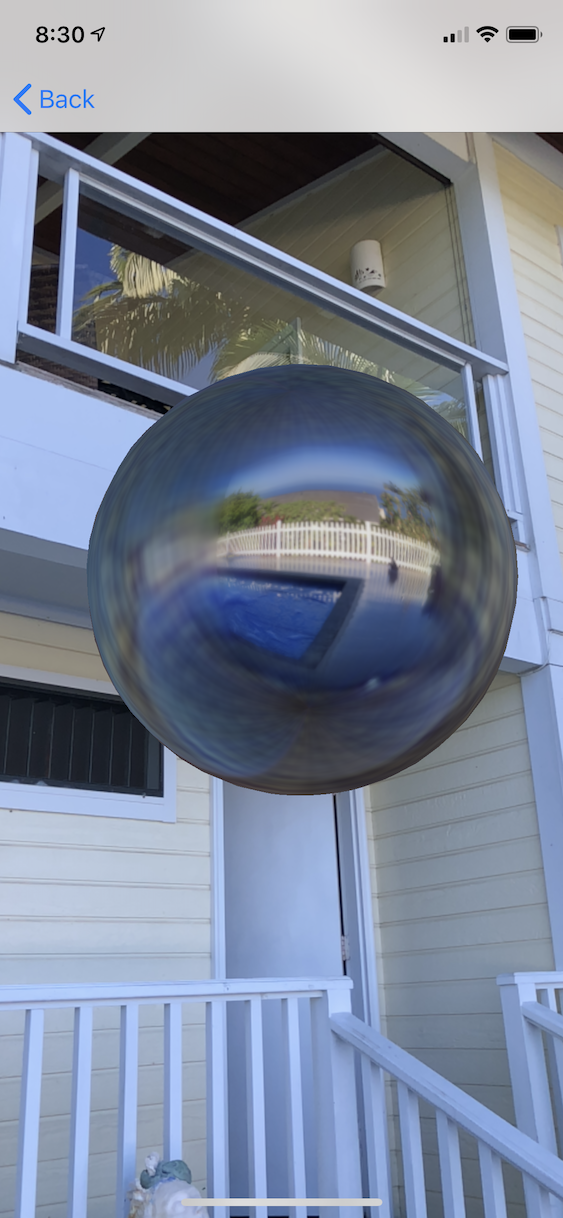
環境紋理
ARKit 2 支援使用擷取的影像來估計光源,甚至將反射醒目提示套用至閃亮的物件「環境紋理」。 環境立方體圖是動態建置的,一旦相機向四面四方看,就可以產生令人印象深刻的現實體驗:
若要使用環境文字:
- 您的
SCNMaterial物件必須針對 和 使用SCNLightingModel.PhysicallyBased,並將介於 0 到 1Metalness.Contents範圍內的值指派給 和Roughness.Contents - 您的追蹤群組態必須設定
EnvironmentTexturing=AREnvironmentTexturing.Automatic:
var sphere = SCNSphere.Create(0.33F);
sphere.FirstMaterial.LightingModelName = SCNLightingModel.PhysicallyBased;
// Shiny metallic sphere
sphere.FirstMaterial.Metalness.Contents = new NSNumber(1.0F);
sphere.FirstMaterial.Roughness.Contents = new NSNumber(0.0F);

// Session configuration:
var configuration = new ARWorldTrackingConfiguration
{
    PlaneDetection = ARPlaneDetection.Horizontal | ARPlaneDetection.Vertical,
    LightEstimationEnabled = true,
    EnvironmentTexturing = AREnvironmentTexturing.Automatic
};
雖然上述代碼段中顯示的完美反射紋理在範例中很有趣,但環境紋理可能更適合用於克制,以免觸發“不可思議的山谷”回應(紋理只是根據相機錄製的估計值)。
共用和持續性AR體驗
ARKit 2 的另一個主要是 類別 ARWorldMap ,可讓您共用或儲存世界追蹤數據。 您可以使用 或 GetCurrentWorldMap(Action<ARWorldMap,NSError>) 取得目前的世界地圖ARSession.GetCurrentWorldMapAsync:
// Local storage
var PersistentWorldPath => Environment.GetFolderPath(Environment.SpecialFolder.Personal) + "/arworldmap";

// Later, after scanning the environment thoroughly...
var worldMap = await Session.GetCurrentWorldMapAsync();
if (worldMap != null)
{
    var data = NSKeyedArchiver.ArchivedDataWithRootObject(worldMap, true, out var err);
    if (err != null)
    {
        Console.WriteLine(err);
    }
    File.WriteAllBytes(PersistentWorldPath, data.ToArray());
}
若要共用或還原世界地圖:
- 從檔案載入數據,
- 將它解除封存到
ARWorldMap物件中, - 請使用 ,做為 屬性的值
ARWorldTrackingConfiguration.InitialWorldMap:
var data = NSData.FromArray(File.ReadAllBytes(PersistentWorldController.PersistenWorldPath));
var worldMap = (ARWorldMap)NSKeyedUnarchiver.GetUnarchivedObject(typeof(ARWorldMap), data, out var err);

var configuration = new ARWorldTrackingConfiguration
{
    PlaneDetection = ARPlaneDetection.Horizontal | ARPlaneDetection.Vertical,
    LightEstimationEnabled = true,
    EnvironmentTexturing = AREnvironmentTexturing.Automatic,
    InitialWorldMap = worldMap
};
ARWorldMap唯一包含不可見的世界追蹤數據和ARAnchor物件,它不包含數字資產。 若要共用幾何或影像,您必須開發適合使用案例的您自己的策略(或許只儲存/傳輸幾何的位置和方向,並將它套用至靜態 SCNGeometry ,或透過儲存/傳輸串行化物件)。 的優點 ARWorldMap 是,資產一旦相對於共用 ARAnchor放置,就會在裝置或會話之間一致出現。
通用場景描述檔格式
ARKit 2 的最終標題功能是 Apple 採用 Pixar 的 通用場景描述 檔格式。 此格式會取代 Collada 的 DAE 格式,作為共用和儲存 ARKit 資產的慣用格式。 支援可視化資產內建於 iOS 12 和 Mojave 中。 USDZ 擴展名是未壓縮且未加密的 ZIP 封存,其中包含 USD 檔案。 Pixar 提供使用美元檔案 的工具,但還沒有多少第三方支援。
ARKit 程式設計秘訣
手動資源管理
在ARKit中,手動管理資源非常重要。 這不僅允許高幀速率,而且確實 需要 避免混淆的「屏幕凍結」。ARKit 架構對於提供新的相機框架ARSession.CurrentFrame() 很懶惰。 在目前ARFrameDispose()已呼叫之前,ARKit 不會提供新的框架! 這會導致影片「凍結」,即使應用程式的其餘部分回應也一樣。 解決方案是一律使用 using 區塊存取ARSession.CurrentFrame,或手動呼叫Dispose()它。
衍生自 NSObject 的所有物件都是 IDisposable 並NSObject實作 Dispose 模式,因此您通常應該遵循此模式在衍生類別上實Dispose作。
操作轉換矩陣
在任何 3D 應用程式中,您將處理 4x4 轉換矩陣,以精簡描述如何透過 3D 空間移動、旋轉和剪下物件。 在 SceneKit 中,這些是 SCNMatrix4 物件。
屬性SCNNode.Transform會SCNMatrix4傳SCNNode回 數據列主要simdfloat4x4型別所支援 之的轉換矩陣。 因此,例如:
var node = new SCNNode { Position = new SCNVector3(2, 3, 4) };
var xform = node.Transform;
Console.WriteLine(xform);
// Output is: "(1, 0, 0, 0)\n(0, 1, 0, 0)\n(0, 0, 1, 0)\n(2, 3, 4, 1)"
如您所見,位置會編碼在底部數據列的前三個元素中。
在 Xamarin 中,操作轉換矩陣的常見類型為 NVector4,依慣例會以數據行為主的方式解譯。 也就是說,M14、M24、M34 而非 M41、M42、M43 預期翻譯/位置元件:
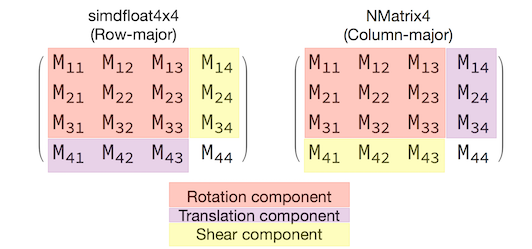
與矩陣解譯的選擇一致,對於適當的行為至關重要。 由於 3D 轉換矩陣是 4x4,一致性錯誤不會產生任何類型的編譯時間或甚至運行時間例外狀況,只是作業會意外採取行動。 如果您的 SceneKit / ARKit 物件似乎停滯、飛離或抖動,則不正確的轉換矩陣是一個很好的可能性。 解決方案很簡單: NMatrix4.Transpose 會執行專案的就地轉置。