Xamarin.Forms BoxView
BoxView 會呈現指定寬度、高度和色彩的簡單矩形。 您可以使用 BoxView 裝飾、基本的圖形,以及透過觸控與用戶互動。
由於 Xamarin.Forms 沒有內建向量圖形系統, BoxView 因此 有助於補償。 本文所述的一些範例程式會用於 BoxView 轉譯圖形。 BoxView的大小可以類似特定寬度和粗細的線條,然後使用 屬性的任何角度Rotation旋轉。
雖然 BoxView 可以模擬簡單的圖形,但您可能想要調查 在 中使用 Xamarin.Forms SkiaSharp以取得更複雜的圖形需求。
設定 BoxView 色彩和大小
一般而言,您將設定的下列屬性 BoxView:
Color表示設定其色彩。CornerRadius表示設定其圓角半徑。WidthRequest以裝置獨立單位設定的BoxView寬度。HeightRequest設定的高度BoxView。
屬性 Color 的類型 Color為 ;屬性可以設定為任何 Color 值,包括 141 個依字母順序排列 AliceBlue 為 YellowGreen的具名色彩靜態只讀字段。
屬性CornerRadius的類型CornerRadius為 ;屬性可以設定為單double一統一的圓角半徑值,或由四double個CornerRadius值所定義的結構,這些值會套用至 的左上方、右上方、左下和右下角BoxView。
WidthRequest和 HeightRequest 屬性只有在配置中不受限制時BoxView才會扮演角色。 當配置容器需要知道子系的大小時,例如,當 是版面配置中Grid自動重設大小的單元格的子系時BoxView,就會發生這種情況。 BoxView當 其 HorizontalOptions 和 VerticalOptions 屬性設定為 以外的LayoutOptions.Fill值時,也會不受限制。 BoxView如果 不受限制,但WidthRequest未設定 和 HeightRequest 屬性,則寬度或高度會設定為預設值 40 單位,或行動裝置上的大約 1/4 英吋。
WidthRequest如果 BoxView是在配置中限制 ,則會忽略 和 HeightRequest 屬性,在此情況下,配置容器會在 上BoxView施加自己的大小。
BoxView可以在一個維度中限制 ,另一個維度則不受限制。 例如,如果 BoxView 是垂直的子系,則的BoxView垂直StackLayout維度不受限制,而且其水平維度通常會受到限制。 但該水準維度有例外狀況:如果 BoxView 的 HorizontalOptions 屬性設定為 以外的 LayoutOptions.Fill專案,則水平維度也不受限制。 本身也可以 StackLayout 有不受限制的水平維度,在此情況下 BoxView ,也會水準不受限制。
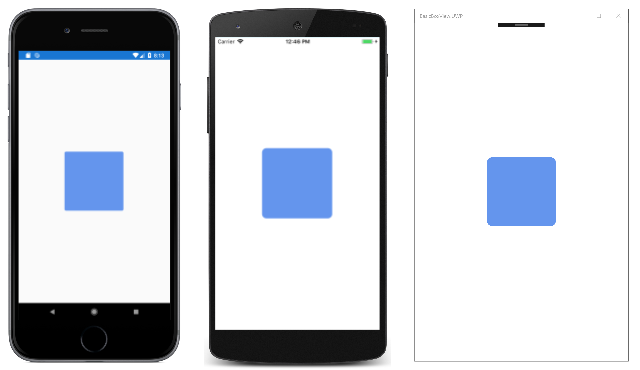
BasicBoxView 範例會在頁面中央顯示一英吋方塊未受限制BoxView:
<ContentPage xmlns="http://xamarin.com/schemas/2014/forms"
             xmlns:x="http://schemas.microsoft.com/winfx/2009/xaml"
             xmlns:local="clr-namespace:BasicBoxView"
             x:Class="BasicBoxView.MainPage">

    <BoxView Color="CornflowerBlue"
             CornerRadius="10"
             WidthRequest="160"
             HeightRequest="160"
             VerticalOptions="Center"
             HorizontalOptions="Center" />

</ContentPage>
結果如下︰
如果和 VerticalOptionsHorizontalOptions 屬性從 BoxView 標記中移除或設定為 Fill,則 BoxView 會受到頁面大小的限制,並展開以填滿頁面。
BoxView也可以是 的AbsoluteLayout子系。 在此情況下,會使用LayoutBounds附加的可系結屬性來設定 的位置和大小BoxView。 在 AbsoluteLayout AbsoluteLayout 一文中會討論 。
您會在下列範例程式中看到所有這些案例的範例。
轉譯文字裝飾
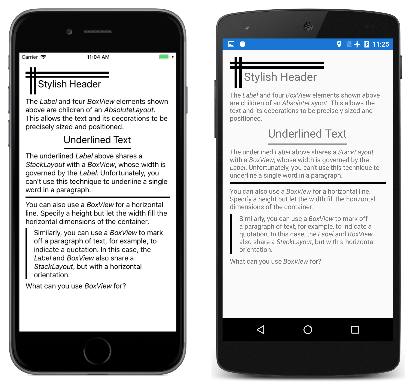
您可以使用 , BoxView 以水平和垂直線條的形式在頁面上新增一些簡單的裝飾。 TextDecoration 範例會示範這一點。 所有程式的視覺效果都定義在 MainPage.xaml 檔案中,其中包含數Label個 和 BoxView 元素,StackLayout如下所示:
<ContentPage xmlns="http://xamarin.com/schemas/2014/forms"
             xmlns:x="http://schemas.microsoft.com/winfx/2009/xaml"
             xmlns:local="clr-namespace:TextDecoration"
             x:Class="TextDecoration.MainPage">
    <ContentPage.Padding>
        <OnPlatform x:TypeArguments="Thickness">
            <On Platform="iOS" Value="0, 20, 0, 0" />
        </OnPlatform>
    </ContentPage.Padding>

    <ContentPage.Resources>
        <ResourceDictionary>
            <Style TargetType="BoxView">
                <Setter Property="Color" Value="Black" />
            </Style>
        </ResourceDictionary>
    </ContentPage.Resources>

    <ScrollView Margin="15">
        <StackLayout>

            ···

        </StackLayout>
    </ScrollView>
</ContentPage>
下列所有標記都是 的 StackLayout子系。 此標籤包含數種類型的裝飾 BoxView 元素,與 元素搭配 Label 使用:
頁面頂端的時尚頁首是透過子系為四BoxView個元素和 一Label個 來達成AbsoluteLayout,這些元素都是指派特定位置和大小:
<AbsoluteLayout>
    <BoxView AbsoluteLayout.LayoutBounds="0, 10, 200, 5" />
    <BoxView AbsoluteLayout.LayoutBounds="0, 20, 200, 5" />
    <BoxView AbsoluteLayout.LayoutBounds="10, 0, 5, 65" />
    <BoxView AbsoluteLayout.LayoutBounds="20, 0, 5, 65" />
    <Label Text="Stylish Header"
           FontSize="24"
           AbsoluteLayout.LayoutBounds="30, 25, AutoSize, AutoSize"/>
</AbsoluteLayout>
在 XAML 檔案中, AbsoluteLayout 後面接著 Label 具有描述 的 AbsoluteLayout格式化文字。
您可以將 和括Label在 的值設定為 以外的Fill值,StackLayoutHorizontalOptions以加上文字字串的底BoxView線。 的寬度接著會受 的寬度StackLayoutLabel所控管,接著會將該寬度強加於 BoxView。 BoxView只會指派明確的高度:
<StackLayout HorizontalOptions="Center">
    <Label Text="Underlined Text"
           FontSize="24" />
    <BoxView HeightRequest="2" />
</StackLayout>
您無法使用這項技術在較長的文字字串或段落內加上個別文字的底線。
您也可以使用 BoxView 來類似於 HTML hr (水平規則)元素。 只要讓 的寬度 BoxView 由其父容器決定,在此案例中為 StackLayout:
<BoxView HeightRequest="3" />
最後,您可以在文字段落的一邊繪製垂直線,方法是將 和 Label 括BoxView在水準 StackLayout中。 在此情況下,的高度與的高度BoxViewStackLayout相同,高度是由 Label的高度所控管:
<StackLayout Orientation="Horizontal">
    <BoxView WidthRequest="4"
             Margin="0, 0, 10, 0" />
    <Label>

        ···

    </Label>
</StackLayout>
使用 BoxView 列出色彩
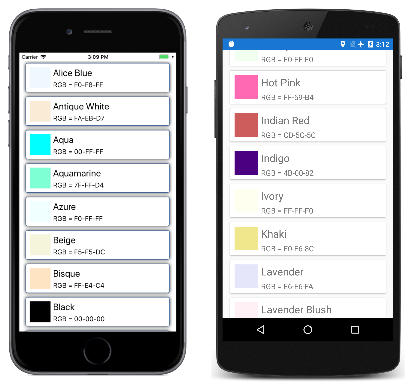
BoxView方便顯示色彩。 此程式會使用 ListView 列出 結構的所有公用靜態只讀欄位 Xamarin.FormsColor :
ListViewColors 程式包含名為 的NamedColor類別。 靜態建構函式會使用反映來存取結構的所有欄位,併為每個字段 Color 建立 NamedColor 物件。 這些會儲存在靜態 All 屬性中:
public class NamedColor
{
    // Instance members.
    private NamedColor()
    {
    }

    public string Name { private set; get; }

    public string FriendlyName { private set; get; }

    public Color Color { private set; get; }

    public string RgbDisplay { private set; get; }

    // Static members.
    static NamedColor()
    {
        List<NamedColor> all = new List<NamedColor>();
        StringBuilder stringBuilder = new StringBuilder();

        // Loop through the public static fields of the Color structure.
        foreach (FieldInfo fieldInfo in typeof(Color).GetRuntimeFields ())
        {
            if (fieldInfo.IsPublic &&
                fieldInfo.IsStatic &&
                fieldInfo.FieldType == typeof (Color))
            {
                // Convert the name to a friendly name.
                string name = fieldInfo.Name;
                stringBuilder.Clear();
                int index = 0;

                foreach (char ch in name)
                {
                    if (index != 0 && Char.IsUpper(ch))
                    {
                        stringBuilder.Append(' ');
                    }
                    stringBuilder.Append(ch);
                    index++;
                }

                // Instantiate a NamedColor object.
                Color color = (Color)fieldInfo.GetValue(null);

                NamedColor namedColor = new NamedColor
                {
                    Name = name,
                    FriendlyName = stringBuilder.ToString(),
                    Color = color,
                    RgbDisplay = String.Format("{0:X2}-{1:X2}-{2:X2}",
                                               (int)(255 * color.R),
                                               (int)(255 * color.G),
                                               (int)(255 * color.B))
                };

                // Add it to the collection.
                all.Add(namedColor);
            }
        }
        all.TrimExcess();
        All = all;
    }

    public static IList<NamedColor> All { private set; get; }
}
程式視覺效果會在 XAML 檔案中描述。 的 ItemsSourceListView 屬性會設定為靜態 NamedColor.All 屬性,這表示 ListView 會顯示所有個別 NamedColor 物件:
<ContentPage xmlns="http://xamarin.com/schemas/2014/forms"
             xmlns:x="http://schemas.microsoft.com/winfx/2009/xaml"
             xmlns:local="clr-namespace:ListViewColors"
             x:Class="ListViewColors.MainPage">
    <ContentPage.Padding>
        <OnPlatform x:TypeArguments="Thickness">
            <On Platform="iOS" Value="10, 20, 10, 0" />
            <On Platform="Android, UWP" Value="10, 0" />
        </OnPlatform>
    </ContentPage.Padding>

    <ListView SeparatorVisibility="None"
              ItemsSource="{x:Static local:NamedColor.All}">
        <ListView.RowHeight>
            <OnPlatform x:TypeArguments="x:Int32">
                <On Platform="iOS, Android" Value="80" />
                <On Platform="UWP" Value="90" />
            </OnPlatform>
        </ListView.RowHeight>

        <ListView.ItemTemplate>
            <DataTemplate>
                <ViewCell>
                    <ContentView Padding="5">
                        <Frame OutlineColor="Accent"
                               Padding="10">
                            <StackLayout Orientation="Horizontal">
                                <BoxView Color="{Binding Color}"
                                         WidthRequest="50"
                                         HeightRequest="50" />
                                <StackLayout>
                                    <Label Text="{Binding FriendlyName}"
                                           FontSize="22"
                                           VerticalOptions="StartAndExpand" />
                                    <Label Text="{Binding RgbDisplay, StringFormat='RGB = {0}'}"
                                           FontSize="16"
                                           VerticalOptions="CenterAndExpand" />
                                </StackLayout>
                            </StackLayout>
                        </Frame>
                    </ContentView>
                </ViewCell>
            </DataTemplate>
        </ListView.ItemTemplate>
    </ListView>
</ContentPage>
物件 NamedColor 會由 ViewCell 設定為 之數據範本的物件 ListView格式化。 此範本包含 BoxView ,其 Color 屬性系結至 Color 物件的 屬性 NamedColor 。
透過子類別化 BoxView 播放生活遊戲
生命遊戲是由數學家約翰·康威發明的 細胞自動化,在20世紀70年代的科學美國人 頁面中普及。 維琪百科文章 康威的生活遊戲提供了很好的介紹。
GameOfLife 程式會定義衍生自 BoxView的類別。Xamarin.FormsLifeCell 這個類別會封裝生命遊戲中個別儲存格的邏輯:
class LifeCell : BoxView
{
    bool isAlive;

    public event EventHandler Tapped;

    public LifeCell()
    {
        BackgroundColor = Color.White;

        TapGestureRecognizer tapGesture = new TapGestureRecognizer();
        tapGesture.Tapped += (sender, args) =>
        {
            Tapped?.Invoke(this, EventArgs.Empty);
        };
        GestureRecognizers.Add(tapGesture);
    }

    public int Col { set; get; }

    public int Row { set; get; }

    public bool IsAlive
    {
        set
        {
            if (isAlive != value)
            {
                isAlive = value;
                BackgroundColor = isAlive ? Color.Black : Color.White;
            }
        }
        get
        {
            return isAlive;
        }
    }
}
LifeCell 將另外三個屬性新增至 BoxView: Col 和 Row 屬性會將儲存格的位置儲存在方格內,而 IsAlive 屬性會指出其狀態。 如果儲存格還運作,屬性IsAlive也會將 的 BoxView 屬性設定Color為黑色,如果儲存格未運作,則為白色。
LifeCell 也會安裝 TapGestureRecognizer ,讓用戶點選儲存格以切換資料格的狀態。 類別會將 Tapped 事件從手勢辨識器轉譯成自己的 Tapped 事件。
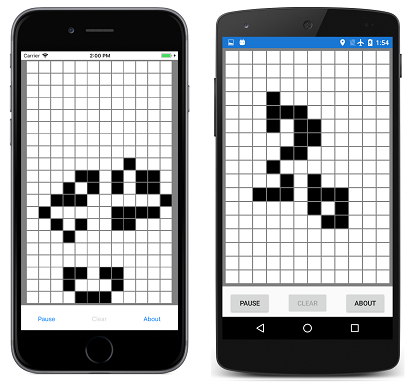
GameOfLife 程式也包含一個LifeGrid類別,可封裝遊戲的大部分邏輯,以及MainPage處理程式視覺效果的類別。 其中包括描述遊戲規則的重疊。 以下是在頁面上顯示數百 LifeCell 個物件的動作程式:
建立數位時鐘
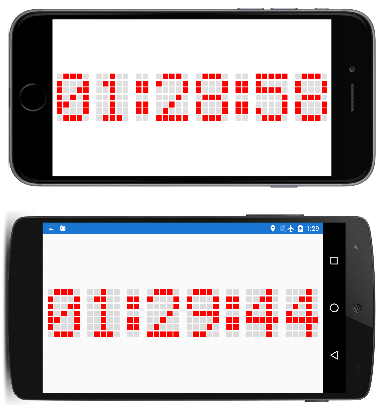
DotMatrixClock 程式會建立 210 BoxView 個元素,以模擬舊式 5 位元組 7 點矩陣顯示的點。 您可以在直向或橫向模式中讀取時間,但橫向比較大:
XAML 檔案會比具現化 AbsoluteLayout 用於時鐘的 稍微多一點:
<ContentPage xmlns="http://xamarin.com/schemas/2014/forms"
             xmlns:x="http://schemas.microsoft.com/winfx/2009/xaml"
             xmlns:local="clr-namespace:DotMatrixClock"
             x:Class="DotMatrixClock.MainPage"
             Padding="10"
             SizeChanged="OnPageSizeChanged">

    <AbsoluteLayout x:Name="absoluteLayout"
                    VerticalOptions="Center" />
</ContentPage>
程序代碼後置檔案中會發生所有其他專案。 點矩陣顯示邏輯藉由數個數位定義大幅簡化,這些陣列描述對應至10位數和冒號的每一個點:
public partial class MainPage : ContentPage
{
    // Total dots horizontally and vertically.
    const int horzDots = 41;
    const int vertDots = 7;

    // 5 x 7 dot matrix patterns for 0 through 9.
    static readonly int[, ,] numberPatterns = new int[10, 7, 5]
    {
        {
            { 0, 1, 1, 1, 0}, { 1, 0, 0, 0, 1}, { 1, 0, 0, 1, 1}, { 1, 0, 1, 0, 1},
            { 1, 1, 0, 0, 1}, { 1, 0, 0, 0, 1}, { 0, 1, 1, 1, 0}
        },
        {
            { 0, 0, 1, 0, 0}, { 0, 1, 1, 0, 0}, { 0, 0, 1, 0, 0}, { 0, 0, 1, 0, 0},
            { 0, 0, 1, 0, 0}, { 0, 0, 1, 0, 0}, { 0, 1, 1, 1, 0}
        },
        {
            { 0, 1, 1, 1, 0}, { 1, 0, 0, 0, 1}, { 0, 0, 0, 0, 1}, { 0, 0, 0, 1, 0},
            { 0, 0, 1, 0, 0}, { 0, 1, 0, 0, 0}, { 1, 1, 1, 1, 1}
        },
        {
            { 1, 1, 1, 1, 1}, { 0, 0, 0, 1, 0}, { 0, 0, 1, 0, 0}, { 0, 0, 0, 1, 0},
            { 0, 0, 0, 0, 1}, { 1, 0, 0, 0, 1}, { 0, 1, 1, 1, 0}
        },
        {
            { 0, 0, 0, 1, 0}, { 0, 0, 1, 1, 0}, { 0, 1, 0, 1, 0}, { 1, 0, 0, 1, 0},
            { 1, 1, 1, 1, 1}, { 0, 0, 0, 1, 0}, { 0, 0, 0, 1, 0}
        },
        {
            { 1, 1, 1, 1, 1}, { 1, 0, 0, 0, 0}, { 1, 1, 1, 1, 0}, { 0, 0, 0, 0, 1},
            { 0, 0, 0, 0, 1}, { 1, 0, 0, 0, 1}, { 0, 1, 1, 1, 0}
        },
        {
            { 0, 0, 1, 1, 0}, { 0, 1, 0, 0, 0}, { 1, 0, 0, 0, 0}, { 1, 1, 1, 1, 0},
            { 1, 0, 0, 0, 1}, { 1, 0, 0, 0, 1}, { 0, 1, 1, 1, 0}
        },
        {
            { 1, 1, 1, 1, 1}, { 0, 0, 0, 0, 1}, { 0, 0, 0, 1, 0}, { 0, 0, 1, 0, 0},
            { 0, 1, 0, 0, 0}, { 0, 1, 0, 0, 0}, { 0, 1, 0, 0, 0}
        },
        {
            { 0, 1, 1, 1, 0}, { 1, 0, 0, 0, 1}, { 1, 0, 0, 0, 1}, { 0, 1, 1, 1, 0},
            { 1, 0, 0, 0, 1}, { 1, 0, 0, 0, 1}, { 0, 1, 1, 1, 0}
        },
        {
            { 0, 1, 1, 1, 0}, { 1, 0, 0, 0, 1}, { 1, 0, 0, 0, 1}, { 0, 1, 1, 1, 1},
            { 0, 0, 0, 0, 1}, { 0, 0, 0, 1, 0}, { 0, 1, 1, 0, 0}
        },
    };

    // Dot matrix pattern for a colon.
    static readonly int[,] colonPattern = new int[7, 2]
    {
        { 0, 0 }, { 1, 1 }, { 1, 1 }, { 0, 0 }, { 1, 1 }, { 1, 1 }, { 0, 0 }
    };

    // BoxView colors for on and off.
    static readonly Color colorOn = Color.Red;
    static readonly Color colorOff = new Color(0.5, 0.5, 0.5, 0.25);

    // Box views for 6 digits, 7 rows, 5 columns.
    BoxView[, ,] digitBoxViews = new BoxView[6, 7, 5];

    ···

}
這些欄位會以三維元素陣組 BoxView 結尾,以儲存六位數的點圖樣。
建構函式會建立數位和冒號的所有 BoxView 元素,並初始化 Color 冒號元素的 BoxView 屬性:
public partial class MainPage : ContentPage
{

    ···

    public MainPage()
    {
        InitializeComponent();

        // BoxView dot dimensions.
        double height = 0.85 / vertDots;
        double width = 0.85 / horzDots;

        // Create and assemble the BoxViews.
        double xIncrement = 1.0 / (horzDots - 1);
        double yIncrement = 1.0 / (vertDots - 1);
        double x = 0;

        for (int digit = 0; digit < 6; digit++)
        {
            for (int col = 0; col < 5; col++)
            {
                double y = 0;

                for (int row = 0; row < 7; row++)
                {
                    // Create the digit BoxView and add to layout.
                    BoxView boxView = new BoxView();
                    digitBoxViews[digit, row, col] = boxView;
                    absoluteLayout.Children.Add(boxView,
                                                new Rectangle(x, y, width, height),
                                                AbsoluteLayoutFlags.All);
                    y += yIncrement;
                }
                x += xIncrement;
            }
            x += xIncrement;

            // Colons between the hours, minutes, and seconds.
            if (digit == 1 || digit == 3)
            {
                int colon = digit / 2;

                for (int col = 0; col < 2; col++)
                {
                    double y = 0;

                    for (int row = 0; row < 7; row++)
                    {
                        // Create the BoxView and set the color.
                        BoxView boxView = new BoxView
                            {
                                Color = colonPattern[row, col] == 1 ?
                                            colorOn : colorOff
                            };
                        absoluteLayout.Children.Add(boxView,
                                                    new Rectangle(x, y, width, height),
                                                    AbsoluteLayoutFlags.All);
                        y += yIncrement;
                    }
                    x += xIncrement;
                }
                x += xIncrement;
            }
        }

        // Set the timer and initialize with a manual call.
        Device.StartTimer(TimeSpan.FromSeconds(1), OnTimer);
        OnTimer();
    }

    ···

}
此程式使用的 AbsoluteLayout相對定位和重設大小功能。 每個 BoxView 寬度和高度都設定為分數值,特別是1的85%除以水準和垂直點的數目。 位置也會設定為分數值。
由於所有位置和大小都相對於的總大小AbsoluteLayout,SizeChanged因此頁面的處理程式只需要設定 的 AbsoluteLayout:HeightRequest
public partial class MainPage : ContentPage
{

    ···

    void OnPageSizeChanged(object sender, EventArgs args)
    {
        // No chance a display will have an aspect ratio > 41:7
        absoluteLayout.HeightRequest = vertDots * Width / horzDots;
    }

    ···

}
的寬度 AbsoluteLayout 會自動設定,因為它會延展至頁面的完整寬度。
類別中的 MainPage 最後一個程式代碼會處理定時器回呼,並將每個數位的點著色。 程式代碼後置檔案開頭的多維度數位定義有助於讓此邏輯成為程式最簡單的部分:
public partial class MainPage : ContentPage
{

    ···

    bool OnTimer()
    {
        DateTime dateTime = DateTime.Now;

        // Convert 24-hour clock to 12-hour clock.
        int hour = (dateTime.Hour + 11) % 12 + 1;

        // Set the dot colors for each digit separately.
        SetDotMatrix(0, hour / 10);
        SetDotMatrix(1, hour % 10);
        SetDotMatrix(2, dateTime.Minute / 10);
        SetDotMatrix(3, dateTime.Minute % 10);
        SetDotMatrix(4, dateTime.Second / 10);
        SetDotMatrix(5, dateTime.Second % 10);
        return true;
    }

    void SetDotMatrix(int index, int digit)
    {
        for (int row = 0; row < 7; row++)
            for (int col = 0; col < 5; col++)
            {
                bool isOn = numberPatterns[digit, row, col] == 1;
                Color color = isOn ? colorOn : colorOff;
                digitBoxViews[index, row, col].Color = color;
            }
    }
}
建立類比時鐘
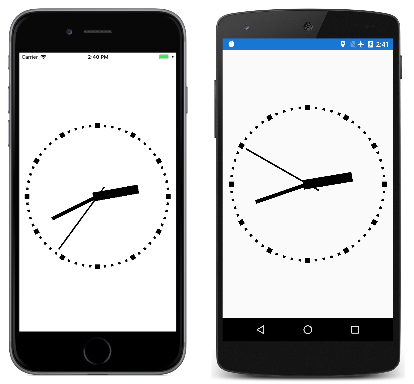
點矩陣時鐘似乎是一個明顯的應用 BoxView,但 BoxView 元素也能夠實現類比時鐘:
BoxViewClock 程式中的所有視覺效果都是 的AbsoluteLayout子系。 這些專案會使用 LayoutBounds 附加屬性來重設大小,並使用 屬性旋轉 Rotation 。
時鐘之手的三 BoxView 個元素會在 XAML 檔案中具現化,但無法定位或調整大小:
<ContentPage xmlns="http://xamarin.com/schemas/2014/forms"
             xmlns:x="http://schemas.microsoft.com/winfx/2009/xaml"
             xmlns:local="clr-namespace:BoxViewClock"
             x:Class="BoxViewClock.MainPage">
    <ContentPage.Padding>
        <OnPlatform x:TypeArguments="Thickness">
            <On Platform="iOS" Value="0, 20, 0, 0" />
        </OnPlatform>
    </ContentPage.Padding>

    <AbsoluteLayout x:Name="absoluteLayout"
                    SizeChanged="OnAbsoluteLayoutSizeChanged">

        <BoxView x:Name="hourHand"
                 Color="Black" />

        <BoxView x:Name="minuteHand"
                 Color="Black" />

        <BoxView x:Name="secondHand"
                 Color="Black" />
    </AbsoluteLayout>
</ContentPage>
程式代碼後置檔案的建構函式會具現化時鐘周長周圍的刻度標記 60 BoxView 個元素:
public partial class MainPage : ContentPage
{

    ···

    BoxView[] tickMarks = new BoxView[60];

    public MainPage()
    {
        InitializeComponent();

        // Create the tick marks (to be sized and positioned later).
        for (int i = 0; i < tickMarks.Length; i++)
        {
            tickMarks[i] = new BoxView { Color = Color.Black };
            absoluteLayout.Children.Add(tickMarks[i]);
        }

        Device.StartTimer(TimeSpan.FromSeconds(1.0 / 60), OnTimerTick);
    }

    ···

}
所有BoxView專案的重設大小和位置都會發生在的處理程式中SizeChangedAbsoluteLayout。 所呼叫 HandParams 類別內部的一點結構描述相對於時鐘總大小,這三隻手的大小各有一點:
public partial class MainPage : ContentPage
{
    // Structure for storing information about the three hands.
    struct HandParams
    {
        public HandParams(double width, double height, double offset) : this()
        {
            Width = width;
            Height = height;
            Offset = offset;
        }

        public double Width { private set; get; }   // fraction of radius
        public double Height { private set; get; }  // ditto
        public double Offset { private set; get; }  // relative to center pivot
    }

    static readonly HandParams secondParams = new HandParams(0.02, 1.1, 0.85);
    static readonly HandParams minuteParams = new HandParams(0.05, 0.8, 0.9);
    static readonly HandParams hourParams = new HandParams(0.125, 0.65, 0.9);

    ···

 }
處理程式 SizeChanged 會決定 的中央和半徑 AbsoluteLayout,然後將60 BoxView 個元素的大小和位置做為刻度標記。 循環會 for 藉由設定 Rotation 每個 BoxView 元素的 屬性來結束。 在處理程序結束時 SizeChanged ,呼叫 LayoutHand 方法以調整時鐘的三個手大小和位置:
public partial class MainPage : ContentPage
{

    ···

    void OnAbsoluteLayoutSizeChanged(object sender, EventArgs args)
    {
        // Get the center and radius of the AbsoluteLayout.
        Point center = new Point(absoluteLayout.Width / 2, absoluteLayout.Height / 2);
        double radius = 0.45 * Math.Min(absoluteLayout.Width, absoluteLayout.Height);

        // Position, size, and rotate the 60 tick marks.
        for (int index = 0; index < tickMarks.Length; index++)
        {
            double size = radius / (index % 5 == 0 ? 15 : 30);
            double radians = index * 2 * Math.PI / tickMarks.Length;
            double x = center.X + radius * Math.Sin(radians) - size / 2;
            double y = center.Y - radius * Math.Cos(radians) - size / 2;
            AbsoluteLayout.SetLayoutBounds(tickMarks[index], new Rectangle(x, y, size, size));
            tickMarks[index].Rotation = 180 * radians / Math.PI;
        }

        // Position and size the three hands.
        LayoutHand(secondHand, secondParams, center, radius);
        LayoutHand(minuteHand, minuteParams, center, radius);
        LayoutHand(hourHand, hourParams, center, radius);
    }

    void LayoutHand(BoxView boxView, HandParams handParams, Point center, double radius)
    {
        double width = handParams.Width * radius;
        double height = handParams.Height * radius;
        double offset = handParams.Offset;

        AbsoluteLayout.SetLayoutBounds(boxView,
            new Rectangle(center.X - 0.5 * width,
                          center.Y - offset * height,
                          width, height));

        // Set the AnchorY property for rotations.
        boxView.AnchorY = handParams.Offset;
    }

    ···

}
方法 LayoutHand 會調整每個手的大小和位置,以直接指向 12:00 的位置。 在 方法的結尾, AnchorY 屬性會設定為對應至時鐘中心的位置。 這表示旋轉的中心。
手部會在定時器回呼函式中旋轉:
public partial class MainPage : ContentPage
{

    ···

    bool OnTimerTick()
    {
        // Set rotation angles for hour and minute hands.
        DateTime dateTime = DateTime.Now;
        hourHand.Rotation = 30 * (dateTime.Hour % 12) + 0.5 * dateTime.Minute;
        minuteHand.Rotation = 6 * dateTime.Minute + 0.1 * dateTime.Second;

        // Do an animation for the second hand.
        double t = dateTime.Millisecond / 1000.0;

        if (t < 0.5)
        {
            t = 0.5 * Easing.SpringIn.Ease(t / 0.5);
        }
        else
        {
            t = 0.5 * (1 + Easing.SpringOut.Ease((t - 0.5) / 0.5));
        }

        secondHand.Rotation = 6 * (dateTime.Second + t);
        return true;
    }
}
第二手的處理方式稍有不同:套用動畫放鬆功能,使動作看起來機械而非平滑。 在每個滴答聲中,第二隻手拉回一點點,然後過度撥動其目的地。 這一點點程式代碼在移動的現實主義中增加了很多。
 下載範例
下載範例