Xamarin.Forms CarouselView 數據
CarouselView 包含下列屬性,可定義要顯示的數據及其外觀:
ItemsSource型IEnumerable別為 的 ,指定要顯示的專案集合,且預設值為null。ItemTemplate類型DataTemplate為 的 ,指定要套用至要顯示之專案集合中每個專案的範本。
這些屬性是由 BindableProperty 物件所支援,這表示屬性可以是數據系結的目標。
注意
CarouselView 會 ItemsUpdatingScrollMode 定義 屬性,這個屬性表示將新專案加入至其中時的 CarouselView 捲動行為。 如需此屬性的詳細資訊,請參閱 新增專案時控制卷動位置。
CarouselView 當使用者捲動時,支援累加式數據虛擬化。 如需詳細資訊,請參閱 以累加方式載入數據。
使用數據填入 CarouselView
會將 CarouselView 其 ItemsSource 屬性設定為任何實作 的 IEnumerable集合,以填入數據。 根據預設, CarouselView 水平顯示專案。
重要
CarouselView如果需要在基礎集合中新增、移除或變更專案時重新整理 ,基礎集合應該是IEnumerable傳送屬性變更通知的集合,例如 ObservableCollection。
CarouselView 您可以使用數據系結將其屬性系結 ItemsSource 至 IEnumerable 集合,以填入數據。 在 XAML 中,這會透過 Binding 標記延伸來達成:
<CarouselView ItemsSource="{Binding Monkeys}" />
對等的 C# 程式碼為:
CarouselView carouselView = new CarouselView();
carouselView.SetBinding(ItemsView.ItemsSourceProperty, "Monkeys");
在此範例中 ItemsSource ,屬性數據會系結至 Monkeys 連接的 ViewModel 屬性。
注意
您可以啟用編譯的系結,以改善應用程式中的數據系結效能 Xamarin.Forms 。 如需詳細資訊,請參閱編譯繫結。
如需如何變更 CarouselView 方向的資訊,請參閱 Xamarin.Forms CarouselView 版面配置。 如需如何定義 中 CarouselView每個項目外觀的資訊,請參閱 定義項目外觀。 如需數據系結的詳細資訊,請參閱 Xamarin.Forms 數據系結。
定義項目外觀
中每個項目 CarouselView 的外觀都可以藉由將 屬性設定 CarouselView.ItemTemplate 為 來 DataTemplate定義:
<CarouselView ItemsSource="{Binding Monkeys}">
    <CarouselView.ItemTemplate>
        <DataTemplate>
            <StackLayout>
                <Frame HasShadow="True"
                       BorderColor="DarkGray"
                       CornerRadius="5"
                       Margin="20"
                       HeightRequest="300"
                       HorizontalOptions="Center"
                       VerticalOptions="CenterAndExpand">
                    <StackLayout>
                        <Label Text="{Binding Name}"
                               FontAttributes="Bold"
                               FontSize="Large"
                               HorizontalOptions="Center"
                               VerticalOptions="Center" />
                        <Image Source="{Binding ImageUrl}"
                               Aspect="AspectFill"
                               HeightRequest="150"
                               WidthRequest="150"
                               HorizontalOptions="Center" />
                        <Label Text="{Binding Location}"
                               HorizontalOptions="Center" />
                        <Label Text="{Binding Details}"
                               FontAttributes="Italic"
                               HorizontalOptions="Center"
                               MaxLines="5"
                               LineBreakMode="TailTruncation" />
                    </StackLayout>
                </Frame>
            </StackLayout>
        </DataTemplate>
    </CarouselView.ItemTemplate>
</CarouselView>
對等的 C# 程式碼為:
CarouselView carouselView = new CarouselView();
carouselView.SetBinding(ItemsView.ItemsSourceProperty, "Monkeys");

carouselView.ItemTemplate = new DataTemplate(() =>
{
    Label nameLabel = new Label { ... };
    nameLabel.SetBinding(Label.TextProperty, "Name");

    Image image = new Image { ... };
    image.SetBinding(Image.SourceProperty, "ImageUrl");

    Label locationLabel = new Label { ... };
    locationLabel.SetBinding(Label.TextProperty, "Location");

    Label detailsLabel = new Label { ... };
    detailsLabel.SetBinding(Label.TextProperty, "Details");

    StackLayout stackLayout = new StackLayout
    {
        Children = { nameLabel, image, locationLabel, detailsLabel }
    };

    Frame frame = new Frame { ... };
    StackLayout rootStackLayout = new StackLayout
    {
        Children = { frame }
    };

    return rootStackLayout;
});
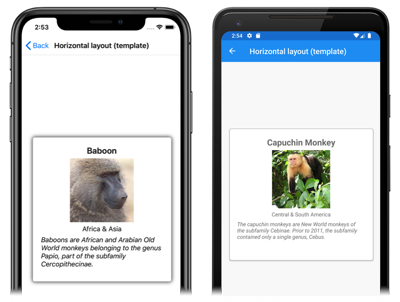
中指定的 DataTemplate 項目會定義 中 CarouselView每個項目的外觀。 在此範例中DataTemplate,內的版面配置是由 管理StackLayout,而且數據會以 物件和三Label個 Image 對象來顯示,這些物件都會繫結至 類別的屬性Monkey:
public class Monkey
{
    public string Name { get; set; }
    public string Location { get; set; }
    public string Details { get; set; }
    public string ImageUrl { get; set; }
}
下列螢幕快照顯示範本化每個項目的結果:
如需數據範本的詳細資訊,請參閱 Xamarin.Forms 數據範本。
選擇運行時間的項目外觀
您可以藉由將 屬性DataTemplateSelector設定CarouselView.ItemTemplate為物件,在執行時間根據專案值,選擇 中CarouselView每個項目的外觀:
<ContentPage ...
             xmlns:controls="clr-namespace:CarouselViewDemos.Controls"
             x:Class="CarouselViewDemos.Views.HorizontalLayoutDataTemplateSelectorPage">
    <ContentPage.Resources>
        <DataTemplate x:Key="AmericanMonkeyTemplate">
            ...
        </DataTemplate>

        <DataTemplate x:Key="OtherMonkeyTemplate">
            ...
        </DataTemplate>

        <controls:MonkeyDataTemplateSelector x:Key="MonkeySelector"
                                             AmericanMonkey="{StaticResource AmericanMonkeyTemplate}"
                                             OtherMonkey="{StaticResource OtherMonkeyTemplate}" />
    </ContentPage.Resources>

    <CarouselView ItemsSource="{Binding Monkeys}"
                  ItemTemplate="{StaticResource MonkeySelector}" />
</ContentPage>
對等的 C# 程式碼為:
CarouselView carouselView = new CarouselView
{
    ItemTemplate = new MonkeyDataTemplateSelector { ... }
};
carouselView.SetBinding(ItemsView.ItemsSourceProperty, "Monkeys");
屬性 ItemTemplate 會設定為 MonkeyDataTemplateSelector 物件。 下列範例顯示 類別 MonkeyDataTemplateSelector :
public class MonkeyDataTemplateSelector : DataTemplateSelector
{
    public DataTemplate AmericanMonkey { get; set; }
    public DataTemplate OtherMonkey { get; set; }

    protected override DataTemplate OnSelectTemplate(object item, BindableObject container)
    {
        return ((Monkey)item).Location.Contains("America") ? AmericanMonkey : OtherMonkey;
    }
}
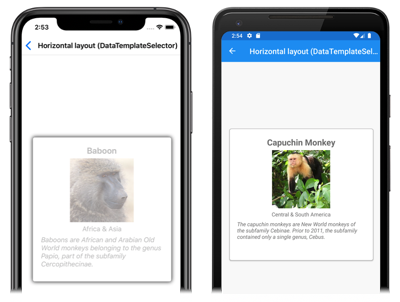
類別 MonkeyDataTemplateSelector 會 AmericanMonkey 定義 和 OtherMonkeyDataTemplate 屬性,這些屬性會設定為不同的數據範本。 當猴子名稱包含 「America」 時,AmericanMonkey覆OnSelectTemplate寫會傳回範本。 當猴子名稱不包含 「America」 時, OnSelectTemplate 覆寫會 OtherMonkey 傳回範本,顯示其數據呈現灰色:
如需數據範本選取器的詳細資訊,請參閱 建立 Xamarin.Forms DataTemplateSelector。
重要
使用 CarouselView時,永遠不要將 物件的根元素 DataTemplate 設定為 ViewCell。 這會導致擲回例外狀況,因為 CarouselView 沒有單元格的概念。
顯示指示器
表示 中 CarouselView項目數和目前位置的指標,可以在 旁邊 CarouselView顯示。 這可以使用 控制項來完成 IndicatorView :
<StackLayout>
    <CarouselView ItemsSource="{Binding Monkeys}"
                  IndicatorView="indicatorView">
        <CarouselView.ItemTemplate>
            <!-- DataTemplate that defines item appearance -->
        </CarouselView.ItemTemplate>
    </CarouselView>
    <IndicatorView x:Name="indicatorView"
                   IndicatorColor="LightGray"
                   SelectedIndicatorColor="DarkGray"
                   HorizontalOptions="Center" />
</StackLayout>
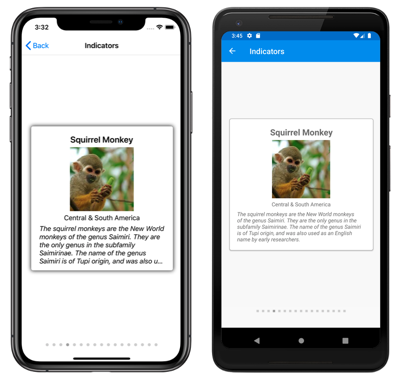
在此範例中, IndicatorView 會在下方 CarouselView轉譯 ,其中包含 中 CarouselView每個專案的指標。 會將 IndicatorView 屬性設定 CarouselView.IndicatorView 為 IndicatorView 物件,以填入數據。 每個指標都是淺灰色圓形,而 代表 中 CarouselView 目前專案的指標為深灰色:
重要
設定屬性會導致CarouselView.IndicatorViewIndicatorView.Position屬性系結至 CarouselView.Position 屬性,並將IndicatorView.ItemsSource屬性系結至 CarouselView.ItemsSource 屬性。
如需指標的詳細資訊,請參閱 Xamarin.Forms IndicatorView。
操作功能表
CarouselView 支援透過 SwipeView的數據項操作功能表,其會顯示具有撥動手勢的操作功能表。 SwipeView是包裝內容專案的容器控件,並提供該內容專案的操作功能表項。 因此,藉由建立 SwipeView ,定義包裝的內容SwipeView,以及撥動手勢所顯示的內容功能表項,即可實CarouselView作 操作功能表。 這可藉由將 新增 SwipeView 至 DataTemplate ,以定義 中 CarouselView每個數據項的外觀:
<CarouselView x:Name="carouselView"
              ItemsSource="{Binding Monkeys}">
    <CarouselView.ItemTemplate>
        <DataTemplate>
            <StackLayout>
                    <Frame HasShadow="True"
                           BorderColor="DarkGray"
                           CornerRadius="5"
                           Margin="20"
                           HeightRequest="300"
                           HorizontalOptions="Center"
                           VerticalOptions="CenterAndExpand">
                        <SwipeView>
                            <SwipeView.TopItems>
                                <SwipeItems>
                                    <SwipeItem Text="Favorite"
                                               IconImageSource="favorite.png"
                                               BackgroundColor="LightGreen"
                                               Command="{Binding Source={x:Reference carouselView}, Path=BindingContext.FavoriteCommand}"
                                               CommandParameter="{Binding}" />
                                </SwipeItems>
                            </SwipeView.TopItems>
                            <SwipeView.BottomItems>
                                <SwipeItems>
                                    <SwipeItem Text="Delete"
                                               IconImageSource="delete.png"
                                               BackgroundColor="LightPink"
                                               Command="{Binding Source={x:Reference carouselView}, Path=BindingContext.DeleteCommand}"
                                               CommandParameter="{Binding}" />
                                </SwipeItems>
                            </SwipeView.BottomItems>
                            <StackLayout>
                                <!-- Define item appearance -->
                            </StackLayout>
                        </SwipeView>
                    </Frame>
            </StackLayout>
        </DataTemplate>
    </CarouselView.ItemTemplate>
</CarouselView>
對等的 C# 程式碼為:
CarouselView carouselView = new CarouselView();
carouselView.SetBinding(ItemsView.ItemsSourceProperty, "Monkeys");

carouselView.ItemTemplate = new DataTemplate(() =>
{
    StackLayout stackLayout = new StackLayout();
    Frame frame = new Frame { ... };

    SwipeView swipeView = new SwipeView();
    SwipeItem favoriteSwipeItem = new SwipeItem
    {
        Text = "Favorite",
        IconImageSource = "favorite.png",
        BackgroundColor = Color.LightGreen
    };
    favoriteSwipeItem.SetBinding(MenuItem.CommandProperty, new Binding("BindingContext.FavoriteCommand", source: carouselView));
    favoriteSwipeItem.SetBinding(MenuItem.CommandParameterProperty, ".");

    SwipeItem deleteSwipeItem = new SwipeItem
    {
        Text = "Delete",
        IconImageSource = "delete.png",
        BackgroundColor = Color.LightPink
    };
    deleteSwipeItem.SetBinding(MenuItem.CommandProperty, new Binding("BindingContext.DeleteCommand", source: carouselView));
    deleteSwipeItem.SetBinding(MenuItem.CommandParameterProperty, ".");

    swipeView.TopItems = new SwipeItems { favoriteSwipeItem };
    swipeView.BottomItems = new SwipeItems { deleteSwipeItem };

    StackLayout swipeViewStackLayout = new StackLayout { ... };
    swipeView.Content = swipeViewStackLayout;
    frame.Content = swipeView;
    stackLayout.Children.Add(frame);

    return stackLayout;
});
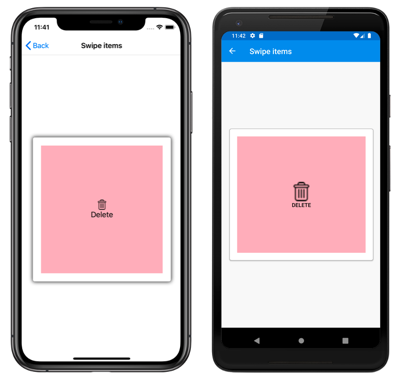
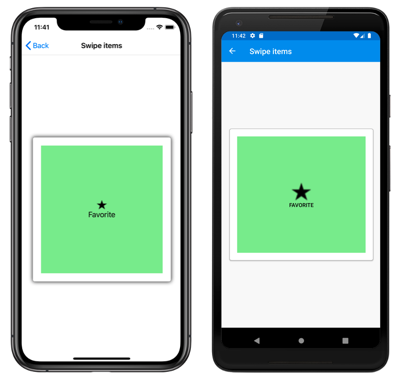
在此範例中SwipeView,內容是 ,StackLayout定義 中CarouselView以 括住Frame的每個項目外觀。 撥動專案可用來對 SwipeView 內容執行動作,並在控件從頂端和底部撥動時顯示:
SwipeView 支援四個不同的撥動方向,而撥動方向是由物件新增至的方向 SwipeItems 集合 SwipeItems 所定義。 根據預設,撥動專案會在用戶點選時執行。 此外,一旦執行撥動專案,撥動專案就會隱藏並 SwipeView 重新顯示內容。 不過,這些行為可以變更。
如需控件的詳細資訊 SwipeView ,請參閱 Xamarin.Forms SwipeView。
提取以重新整理
CarouselView 支援透過 RefreshView提取來重新整理功能,這可藉由向下提取專案來重新整理所顯示的數據。 RefreshView是一個容器控件,提供提取來重新整理其子系的功能,前提是子系支援可捲動的內容。 因此,藉由將提取重新整理設定為 的RefreshView子系,會針對 CarouselView 實作 :
<RefreshView IsRefreshing="{Binding IsRefreshing}"
             Command="{Binding RefreshCommand}">
    <CarouselView ItemsSource="{Binding Animals}">
        ...
    </CarouselView>
</RefreshView>
對等的 C# 程式碼為:
RefreshView refreshView = new RefreshView();
ICommand refreshCommand = new Command(() =>
{
    // IsRefreshing is true
    // Refresh data here
    refreshView.IsRefreshing = false;
});
refreshView.Command = refreshCommand;

CarouselView carouselView = new CarouselView();
carouselView.SetBinding(ItemsView.ItemsSourceProperty, "Animals");
refreshView.Content = carouselView;
// ...
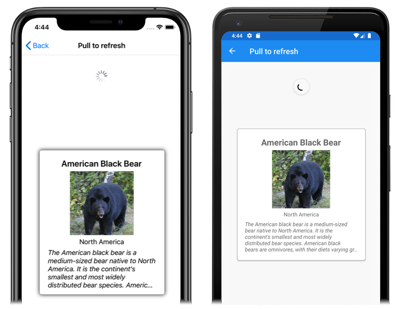
當使用者起始重新整理時, ICommand 會執行 屬性所 Command 定義的 ,這應該會重新整理要顯示的專案。 重新整理發生時會顯示重新整理視覺效果,其中包含動畫進度圓形:
屬性的值 RefreshView.IsRefreshing 表示 的 RefreshView目前狀態。 當使用者觸發重新整理時,這個屬性會自動轉換為 true。 重新整理完成後,您應該將 屬性 false重設為 。
如需 的詳細資訊 RefreshView,請參閱 Xamarin.Forms RefreshView。
以累加方式載入數據
CarouselView 當使用者捲動時,支援累加式數據虛擬化。 這可讓使用者捲動時,以異步方式從 Web 服務載入數據頁面等案例。 此外,可以設定載入更多資料的時間點,讓使用者看不到空白,或停止捲動。
CarouselView 定義下列屬性來控制資料的累加式載入:
RemainingItemsThreshold類型int為 的 ,表示清單中尚未顯示RemainingItemsThresholdReached要引發事件的項目臨界值。RemainingItemsThresholdReachedCommand,類型ICommand為 ,會在 到達時RemainingItemsThreshold執行。RemainingItemsThresholdReachedCommandParameter,屬於object類型,這是傳遞至RemainingItemsThresholdReachedCommand的參數。
CarouselView也會定義RemainingItemsThresholdReached在捲動到足以RemainingItemsThreshold顯示項目時CarouselView引發的事件。 此事件可以處理以載入更多專案。 此外,在引發事件時 RemainingItemsThresholdReached , RemainingItemsThresholdReachedCommand 會執行 ,讓累加式數據載入在 viewmodel 中執行。
屬性的 RemainingItemsThreshold 預設值為 -1,表示 RemainingItemsThresholdReached 永遠不會引發事件。 當屬性值為 0 時, RemainingItemsThresholdReached 會在 顯示 中的 ItemsSource 最後一個項目時引發 事件。 對於大於 0 的值,當 包含尚未捲動的項目數目時ItemsSource,RemainingItemsThresholdReached就會引發 事件。
注意
CarouselView 會 RemainingItemsThreshold 驗證 屬性,使其值一律大於或等於 -1。
下列 XAML 範例示範 CarouselView 以累加方式載入資料的 :
<CarouselView ItemsSource="{Binding Animals}"
              RemainingItemsThreshold="2"
              RemainingItemsThresholdReached="OnCarouselViewRemainingItemsThresholdReached"
              RemainingItemsThresholdReachedCommand="{Binding LoadMoreDataCommand}">
    ...
</CarouselView>
對等的 C# 程式碼為:
CarouselView carouselView = new CarouselView
{
    RemainingItemsThreshold = 2
};
carouselView.RemainingItemsThresholdReached += OnCollectionViewRemainingItemsThresholdReached;
carouselView.SetBinding(ItemsView.ItemsSourceProperty, "Animals");
在此程式代碼範例中 RemainingItemsThresholdReached ,事件會在有 2 個專案尚未捲動時引發,而回應中會 OnCollectionViewRemainingItemsThresholdReached 執行事件處理程式:
void OnCollectionViewRemainingItemsThresholdReached(object sender, EventArgs e)
{
    // Retrieve more data here and add it to the CollectionView's ItemsSource collection.
}
注意
您也可以藉由將 系結 RemainingItemsThresholdReachedCommand 至 ICommand viewmodel 中的實作,以累加方式載入數據。
