.NET MAUI
A Microsoft open-source framework for building native device applications spanning mobile, tablet, and desktop.
2,884 questions
This browser is no longer supported.
Upgrade to Microsoft Edge to take advantage of the latest features, security updates, and technical support.
' cx='32' cy='32' r='32' /%3E%3Ctext x='50%25' y='55%25' dominant-baseline='middle' text-anchor='middle' fill='%23FFF' %3ESM%3C/text%3E%3C/svg%3E)
In android emulator i can access the camera and take the pictures but i need to save the picture in phone storage
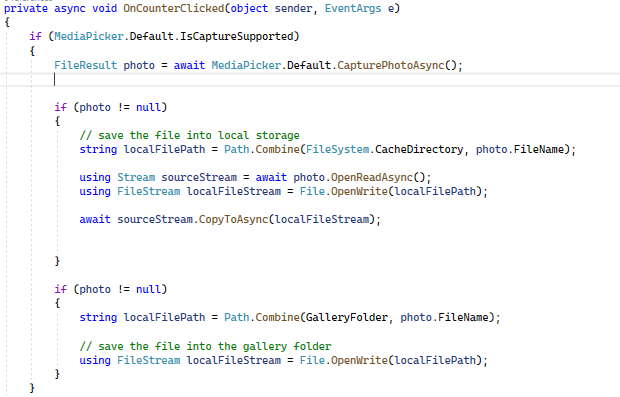
this is for access camera I need save the image from that camera
' cx='32' cy='32' r='32' /%3E%3Ctext x='50%25' y='55%25' dominant-baseline='middle' text-anchor='middle' fill='%23FFF' %3ED%3C/text%3E%3C/svg%3E)
Hello @ShaikMuneerNihal-0131,
Your above program already saves to phone storage although as FileSystem.CacheDirectory, the location is where temporary data is stored.
If you're looking for your app's storage location, use FileSystem.AppDataDirectory instead. This location although usually not visible to the user, it will be backed up (say, when syncing to cloud storage).
If you wish to use your device's media gallery, the best bet is to use Media Plugin for Xamarin and Windows which also works for .NET MAUI (I have checked this).
To use Media Plugin, head to https://github.com/jamesmontemagno/MediaPlugin and you will find all clearly presented guides there including code examples. It is important to setup permissions and File Provider Paths so that your app knows where to save the camera pictures and videos.
Media Plugin also has all the useful utilities built-in, such as checking if a camera exists and if certain features are supported, so that you can focus on saving or picking media content by using TakePhotoAsync(), TakeVideoAsync(), PickPhotoAsync(), and PickVideoAsync() together with StoreCameraMediaOptions and PickMediaOptions setting definitions, all making the task so easy.
Thank you for answering @dg2k ,
can you provide any detail video on that I am new to learn this technology.
Hi @ShaikMuneerNihal-0131,
The detail is provided here and in a way I am trying to avoid a repetition with this answer. Here is a quick rundown of what you need to do. I am assuming Android platform.
Install Xam.Plugin.Media Nuget package ( Project properties -> Manage Nuget Packages ... then Browse Tab and type in Xam.Plugin.Media and follow the steps).
Add the following permissions to the AndroidManifest.xml (to manifest tag) so that you have access permission to save to, and read from your phone's storage.
<uses-permission android:name="android.permission.READ_EXTERNAL_STORAGE" />
<uses-permission android:name="android.permission.WRITE_EXTERNAL_STORAGE" />
Again, add the following to AndroidManifest.xml in the application tag. This is to tell your app where to save your captured pictures and videos on phone storage, just like your camera saves automatically to the media gallery. With this setting, you are essentially defining the folder names for your pictures and videos (the folder names are separately defined with string resource as indicated below).
<provider android:name="androidx.core.content.FileProvider"
    android:authorities="${applicationId}.fileprovider"
    android:exported="false"
    android:grantUriPermissions="true">

 <meta-data android:name="android.support.FILE_PROVIDER_PATHS"
 android:resource="@xml/file_paths"></meta-data>
</provider>
To define the file_paths shown in above, create a folder called xml in Android's Resources folder. In that folder create a file called file_paths.xml. Put the following text in that file.
<?xml version="1.0" encoding="utf-8"?>
<paths xmlns:android="http://schemas.android.com/apk/res/android">
 <external-files-path name="my_pictures" path="Pictures" />
 <external-files-path name="my_movies" path="Movies" />
</paths>
The above is now telling your app to save pictures in InternalStorage\Pictures and videos in InternalStorage\Movies. Of course, you can change the name Pictures and Movies as you like.
Just for a reference, your camera is automatically saving captured media to InternalStorage\DCIM folder (DCIM - Digital Camera IMage). As you can see, your media folders and camera's own folder are sitting at the same hierarchy in the phone storage and when you navigate to view pictures and videos you can easily see both yours and camera's captured media. Some apps may aggregate all the media for you but the folder makes it distinct.
Now to the Coding:
To capture photo, use the following code. SaveToAlbum = true is important and you can give the file name some personal prefix (I used your handle name for fun) and appended the date string to 4-digit fractional second for uniqueness and with file suffix jpg. There are numerous options that can be set by StoreCameraMediaOptions and explore those to your requirements. My settings below are to save a small thumbnail image for illustration. Remove those options to opt for a default size, or define based on your requirements.
try
{
    var photoFile = await CrossMedia.Current.TakePhotoAsync(new StoreCameraMediaOptions
    {
        SaveToAlbum = true,
        Name = "ShaikMuneerNihal-" + DateTime.UtcNow.ToString("yyMMdd-HHmmss-ffff") + ".jpg",
        DefaultCamera = CameraDevice.Front,
        CustomPhotoSize = 50,
        MaxWidthHeight = 100,
        AllowCropping = true
    });
}
catch (NotSupportedException ex)
{
    await DisplayAlert("App name or some title here", "No camera device found.\n\nUnable to take photos.", "OK";
}
catch (Exception ex)
{
    // catch other errors here.
}
For video capture, you instead use TakeVideoAsync with StoreVideoOptions, hence:
var videoFile = await CrossMedia.Current.TakeVideoAsync(new  StoreVideoOptions
{

    . . .

});
To do the reverse process of Picking a picture or video file, you use:
CrossMedia.Current.PickPhotoAsync(new PickMediaOptions ...
and
CrossMedia.Current.PickVideoAsync(new PickMediaOptions ...
The above is just an overview to get you started, and the Media Plugin has a rich set of options that cannot be covered within such an answer. It is easy to work your way up once you try out the above starter code. Good luck!
IMPORTANT: If the answer is the right solution, please click "Accept Answer" and kindly upvote it. If you have extra questions about this answer, please click "Comment" but still do not forget the "Accept Answer" if the question is answered.
' cx='32' cy='32' r='32' /%3E%3Ctext x='50%25' y='55%25' dominant-baseline='middle' text-anchor='middle' fill='%23FFF' %3EC%3C/text%3E%3C/svg%3E)
This is an excellent post. I had the same question. But I'm still left wondering if the Maui Libraries have the ability to write to external resources. It took me a while to wrap my head around the fact that in maui/android, I can't interrogate the files I'm saving from outside of my app process.