تكوين أنظمة مجموعات بيانات النقاط في Android SDK
عند تصور العديد من نقاط البيانات على الخريطة، قد تتداخل النقاط مع بعضها. قد يتسبب التداخل في أن تصبح الخريطة غير قابلة للقراءة وصعبة الاستخدام. تجميع بيانات نقطة هي عملية دمج نقاط البيانات القريبة من بعضها البعض وتمثيلها على الخريطة كنقطة بيانات واحدة مجمعة. عندما يكبر المستخدم في الخريطة، تتقسم المجموعات إلى نقاط البيانات الفردية. عند العمل مع عدد كبير من نقاط البيانات، استخدم عمليات تكوين أنظمة المجموعات لتحسين تجربة المستخدم.
إشعار
خرائط Azure إيقاف Android SDK
تم الآن إهمال خرائط Azure Native SDK لنظام التشغيل Android وسيتم إيقافه في 3/31/25. لتجنب انقطاع الخدمة، قم بالترحيل إلى خرائط Azure Web SDK بحلول 3/31/25. لمزيد من المعلومات، راجع دليل ترحيل خرائط Azure Android SDK.
المتطلبات الأساسية
تأكد من إكمال الخطوات الواردة في تشغيل سريع : إنشاء مستند لتطبيق Android. يمكن إدراج كتل التعليمة البرمجية في هذه المقالة في معالج أحداث onReady الخرائط.
تمكين التجميع على مصدر بيانات
تمكين التجميع في الفئة DataSource عن طريق تعيين الخيار cluster إلى true. تعيين clusterRadius لتحديد النقاط القريبة ودمجها في مجموعة. القيمة clusterRadius بالبكسل. استخدم clusterMaxZoom لتحديد مستوى التكبير/التصغير لتعطيل منطق تكوين أنظمة المجموعات. فيما يلي مثال على كيفية تمكين التجميع في مصدر بيانات.
//Create a data source and enable clustering.
DataSource source = new DataSource(
    //Tell the data source to cluster point data.
    cluster(true),

    //The radius in pixels to cluster points together.
    clusterRadius(45),

    //The maximum zoom level in which clustering occurs.
    //If you zoom in more than this, all points are rendered as symbols.
    clusterMaxZoom(15)
);
 //Create a data source and enable clustering.
val source = DataSource(
    //Tell the data source to cluster point data.
    cluster(true),

    //The radius in pixels to cluster points together.
    clusterRadius(45),

    //The maximum zoom level in which clustering occurs.
    //If you zoom in more than this, all points are rendered as symbols.
    clusterMaxZoom(15)
)
تنبيه
يعمل تكوين أنظمة المجموعات مع ميزات Point فحسب. إذا كان مصدر البيانات يحتوي على ميزات لأنواع هندسة أخرى، مثل LineString أو Polygon، فسيحدث خطأ.
تلميح
إذا كانت نقطتا البيانات قريبتين معًا على أرض الواقع، فمن المحتمل ألا تنفصل المجموعة أبدًا، بغض النظر عن مدى التكبير الذي يُجريه المستخدم. لمعالجة ذلك، يمكنك تعيين الخيار clusterMaxZoom لتعطيل منطق تكوين أنظمة المجموعات وعرض كل شيء ببساطة.
توفر الفئة DataSource الطرق التالية المتعلقة بتكوين أنظمة المجموعات أيضًا.
| الأسلوب | نوع الإرجاع | الوصف |
|---|---|---|
getClusterChildren(Feature clusterFeature) |
FeatureCollection |
استرداد العناصر الفرعية للمجموعة المحددة في مستوى التكبير/التصغير التالي. قد تكون هذه العناصر الفرعية مزيجًا من الأشكال والمجموعات الفرعية. تصبح المجموعات الفرعية ميزات مع خصائص مطابقة ClusteredProperties. |
getClusterExpansionZoom(Feature clusterFeature) |
int |
حساب مستوى التكبير/التصغير الذي يبدأ فيه نظام المجموعة في التوسع أو التفريق. |
getClusterLeaves(Feature clusterFeature, long limit, long offset) |
FeatureCollection |
استرداد كافة النقاط في مجموعة. تعيين limit إلى إرجاع مجموعة فرعية من النقاط، واستخدام offset الصفحة إلى خلال النقاط. |
عرض المجموعات باستخدام طبقة فقاعية
تعد الطبقة الفقاعية طريقة رائعة لعرض النقاط المُجمّعة. استخدم التعبيرات لتوسيع نطاق نصف القطر وتغيير اللون استنادًا إلى عدد النقاط في نظام المجموعة. إذا قمت بعرض مجموعات باستخدام طبقة فقاعية، يجب عليك استخدام طبقة منفصلة لعرض نقاط بيانات غير مُجمّعة.
لعرض حجم المجموعة أعلى الفقاعة، استخدم طبقة الرمز مع النص، ولا تستخدم الأيقونة.
تعرض التعليمات البرمجية التالية النقاط المُجمّعة باستخدام طبقة فقاعة، وعدد النقاط في كل نظام مجموعة باستخدام طبقة الرمز. يتم استخدام طبقة رمز ثانية لعرض نقاط فردية غير موجودة داخل نظام مجموعة.
//Create a data source and add it to the map.
DataSource source = new DataSource(
    //Tell the data source to cluster point data.
    cluster(true),

    //The radius in pixels to cluster points together.
    clusterRadius(45),

    //The maximum zoom level in which clustering occurs.
    //If you zoom in more than this, all points are rendered as symbols.
    clusterMaxZoom(15)
);

//Import the geojson data and add it to the data source.
map.importDataFromUrl("https://earthquake.usgs.gov/earthquakes/feed/v1.0/summary/all_week.geojson");

//Add data source to the map.
map.sources.add(source);

//Create a bubble layer for rendering clustered data points.
map.layers.add(new BubbleLayer(source,
    //Scale the size of the clustered bubble based on the number of points in the cluster.
    bubbleRadius(
        step(
            get("point_count"),
            20,             //Default of 20 pixel radius.
            stop(100, 30),  //If point_count >= 100, radius is 30 pixels.
            stop(750, 40)   //If point_count >= 750, radius is 40 pixels.
        )
    ),

    //Change the color of the cluster based on the value on the point_cluster property of the cluster.
    bubbleColor(
        step(
            toNumber(get("point_count")),
            color(Color.GREEN),              //Default to lime green.
            stop(100, color(Color.YELLOW)),  //If the point_count >= 100, color is yellow.
            stop(750, color(Color.RED))      //If the point_count >= 100, color is red.
        )
    ),

    bubbleStrokeWidth(0f),

    //Only rendered data points which have a point_count property, which clusters do.
    BubbleLayerOptions.filter(has("point_count"))
));

//Create a symbol layer to render the count of locations in a cluster.
map.layers.add(new SymbolLayer(source,
    iconImage("none"),                //Hide the icon image.
    textField(get("point_count")),    //Display the point count as text.
    textOffset(new Float[]{ 0f, 0.4f }),

    //Allow clustered points in this layer.
    SymbolLayerOptions.filter(has("point_count"))
));

//Create a layer to render the individual locations.
map.layers.add(new SymbolLayer(source,
    //Filter out clustered points from this layer.
    SymbolLayerOptions.filter(not(has("point_count")))
));
//Create a data source and add it to the map.
val source = DataSource(
    //Tell the data source to cluster point data.
    cluster(true),

    //The radius in pixels to cluster points together.
    clusterRadius(45),

    //The maximum zoom level in which clustering occurs.
    //If you zoom in more than this, all points are rendered as symbols.
    clusterMaxZoom(15)
)

//Import the geojson data and add it to the data source.
map.importDataFromUrl("https://earthquake.usgs.gov/earthquakes/feed/v1.0/summary/all_week.geojson")

//Add data source to the map.
map.sources.add(source)

//Create a bubble layer for rendering clustered data points.
map.layers.add(
    BubbleLayer(
        source,

        //Scale the size of the clustered bubble based on the number of points in the cluster.
        bubbleRadius(
            step(
                get("point_count"),
                20,  //Default of 20 pixel radius.
                stop(100, 30),  //If point_count >= 100, radius is 30 pixels.
                stop(750, 40) //If point_count >= 750, radius is 40 pixels.
            )
        ),

        //Change the color of the cluster based on the value on the point_cluster property of the cluster.
        bubbleColor(
            step(
                toNumber(get("point_count")),
                color(Color.GREEN),  //Default to lime green.
                stop(100, color(Color.YELLOW)),  //If the point_count >= 100, color is yellow.
                stop(750, color(Color.RED)) //If the point_count >= 100, color is red.
            )
        ),
        bubbleStrokeWidth(0f),

        //Only rendered data points which have a point_count property, which clusters do.
        BubbleLayerOptions.filter(has("point_count"))
    )
)

//Create a symbol layer to render the count of locations in a cluster.
map.layers.add(
    SymbolLayer(
        source,
        iconImage("none"),  //Hide the icon image.
        textField(get("point_count")),  //Display the point count as text.
        textOffset(arrayOf(0f, 0.4f)),

        //Allow clustered points in this layer.
        SymbolLayerOptions.filter(has("point_count"))
    )
)

//Create a layer to render the individual locations.
map.layers.add(
    SymbolLayer(
        source,

        //Filter out clustered points from this layer.
        SymbolLayerOptions.filter(not(has("point_count")))
    )
)
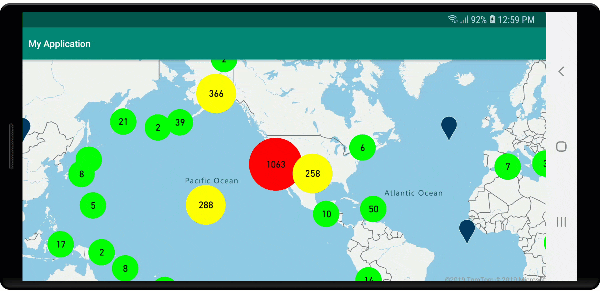
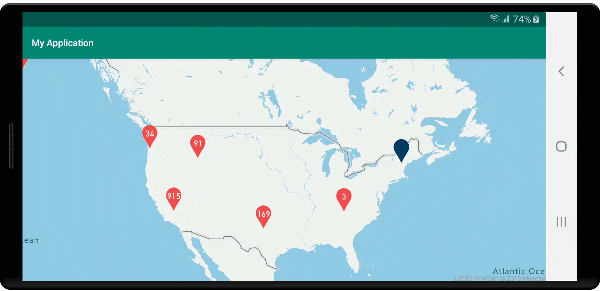
تظهر الصورة التالية ميزات نقطة مجمعة لعرض التعليمات البرمجية أعلاه في طبقة فقاعية، محددة الحجم وملونة استنادًا إلى عدد النقاط في نظام المجموعة. يتم عرض النقاط غير المتفاوتة باستخدام طبقة رمز.
عرض المجموعات باستخدام طبقة الرمز
عند تصور نقاط البيانات، تخفي طبقة الرمز تلقائيًا الرموز التي تتداخل مع بعضها البعض لضمان واجهة مستخدم أنقى. قد يكون هذا السلوك الافتراضي غير مرغوب فيه إذا كنت تريد إظهار كثافة نقاط البيانات على الخريطة. ومع ذلك، يمكن تغيير هذه الإعدادات. لعرض كافة الرموز، قم بتعيين الخيار iconAllowOverlap لطبقة الرموز إلى true.
استخدم تكوين أنظمة المجموعات لإظهار كثافة نقاط البيانات مع الحفاظ على واجهة مستخدم نقية. يوضح لك النموذج التالي كيفية إضافة رموز مخصصة وتمثيل المجموعات ونقاط البيانات الفردية باستخدام طبقة الرمز.
//Load all the custom image icons into the map resources.
map.images.add("earthquake_icon", R.drawable.earthquake_icon);
map.images.add("warning_triangle_icon", R.drawable.warning_triangle_icon);

//Create a data source and add it to the map.
DataSource source = new DataSource(
    //Tell the data source to cluster point data.
    cluster(true)
);

//Import the geojson data and add it to the data source.
map.importDataFromUrl("https://earthquake.usgs.gov/earthquakes/feed/v1.0/summary/all_week.geojson");

//Add data source to the map.
map.sources.add(source);

//Create a symbol layer to render the clusters.
map.layers.add(new SymbolLayer(source,
    iconImage("warning_triangle_icon"),
    textField(get("point_count")),
    textOffset(new Float[]{ 0f, -0.4f }),

    //Allow clustered points in this layer.
    filter(has("point_count"))
));

//Create a layer to render the individual locations.
map.layers.add(new SymbolLayer(source,
    iconImage("earthquake_icon"),

    //Filter out clustered points from this layer.
    filter(not(has("point_count")))
));
//Load all the custom image icons into the map resources.
map.images.add("earthquake_icon", R.drawable.earthquake_icon)
map.images.add("warning_triangle_icon", R.drawable.warning_triangle_icon)

//Create a data source and add it to the map.
val source = DataSource(
    //Tell the data source to cluster point data.
    cluster(true)
)

//Import the geojson data and add it to the data source.
map.importDataFromUrl("https://earthquake.usgs.gov/earthquakes/feed/v1.0/summary/all_week.geojson")

//Add data source to the map.
map.sources.add(source)

//Create a symbol layer to render the clusters.
map.layers.add(
    SymbolLayer(
        source,
        iconImage("warning_triangle_icon"),
        textField(get("point_count")),
        textOffset(arrayOf(0f, -0.4f)),

        //Allow clustered points in this layer.
        filter(has("point_count"))
    )
)

//Create a layer to render the individual locations.
map.layers.add(
    SymbolLayer(
        source,
        iconImage("earthquake_icon"),

        //Filter out clustered points from this layer.
        filter(not(has("point_count")))
    )
)
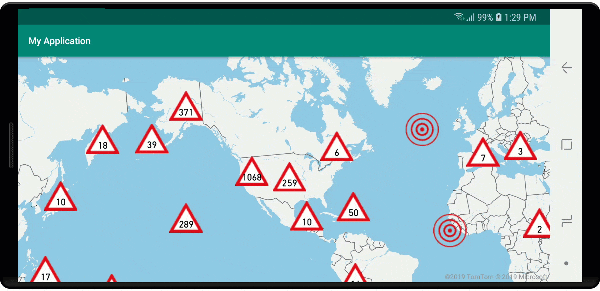
بالنسبة لهذه العينة، تم تحميل الصورة التالية في مجلد التطبيق القابل للرسم.
| earthquake_icon.png | warning_triangle_icon.png |
تُظهر الصورة التالية التعليمات البرمجية أعلاه التي تعرض ميزات نقطة مجمعة وغير مجمعة باستخدام أيقونات مخصصة.
تكوين أنظمة المجموعات وطبقة خريطة التمثيل اللوني
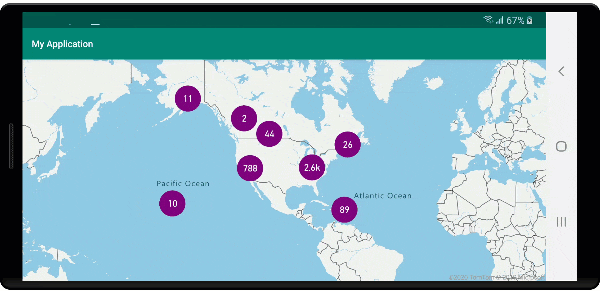
تُعد خرائط التمثيل اللوني طريقة رائعة لعرض كثافة البيانات على الخريطة. يمكن لطريقة التصور معالجة عدد كبير من نقاط البيانات بمفردها. إذا تم تجميع نقاط البيانات وتم استخدام حجم نظام المجموعة كوزن لخريطة التمثيل اللوني، يمكن لخريطة التمثيل اللوني معالجة المزيد من البيانات. لتحقيق هذا الخيار، قم بتعيين heatmapWeight خيار طبقة خريطة التمثيل اللوني إلى get("point_count"). عندما يكون نصف قطر نظام المجموعة صغيرا، تبدو خريطة التمثيل اللوني متطابقة تقريبا مع خريطة التمثيل اللوني باستخدام نقاط البيانات غير المتفاوتة المسافات، ولكنها تؤدي أداء أفضل. ومع ذلك، ينتج عن نصف قطر نظام المجموعة الأصغر خريطة حرارية أكثر دقة، ولكن مع فوائد أداء أقل.
//Create a data source and add it to the map.
DataSource source = new DataSource(
    //Tell the data source to cluster point data.
    cluster(true),

    //The radius in pixels to cluster points together.
    clusterRadius(10)
);

//Import the geojson data and add it to the data source.
map.importDataFromUrl("https://earthquake.usgs.gov/earthquakes/feed/v1.0/summary/all_week.geojson");

//Add data source to the map.
map.sources.add(source);

//Create a heat map and add it to the map.
map.layers.add(new HeatMapLayer(source,
    //Set the weight to the point_count property of the data points.
    heatmapWeight(get("point_count")),

    //Optionally adjust the radius of each heat point.
    heatmapRadius(20f)
), "labels");
//Create a data source and add it to the map.
val source = DataSource(
    //Tell the data source to cluster point data.
    cluster(true),

    //The radius in pixels to cluster points together.
    clusterRadius(10)
)

//Import the geojson data and add it to the data source.
map.importDataFromUrl("https://earthquake.usgs.gov/earthquakes/feed/v1.0/summary/all_week.geojson")

//Add data source to the map.
map.sources.add(source)

//Create a heat map and add it to the map.
map.layers.add(
    HeatMapLayer(
        source,

        //Set the weight to the point_count property of the data points.
        heatmapWeight(get("point_count")),

        //Optionally adjust the radius of each heat point.
        heatmapRadius(20f)
    ), "labels"
)
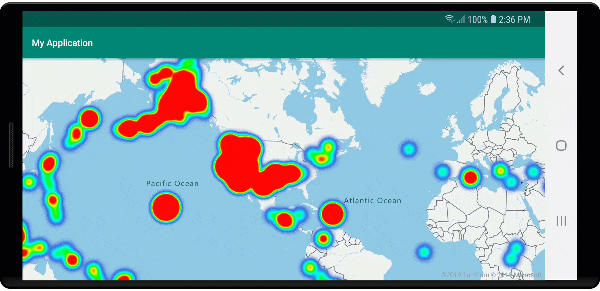
تظهر الصورة التالية التعليمات البرمجية أعلاه التي تعرض خريطة التمثيل اللوني التي تم تحسينها باستخدام ميزات النقطة المجمعة وعدد نظام المجموعة كوزن في خريطة التمثيل اللوني.
اضغط على الأحداث على نقاط البيانات المجمعة
عند وقوع أحداث الضغط على طبقة تحتوي على نقاط بيانات مجمعة، تعود نقطة البيانات المجمعة إلى الحدث كعنصر ميزة نقطة GeoJSON. تحتوي ميزة النقطة هذه على الخصائص التالية:
| اسم الخاصية | كتابة | الوصف |
|---|---|---|
cluster |
boolean | تشير إلى ما إذا كانت الميزة تمثل مجموعة. |
point_count |
رقم | عدد النقاط التي تحتوي عليها المجموعة. |
point_count |
رقم | عدد النقاط التي تحتوي عليها المجموعة. |
point_count_abbreviated |
سلسلة | سلسلة تختصر القيمة point_count إذا كانت طويلة. (على سبيل المثال، 4,000 يصبح 4K) |
يأخذ هذا المثال طبقة فقاعة تعرض نقاط نظام المجموعة وتضيف حدث الضغط. عند تشغيل حدث الضغط، تقوم التعليمات البرمجية بحساب الخريطة وتكبيرها إلى مستوى التكبير/التصغير التالي، حيث تنفصل المجموعة. يتم تنفيذ هذه الوظيفة باستخدام أسلوب getClusterExpansionZoomالخاص DataSource بالفئة وخاصية cluster_id نقطة البيانات المجمعة التي تم النقر فوقها.
//Create a data source and add it to the map.
DataSource source = new DataSource(
    //Tell the data source to cluster point data.
    cluster(true),

    //The radius in pixels to cluster points together.
    clusterRadius(45),

    //The maximum zoom level in which clustering occurs.
    //If you zoom in more than this, all points are rendered as symbols.
    clusterMaxZoom(15)
);

//Import the geojson data and add it to the data source.
source.importDataFromUrl("https://earthquake.usgs.gov/earthquakes/feed/v1.0/summary/all_week.geojson");

//Add data source to the map.
map.sources.add(source);

//Create a bubble layer for rendering clustered data points.
BubbleLayer clusterBubbleLayer = new BubbleLayer(source,
    //Scale the size of the clustered bubble based on the number of points in the cluster.
    bubbleRadius(
        step(
            get("point_count"),
            20f,    //Default of 20 pixel radius.
            stop(100, 30),   //If point_count >= 100, radius is 30 pixels.
            stop(750, 40)    //If point_count >= 750, radius is 40 pixels.
        )
    ),

    //Change the color of the cluster based on the value on the point_cluster property of the cluster.
    bubbleColor(
        step(
            get("point_count"),
            color(Color.GREEN),  //Default to green.
            stop(100, color(Color.YELLOW)), //If the point_count >= 100, color is yellow.
            stop(750, color(Color.RED))     //If the point_count >= 100, color is red.
        )
    ),

    bubbleStrokeWidth(0f),

    //Only rendered data points which have a point_count property, which clusters do.
    BubbleLayerOptions.filter(has("point_count"))
);

//Add the clusterBubbleLayer and two additional layers to the map.
map.layers.add(clusterBubbleLayer);

//Create a symbol layer to render the count of locations in a cluster.
map.layers.add(new SymbolLayer(source,
    //Hide the icon image.
    iconImage("none"),

    //Display the 'point_count_abbreviated' property value.
    textField(get("point_count_abbreviated")),

    //Offset the text position so that it's centered nicely.
    textOffset(new Float[] { 0f, 0.4f }),

    //Only rendered data points which have a point_count property, which clusters do.
    SymbolLayerOptions.filter(has("point_count"))
));

//Create a layer to render the individual locations.
map.layers.add(new SymbolLayer(source,
    //Filter out clustered points from this layer.
    SymbolLayerOptions.filter(not(has("point_count")))
));

//Add a click event to the cluster layer so we can zoom in when a user clicks a cluster.
map.events.add((OnFeatureClick) (features) -> {
    if(features.size() > 0) {
        //Get the clustered point from the event.
        Feature cluster = features.get(0);

        //Get the cluster expansion zoom level. This is the zoom level at which the cluster starts to break apart.
        int expansionZoom = source.getClusterExpansionZoom(cluster);

        //Update the map camera to be centered over the cluster.
        map.setCamera(
            //Center the map over the cluster points location.
            center((Point)cluster.geometry()),

            //Zoom to the clusters expansion zoom level.
            zoom(expansionZoom),

            //Animate the movement of the camera to the new position.
            animationType(AnimationType.EASE),
            animationDuration(200)
        );
    }

    //Return true indicating if event should be consumed and not passed further to other listeners registered afterwards, false otherwise.
    return true;
}, clusterBubbleLayer);
//Create a data source and add it to the map.
val source = DataSource( //Tell the data source to cluster point data.
    //The radius in pixels to cluster points together.
    cluster(true),

    //The maximum zoom level in which clustering occurs.
    clusterRadius(45),

    //If you zoom in more than this, all points are rendered as symbols.
    clusterMaxZoom(15)
)

//Import the geojson data and add it to the data source.
source.importDataFromUrl("https://earthquake.usgs.gov/earthquakes/feed/v1.0/summary/all_week.geojson")

//Add data source to the map.
map.sources.add(source)

//Create a bubble layer for rendering clustered data points.
val clusterBubbleLayer = BubbleLayer(
    source,

    //Scale the size of the clustered bubble based on the number of points in the cluster.
    bubbleRadius(
        step(
            get("point_count"),
            20f,  //Default of 20 pixel radius.
            stop(100, 30),  //If point_count >= 100, radius is 30 pixels.
            stop(750, 40) //If point_count >= 750, radius is 40 pixels.
        )
    ),

    //Change the color of the cluster based on the value on the point_cluster property of the cluster.
    bubbleColor(
        step(
            get("point_count"),
            color(Color.GREEN),  //Default to green.
            stop(
                100,
                color(Color.YELLOW)
            ),  //If the point_count >= 100, color is yellow.
            stop(750, color(Color.RED)) //If the point_count >= 100, color is red.
        )
    ),

    bubbleStrokeWidth(0f),

    //Only rendered data points which have a point_count property, which clusters do.
    BubbleLayerOptions.filter(has("point_count"))
)

//Add the clusterBubbleLayer and two additional layers to the map.
map.layers.add(clusterBubbleLayer)

//Create a symbol layer to render the count of locations in a cluster.
map.layers.add(
    SymbolLayer(
        source,

        //Hide the icon image.
        iconImage("none"),

        //Display the 'point_count_abbreviated' property value.
        textField(get("point_count_abbreviated")),

        //Offset the text position so that it's centered nicely.
        textOffset(
            arrayOf(
                0f,
                0.4f
            )
        ),

        //Only rendered data points which have a point_count property, which clusters do.
        SymbolLayerOptions.filter(has("point_count"))
    )
)

//Create a layer to render the individual locations.
map.layers.add(
    SymbolLayer(
        source,

        //Filter out clustered points from this layer.
        SymbolLayerOptions.filter(not(has("point_count")))
    )
)

//Add a click event to the cluster layer so we can zoom in when a user clicks a cluster.
map.events.add(OnFeatureClick { features: List<Feature?>? ->
    if (features.size() > 0) {
        //Get the clustered point from the event.
        val cluster: Feature = features.get(0)

        //Get the cluster expansion zoom level. This is the zoom level at which the cluster starts to break apart.
        val expansionZoom: Int = source.getClusterExpansionZoom(cluster)

        //Update the map camera to be centered over the cluster.
        map.setCamera(

            //Center the map over the cluster points location.
            center(cluster.geometry() as Point?),

            //Zoom to the clusters expansion zoom level.
            zoom(expansionZoom),

            //Animate the movement of the camera to the new position.
            animationType(AnimationType.EASE),
            animationDuration(200)
        )
    }
    true
}, clusterBubbleLayer)
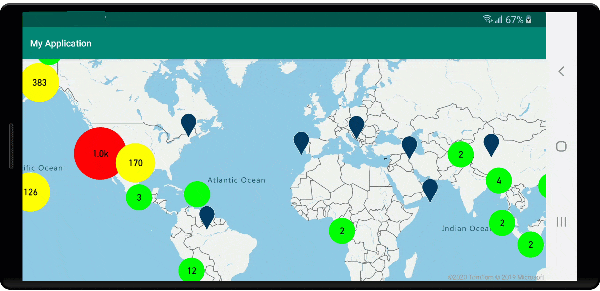
تظهر الصورة التالية التعليمات البرمجية أعلاه التي تعرض نقاطا مجمعة على خريطة عند تحديدها، قم بالتكبير/التصغير في مستوى التكبير/التصغير التالي الذي يبدأ نظام المجموعة في قطعه وتوسيعه.
عرض منطقة نظام المجموعة
تنتشر بيانات النقطة التي تمثلها المجموعة عبر المنطقة. في هذه العينة عند تمرير الماوس فوق نظام المجموعة، ويحدث سلوكان رئيسيان. أولاً، سيتم استخدام نقاط البيانات الفردية المضمنة في نظام المجموعة لحساب هيكل محدب. بعد ذلك، يتم عرض بنية convex على الخريطة لإظهار منطقة. إن الهيكل المحدب هو مضلع يلف مجموعة من النقاط مثل شريط مطاطي ويمكن حسابه باستخدام طريقة atlas.math.getConvexHull. يمكن استرداد جميع النقاط الموجودة في نظام مجموعة من مصدر البيانات باستخدام الأسلوب getClusterLeaves.
//Create a data source and add it to the map.
DataSource source = new DataSource(
    //Tell the data source to cluster point data.
    cluster(true)
);

//Import the geojson data and add it to the data source.
source.importDataFromUrl("https://earthquake.usgs.gov/earthquakes/feed/v1.0/summary/all_week.geojson");

//Add data source to the map.
map.sources.add(source);

//Create a data source for the convex hull polygon. Since this will be updated frequently it is more efficient to separate this into its own data source.
DataSource polygonDataSource = new DataSource();

//Add data source to the map.
map.sources.add(polygonDataSource);

//Add a polygon layer and a line layer to display the convex hull.
map.layers.add(new PolygonLayer(polygonDataSource));
map.layers.add(new LineLayer(polygonDataSource));

//Create a symbol layer to render the clusters.
SymbolLayer clusterLayer = new SymbolLayer(source,
    iconImage("marker-red"),
    textField(get("point_count_abbreviated")),
    textOffset(new Float[] { 0f, -1.2f }),
    textColor(Color.WHITE),
    textSize(14f),

    //Only rendered data points which have a point_count property, which clusters do.
    SymbolLayerOptions.filter(has("point_count"))
);
map.layers.add(clusterLayer);

//Create a layer to render the individual locations.
map.layers.add(new SymbolLayer(source,
    //Filter out clustered points from this layer.
    SymbolLayerOptions.filter(not(has("point_count")))
));

//Add a click event to the layer so we can calculate the convex hull of all the points within a cluster.
map.events.add((OnFeatureClick) (features) -> {
    if(features.size() > 0) {
        //Get the clustered point from the event.
        Feature cluster = features.get(0);

        //Get all points in the cluster. Set the offset to 0 and the max long value to return all points.
        FeatureCollection leaves = source.getClusterLeaves(cluster, Long.MAX_VALUE, 0);

        //Get the point features from the feature collection.
        List<Feature> childFeatures = leaves.features();

        //When only two points in a cluster. Render a line.
        if(childFeatures.size() == 2){
            //Extract the geometry points from the child features.
            List<Point> points = new ArrayList();

            childFeatures.forEach(f -> {
                points.add((Point)f.geometry());
            });

            //Create a line from the points.
            polygonDataSource.setShapes(LineString.fromLngLats(points));
        } else {
            Polygon hullPolygon = MapMath.getConvexHull(leaves);

            //Overwrite all data in the polygon data source with the newly calculated convex hull polygon.
            polygonDataSource.setShapes(hullPolygon);
        }
    }

    //Return true indicating if event should be consumed and not passed further to other listeners registered afterwards, false otherwise.
    return true;
}, clusterLayer);
//Create a data source and add it to the map.
val source = DataSource(
    //Tell the data source to cluster point data.
    cluster(true)
)

//Import the geojson data and add it to the data source.
source.importDataFromUrl("https://earthquake.usgs.gov/earthquakes/feed/v1.0/summary/all_week.geojson")

//Add data source to the map.
map.sources.add(source)

//Create a data source for the convex hull polygon. Since this will be updated frequently it is more efficient to separate this into its own data source.
val polygonDataSource = DataSource()

//Add data source to the map.
map.sources.add(polygonDataSource)

//Add a polygon layer and a line layer to display the convex hull.
map.layers.add(PolygonLayer(polygonDataSource))
map.layers.add(LineLayer(polygonDataSource))

//Create a symbol layer to render the clusters.
val clusterLayer = SymbolLayer(
    source,
    iconImage("marker-red"),
    textField(get("point_count_abbreviated")),
    textOffset(arrayOf(0f, -1.2f)),
    textColor(Color.WHITE),
    textSize(14f),

    //Only rendered data points which have a point_count property, which clusters do.
    SymbolLayerOptions.filter(has("point_count"))
)
map.layers.add(clusterLayer)

//Create a layer to render the individual locations.
map.layers.add(
    SymbolLayer(
        source,

        //Filter out clustered points from this layer.
        SymbolLayerOptions.filter(not(has("point_count")))
    )
)

//Add a click event to the layer so we can calculate the convex hull of all the points within a cluster.
map.events.add(OnFeatureClick { features: List<Feature?>? ->
    if (features.size() > 0) {
        //Get the clustered point from the event.
        val cluster: Feature = features.get(0)

        //Get all points in the cluster. Set the offset to 0 and the max long value to return all points.
        val leaves: FeatureCollection = source.getClusterLeaves(cluster, Long.MAX_VALUE, 0)

        //Get the point features from the feature collection.
        val childFeatures = leaves.features()

        //When only two points in a cluster. Render a line.
        if (childFeatures!!.size == 2) {
            //Extract the geometry points from the child features.
            val points: MutableList<Point?> = ArrayList()
            childFeatures!!.forEach(Consumer { f: Feature ->
                points.add(
                    f.geometry() as Point?
                )
            })

            //Create a line from the points.
            polygonDataSource.setShapes(LineString.fromLngLats(points))
        } else {
            val hullPolygon: Polygon = MapMath.getConvexHull(leaves)

            //Overwrite all data in the polygon data source with the newly calculated convex hull polygon.
            polygonDataSource.setShapes(hullPolygon)
        }
    }
    true
}, clusterLayer)
تظهر الصورة التالية التعليمات البرمجية أعلاه تعرض منطقة جميع النقاط داخل نظام مجموعة تم النقر فوقه.
تجميع البيانات في نظام مجموعات
غالبًا ما يتم تمثيل المجموعات باستخدام رمز مع عدد النقاط الموجودة داخل نظام المجموعة. ولكن، في بعض الأحيان من المستحسن تخصيص نمط المجموعات بمزيد من المقاييس. باستخدام خصائص نظام المجموعة، يمكن إنشاء خصائص مخصصة وتساوي عملية حسابية استناداً إلى الخصائص ضمن كل نقطة في نظام المجموعة. يمكن تعريف خصائص المجموعة في خيار clusterPropertiesمن DataSource.
تحسب التعليمات البرمجية التالية عددًا استنادًا إلى خاصية نوع الكيان لكل نقطة بيانات في نظام مجموعة. عند تحديد مستخدم على نظام مجموعة، تظهر نافذة منبثقة مع معلومات إضافية حول نظام المجموعة.
//An array of all entity type property names in features of the data set.
String[] entityTypes = new String[] { "Gas Station", "Grocery Store", "Restaurant", "School" };

//Create a popup and add it to the map.
Popup popup = new Popup();
map.popups.add(popup);

//Close the popup initially.
popup.close();

//Create a data source and add it to the map.
source = new DataSource(
    //Tell the data source to cluster point data.
    cluster(true),

    //The radius in pixels to cluster points together.
    clusterRadius(50),

    //Calculate counts for each entity type in a cluster as custom aggregate properties.
    clusterProperties(new ClusterProperty[]{
        new ClusterProperty("Gas Station", sum(accumulated(), get("Gas Station")), switchCase(eq(get("EntityType"), literal("Gas Station")), literal(1), literal(0))),
        new ClusterProperty("Grocery Store", sum(accumulated(), get("Grocery Store")), switchCase(eq(get("EntityType"), literal("Grocery Store")), literal(1), literal(0))),
        new ClusterProperty("Restaurant", sum(accumulated(), get("Restaurant")), switchCase(eq(get("EntityType"), literal("Restaurant")), literal(1), literal(0))),
        new ClusterProperty("School", sum(accumulated(), get("School")), switchCase(eq(get("EntityType"), literal("School")), literal(1), literal(0)))
    })
);

//Import the geojson data and add it to the data source.
source.importDataFromUrl("https://samples.azuremaps.com/data/geojson/SamplePoiDataSet.json");

//Add data source to the map.
map.sources.add(source);

//Create a bubble layer for rendering clustered data points.
BubbleLayer clusterBubbleLayer = new BubbleLayer(source,
    bubbleRadius(20f),
    bubbleColor("purple"),
    bubbleStrokeWidth(0f),

    //Only rendered data points which have a point_count property, which clusters do.
    BubbleLayerOptions.filter(has("point_count"))
);

//Add the clusterBubbleLayer and two additional layers to the map.
map.layers.add(clusterBubbleLayer);

//Create a symbol layer to render the count of locations in a cluster.
map.layers.add(new SymbolLayer(source,
    //Hide the icon image.
    iconImage("none"),

    //Display the 'point_count_abbreviated' property value.
    textField(get("point_count_abbreviated")),

    textColor(Color.WHITE),
    textOffset(new Float[] { 0f, 0.4f }),

    //Only rendered data points which have a point_count property, which clusters do.
    SymbolLayerOptions.filter(has("point_count"))
));

//Create a layer to render the individual locations.
map.layers.add(new SymbolLayer(source,
    //Filter out clustered points from this layer.
    SymbolLayerOptions.filter(not(has("point_count")))
));

//Add a click event to the cluster layer and display the aggregate details of the cluster.
map.events.add((OnFeatureClick) (features) -> {
    if(features.size() > 0) {
        //Get the clustered point from the event.
        Feature cluster = features.get(0);

        //Create a number formatter that removes decimal places.
        NumberFormat nf = DecimalFormat.getInstance();
        nf.setMaximumFractionDigits(0);

        //Create the popup's content.
        StringBuilder sb = new StringBuilder();

        sb.append("Cluster size: ");
        sb.append(nf.format(cluster.getNumberProperty("point_count")));
        sb.append(" entities\n");

        for(int i = 0; i < entityTypes.length; i++) {
            sb.append("\n");

            //Get the entity type name.
            sb.append(entityTypes[i]);
            sb.append(": ");

            //Get the aggregated entity type count from the properties of the cluster by name.
            sb.append(nf.format(cluster.getNumberProperty(entityTypes[i])));
        }

        //Retrieve the custom layout for the popup.
        View customView = LayoutInflater.from(this).inflate(R.layout.popup_text, null);

        //Access the text view within the custom view and set the text to the title property of the feature.
        TextView tv = customView.findViewById(R.id.message);
        tv.setText(sb.toString());

        //Get the position of the cluster.
        Position pos = MapMath.getPosition((Point)cluster.geometry());

        //Set the options on the popup.
        popup.setOptions(
            //Set the popups position.
            position(pos),

            //Set the anchor point of the popup content.
            anchor(AnchorType.BOTTOM),

            //Set the content of the popup.
            content(customView)
        );

        //Open the popup.
        popup.open();
    }

    //Return a boolean indicating if event should be consumed or continue bubble up.
    return true;
}, clusterBubbleLayer);
//An array of all entity type property names in features of the data set.
val entityTypes = arrayOf("Gas Station", "Grocery Store", "Restaurant", "School")

//Create a popup and add it to the map.
val popup = Popup()
map.popups.add(popup)

//Close the popup initially.
popup.close()

//Create a data source and add it to the map.
val source = DataSource(
    //Tell the data source to cluster point data.
    cluster(true),

    //The radius in pixels to cluster points together.
    clusterRadius(50),

    //Calculate counts for each entity type in a cluster as custom aggregate properties.
    clusterProperties(
        arrayOf<ClusterProperty>(
            ClusterProperty("Gas Station", sum(accumulated(), get("Gas Station")), switchCase(eq(get("EntityType"), literal("Gas Station")), literal(1), literal(0))),
            ClusterProperty("Grocery Store", sum(accumulated(), get("Grocery Store")), switchCase(eq(get("EntityType"), literal("Grocery Store")), literal(1), literal(0))),
            ClusterProperty("Restaurant", sum(accumulated(), get("Restaurant")), switchCase(eq(get("EntityType"), literal("Restaurant")), literal(1), literal(0))),
            ClusterProperty("School", sum(accumulated(), get("School")), switchCase(eq(get("EntityType"), literal("School")), literal(1), literal(0)))
        )
    )
)

//Import the geojson data and add it to the data source.
source.importDataFromUrl("https://samples.azuremaps.com/data/geojson/SamplePoiDataSet.json")

//Add data source to the map.
map.sources.add(source)

//Create a bubble layer for rendering clustered data points.
val clusterBubbleLayer = BubbleLayer(
    source,
    bubbleRadius(20f),
    bubbleColor("purple"),
    bubbleStrokeWidth(0f),

    //Only rendered data points which have a point_count property, which clusters do.
    BubbleLayerOptions.filter(has("point_count"))
)

//Add the clusterBubbleLayer and two additional layers to the map.
map.layers.add(clusterBubbleLayer)

//Create a symbol layer to render the count of locations in a cluster.
map.layers.add(
    SymbolLayer(
        source,

        //Hide the icon image.
        iconImage("none"),

        //Display the 'point_count_abbreviated' property value.
        textField(get("point_count_abbreviated")),

        textColor(Color.WHITE),
        textOffset(arrayOf(0f, 0.4f)),

        //Only rendered data points which have a point_count property, which clusters do.
        SymbolLayerOptions.filter(has("point_count"))
    )
)

//Create a layer to render the individual locations.
map.layers.add(
    SymbolLayer(
        source,

        //Filter out clustered points from this layer.
        SymbolLayerOptions.filter(not(has("point_count")))
    )
)

//Add a click event to the cluster layer and display the aggregate details of the cluster.
map.events.add(OnFeatureClick { features: List<Feature> ->
    if (features.size > 0) {
        //Get the clustered point from the event.
        val cluster = features[0]

        //Create a number formatter that removes decimal places.
        val nf: NumberFormat = DecimalFormat.getInstance()
        nf.setMaximumFractionDigits(0)

        //Create the popup's content.
        val sb = StringBuilder()

        sb.append("Cluster size: ")
        sb.append(nf.format(cluster.getNumberProperty("point_count")))
        sb.append(" entities\n")

        for (i in entityTypes.indices) {
            sb.append("\n")

            //Get the entity type name.
            sb.append(entityTypes[i])
            sb.append(": ")

            //Get the aggregated entity type count from the properties of the cluster by name.
            sb.append(nf.format(cluster.getNumberProperty(entityTypes[i])))
        }

        //Retrieve the custom layout for the popup.
        val customView: View = LayoutInflater.from(this).inflate(R.layout.popup_text, null)

        //Access the text view within the custom view and set the text to the title property of the feature.
        val tv: TextView = customView.findViewById(R.id.message)
        tv.text = sb.toString()

        //Get the position of the cluster.
        val pos: Position = MapMath.getPosition(cluster.geometry() as Point?)

        //Set the options on the popup.
        popup.setOptions(
            //Set the popups position.
            position(pos),

            //Set the anchor point of the popup content.
            anchor(AnchorType.BOTTOM),

            //Set the content of the popup.
            content(customView)
        )

        //Open the popup.
        popup.open()
    }

    //Return a boolean indicating if event should be consumed or continue bubble up.
    true
} as OnFeatureClick, clusterBubbleLayer)
تتبع النافذة المنبثقة الخطوات الموضحة في عرض مستند منبثق.
تظهر الصورة التالية التعليمات البرمجية أعلاه تعرض نافذة منبثقة مع عدد مجمع لكل نوع قيمة كيان لجميع النقاط في النقطة المجمعة التي تم النقر فوقها.
الخطوات التالية
لإضافة المزيد من البيانات إلى الخريطة:
الملاحظات
قريبًا: خلال عام 2024، سنتخلص تدريجيًا من GitHub Issues بوصفها آلية إرسال ملاحظات للمحتوى ونستبدلها بنظام ملاحظات جديد. لمزيد من المعلومات، راجع https://aka.ms/ContentUserFeedback.
إرسال الملاحظات وعرضها المتعلقة بـ