إنشاء مصدر بيانات (Android SDK)
تخزن خرائط Azure Android SDK البيانات في مصادر البيانات. يؤدي استخدام مصادر البيانات إلى تحسين عمليات البيانات للاستعلام والعرض. يوجد حاليًا نوعان من مصادر البيانات:
- مصدر GeoJSON: يدير بيانات الموقع الأولية بتنسيق GeoJSON محليًا. جيد لمجموعات البيانات الصغيرة والمتوسطة (حتى مئات الآلاف من الأشكال).
- مصدر صور مصغرة من الخريطة لخطوط المتجه: تحميل البيانات المنسقة على هيئة صور مصغرة من الخريطة لخطوط المتجه للخريطة الحالية، بناءً على نظام تقسيم الخرائط. مثالي لمجموعات البيانات الكبيرة إلى الضخمة (ملايين أو مليارات الأشكال).
إشعار
خرائط Azure إيقاف Android SDK
تم الآن إهمال خرائط Azure Native SDK لنظام التشغيل Android وسيتم إيقافه في 3/31/25. لتجنب انقطاع الخدمة، قم بالترحيل إلى خرائط Azure Web SDK بحلول 3/31/25. لمزيد من المعلومات، راجع دليل ترحيل خرائط Azure Android SDK.
مصدر بيانات GeoJSON
تستخدم خرائط Azure GeoJSON كأحد نماذج البيانات الأساسية. GeoJSON هي طريقة قياسية جغرافية مكانية مفتوحة لتمثيل البيانات الجغرافية المكانية بتنسيق JSON. تتوفر فئات GeoJSON في خرائط Azure Android SDK لتسهيل إنشاء بيانات GeoJSON وتسلسلها. قم بتحميل وتخزين بيانات GeoJSON في فئة DataSource وقم بعرضها باستخدام الطبقات. توضح التعليمة البرمجية التالية كيف يمكن إنشاء عناصر GeoJSON في خرائط Azure.
/*
    Raw GeoJSON feature

    {
         "type": "Feature",
         "geometry": {
             "type": "Point",
             "coordinates": [-100, 45]
         },
         "properties": {
             "custom-property": "value"
         }
    }

*/

//Create a point feature.
Feature feature = Feature.fromGeometry(Point.fromLngLat(-100, 45));

//Add a property to the feature.
feature.addStringProperty("custom-property", "value");

//Add the feature to the data source.
source.add(feature);
/*
    Raw GeoJSON feature

    {
         "type": "Feature",
         "geometry": {
             "type": "Point",
             "coordinates": [-100, 45]
         },
         "properties": {
             "custom-property": "value"
         }
    }

*/

//Create a point feature.
val feature = Feature.fromGeometry(Point.fromLngLat(-100, 45))

//Add a property to the feature.
feature.addStringProperty("custom-property", "value")

//Add the feature to the data source.
source.add(feature)
تلميح
يمكن إضافة بيانات GeoJSON إلى مثيل DataSource باستخدام إحدى الطرق الثلاث؛ add وimportDataFromUrl وsetShapes. يوفر الأسلوب setShapes طريقة فعالة لاستبدال كافة البيانات الموجودة في مصدر البيانات. إذا اتصلت بالطرق clear ثم add لاستبدال جميع البيانات في مصدر البيانات، فسيتم إجراء استدعاءين للعرض على الخريطة. يمسح الأسلوب setShape البيانات ويضيفها إلى مصدر البيانات باستدعاء واحد للخريطة.
بدلا من ذلك، يمكن تحميل الخصائص في JsonObject أولا ثم تمريرها إلى الميزة عند إنشائها، كما هو موضح في نموذج التعليمات البرمجية التالي.
//Create a JsonObject to store properties for the feature.
JsonObject properties = new JsonObject();
properties.addProperty("custom-property", "value");

Feature feature = Feature.fromGeometry(Point.fromLngLat(-100, 45), properties);
//Create a JsonObject to store properties for the feature.
val properties = JsonObject()
properties.addProperty("custom-property", "value")

val feature = Feature.fromGeometry(Point.fromLngLat(-100, 45), properties)
بمجرد إنشاء ميزة GeoJSON، يمكن إضافة مصدر بيانات إلى الخريطة من خلال خاصية sources على الخريطة. توضح التعليمة البرمجية التالية كيفية إنشاء DataSourceوإضافته إلى الخريطة وإضافة معلم إلى مصدر البيانات.
//Create a data source and add it to the map.
DataSource source = new DataSource();
map.sources.add(source);

//Add GeoJSON feature to the data source.
source.add(feature);
توضح التعليمة البرمجية التالية عدة طرق لإنشاء GeoJSON Feature وFeatureCollection والهندسة.
//GeoJSON Point Geometry
Point point = Point.fromLngLat(LONGITUDE, LATITUDE);

//GeoJSON Point Geometry
LineString linestring = LineString.fromLngLats(PointList);

//GeoJSON Polygon Geometry
Polygon polygon = Polygon.fromLngLats(listOfPointList);

Polygon polygonFromOuterInner = Polygon.fromOuterInner(outerLineStringObject,innerLineStringObject);

//GeoJSON MultiPoint Geometry
MultiPoint multiPoint = MultiPoint.fromLngLats(PointList);

//GeoJSON MultiLineString Geometry
MultiLineString multiLineStringFromLngLat = MultiLineString.fromLngLats(listOfPointList);

MultiLineString multiLineString = MultiLineString.fromLineString(singleLineString);

//GeoJSON MultiPolygon Geometry
MultiPolygon multiPolygon = MultiPolygon.fromLngLats(listOflistOfPointList);

MultiPolygon multiPolygonFromPolygon = MultiPolygon.fromPolygon(polygon);

MultiPolygon multiPolygonFromPolygons = MultiPolygon.fromPolygons(PolygonList);

//GeoJSON Feature
Feature pointFeature = Feature.fromGeometry(Point.fromLngLat(LONGITUDE, LATITUDE));

//GeoJSON FeatureCollection
FeatureCollection featureCollectionFromSingleFeature = FeatureCollection.fromFeature(pointFeature);

FeatureCollection featureCollection = FeatureCollection.fromFeatures(listOfFeatures);
//GeoJSON Point Geometry
val point = Point.fromLngLat(LONGITUDE, LATITUDE)

//GeoJSON Point Geometry
val linestring = LineString.fromLngLats(PointList)

//GeoJSON Polygon Geometry
val polygon = Polygon.fromLngLats(listOfPointList)

val polygonFromOuterInner = Polygon.fromOuterInner(outerLineStringObject, innerLineStringObject)

//GeoJSON MultiPoint Geometry
val multiPoint = MultiPoint.fromLngLats(PointList)

//GeoJSON MultiLineString Geometry
val multiLineStringFromLngLat = MultiLineString.fromLngLats(listOfPointList)

val multiLineString = MultiLineString.fromLineString(singleLineString)

//GeoJSON MultiPolygon Geometry
val multiPolygon = MultiPolygon.fromLngLats(listOflistOfPointList)

val multiPolygonFromPolygon = MultiPolygon.fromPolygon(polygon)

val multiPolygonFromPolygons = MultiPolygon.fromPolygons(PolygonList)

//GeoJSON Feature
val pointFeature = Feature.fromGeometry(Point.fromLngLat(LONGITUDE, LATITUDE))

//GeoJSON FeatureCollection
val featureCollectionFromSingleFeature = FeatureCollection.fromFeature(pointFeature)

val featureCollection = FeatureCollection.fromFeatures(listOfFeatures)
ترتيب وإلغاء تسلسل GeoJSON
تحتوي جميع فئات المعالم والميزات والهندسة على طرق fromJson() وtoJson() ثابتة تساعد في إنشاء التسلسل. تقوم سلسلة JSON الصالحة المنسقة التي fromJson() تم تمريرها عبر الأسلوب بإنشاء العنصر الهندسي. تعني هذه الطريقة fromJson() أيضاً أنه يمكنك استخدام Gson أو إستراتيجيات التسلسل/إلغاء التسلسل الأخرى. توضح التعليمة البرمجية التالية كيفية أخذ ميزة GeoJSON ذات السلسلة النصية وإلغاء تسلسلها في فئة Feature، ثم إعادة ترتيبها في سلسلة GeoJSON.
//Take a stringified GeoJSON object.
String GeoJSON_STRING = "{"
    + "      \"type\": \"Feature\","
    + "      \"geometry\": {"
    + "            \"type\": \"Point\""
    + "            \"coordinates\": [-100, 45]"
    + "      },"
    + "      \"properties\": {"
    + "            \"custom-property\": \"value\""
    + "      },"
    + "}";

//Deserialize the JSON string into a feature.
Feature feature = Feature.fromJson(GeoJSON_STRING);

//Serialize a feature collection to a string.
String featureString = feature.toJson();
//Take a stringified GeoJSON object.
val GeoJSON_STRING = ("{"
        + "      \"type\": \"Feature\","
        + "      \"geometry\": {"
        + "            \"type\": \"Point\""
        + "            \"coordinates\": [-100, 45]"
        + "      },"
        + "      \"properties\": {"
        + "            \"custom-property\": \"value\""
        + "      },"
        + "}")

//Deserialize the JSON string into a feature.
val feature = Feature.fromJson(GeoJSON_STRING)

//Serialize a feature collection to a string.
val featureString = feature.toJson()
قم باستيراد بيانات GeoJSON من الويب أو مجلد الأصول
تحتوي معظم ملفات GeoJSON على مجموعة FeatureCollection. اقرأ ملفات GeoJSON كسلاسل واستخدم طريقة FeatureCollection.fromJson لإلغاء تسلسلها.
DataSource تحتوي الفئة على أسلوب مضمن يسمى importDataFromUrl يمكن تحميله في ملفات GeoJSON باستخدام عنوان URL إلى ملف على الويب أو في مجلد الأصول. يجب استدعاء هذه الطريقة قبل إضافة مصدر البيانات إلى الخريطة.
zone_pivot_groups: azure-maps-android
//Create a data source and add it to the map.
DataSource source = new DataSource();

//Import the geojson data and add it to the data source.
source.importDataFromUrl("URL_or_FilePath_to_GeoJSON_data");

//Examples:
//source.importDataFromUrl("asset://sample_file.json");
//source.importDataFromUrl("https://example.com/sample_file.json");

//Add data source to the map.
map.sources.add(source);
//Create a data source and add it to the map.
var source = new DataSource()

//Import the geojson data and add it to the data source.
source.importDataFromUrl("URL_or_FilePath_to_GeoJSON_data")

//Examples:
//source.importDataFromUrl("asset://sample_file.json")
//source.importDataFromUrl("https://example.com/sample_file.json")

//Add data source to the map.
map.sources.add(source)
importDataFromUrl يوفر الأسلوب طريقة سهلة لتحميل موجز GeoJSON في مصدر بيانات ولكنه يوفر تحكما محدودا في كيفية تحميل البيانات وما يحدث بعد تحميلها. التعليمة البرمجية التالية هي فئة قابلة لإعادة الاستخدام لاستيراد البيانات من الويب أو مجلد الأصول وإعادتها إلى مؤشر ترابط واجهة المستخدم عبر وظيفة رد الاتصال. بعد ذلك، أضف المزيد من منطق التحميل اللاحق في رد الاتصال لمعالجة البيانات، وإضافتها إلى الخريطة، وحساب مربع الإحاطة الخاص بها، وتحديث كاميرا الخرائط.
import android.content.Context;
import android.os.Handler;
import android.os.Looper;
import android.webkit.URLUtil;

import java.io.BufferedReader;
import java.io.IOException;
import java.io.InputStream;
import java.io.InputStreamReader;
import java.net.URL;
import java.util.concurrent.ExecutorService;
import java.util.concurrent.Executors;

import javax.net.ssl.HttpsURLConnection;

public class Utils {

    interface SimpleCallback {
        void notify(String result);
    }

    /**
     * Imports data from a web url or asset file name and returns it to a callback.
     * @param urlOrFileName A web url or asset file name that points to data to load.
     * @param context The context of the app.
     * @param callback The callback function to return the data to.
     */
    public static void importData(String urlOrFileName, Context context, SimpleCallback callback){
        importData(urlOrFileName, context, callback, null);
    }

    /**
     * Imports data from a web url or asset file name and returns it to a callback.
     * @param urlOrFileName A web url or asset file name that points to data to load.
     * @param context The context of the app.
     * @param callback The callback function to return the data to.
     * @param error A callback function to return errors to.
     */
    public static void importData(String urlOrFileName, Context context, SimpleCallback callback, SimpleCallback error){
        if(urlOrFileName != null && callback != null) {
            ExecutorService executor = Executors.newSingleThreadExecutor();
            Handler handler = new Handler(Looper.getMainLooper());

            executor.execute(() -> {
                String data = null;

                try {

                    if(URLUtil.isNetworkUrl(urlOrFileName)){
                        data = importFromWeb(urlOrFileName);
                    } else {
                        //Assume file is in assets folder.
                        data = importFromAssets(context, urlOrFileName);
                    }

                    final String result = data;

                    handler.post(() -> {
                        //Ensure the resulting data string is not null or empty.
                        if (result != null && !result.isEmpty()) {
                            callback.notify(result);
                        } else {
                            error.notify("No data imported.");
                        }
                    });
                } catch(Exception e) {
                    if(error != null){
                        error.notify(e.getMessage());
                    }
                }
            });
        }
    }

    /**
     * Imports data from an assets file as a string.
     * @param context The context of the app.
     * @param fileName The asset file name.
     * @return
     * @throws IOException
     */
    private static String importFromAssets(Context context, String fileName) throws IOException {
        InputStream stream = null;

        try {
            stream = context.getAssets().open(fileName);

            if(stream != null) {
                return readStreamAsString(stream);
            }
        } catch (Exception e) {
            e.printStackTrace();
        } finally {
            // Close Stream and disconnect HTTPS connection.
            if (stream != null) {
                stream.close();
            }
        }

        return null;
    }

    /**
     * Imports data from the web as a string.
     * @param url URL to the data.
     * @return
     * @throws IOException
     */
    private static String importFromWeb(String url) throws IOException {
        InputStream stream = null;
        HttpsURLConnection connection = null;
        String result = null;

        try {
            connection = (HttpsURLConnection) new URL(url).openConnection();

            //For this use case, set HTTP method to GET.
            connection.setRequestMethod("GET");

            //Open communications link (network traffic occurs here).
            connection.connect();

            int responseCode = connection.getResponseCode();
            if (responseCode != HttpsURLConnection.HTTP_OK) {
                throw new IOException("HTTP error code: " + responseCode);
            }

            //Retrieve the response body as an InputStream.
            stream = connection.getInputStream();

            if (stream != null) {
                return readStreamAsString(stream);
            }
        } catch (Exception e) {
            e.printStackTrace();
        } finally {
            // Close Stream and disconnect HTTPS connection.
            if (stream != null) {
                stream.close();
            }
            if (connection != null) {
                connection.disconnect();
            }
        }

        return result;
    }

    /**
     * Reads an input stream as a string.
     * @param stream Stream to convert.
     * @return
     * @throws IOException
     */
    private static String readStreamAsString(InputStream stream) throws IOException {
        //Convert the contents of an InputStream to a String.
        BufferedReader in = new BufferedReader(new InputStreamReader(stream, "UTF-8"));

        String inputLine;
        StringBuffer response = new StringBuffer();

        while ((inputLine = in.readLine()) != null) {
            response.append(inputLine);
        }

        in.close();

        return response.toString();
    }
}
import android.content.Context
import android.os.Handler
import android.os.Looper
import android.webkit.URLUtil
import java.net.URL
import java.util.concurrent.ExecutorService
import java.util.concurrent.Executors

class Utils {
    companion object {

        /**
            * Imports data from a web url or asset file name and returns it to a callback.
            * @param urlOrFileName A web url or asset file name that points to data to load.
            * @param context The context of the app.
            * @param callback The callback function to return the data to.
            */
        fun importData(urlOrFileName: String?, context: Context, callback: (String?) -> Unit) {
            importData(urlOrFileName, context, callback, null)
        }

        /**
            * Imports data from a web url or asset file name and returns it to a callback.
            * @param urlOrFileName A web url or asset file name that points to data to load.
            * @param context The context of the app.
            * @param callback The callback function to return the data to.
            * @param error A callback function to return errors to.
            */
        public fun importData(urlOrFileName: String?, context: Context, callback: (String?) -> Unit, error: ((String?) -> Unit)?) {
            if (urlOrFileName != null && callback != null) {
                val executor: ExecutorService = Executors.newSingleThreadExecutor()
                val handler = Handler(Looper.getMainLooper())
                executor.execute {
                    var data: String? = null

                    try {
                        data = if (URLUtil.isNetworkUrl(urlOrFileName)) {
                            URL(urlOrFileName).readText()
                        } else { //Assume file is in assets folder.
                            context.assets.open(urlOrFileName).bufferedReader().use{
                                it.readText()
                            }
                        }

                        handler.post {
                            //Ensure the resulting data string is not null or empty.
                            if (data != null && !data.isEmpty()) {
                                callback(data)
                            } else {
                                error!!("No data imported.")
                            }
                        }
                    } catch (e: Exception) {
                        error!!(e.message)
                    }
                }
            }
        }
    }
}
توضح التعليمات البرمجية التالية كيفية استخدام هذه الأداة المساعدة لاستيراد بيانات GeoJSON كسلسلة وإعادتها إلى مؤشر ترابط واجهة المستخدم عبر رد اتصال. في رد الاتصال، يمكن إجراء تسلسل لبيانات السلسلة في مجموعة ميزات GeoJSON وإضافتها إلى مصدر البيانات. اختيارياً، قم بتحديث كاميرا الخرائط للتركيز على البيانات.
//Create a data source and add it to the map.
DataSource source = new DataSource();
map.sources.add(source);

//Import the geojson data and add it to the data source.
Utils.importData("URL_or_FilePath_to_GeoJSON_data",
    this,
    (String result) -> {
        //Parse the data as a GeoJSON Feature Collection.
        FeatureCollection fc = FeatureCollection.fromJson(result);

        //Add the feature collection to the data source.
        source.add(fc);

        //Optionally, update the maps camera to focus in on the data.

        //Calculate the bounding box of all the data in the Feature Collection.
        BoundingBox bbox = MapMath.fromData(fc);

        //Update the maps camera so it is focused on the data.
        map.setCamera(
            bounds(bbox),
            padding(20));
    });
//Create a data source and add it to the map.
DataSource source = new DataSource();
map.sources.add(source);

//Import the GeoJSON data and add it to the data source.
Utils.importData("SamplePoiDataSet.json", this) {
    result: String? ->
        //Parse the data as a GeoJSON Feature Collection.
            val fc = FeatureCollection.fromJson(result!!)

        //Add the feature collection to the data source.
        source.add(fc)

        //Optionally, update the maps camera to focus in on the data.

        //Calculate the bounding box of all the data in the Feature Collection.
        val bbox = MapMath.fromData(fc);

        //Update the maps camera so it is focused on the data.
        map.setCamera(
            bounds(bbox),

            //Padding added to account for pixel size of rendered points.
            padding(20)
        )
    }
تحديث ميزة
DataSource تسهل الفئة إضافة الميزات وإزالتها. يتطلب تحديث الهندسة أو خصائص المعلم استبدال الميزة في مصدر البيانات. هناك طريقتان يمكن استخدامهما لتحديث ميزة (ميزات):
- قم بإنشاء الميزة (الميزات) الجديدة بالتحديثات المطلوبة واستبدل جميع الميزات في مصدر البيانات باستخدام طريقة
setShapes. تعمل هذه الطريقة بشكل جيد عندما تريد تحديث كافة الميزات الموجودة في مصدر البيانات.
DataSource source;

private void onReady(AzureMap map) {
    //Create a data source and add it to the map.
    source = new DataSource();
    map.sources.add(source);

    //Create a feature and add it to the data source.
    Feature myFeature = Feature.fromGeometry(Point.fromLngLat(0,0));
    myFeature.addStringProperty("Name", "Original value");

    source.add(myFeature);
}

private void updateFeature(){
    //Create a new replacement feature with an updated geometry and property value.
    Feature myNewFeature = Feature.fromGeometry(Point.fromLngLat(-10, 10));
    myNewFeature.addStringProperty("Name", "New value");

    //Replace all features to the data source with the new one.
    source.setShapes(myNewFeature);
}
var source: DataSource? = null

private fun onReady(map: AzureMap) {
    //Create a data source and add it to the map.
    source = DataSource()
    map.sources.add(source)

    //Create a feature and add it to the data source.
    val myFeature = Feature.fromGeometry(Point.fromLngLat(0.0, 0.0))
    myFeature.addStringProperty("Name", "Original value")
    source!!.add(myFeature)
}

private fun updateFeature() {
    //Create a new replacement feature with an updated geometry and property value.
    val myNewFeature = Feature.fromGeometry(Point.fromLngLat(-10.0, 10.0))
    myNewFeature.addStringProperty("Name", "New value")

    //Replace all features to the data source with the new one.
    source!!.setShapes(myNewFeature)
}
- تتبع مثيل الميزة في متغير، وقم بتمريرها إلى طريقة مصادر البيانات
removeلإزالتها. قم بإنشاء الميزة (الميزات) الجديدة بالتحديثات المطلوبة، وتحديث مرجع المتغير، وإضافته إلى مصدر البيانات باستخدام طريقةadd.
DataSource source;
Feature myFeature;

private void onReady(AzureMap map) {
    //Create a data source and add it to the map.
    source = new DataSource();
    map.sources.add(source);

    //Create a feature and add it to the data source.
    myFeature = Feature.fromGeometry(Point.fromLngLat(0,0));
    myFeature.addStringProperty("Name", "Original value");

    source.add(myFeature);
}

private void updateFeature(){
    //Remove the feature instance from the data source.
    source.remove(myFeature);

    //Get properties from original feature.
    JsonObject props = myFeature.properties();

    //Update a property.
    props.addProperty("Name", "New value");

    //Create a new replacement feature with an updated geometry.
    myFeature = Feature.fromGeometry(Point.fromLngLat(-10, 10), props);

    //Re-add the feature to the data source.
    source.add(myFeature);
}
var source: DataSource? = null
var myFeature: Feature? = null

private fun onReady(map: AzureMap) {
    //Create a data source and add it to the map.
    source = DataSource()
    map.sources.add(source)

    //Create a feature and add it to the data source.
    myFeature = Feature.fromGeometry(Point.fromLngLat(0.0, 0.0))
    myFeature.addStringProperty("Name", "Original value")
    source!!.add(myFeature)
}

private fun updateFeature() {
    //Remove the feature instance from the data source.
    source!!.remove(myFeature)

    //Get properties from original feature.
    val props = myFeature!!.properties()

    //Update a property.
    props!!.addProperty("Name", "New value")

    //Create a new replacement feature with an updated geometry.
    myFeature = Feature.fromGeometry(Point.fromLngLat(-10.0, 10.0), props)

    //Re-add the feature to the data source.
    source!!.add(myFeature)
}
تلميح
إذا كانت لديك بعض البيانات التي سيتم تحديثها بانتظام، وبيانات أخرى نادراً ما يتم تغييرها، فمن الأفضل تقسيمها إلى مثيلات مصدر بيانات منفصلة. عند حدوث تحديث في مصدر بيانات، فإنه يفرض على الخريطة إعادة رسم جميع المعالم الموجودة في مصدر البيانات. من خلال تقسيم هذه البيانات، ستتم إعادة رسم الميزات التي يتم تحديثها بانتظام فقط عند حدوث تحديث في مصدر البيانات هذا بينما لن تحتاج الميزات الموجودة في مصدر البيانات الآخر إلى إعادة رسمها. هذا يساعد في الأداء.
مصدر صور مصغرة من الخريطة لخطوط المتجهات
يصف مصدر الصور المصغرة الاتجاهية من الخريطة كيفية الوصول إلى طبقة الصور المصغرة الاتجاهية من الخريطة. استخدم الفئة VectorTileSource لإنشاء مثيل لمصدر الصور المصغرة الاتجاهية من الخريطة. طبقات تجانب الاتجاه تشبه طبقات التجانب، لكنها ليست متماثلة. تمثل طبقة التجانب صورة نقطية. طبقات تجانب الاتجاه هي ملف مضغوط بتنسيق PBF. يحتوي هذا الملف المضغوط على بيانات خريطة خط متجه وطبقة واحدة أو أكثر. يمكن تقديم الملف وتصميمه على العميل، بناءً على نمط كل طبقة. تحتوي البيانات الموجودة في صور مصغرة من الخريطة لخطوط المتجه على معالم جغرافية في شكل نقاط وخطوط ومضلعات. يوجد العديد من المزايا لاستخدام طبقات الصور المصغرة من الخريطة بدلًا من طبقات الصور المصغرة النقطية:
- عادةً ما يكون حجم ملف الصور المصغرة من الخريطة أصغر بكثير من صورة مصغرة من الخريطة النقطية المكافئة. على هذا النحو، يتم استخدام نطاق ترددي أقل. إنه يعني زمن انتقال أقل وخريطة أسرع وتجربة مستخدم أفضل.
- نظرًا لأن الصور المصغرة من الخريطة يتم عرضها على العميل، فإنها تتكيف مع دقة الجهاز الذي يتم عرضها عليه. نتيجة لذلك، تظهر الخرائط المعروضة بشكل أكثر تحديدًا، مع تسميات واضحة تمامًا.
- لا يتطلب تغيير نمط البيانات في خرائط المتجهات تنزيل البيانات مرة أخرى، حيث يمكن تطبيق النمط الجديد على العميل. في المقابل، يتطلب تغيير نمط طبقة تجانب البيانات النقطية عادةً تحميل صور مصغرة من الخريطة من الخادم ثم تطبيق النمط الجديد.
- نظرًا لأن البيانات يتم تسليمها في شكل متجه، فهناك معالجة أقل من جانب الخادم مطلوبة لإعداد البيانات. نتيجة لذلك، يمكن توفير البيانات الأحدث أسرع.
تلتزم خرائط Azure بمواصفات Mapbox Vector Tile، وهو معيار مفتوح. توفر خرائط Azure خدمات الصور المصغرة الاتجاهية من الخريطة التالية كجزء من النظام الأساسي:
- إطارات متجانبة للطريق
- حوادث المرور
- تدفق نسبة استخدام الشبكة
- يسمح خرائط Azure Creator أيضا بإنشاء تجانبات متجهات مخصصة والوصول إليها من خلال العرض - الحصول على واجهة برمجة تطبيقات تجانب الخريطة
تلميح
عند استخدام مربعات الصور المتجهة أو النقطية من خدمة عرض خرائط Azure مع Web SDK، يمكنك استبدال atlas.microsoft.com بالعنصر النائب azmapsdomain.invalid. سيتم استبدال هذا العنصر النائب بنفس المجال الذي تستخدمه الخريطة وسيقوم تلقائيًا بإلحاق نفس تفاصيل المصادقة أيضًا. يعمل هذا على تبسيط المصادقة بشكل كبير مع خدمة العرض عند استخدام مصادقة Microsoft Entra.
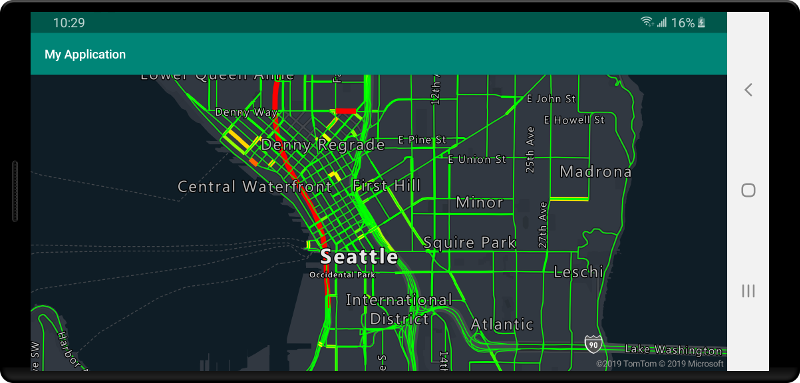
لعرض البيانات من مصدر الصور المصغرة من الخريطة على الخريطة، قم بتوصيل المصدر بإحدى طبقات عرض البيانات. يجب أن تحدد كل الطبقات التي تستخدم مصدر متجه قيمة sourceLayer في الخيارات. تقوم التعليمة البرمجية التالية بتحميل خدمة صور مصغرة من الخريطة لمتجهات تدفق نسبة استخدام شبكة خرائط Azure كمصدر صورة مصغرة من الخريطة للمتجهات، ثم تعرضها على خريطة باستخدام طبقة خط. يحتوي مصدر الصور المصغرة من الخريطة هذا على مجموعة واحدة من البيانات في الطبقة المصدر تسمى "تدفق نسبة استخدام الشبكة". تحتوي بيانات الخط في مجموعة البيانات هذه على خاصية تسمى traffic_level تُستخدم في هذه التعليمة البرمجية لتحديد اللون وقياس حجم الخطوط.
//Formatted URL to the traffic flow vector tiles, with the maps subscription key appended to it.
String trafficFlowUrl = "https://azmapsdomain.invalid/traffic/flow/tile/pbf?api-version=1.0&style=relative&zoom={z}&x={x}&y={y}";

//Create a vector tile source and add it to the map.
VectorTileSource source = new VectorTileSource(
    tiles(new String[] { trafficFlowUrl }),
    maxSourceZoom(22)
);
map.sources.add(source);

//Create a layer for traffic flow lines.
LineLayer layer = new LineLayer(source,
    //The name of the data layer within the data source to pass into this rendering layer.
    sourceLayer("Traffic flow"),

    //Color the roads based on the traffic_level property.
    strokeColor(
        interpolate(
            linear(),
            get("traffic_level"),
            stop(0, color(Color.RED)),
            stop(0.33, color(Color.YELLOW)),
            stop(0.66, color(Color.GREEN))
        )
    ),

    //Scale the width of roads based on the traffic_level property.
    strokeWidth(
        interpolate(
            linear(),
            get("traffic_level"),
            stop(0, 6),
            stop(1,1)
        )
    )
);

//Add the traffic flow layer below the labels to make the map clearer.
map.layers.add(layer, "labels");
//Formatted URL to the traffic flow vector tiles, with the maps subscription key appended to it.
val trafficFlowUrl = "https://azmapsdomain.invalid/traffic/flow/tile/pbf?api-version=1.0&style=relative&zoom={z}&x={x}&y={y}"

//Create a vector tile source and add it to the map.
val source = VectorTileSource(
    tiles(arrayOf(trafficFlowUrl)),
    maxSourceZoom(22)
)
map.sources.add(source)

//Create a layer for traffic flow lines.
val layer = LineLayer(
    source,  //The name of the data layer within the data source to pass into this rendering layer.
    sourceLayer("Traffic flow"),  //Color the roads based on the traffic_level property.
    strokeColor(
        interpolate(
            linear(),
            get("traffic_level"),
            stop(0, color(Color.RED)),
            stop(0.33, color(Color.YELLOW)),
            stop(0.66, color(Color.GREEN))
        )
    ),  //Scale the width of roads based on the traffic_level property.
    strokeWidth(
        interpolate(
            linear(),
            get("traffic_level"),
            stop(0, 6),
            stop(1, 1)
        )
    )
)

//Add the traffic flow layer below the labels to make the map clearer.
map.layers.add(layer, "labels")
توصيل مصدر بيانات بطبقة
يتم عرض البيانات على الخريطة باستخدام طبقات التقديم. يمكن أن تشير طبقة عرض واحدة أو أكثر إلى مصدر بيانات واحد. تتطلب طبقات العرض التالية مصدر بيانات:
- طبقة الفقاعة - تعرض بيانات النقطة كدوائر متدرجة على الخريطة.
- طبقة الرمز- تعرض بيانات النقطة كأيقونات أو نص.
- طبقة خريطة التمثيل اللوني - تعرض بيانات النقاط كخريطة حرارية للكثافة.
- طبقة الخط - عرض خط و/أو عرض مخطط المضلعات.
- طبقة المضلع - تملأ مساحة المضلع بلون خالص أو بنمط صورة.
توضح التعليمة البرمجية التالية كيفية إنشاء مصدر بيانات وإضافته إلى الخريطة وتوصيله بطبقة فقاعية. بعد ذلك، قم باستيراد بيانات نقطة GeoJSON من موقع بعيد إلى مصدر البيانات.
//Create a data source and add it to the map.
DataSource source = new DataSource();

//Import the geojson data and add it to the data source.
source.importDataFromUrl("URL_or_FilePath_to_GeoJSON_data");

//Add data source to the map.
map.sources.add(source);

//Create a layer that defines how to render points in the data source and add it to the map.
BubbleLayer layer = new BubbleLayer(source);
map.layers.add(layer);
//Create a data source and add it to the map.
val source = DataSource()

//Import the geojson data and add it to the data source.
source.importDataFromUrl("URL_or_FilePath_to_GeoJSON_data")

//Add data source to the map.
map.sources.add(source)
هناك المزيد من طبقات العرض التي لا تتصل بمصادر البيانات هذه، ولكنها تقوم بتحميل البيانات مباشرة للعرض.
- طبقة الصور المصغرة من الخريطة - تُركب طبقة تجانب نقطية أعلى الخريطة.
مصدر بيانات واحد متعدد الطبقات
يمكن توصيل طبقات متعددة بمصدر بيانات واحد. يوجد العديد من السيناريوهات المختلفة التي يكون فيها هذا الخيار مفيدًا. على سبيل المثال، ضع في اعتبارك السيناريو الذي يرسم فيه المستخدم مضلعًا. يجب أن نعرض ونملأ منطقة المضلع بينما يضيف المستخدم نقاطًا إلى الخريطة. إضافة خط ذي نمط لتخطيط المضلع يجعل من السهل رؤية حواف المضلع، أثناء رسم المستخدم. لتعديل موضع فردي بشكل ملائم في المضلع، قد نضيف مؤشراً، مثل دبوس أو علامة، فوق كل موضع.

في معظم الأنظمة الأساسية لرسم الخرائط، قد تحتاج إلى عنصر مضلع وعنصر خط ودبوس لكل موضع في المضلع. أثناء تعديل المضلع، ستحتاج إلى تحديث الخط والدبابيس يدويًا، والتي يمكن أن تصبح معقدة بسرعة.
مع خرائط Azure، كل ما تحتاجه هو مضلع واحد في مصدر بيانات كما هو موضح في التعليمات البرمجية التالية.
//Create a data source and add it to the map.
DataSource source = new DataSource();
map.sources.add(source);

//Create a polygon and add it to the data source.
source.add(Polygon.fromLngLats(/* List of points */));

//Create a polygon layer to render the filled in area of the polygon.
PolygonLayer polygonLayer = new PolygonLayer(source,
    fillColor("rgba(255,165,0,0.2)")
);

//Create a line layer for greater control of rendering the outline of the polygon.
LineLayer lineLayer = new LineLayer(source,
    strokeColor("orange"),
    strokeWidth(2f)
);

//Create a bubble layer to render the vertices of the polygon as scaled circles.
BubbleLayer bubbleLayer = new BubbleLayer(source,
    bubbleColor("orange"),
    bubbleRadius(5f),
    bubbleStrokeColor("white"),
    bubbleStrokeWidth(2f)
);

//Add all layers to the map.
map.layers.add(new Layer[] { polygonLayer, lineLayer, bubbleLayer });
//Create a data source and add it to the map.
val source = DataSource()
map.sources.add(source)

//Create a polygon and add it to the data source.
source.add(Polygon.fromLngLats())

//Create a polygon layer to render the filled in area of the polygon.
val polygonLayer = PolygonLayer(
    source,
    fillColor("rgba(255,165,0,0.2)")
)

//Create a line layer for greater control of rendering the outline of the polygon.
val lineLayer = LineLayer(
    source,
    strokeColor("orange"),
    strokeWidth(2f)
)

//Create a bubble layer to render the vertices of the polygon as scaled circles.
val bubbleLayer = BubbleLayer(
    source,
    bubbleColor("orange"),
    bubbleRadius(5f),
    bubbleStrokeColor("white"),
    bubbleStrokeWidth(2f)
)

//Add all layers to the map.
map.layers.add(arrayOf<Layer>(polygonLayer, lineLayer, bubbleLayer))
تلميح
عند إضافة طبقات إلى الخريطة باستخدام طريقة map.layers.add، يمكن تمرير المعرف أو مثيل الطبقة الحالية كمعامل ثانٍ. هذا من شأنه أن يخبر تلك الخريطة بإدراج الطبقة الجديدة التي تتم إضافتها أسفل الطبقة الحالية. بالإضافة إلى تمرير معرف الطبقة، تدعم هذه الطريقة أيضًا القيم التالية.
"labels"- إدراج الطبقة الجديدة أسفل طبقات تسمية الخريطة."transit"- يُدرج الطبقة الجديدة أسفل طريق الخريطة وطبقات النقل العام.
الخطوات التالية
راجع المقالات التالية للحصول على المزيد من نماذج التعليمات البرمجية لإضافتها إلى الخرائط الخاصة بك:
الملاحظات
قريبًا: خلال عام 2024، سنتخلص تدريجيًا من GitHub Issues بوصفها آلية إرسال ملاحظات للمحتوى ونستبدلها بنظام ملاحظات جديد. لمزيد من المعلومات، راجع https://aka.ms/ContentUserFeedback.
إرسال الملاحظات وعرضها المتعلقة بـ