Note
Access to this page requires authorization. You can try signing in or changing directories.
Access to this page requires authorization. You can try changing directories.
Important
On 31 March 2028, kubenet networking for Azure Kubernetes Service (AKS) will be retired.
To avoid service disruptions, you'll need to upgrade to Azure Container Networking Interface (CNI) overlay before that date, when workloads running on kubenet for AKS will no longer be supported.
AKS clusters use kubenet and create an Azure virtual network and subnet for you by default. With kubenet, nodes get an IP address from the Azure virtual network subnet. Pods receive an IP address from a logically different address space to the Azure virtual network subnet of the nodes. Network address translation (NAT) is then configured so the pods can reach resources on the Azure virtual network. The source IP address of the traffic is NAT'd to the node's primary IP address. This approach greatly reduces the number of IP addresses you need to reserve in your network space for pods to use.
With Azure Container Networking Interface (CNI), every pod gets an IP address from the subnet and can be accessed directly. These IP addresses must be planned in advance and unique across your network space. Each node has a configuration parameter for the maximum number of pods it supports. The equivalent number of IP addresses per node are then reserved up front for that node. This approach requires more planning, and often leads to IP address exhaustion or the need to rebuild clusters in a larger subnet as your application demands grow. You can configure the maximum pods deployable to a node at cluster creation time or when creating new node pools. If you don't specify maxPods when creating new node pools, you receive a default value of 110 for kubenet.
This article shows you how to use kubenet networking to create and use a virtual network subnet for an AKS cluster. For more information on network options and considerations, see Network concepts for Kubernetes and AKS.
Prerequisites
- The virtual network for the AKS cluster must allow outbound internet connectivity.
- Don't create more than one AKS cluster in the same subnet.
- AKS clusters can't use
169.254.0.0/16,172.30.0.0/16,172.31.0.0/16, or192.0.2.0/24for the Kubernetes service address range, pod address range, or cluster virtual network address range. On clusters running Kubernetes versions earlier than 1.33, these ranges can't be updated after you create your cluster. Starting with Kubernetes 1.33, you can extend the service IP range after cluster creation using theServiceCIDRKubernetes resource. - The cluster identity used by the AKS cluster must at least have the Network Contributor role on the subnet within your virtual network. CLI helps set the role assignment automatically. If you're using an ARM template or other clients, you need to manually set the role assignment. You must also have the appropriate permissions, such as the subscription owner, to create a cluster identity and assign it permissions. If you want to define a custom role instead of using the built-in Network Contributor role, you need the following permissions:
Microsoft.Network/virtualNetworks/subnets/join/actionMicrosoft.Network/virtualNetworks/subnets/read
Warning
To use Windows Server node pools, you must use Azure CNI. The kubenet network model isn't available for Windows Server containers.
Before you begin
You need the Azure CLI version 2.0.65 or later installed and configured. Run az --version to find the version. If you need to install or upgrade, see Install Azure CLI.
Overview of kubenet networking with your own subnet
In many environments, you have defined virtual networks and subnets with allocated IP address ranges, and you use these resources to support multiple services and applications. To provide network connectivity, AKS clusters can use kubenet (basic networking) or Azure CNI (advanced networking).
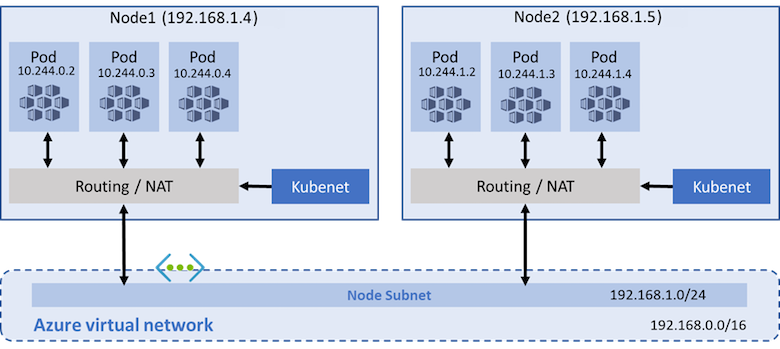
With kubenet, only the nodes receive an IP address in the virtual network subnet. Pods can't communicate directly with each other. Instead, User Defined Routing (UDR) and IP forwarding handle connectivity between pods across nodes. UDRs and IP forwarding configuration is created and maintained by the AKS service by default, but you can bring your own route table for custom route management if you want. You can also deploy pods behind a service that receives an assigned IP address and load balances traffic for the application. The following diagram shows how the AKS nodes receive an IP address in the virtual network subnet, but not the pods:
Azure supports a maximum of 400 routes in a UDR, so you can't have an AKS cluster larger than 400 nodes. AKS virtual nodes and Azure Network Policies aren't supported with kubenet. Calico Network Policies are supported.
With Azure CNI, each pod receives an IP address in the IP subnet and can communicate directly with other pods and services. Your clusters can be as large as the IP address range you specify. However, you must plan the IP address range in advance, and all the IP addresses are consumed by the AKS nodes based on the maximum number of pods they can support. Advanced network features and scenarios such as virtual nodes or Network Policies (either Azure or Calico) are supported with Azure CNI.
Limitations & considerations for kubenet
- An additional hop is required in the design of kubenet, which adds minor latency to pod communication.
- Route tables and user-defined routes are required for using kubenet, which adds complexity to operations.
- For more information, see Customize cluster egress with a user-defined routing table in AKS and Customize cluster egress with outbound types in AKS.
- Direct pod addressing isn't supported for kubenet due to kubenet design.
- Unlike Azure CNI clusters, multiple kubenet clusters can't share a subnet.
- AKS doesn't apply Network Security Groups (NSGs) to its subnet and doesn't modify any of the NSGs associated with that subnet. If you provide your own subnet and add NSGs associated with that subnet, you must ensure the security rules in the NSGs allow traffic between the node and pod CIDR. For more details, see Network security groups.
- Features not supported on kubenet include:
Note
Some of the system pods such as konnectivity within the cluster use the host node IP address rather than an IP from the overlay address space. The system pods will only use the node IP and not an IP address from the virtual network.
IP address availability and exhaustion
A common issue with Azure CNI is that the assigned IP address range is too small to then add more nodes when you scale or upgrade a cluster. The network team also might not be able to issue a large enough IP address range to support your expected application demands.
As a compromise, you can create an AKS cluster that uses kubenet and connect to an existing virtual network subnet. This approach lets the nodes receive defined IP addresses without the need to reserve a large number of IP addresses up front for any potential pods that could run in the cluster. With kubenet, you can use a much smaller IP address range and support large clusters and application demands. For example, with a /27 IP address range on your subnet, you can run a 20-25 node cluster with enough room to scale or upgrade. This cluster size can support up to 2,200-2,750 pods (with a default maximum of 110 pods per node). The maximum number of pods per node that you can configure with kubenet in AKS is 250.
The following basic calculations compare the difference in network models:
- kubenet: A simple /24 IP address range can support up to 251 nodes in the cluster. Each Azure virtual network subnet reserves the first three IP addresses for management operations. This node count can support up to 27,610 pods, with a default maximum of 110 pods per node.
- Azure CNI: That same basic /24 subnet range can only support a maximum of eight nodes in the cluster. This node count can only support up to 240 pods, with a default maximum of 30 pods per node.
Note
These maximums don't take into account upgrade or scale operations. In practice, you can't run the maximum number of nodes the subnet IP address range supports. You must leave some IP addresses available for scaling or upgrading operations.
Virtual network peering and ExpressRoute connections
To provide on-premises connectivity, both kubenet and Azure-CNI network approaches can use Azure virtual network peering or ExpressRoute connections. Plan your IP address ranges carefully to prevent overlap and incorrect traffic routing. For example, many on-premises networks use a 10.0.0.0/8 address range that's advertised over the ExpressRoute connection. We recommend creating your AKS clusters in Azure virtual network subnets outside this address range, such as 172.16.0.0/16.
Choose a network model to use
The following considerations help outline when each network model may be the most appropriate:
Use kubenet when:
- You have limited IP address space.
- Most of the pod communication is within the cluster.
- You don't need advanced AKS features, such as virtual nodes or Azure Network Policy.
Use Azure CNI when:
- You have available IP address space.
- Most of the pod communication is to resources outside of the cluster.
- You don't want to manage user defined routes for pod connectivity.
- You need AKS advanced features, such as virtual nodes or Azure Network Policy.
For more information to help you decide which network model to use, see Compare network models and their support scope.
Create a virtual network and subnet
Create a resource group using the
az group createcommand.az group create --name myResourceGroup --location eastusIf you don't have an existing virtual network and subnet to use, create these network resources using the
az network vnet createcommand. The following example command creates a virtual network named myAKSVnet with the address prefix of 192.168.0.0/16 and a subnet named myAKSSubnet with the address prefix 192.168.1.0/24:az network vnet create \ --resource-group myResourceGroup \ --name myAKSVnet \ --address-prefixes 192.168.0.0/16 \ --subnet-name myAKSSubnet \ --subnet-prefix 192.168.1.0/24 \ --location eastusGet the subnet resource ID using the
az network vnet subnet showcommand and store it as a variable namedSUBNET_IDfor later use.SUBNET_ID=$(az network vnet subnet show --resource-group myResourceGroup --vnet-name myAKSVnet --name myAKSSubnet --query id -o tsv)
Create an AKS cluster in the virtual network
Create an AKS cluster with system-assigned managed identities
Note
When using system-assigned identity, the Azure CLI grants the Network Contributor role to the system-assigned identity after the cluster is created. If you're using an ARM template or other clients, you need to use the user-assigned managed identity instead.
Create an AKS cluster with system-assigned managed identities using the
az aks createcommand.az aks create \ --resource-group myResourceGroup \ --name myAKSCluster \ --network-plugin kubenet \ --service-cidr 10.0.0.0/16 \ --dns-service-ip 10.0.0.10 \ --pod-cidr 10.244.0.0/16 \ --vnet-subnet-id $SUBNET_ID \ --generate-ssh-keysDeployment parameters:
- --service-cidr is optional. This address is used to assign internal services in the AKS cluster an IP address. This IP address range should be an address space that isn't in use elsewhere in your network environment, including any on-premises network ranges if you connect, or plan to connect, your Azure virtual networks using Express Route or a Site-to-Site VPN connection. The default value is 10.0.0.0/16.
- --dns-service-ip is optional. The address should be the .10 address of your service IP address range. The default value is 10.0.0.10.
- --pod-cidr is optional. This address should be a large address space that isn't in use elsewhere in your network environment. This range includes any on-premises network ranges if you connect, or plan to connect, your Azure virtual networks using Express Route or a Site-to-Site VPN connection. The default value is 10.244.0.0/16.
- This address range must be large enough to accommodate the number of nodes that you expect to scale up to. You can't change this address range once the cluster is deployed.
- The pod IP address range is used to assign a /24 address space to each node in the cluster. In the following example, the --pod-cidr of 10.244.0.0/16 assigns the first node 10.244.0.0/24, the second node 10.244.1.0/24, and the third node 10.244.2.0/24.
- As the cluster scales or upgrades, the Azure platform continues to assign a pod IP address range to each new node.
Create an AKS cluster with user-assigned managed identity
Create a managed identity
Create a managed identity using the
az identitycommand. If you have an existing managed identity, find the principal ID using theaz identity show --ids <identity-resource-id>command instead.az identity create --name myIdentity --resource-group myResourceGroupYour output should resemble the following example output:
{
  "clientId": "<client-id>",
  "clientSecretUrl": "<clientSecretUrl>",
  "id": "/subscriptions/<subscriptionid>/resourcegroups/myResourceGroup/providers/Microsoft.ManagedIdentity/userAssignedIdentities/myIdentity",
  "location": "westus2",
  "name": "myIdentity",
  "principalId": "<principal-id>",
  "resourceGroup": "myResourceGroup",
  "tags": {},
  "tenantId": "<tenant-id>",
  "type": "Microsoft.ManagedIdentity/userAssignedIdentities"
}
Add role assignment for managed identity
If you're using the Azure CLI, the role is automatically added and you can skip this step. If you're using an ARM template or other clients, you need to use the Principal ID of the cluster managed identity to perform a role assignment.
Get the virtual network resource ID using the
az network vnet showcommand and store it as a variable namedVNET_ID.VNET_ID=$(az network vnet show --resource-group myResourceGroup --name myAKSVnet --query id -o tsv)Assign the managed identity for your AKS cluster Network Contributor permissions on the virtual network using the
az role assignment createcommand and provide the <principalId>.az role assignment create --assignee <control-plane-identity-principal-id> --scope $VNET_ID --role "Network Contributor" # Example command az role assignment create --assignee 22222222-2222-2222-2222-222222222222 --scope "/subscriptions/aaaa0a0a-bb1b-cc2c-dd3d-eeeeee4e4e4e/resourceGroups/myResourceGroup/providers/Microsoft.Network/virtualNetworks/myAKSVnet" --role "Network Contributor"
Note
Permission granted to your cluster's managed identity used by Azure may take up 60 minutes to populate.
Create an AKS cluster
Create an AKS cluster using the
az aks createcommand and provide the control plane's managed identity resource ID for theassign-identityargument to assign the user-assigned managed identity.az aks create \ --resource-group myResourceGroup \ --name myAKSCluster \ --node-count 3 \ --network-plugin kubenet \ --vnet-subnet-id $SUBNET_ID \ --assign-identity <identity-resource-id> \ --generate-ssh-keys
When you create an AKS cluster, a network security group and route table are automatically created. These network resources are managed by the AKS control plane. The network security group is automatically associated with the virtual NICs on your nodes. The route table is automatically associated with the virtual network subnet. Network security group rules and route tables are automatically updated as you create and expose services.
Bring your own subnet and route table with kubenet
With kubenet, a route table must exist on your cluster subnet(s). AKS supports bringing your own existing subnet and route table. If your custom subnet doesn't contain a route table, AKS creates one for you and adds rules throughout the cluster lifecycle. If your custom subnet contains a route table when you create your cluster, AKS acknowledges the existing route table during cluster operations and adds/updates rules accordingly for cloud provider operations.
Warning
You can add/update custom rules on the custom route table. However, rules are added by the Kubernetes cloud provider which can't be updated or removed. Rules such as 0.0.0.0/0 generally exist on a given route table (unless the egress outbound type is none) and map to the target of your internet gateway, such as an NVA or other egress gateway. Take caution when updating rules.
Learn more about setting up a custom route table.
Kubenet networking requires organized route table rules to successfully route requests. Due to this design, route tables must be carefully maintained for each cluster that relies on it. Multiple clusters can't share a route table because pod CIDRs from different clusters might overlap which causes unexpected and broken routing scenarios. When configuring multiple clusters on the same virtual network or dedicating a virtual network to each cluster, consider the following limitations:
- A custom route table must be associated to the subnet before you create the AKS cluster.
- The associated route table resource can't be updated after cluster creation. However, custom rules can be modified on the route table.
- Each AKS cluster must use a single, unique route table for all subnets associated with the cluster. You can't reuse a route table with multiple clusters due to the potential for overlapping pod CIDRs and conflicting routing rules.
- For system-assigned managed identity, it's only supported to provide your own subnet and route table via Azure CLI because Azure CLI automatically adds the role assignment. If you're using an ARM template or other clients, you must use a user-assigned managed identity, assign permissions before cluster creation, and ensure the user-assigned identity has write permissions to your custom subnet and custom route table.
- Using the same route table with multiple AKS clusters isn't supported.
Note
When you create and use your own VNet and route table with the kubenet network plugin, you must configure a user-assigned managed identity for the cluster. With a system-assigned managed identity, you can't retrieve the identity ID before creating a cluster, which causes a delay during role assignment.
Both system-assigned and user-assigned managed identities are supported when you create and use your own VNet and route table with the Azure network plugin. We highly recommend using a user-assigned managed identity for BYO scenarios.
Add a route table with a user-assigned managed identity to your AKS cluster
After creating a custom route table and associating it with a subnet in your virtual network, you can create a new AKS cluster specifying your route table with a user-assigned managed identity. You need to use the subnet ID for where you plan to deploy your AKS cluster. This subnet also must be associated with your custom route table.
Get the subnet ID using the
az network vnet subnet listcommand.az network vnet subnet list --resource-group myResourceGroup --vnet-name myAKSVnet [--subscription]Create an AKS cluster with a custom subnet pre-configured with a route table using the
az aks createcommand and providing your values for the--vnet-subnet-idand--assign-identityparameters.az aks create \ --resource-group myResourceGroup \ --name myManagedCluster \ --vnet-subnet-id mySubnetIDResourceID \ --assign-identity controlPlaneIdentityResourceID \ --generate-ssh-keys
Next steps
This article showed you how to deploy your AKS cluster into your existing virtual network subnet. Now, you can start creating new apps using Helm or deploying existing apps using Helm.