Note
Access to this page requires authorization. You can try signing in or changing directories.
Access to this page requires authorization. You can try changing directories.
APPLIES TO:  Azure Data Factory
  Azure Synapse Analytics
Tip
Data Factory in Microsoft Fabric is the next generation of Azure Data Factory, with a simpler architecture, built-in AI, and new features. If you're new to data integration, start with Fabric Data Factory. Existing ADF workloads can upgrade to Fabric to access new capabilities across data science, real-time analytics, and reporting.
By default, the Azure Data Factory user interface experience (UX) authors directly against the data factory service. This experience has the following limitations:
- The Data Factory service doesn't include a repository for storing the JSON entities for your changes. The only way to save changes is via the Publish All button and all changes are published directly to the data factory service.
- The Data Factory service isn't optimized for collaboration and version control.
- The Azure Resource Manager template required to deploy Data Factory itself isn't included.
To provide a better authoring experience, Azure Data Factory allows you to configure a Git repository with either Azure Repos or GitHub. Git is a version control system that allows for easier change tracking and collaboration. This article outlines how to configure and work in a git repository along with highlighting best practices and a troubleshooting guide.
You can also reference Continuous integration and delivery (CI/CD) in Azure Data Factory to learn more about the larger CI/CD pattern, of which source control is a critical aspect.
Note
We have added GitHub public support on Azure Gov and Microsoft Azure operated by 21Vianet. Refer to the announcement blog.
To learn more about how Azure Data Factory integrates with Git, view the 15-minute tutorial video below:
Advantages of Git integration
Below is a list of some of the advantages git integration provides to the authoring experience:
- Source control: As your data factory workloads become crucial, you would want to integrate your factory with Git to apply several source control benefits like the following:
- Ability to track/audit changes.
- Ability to revert changes that introduced bugs.
- Partial saves: When authoring against the data factory service, you can't save changes as a draft, and all publishes must pass data factory validation. Whether your pipelines aren't finished or you simply don't want to lose changes if your computer crashes, git integration allows for incremental changes of data factory resources regardless of what state they are in. Configuring a git repository allows you to save changes, letting you only publish after you test your changes to your satisfaction.
- Collaboration and control: If you have multiple team members contributing to the same factory, you might want to let your teammates collaborate with each other via a code review process. You can also set up your factory such that not every contributor has equal permissions. Some team members might only be allowed to make changes via Git and only certain people in the team are allowed to publish the changes to the factory.
- Better CI/CD: If you're deploying to multiple environments with a continuous delivery process, git integration makes certain actions easier. Some of these actions include:
- Configure your release pipeline to trigger automatically as soon as there are any changes made to your 'dev' factory.
- Customize the properties in your factory that are available as parameters in the Resource Manager template. It can be useful to keep only the required set of properties as parameters, and have everything else hard-coded.
- Better Performance: An average factory with git integration loads 10 times faster than one authoring against the data factory service. This performance improvement is because resources are downloaded via Git.
Note
Authoring directly with the Data Factory service is disabled in the Azure Data Factory UX when a Git repository is configured. Changes made via PowerShell or an SDK are published directly to the Data Factory service and are not entered into Git.
Connect to a Git repository
There are four different ways to connect a Git repository to your data factory for both Azure Repos and GitHub. After you connect to a Git repository, you can view and manage your configuration in the management hub under Git configuration in the Source control section.
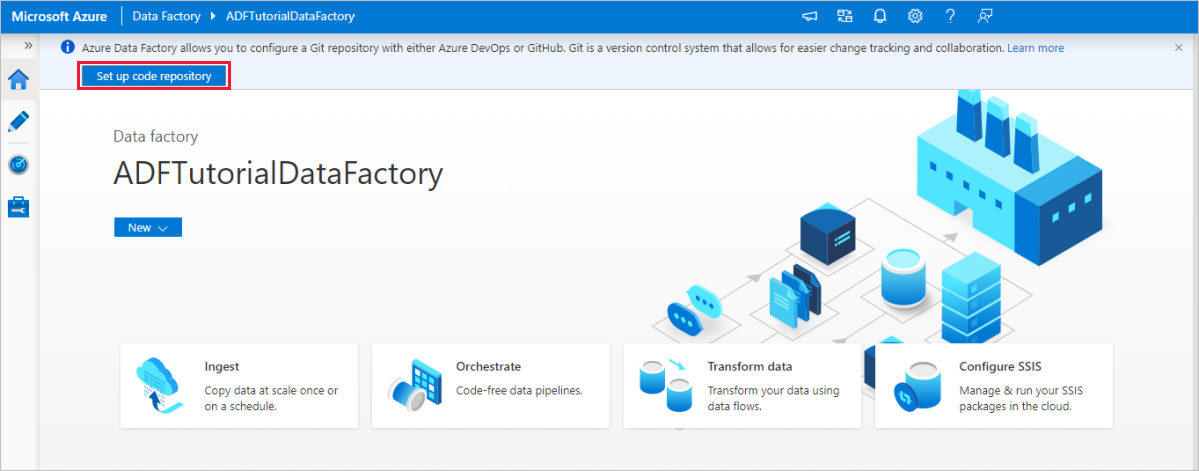
Configuration method 1: Home page
In the Azure Data Factory home page, select Set up code repository at the top.
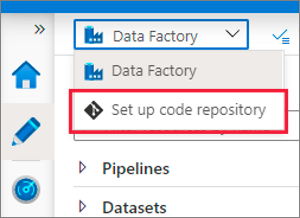
Configuration method 2: Authoring canvas
In the Azure Data Factory UX authoring canvas, select the Data Factory drop-down menu, and then select Set up code repository.
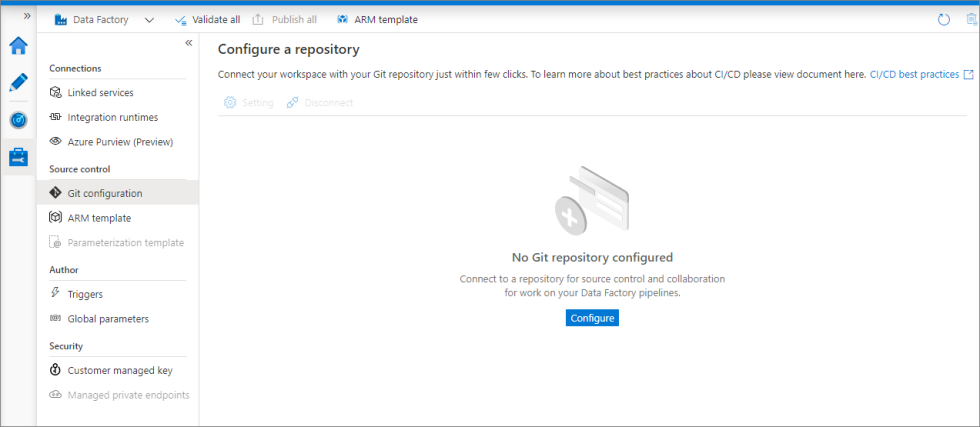
Configuration method 3: Management hub
Go to the management hub in the Azure Data Factory Studio. Select Git configuration in the Source control section. If you have no repository connected, select Configure.
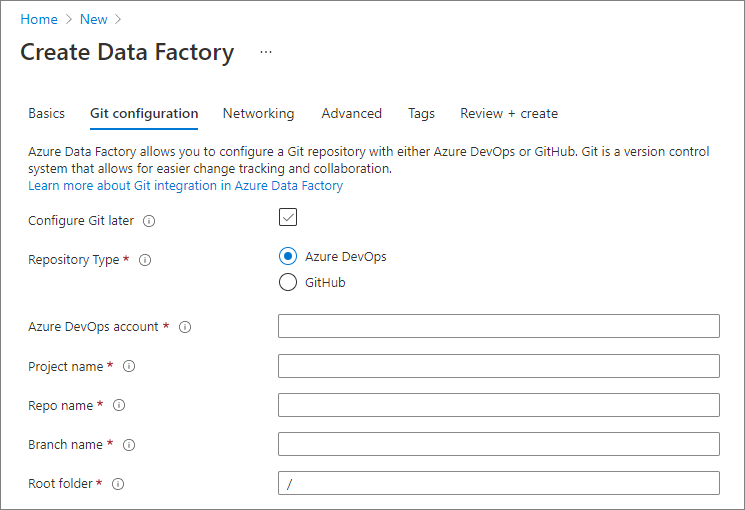
Configuration method 4: During factory creation
When creating a new data factory in the Azure portal, you can configure Git repository information in the Git configuration tab.
Note
When configuring git in the Azure portal, settings like project name and repo name have to be manually entered instead of being part of a dropdown.
Author with Azure Repos Git integration
Visual authoring with Azure Repos Git integration supports source control and collaboration for work on your data factory pipelines. You can associate a data factory with an Azure Repos Git organization repository for source control, collaboration, versioning, and so on. A single Azure Repos Git organization can have multiple repositories, but an Azure Repos Git repository can be associated with only one data factory. If you don't have an Azure Repos organization or repository, follow these instructions to create your resources.
Note
You can store script and data files in an Azure Repos Git repository. However, you have to upload the files manually to Azure Storage. A data factory pipeline doesn't automatically upload script or data files stored in an Azure Repos Git repository to Azure Storage. Additional files such as ARM templates, scripts, or configuration files, can be stored in the repository outside of the mapped folder. If you do this, keep in mind that an additional task is required to build/deploy and interact with the files stored outside of the mapped Azure DevOps folder.
Azure Repos settings
The configuration pane walks you step-by-step through configuring each of the following code repository settings:
| Setting | Description | Value |
|---|---|---|
| Repository Type | The type of the Azure Repos code repository. |
Azure DevOps Git or GitHub |
| Microsoft Entra ID | Your Microsoft Entra tenant name. | <your tenant name> |
| Azure Repos Organization | Your Azure Repos organization name. You can locate your Azure Repos organization name at https://{organization name}.visualstudio.com. You can sign in to your Azure Repos organization to access your Visual Studio profile and see your repositories and projects. |
<your organization name> |
| ProjectName | Your Azure Repos project name. You can locate your Azure Repos project name at https://{organization name}.visualstudio.com/{project name}. |
<your Azure Repos project name> |
| RepositoryName | Your Azure Repos code repository name. Azure Repos projects contain Git repositories to manage your source code as your project grows. You can create a new repository or use an existing repository that's already in your project. | <your Azure Repos code repository name> |
| Collaboration branch | Your Azure Repos collaboration branch that is used for publishing. By default, it's main. Change this setting in case you want to publish resources from another branch. |
<your collaboration branch name> |
| Publish branch | The Publish branch is the branch in your repository where publishing related ARM templates are stored and updated. By default, it's adf_publish. |
<your publish branch name> |
| Root folder | Your root folder in your Azure Repos collaboration branch. | <your root folder name> |
| Import existing Data Factory resources to repository | Specifies whether to import existing data factory resources from the UX Authoring canvas into an Azure Repos Git repository. Select the box to import your data factory resources into the associated Git repository in JSON format. This action exports each resource individually (that is, the linked services and datasets are exported into separate JSONs). When this box isn't selected, the existing resources aren't imported. | Selected (default) |
| Branch to import resource into | Specifies into which branch the data factory resources (pipelines, datasets, linked services etc.) are imported. You can import resources into one of the following branches: a. Collaboration b. Create new c. Use Existing |
Note
If you are using Microsoft Edge and do not see any values in your Azure DevOps Account dropdown, add https://*.visualstudio.com to the trusted sites list.
Editing repo settings
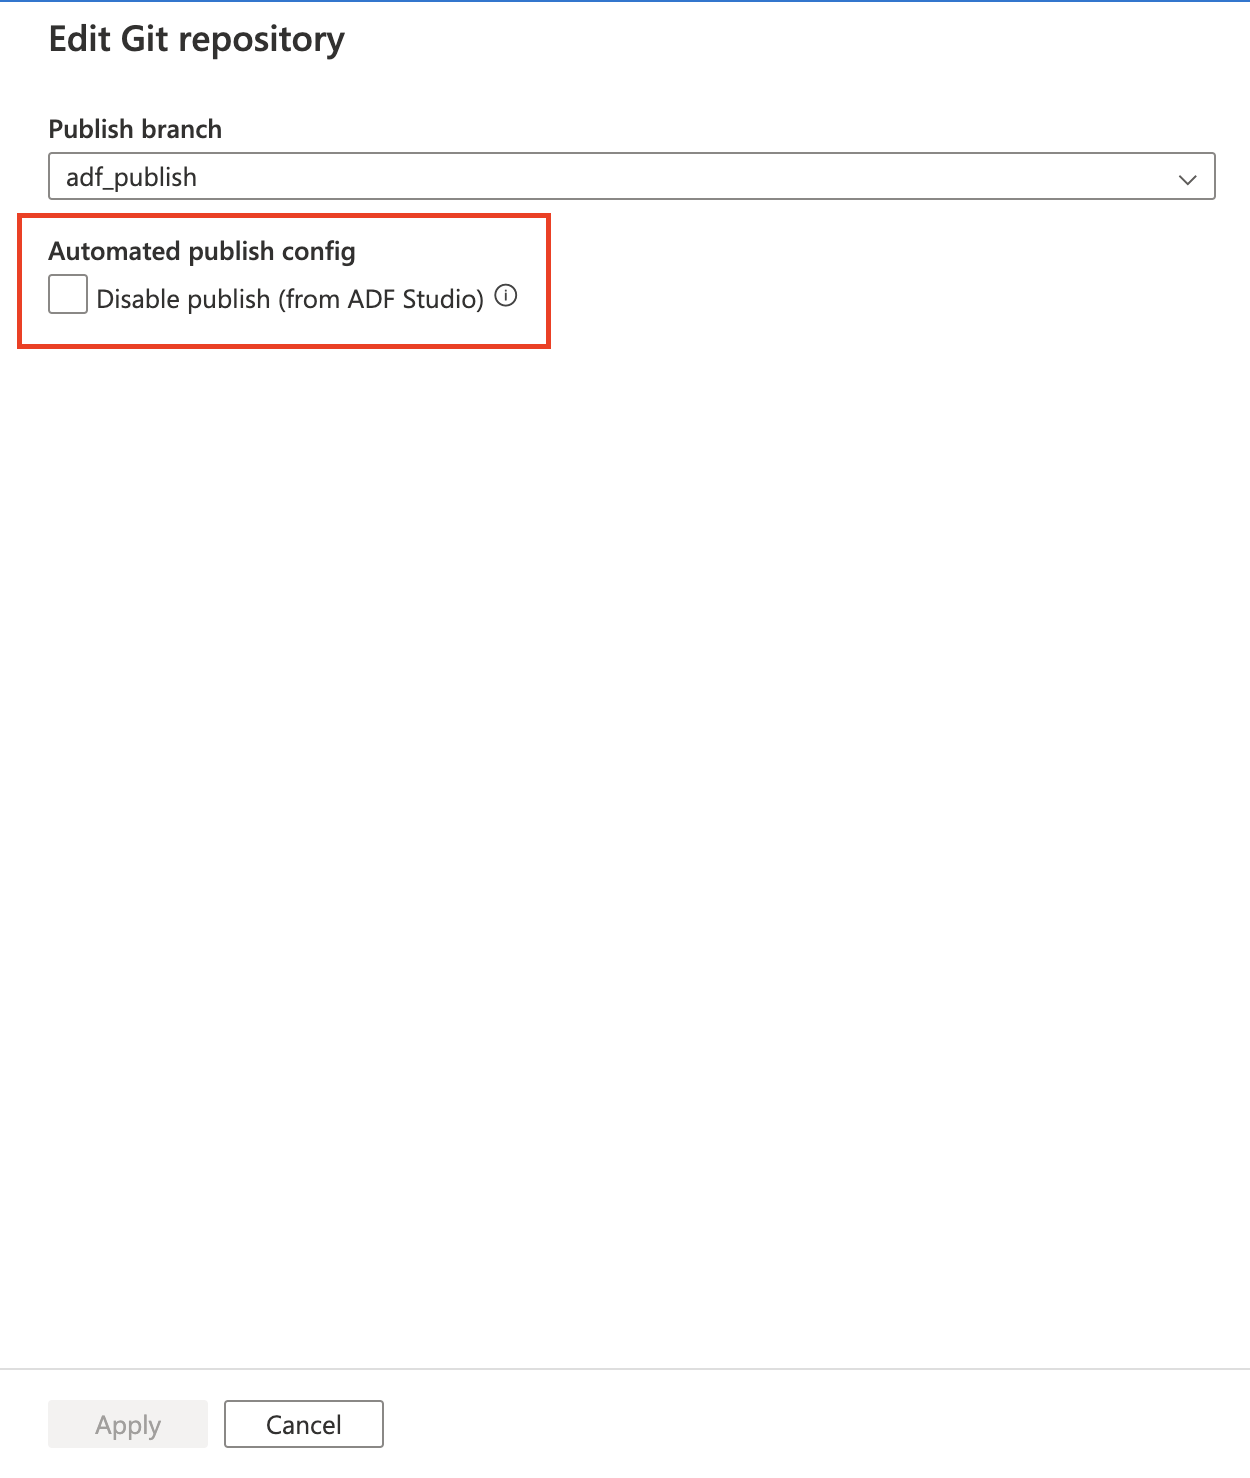
If any adjustments need to be made to the settings of your configured Azure Repos Git repository, you can choose to Edit.
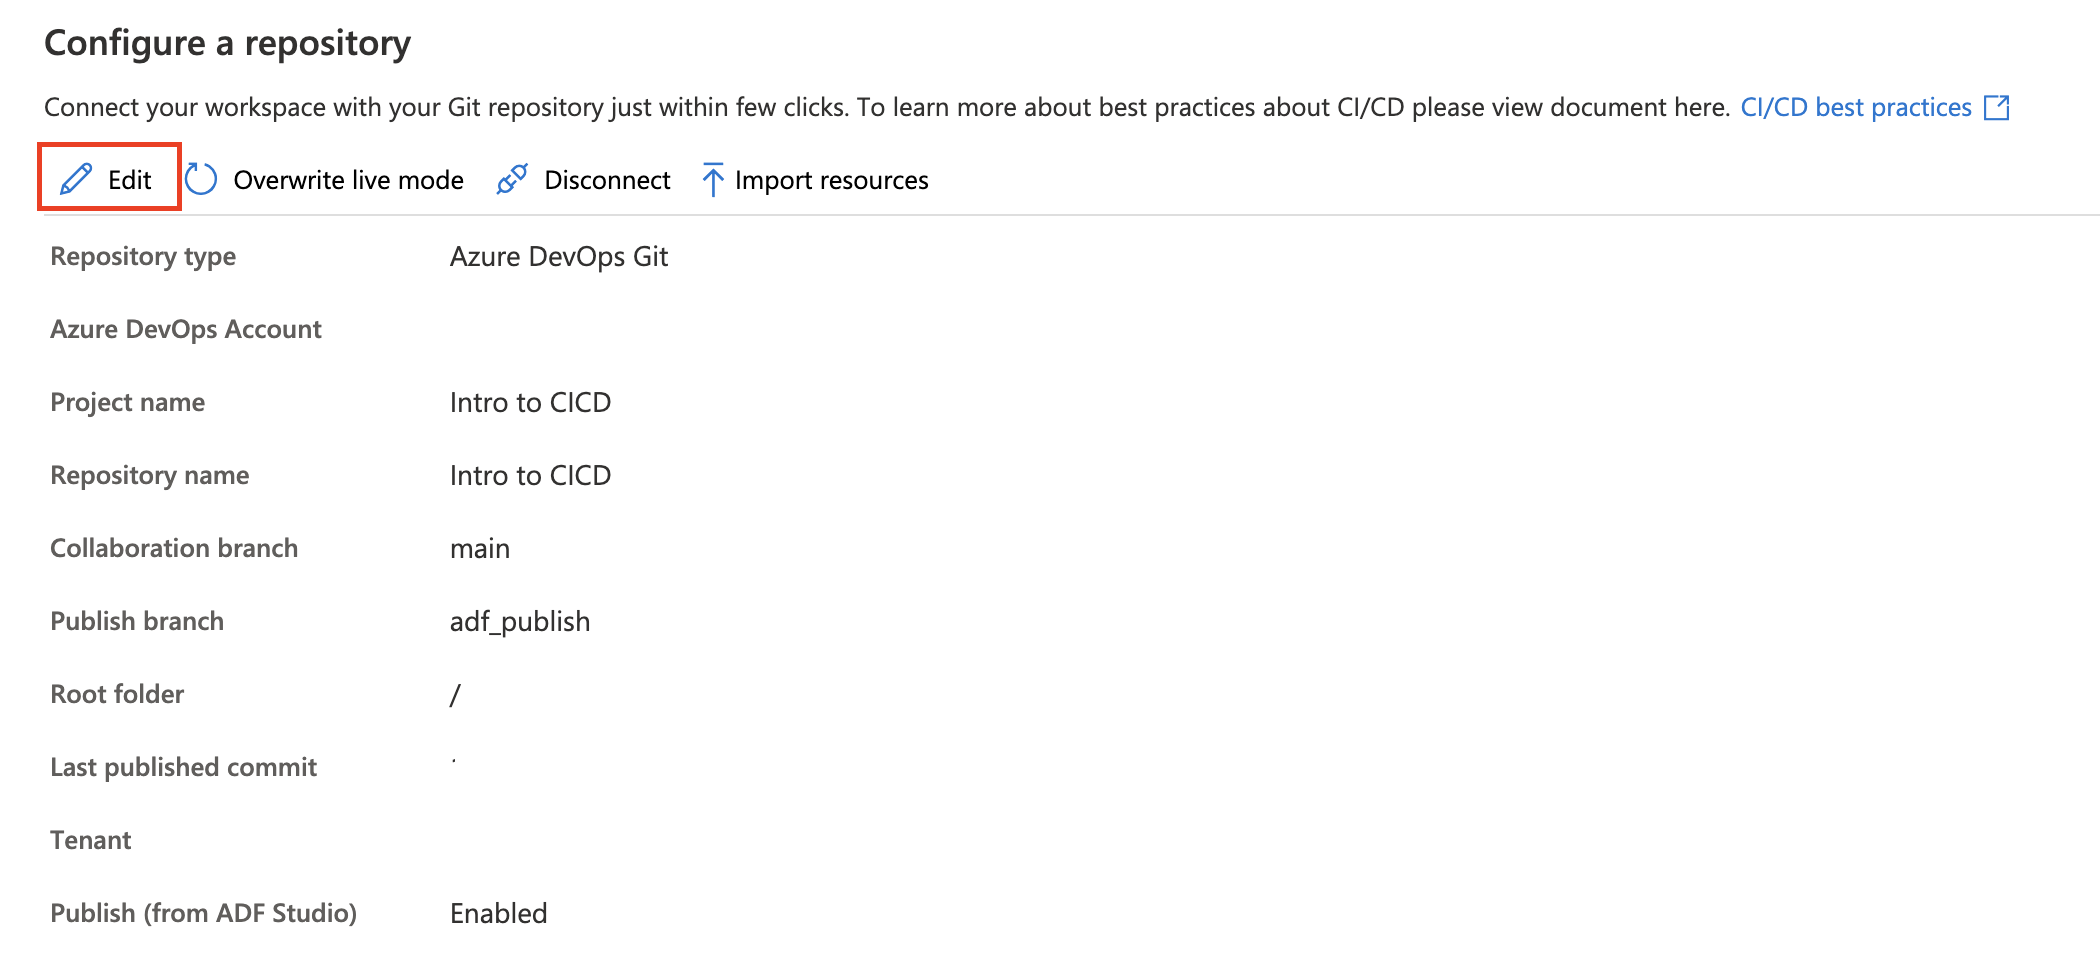
You can update your publish branch and decide whether or not to disable the publish button from the ADF studio. If you choose to disable the publish button from the studio, the publish button is grayed out in the studio. This helps you avoid overwriting the last automated publish deployment.
Use a different Microsoft Entra tenant
The Azure Repos Git repo can be in a different Microsoft Entra tenant. To specify a different Microsoft Entra tenant, you have to have administrator permissions for the Azure subscription that you're using. For more info, see change subscription administrator.
Important
To connect to another Microsoft Entra ID, the user logged in must be a part of that active directory.
Use your personal Microsoft account
To use a personal Microsoft account for Git integration, you can link your personal Azure Repo to your organization's Active Directory.
Add your personal Microsoft account to your organization's Active Directory as a guest. For more info, see Add Microsoft Entra B2B collaboration users in the Azure portal.
Sign in to the Azure portal with your personal Microsoft account. Then switch to your organization's Active Directory.
Go to the Azure DevOps section, where you now see your personal repo. Select the repo and connect with Active Directory.
After these configuration steps, your personal repo is available when you set up Git integration in the Data Factory UI.
For more info about connecting Azure Repos to your organization's Active Directory, see Connect your Azure DevOps organization to Microsoft Entra ID.
Author with GitHub integration
Visual authoring with GitHub integration supports source control and collaboration for work on your data factory pipelines. You can associate a data factory with a GitHub account repository for source control, collaboration, versioning. A single GitHub account can host multiple repositories, and each repository can be associated with multiple data factories. By configuring each data factory to use a different branch within the same repository, you can maintain separate environments (such as development, staging, and production) while managing their configurations independently. If you don't have a GitHub account or repository, follow these instructions to create your resources.
The GitHub integration with Data Factory supports both public GitHub (that is, https://github.com), GitHub Enterprise Cloud and GitHub Enterprise Server. You can use both public and private GitHub repositories with Data Factory as long you have read and write permission to the repository in GitHub. To connect with a public repository, select the Use Link Repository option, as they aren't visible in the dropdown menu of Repository name. ADF’s GitHub enterprise server integration only works with officially supported versions of GitHub enterprise server.
For repositories owned by GitHub organization account, the admin has to authorize the ADF app. For repositories owned by GitHub user account, a user with at least collaborator permission can authorize ADF app. This permission doesn't give ADF app direct access to all the repositories owned by the account/organization, it only allows the ADF app to act on-behalf of the user to access repositories based on user's access permissions.
Note
If you are using Microsoft Edge, GitHub Enterprise version less than 2.1.4 does not work with it. GitHub officially supports >=3.0 and these all should be fine for ADF. As GitHub changes its minimum version, ADF supported versions also change.
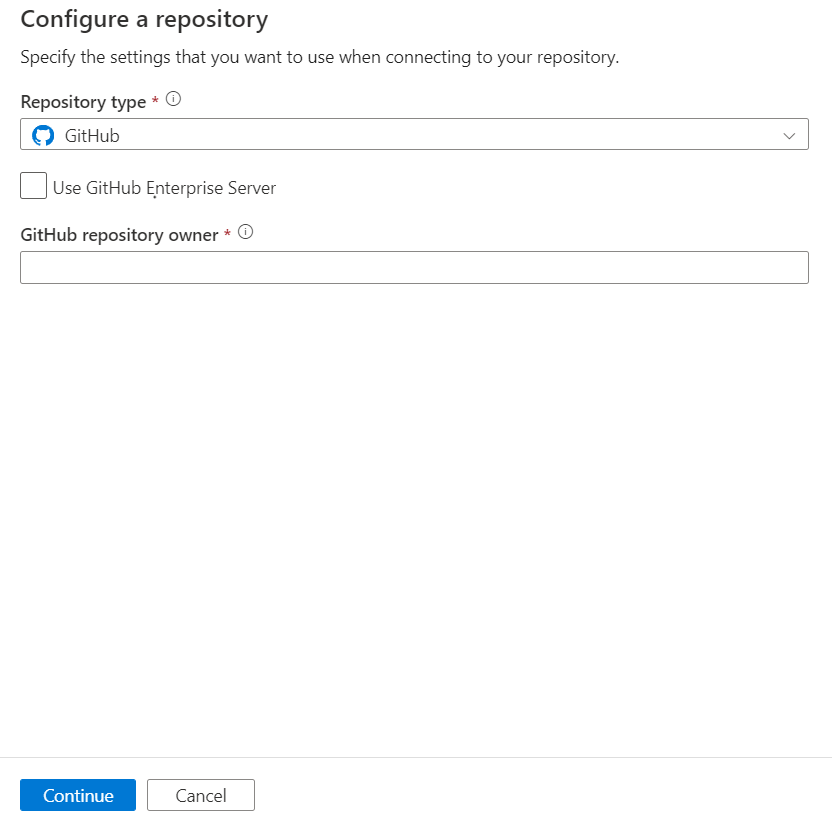
GitHub settings
Note
If you encounter the error Failed to list GitHub repositories. Please make sure the account name is correct and you have permission to perform the action., ensure you're using the correct owner name, and not the GitHub repository URL.
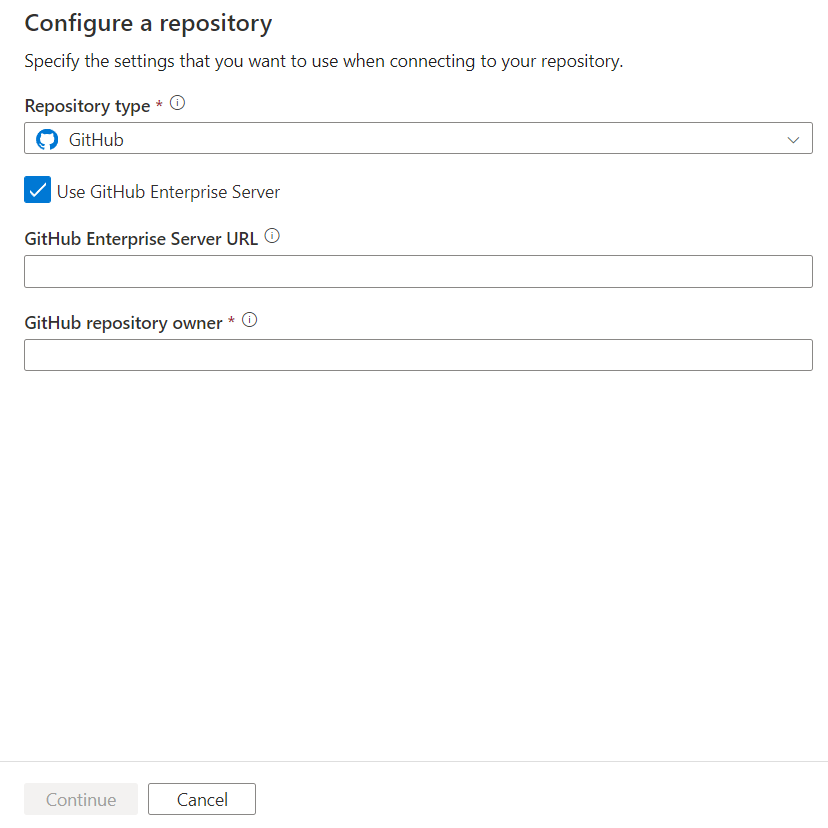
The configuration pane shows the following GitHub repository settings:
| Setting | Description | Value |
|---|---|---|
| Repository Type | The type of the Azure Repos code repository. | GitHub |
| Use GitHub Enterprise Server | Checkbox to select GitHub Enterprise Server. | unselected (default) |
| GitHub Enterprise Server URL | The GitHub Enterprise root URL (must be HTTPS for local GitHub Enterprise server). For example: https://github.mydomain.com. Required only if Use GitHub Enterprise Server is selected |
<your GitHub Enterprise Server URL> |
| GitHub repository owner | GitHub organization or account that owns the repository. This name can be found from https://github.com/{owner}/{repository name}. Navigating to this page prompts you to enter GitHub OAuth credentials to your GitHub organization or account. If you select Use GitHub Enterprise Server, a dialog box appears to let you enter your access token. | <your GitHub repository owner name> |
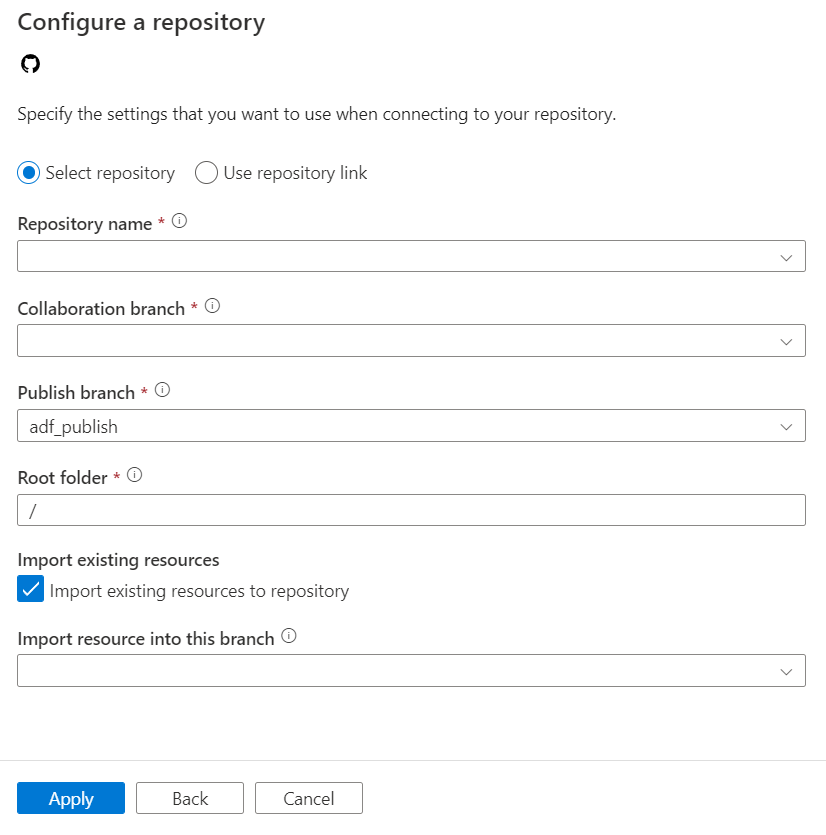
| Repository Name | Your GitHub code repository name. GitHub accounts contain Git repositories to manage your source code. You can create a new repository or use an existing repository that's already in your account. Specify your GitHub code repository name when you select Select repository. | <your repository name> |
| Git repository link | Your GitHub code repository link. Specify your GitHub code repository link when you select Use repository link. | <your repository link> |
| Collaboration branch | Your GitHub collaboration branch that is used for publishing. By default, it's main. Change this setting in case you want to publish resources from another branch. You can also create a new collaboration branch here. | <your collaboration branch> |
| Publish branch | The branch in your repository where publishing-related ARM templates are stored and updated. | <your publish branch name> |
| Root folder | Your root folder in your GitHub collaboration branch. | <your root folder name> |
| Import existing resources to repository | Specifies whether to import existing data factory resources from the UX authoring canvas into a GitHub repository. Select the box to import your data factory resources into the associated Git repository in JSON format. This action exports each resource individually (that is, the linked services and datasets are exported into separate JSONs). When this box isn't selected, the existing resources aren't imported. | Selected (default) |
| Import resource into this branch | Specifies into which branch the data factory resources (pipelines, datasets, linked services etc.) are imported. |
Editing repo settings
If any adjustments need to be made to the settings of your configured GitHub repository, you can choose to Edit.
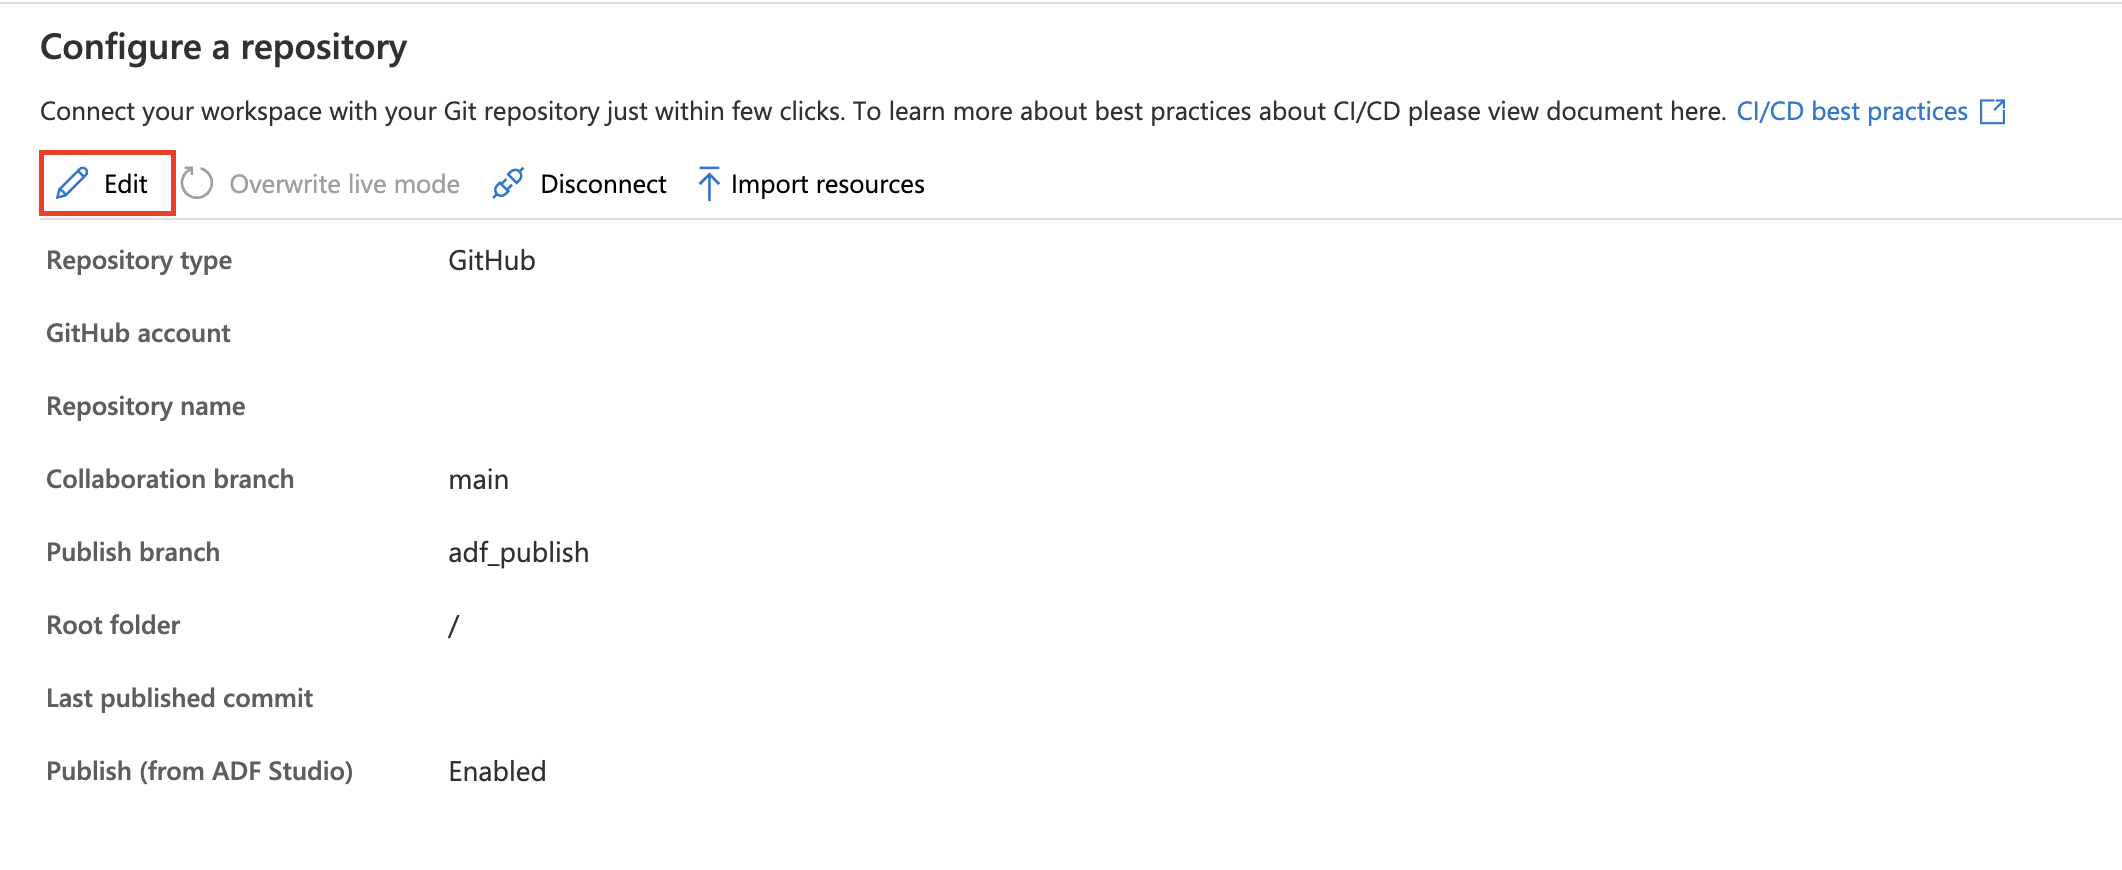
You can update your publish branch and decide whether or not to disable the publish button from the ADF studio. If you choose to disable the publish button from the studio, the publish button is grayed out in the studio. This helps avoid overwriting the last automated publish deployment.
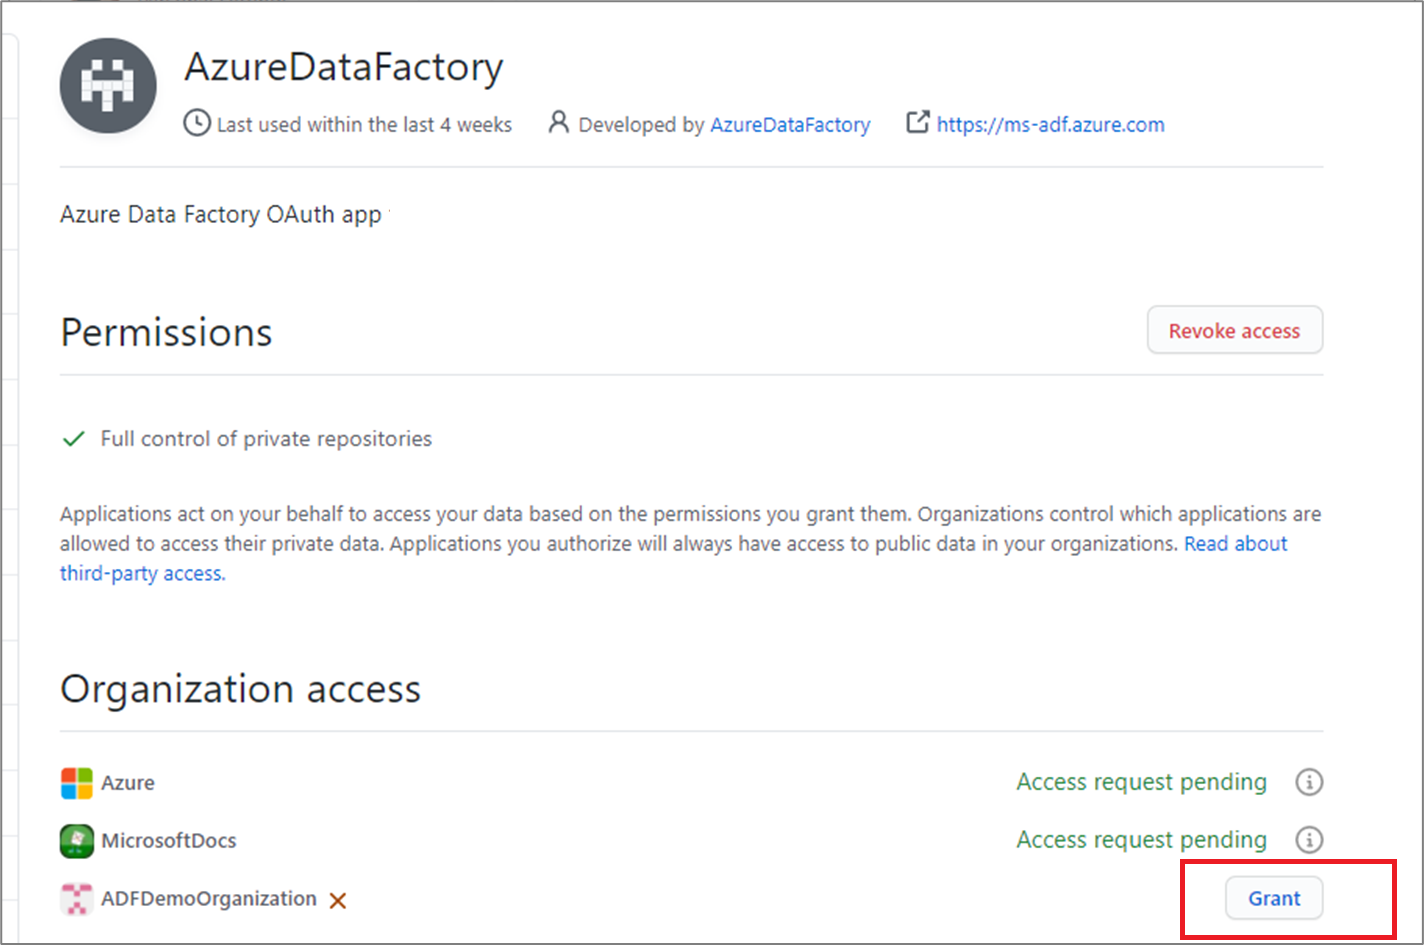
GitHub organizations
Connecting to a GitHub organization requires the organization to grant permission to Azure Data Factory. A user with ADMIN permissions on the organization must perform the below steps to allow data factory to connect.
Connecting to public GitHub or GitHub Enterprise Cloud for the first time in Azure Data Factory
If you're connecting to public GitHub or GitHub Enterprise Cloud from Azure Data Factory for the first time, follow these steps to connect to a GitHub organization.
- In the Git configuration pane, enter the organization name in the GitHub Account field. A prompt to log into GitHub appears.
- Sign in using your user credentials.
- You are asked to authorize Azure Data Factory as an application called AzureDataFactory. On this screen, you see an option to grant permission for ADF to access the organization. If you don't see the option to grant permission, ask an admin to manually grant the permission through GitHub.
Once you follow these steps, your factory can connect to both public and private repositories within your organization. If you're unable to connect, try clearing the browser cache and retrying.
Already connected to public GitHub or GitHub Enterprise Cloud using a personal account
If you already connected to public GitHub or GitHub Enterprise Cloud and only granted permission to access a personal account, follow the below steps to grant permissions to an organization.
Go to GitHub and open Settings.
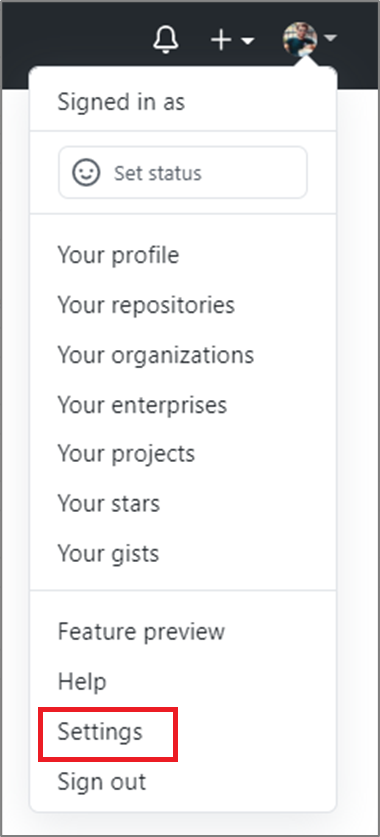
Select Applications. In the Authorized OAuth apps tab, you should see AzureDataFactory.
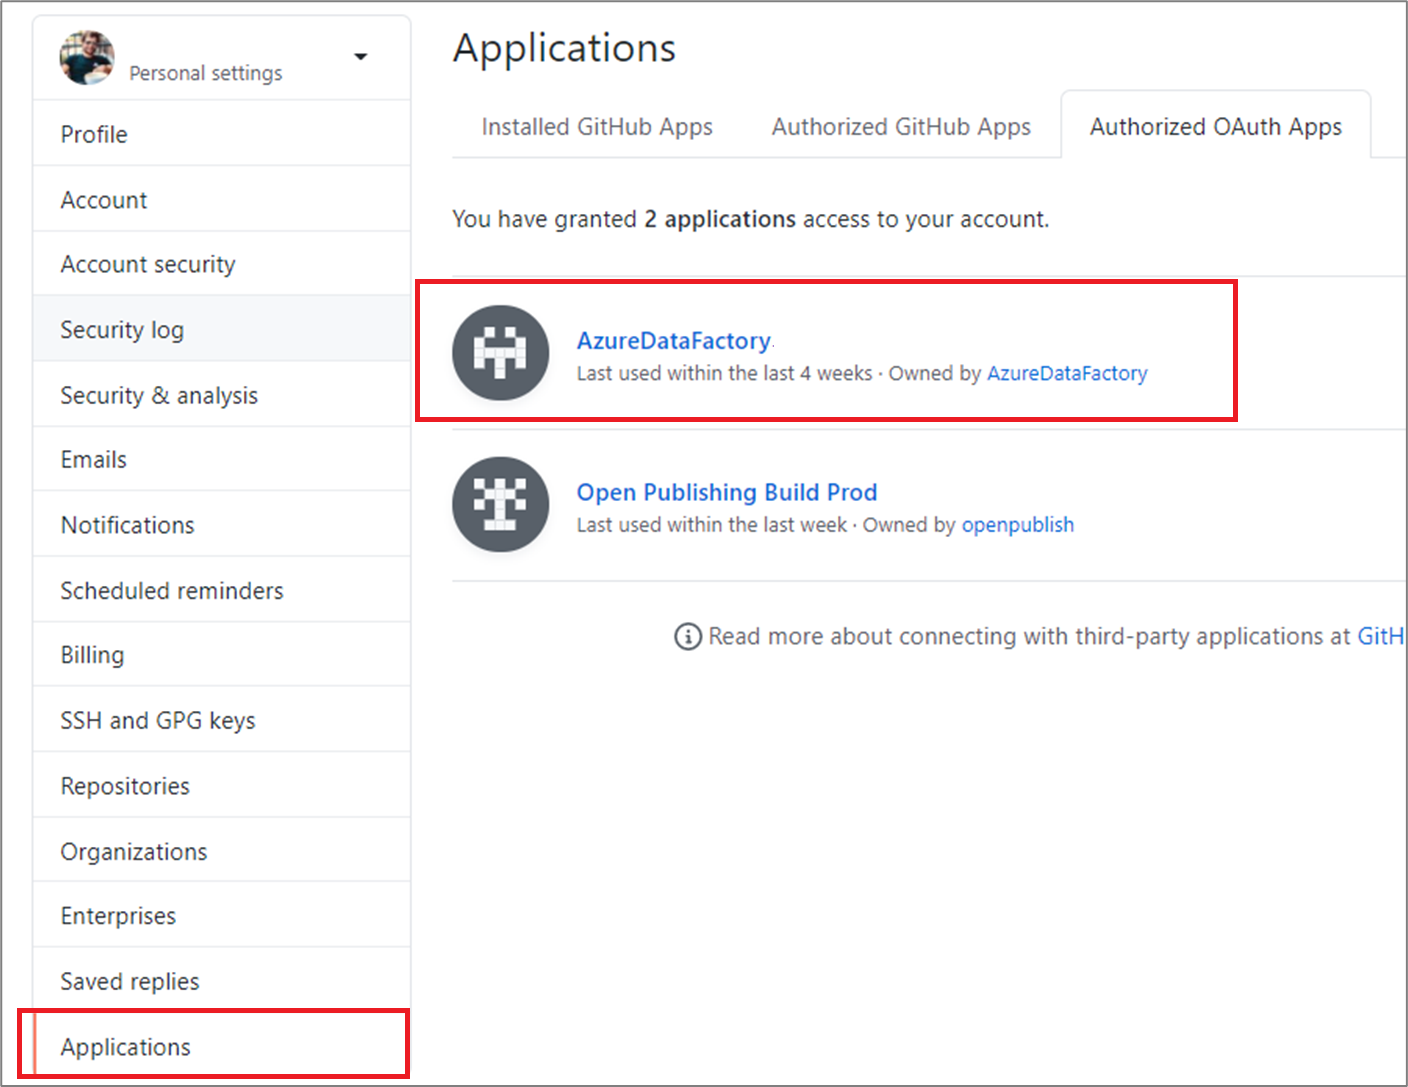
Select the application and grant the application access to your organization.
Once you follow these steps, your factory can connect to both public and private repositories within your organization.
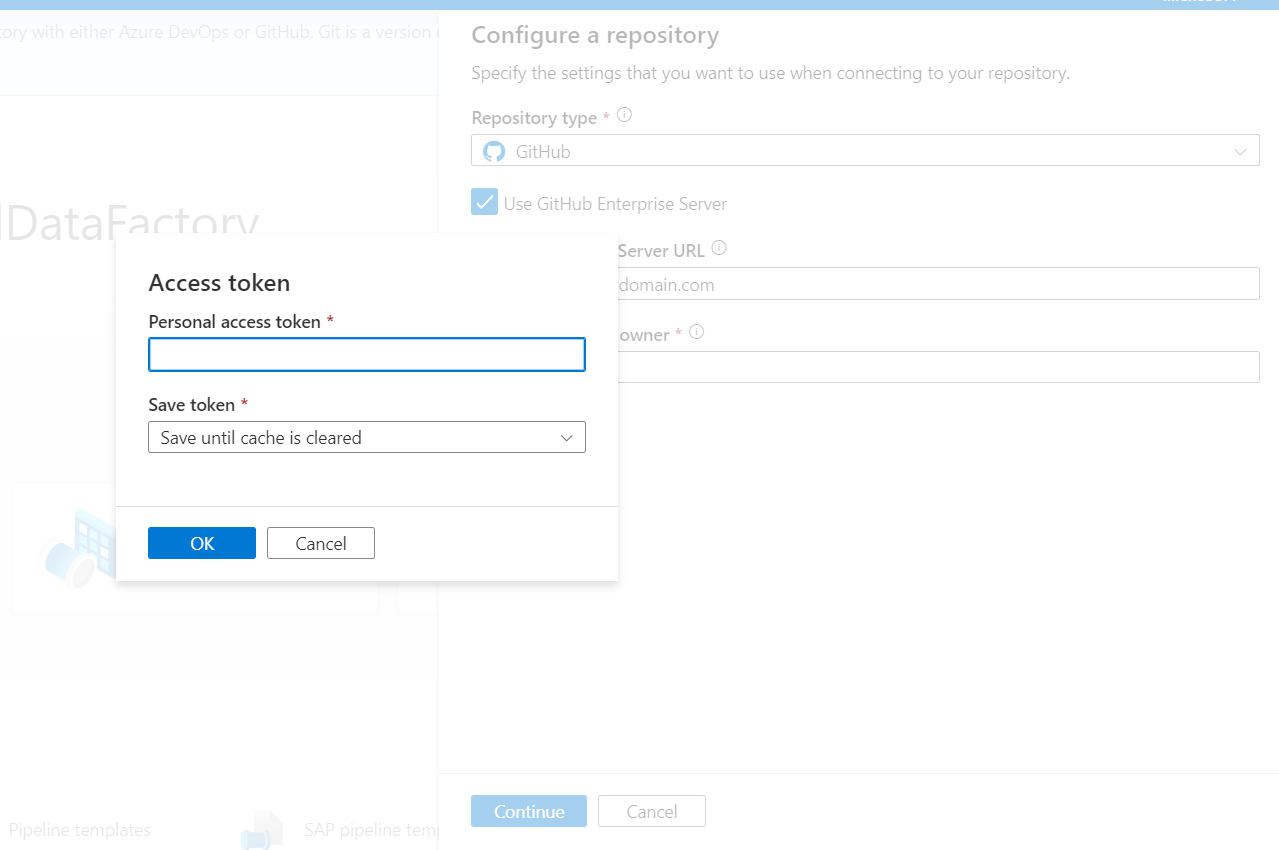
Connecting to GitHub Enterprise Server
If you connect to GitHub Enterprise Server, you need to use a personal access token for authentication. Learn how to create a personal access token in Creating a personal access token.
Note
GitHub Enterprise Server is in your self-hosted private environment, so you need full control of the firewall, network policies, and VPN when you use this authentication. For more information, see About GitHub Enterprise Server.
Known GitHub limitations
You can store script and data files in a GitHub repository. However, you have to upload the files manually to Azure Storage. A Data Factory pipeline doesn't automatically upload script or data files stored in a GitHub repository to Azure Storage.
GitHub Enterprise with a version older than 2.14.0 doesn't work in the Microsoft Edge browser.
GitHub integration with the Data Factory visual authoring tools only works in the generally available version of Data Factory.
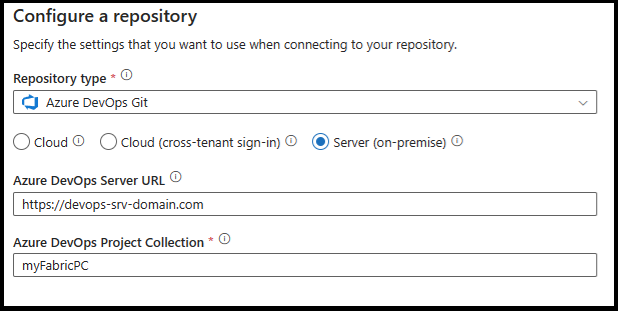
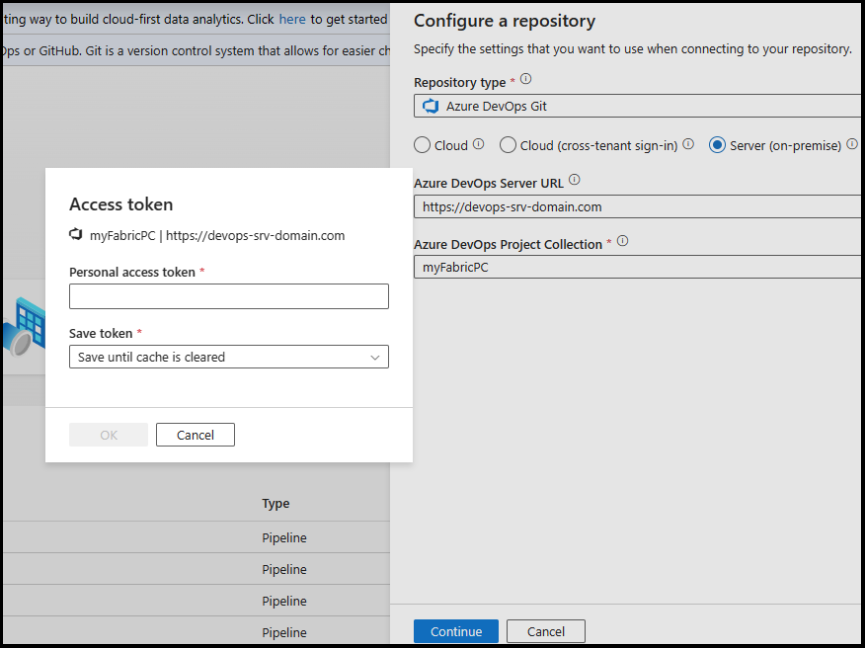
Connecting to Azure DevOps Server 2022
If you connect to Azure DevOps Server 2022, you need to use a personal access token for authentication. Learn how to create a personal access token here.
Connect to on-premises Azure DevOps by providing the Azure DevOps Server URL and Azure DevOps Project Collection
Provide the token with access scope as read/write for code.
Version control
Version control systems (also known as source control) let developers collaborate on code and track changes that are made to the code base. Source control is an essential tool for multi-developer projects.
Creating feature branches
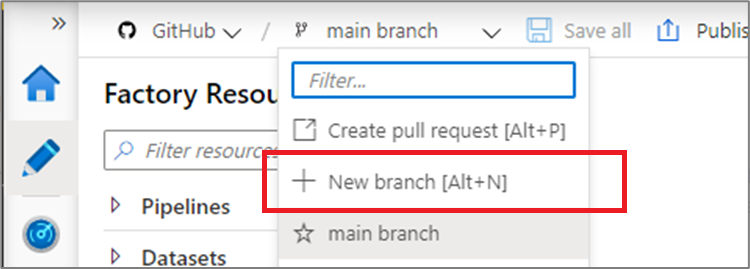
Each Azure Repos Git repository that's associated with a data factory has a collaboration branch. (main is the default collaboration branch). Users can also create feature branches by clicking + New Branch in the branch dropdown.
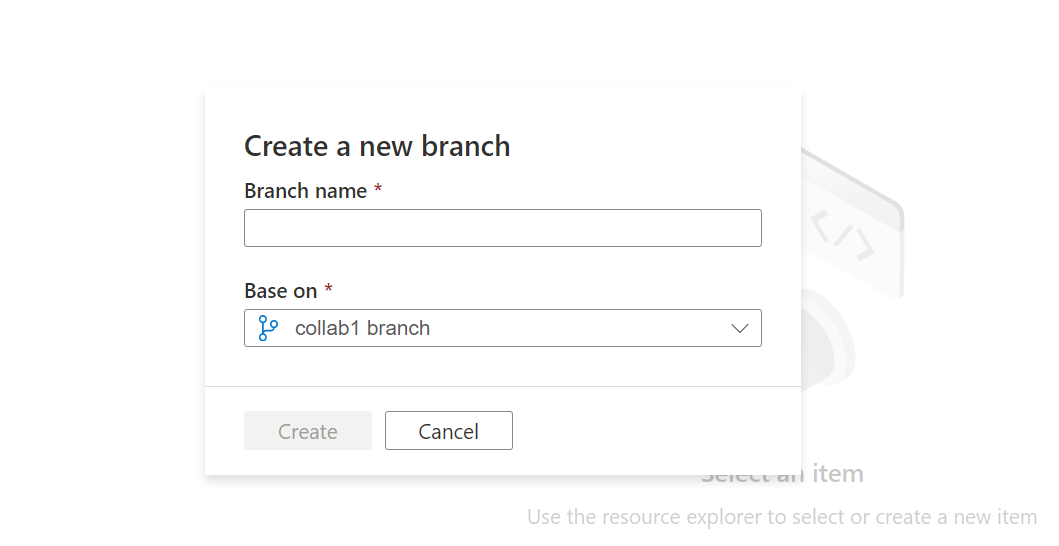
Once the new branch pane appears, enter the name of your feature branch and select a branch to base the work off of.
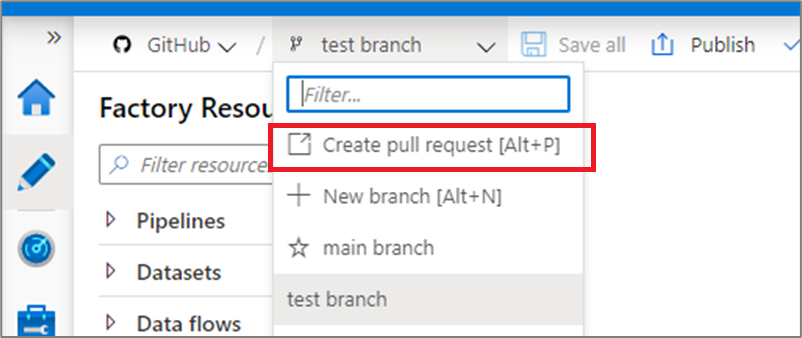
When you are ready to merge the changes from your feature branch to your collaboration branch, click on the branch dropdown and select Create pull request. This action takes you to Azure Repos Git where you can raise pull requests, do code reviews, and merge changes to your collaboration branch. (main is the default). You are only allowed to publish to the Data Factory service from your collaboration branch.
Configure publishing settings
By default, data factory generates the Resource Manager templates of the published factory and saves them into a branch called adf_publish. To configure a custom publish branch, add a publish_config.json file to the root folder in the collaboration branch. When publishing, ADF reads this file, looks for the field publishBranch, and saves all Resource Manager templates to the specified location. If the branch doesn't exist, data factory automatically creates it. An example of what this file looks like is below:
{
    "publishBranch": "factory/adf_publish"
}
Azure Data Factory can only have one publish branch at a time. When you specify a new publish branch, Data Factory doesn't delete the previous publish branch. If you want to remove the previous publish branch, delete it manually.
Note
Data Factory only reads the publish_config.json file when it loads the factory. If you already have the factory loaded in the portal, refresh the browser to make your changes take effect.
Publish code changes
After you have merged changes to the collaboration branch (main is the default), click Publish to manually publish your code changes in the main branch to the Data Factory service.
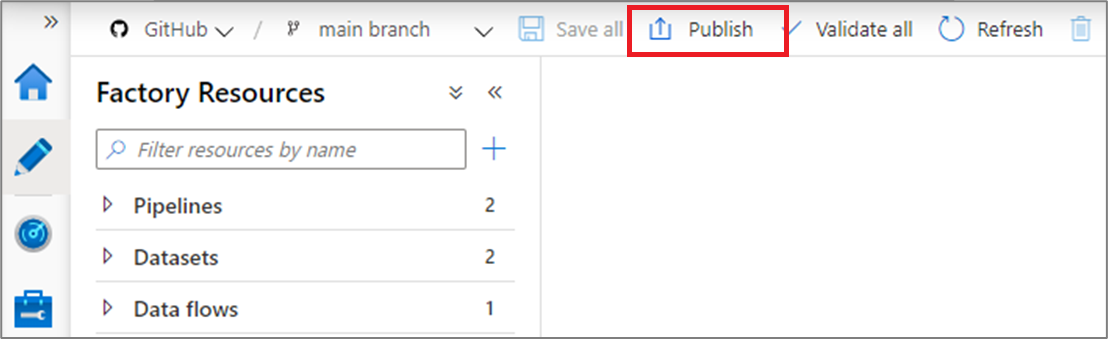
A side pane will open where you confirm that the publish branch and pending changes are correct. Once you verify your changes, click OK to confirm the publish.

Important
The main branch is not representative of what's deployed in the Data Factory service. The main branch must be published manually to the Data Factory service.
Best practices for Git integration
Permissions
Typically you don't want every team member to have permission to update the Data Factory. The following permissions settings are recommended:
- All team members should have read permissions to the Data Factory.
- Only a select set of people should be allowed to publish to the Data Factory. To do so, they must have the Data Factory contributor role on the Resource Group that contains the Data Factory. For more information on permissions, see Roles and permissions for Azure Data Factory.
It's recommended to not allow direct check-ins to the collaboration branch. This restriction can help prevent bugs as every check-in will go through a pull request review process described in Creating feature branches.
Using passwords from Azure Key Vault
It's recommended to use Azure Key Vault to store any connection strings or passwords or managed identity authentication for Data Factory Linked Services. For security reasons, data factory doesn't store secrets in Git. Any changes to Linked Services containing secrets such as passwords are published immediately to the Azure Data Factory service.
Using Key Vault or MSI authentication also makes continuous integration and deployment easier as you won't have to provide these secrets during Resource Manager template deployment.
Troubleshooting Git integration
Stale publish branch
Below are some examples of situations that can cause a stale publish branch:
- A user has multiple branches. In one feature branch, they deleted a linked service that isn't AKV associated (non-AKV linked services are published immediately regardless if they are in Git or not) and never merged the feature branch into the collaboration branch.
- A user modified the data factory using the SDK or PowerShell
- A user moved all resources to a new branch and tried to publish for the first time. Linked services should be created manually when importing resources.
- A user uploads a non-AKV linked service or an Integration Runtime JSON manually. They reference that resource from another resource such as a dataset, linked service, or pipeline. A non-AKV linked service created through the user interface is published immediately because the credentials need to be encrypted. If you upload a dataset referencing that linked service and try to publish, the user interface allows it because it exists in the git environment. It will be rejected at publish time since it does not exist in the data factory service.
If the publish branch is out of sync with the main branch and contains out-of-date resources despite a recent publish, you can use either of the below solutions:
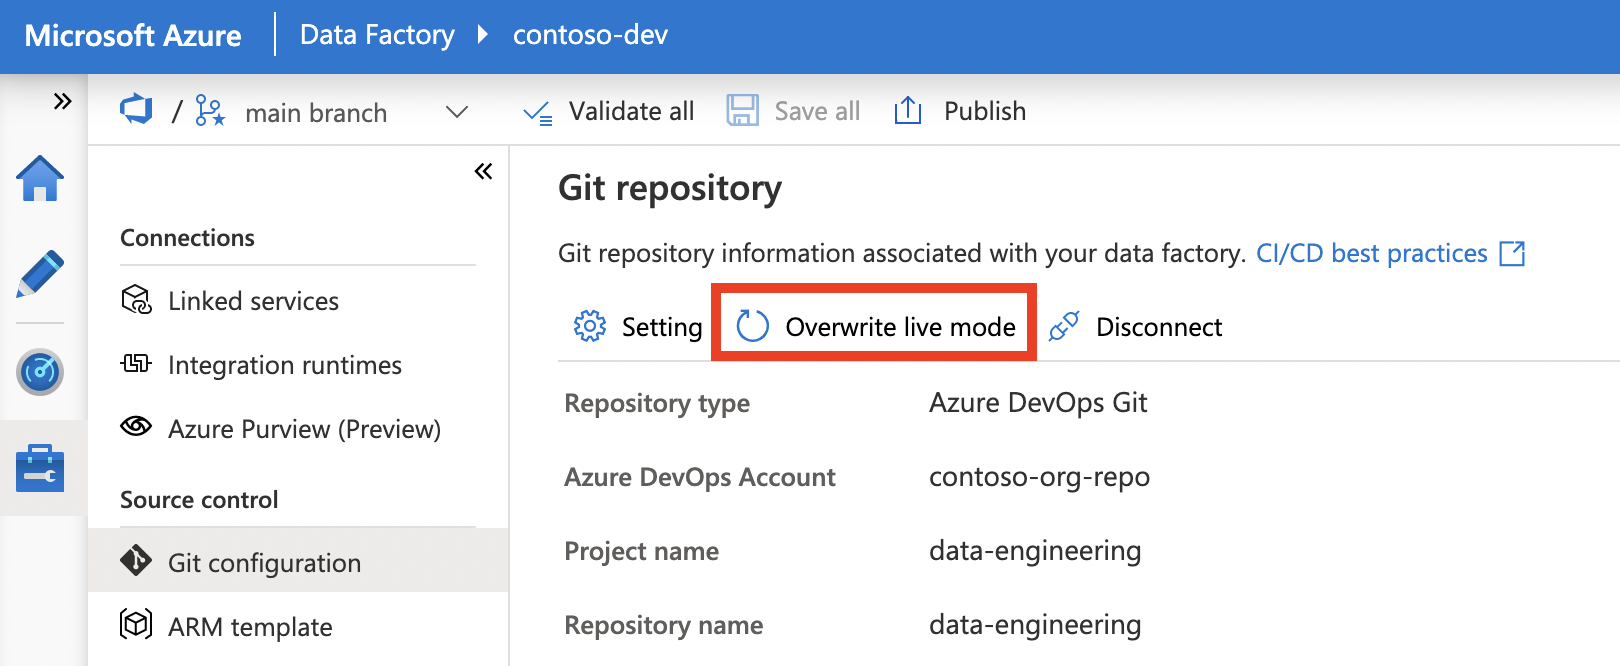
Option 1: Use Overwrite live mode functionality
It publishes or overwrites the code from your collaboration branch into the live mode. It considers the code in your repository as the source of truth.
Code flow: Collaboration branch -> Live mode
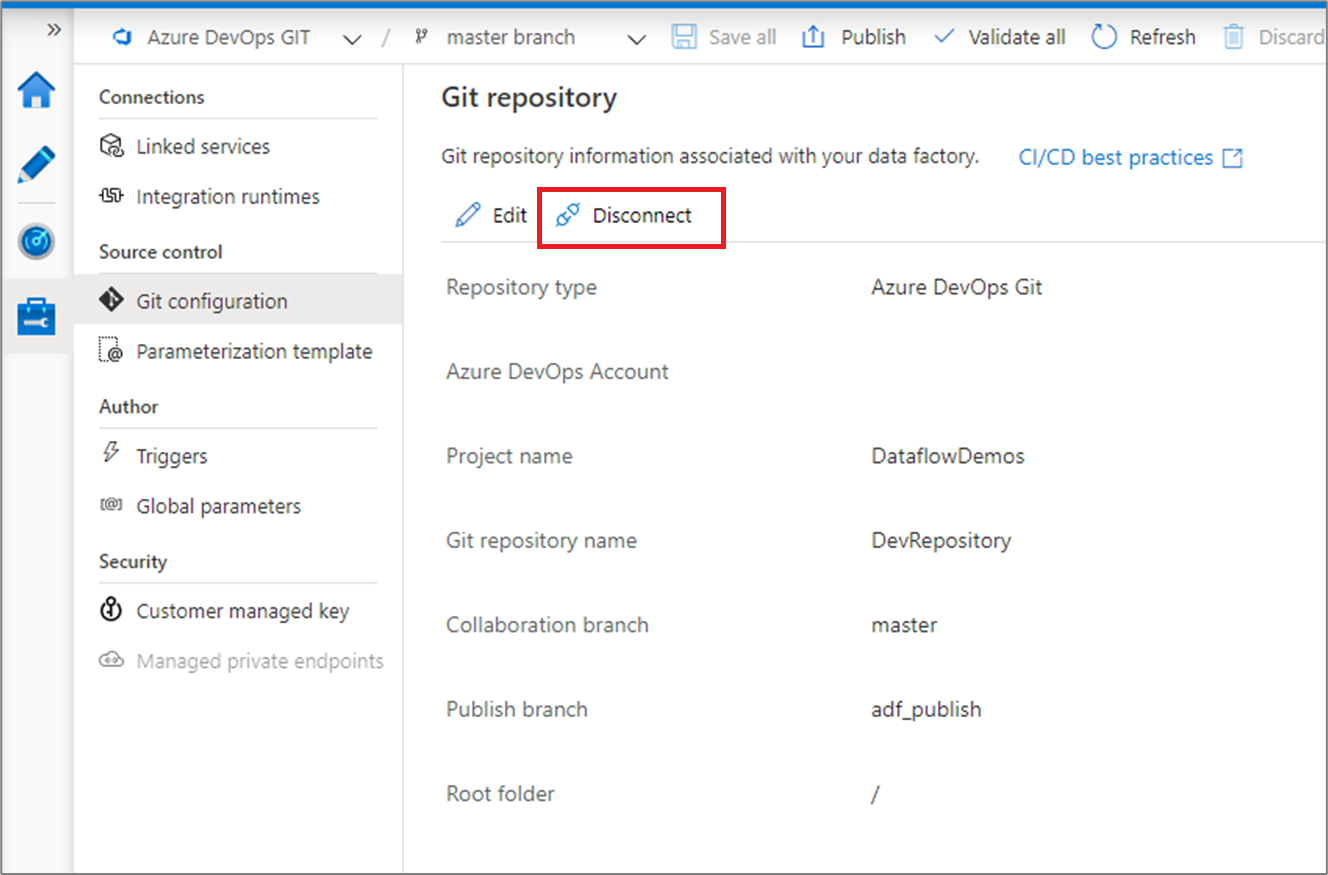
Option 2: Disconnect and reconnect Git repository
It imports the code from live mode into collaboration branch. It considers the code in live mode as source of truth.
Code flow: Live mode -> Collaboration branch
- Remove your current Git repository
- Reconfigure Git with the same settings, but make sure Import existing Data Factory resources to repository is selected and choose Collaboration branch (same branch)
- Create a pull request to merge the changes to the collaboration branch.
Note
It is only necessary to create and merge a pull request if you are working in a repository that does not allow direct commits. In most organizations, submissions into the repository require review before merging so the best practice is usually to use this approach. But in some cases no review is required, in which case it isn't necessary to create and merge a pull request, but changes can be directly committed to the collaboration branch.
Choose either method appropriately as needed.
All resources showing as new on publish
While publishing, all resources might show as new even if they were previously published. This can happen if the lastCommitId property is reset on the factory’s repoConfiguration property either by re-deploying a factory ARM template or updating the factory repoConfiguration property through PowerShell or the REST API. Continuing to publish the resources can resolve the issue, but to prevent it from occurring again, avoid updating the factory repoConfiguration property.
Switch to a different Git repository
To switch to a different Git repository, go to Git configuration page in the management hub under Source control. Select Disconnect.
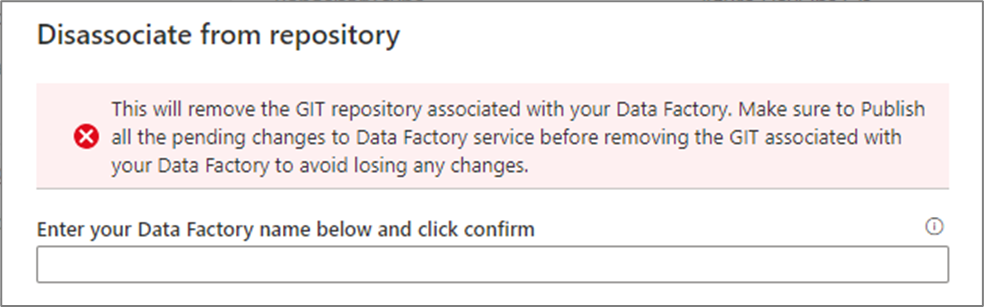
Enter your data factory name and click confirm to remove the Git repository associated with your data factory.
After you remove the association with the current repo, you can configure your Git settings to use a different repo and then import existing Data Factory resources to the new repo.
Important
Removing Git configuration from a data factory doesn't delete anything from the repository. The factory contains all published resources. You can continue to edit the factory directly against the service.
Related content
- To learn more about monitoring and managing pipelines, see Monitor and manage pipelines programmatically.
- To implement continuous integration and deployment, see Continuous integration and delivery (CI/CD) in Azure Data Factory.